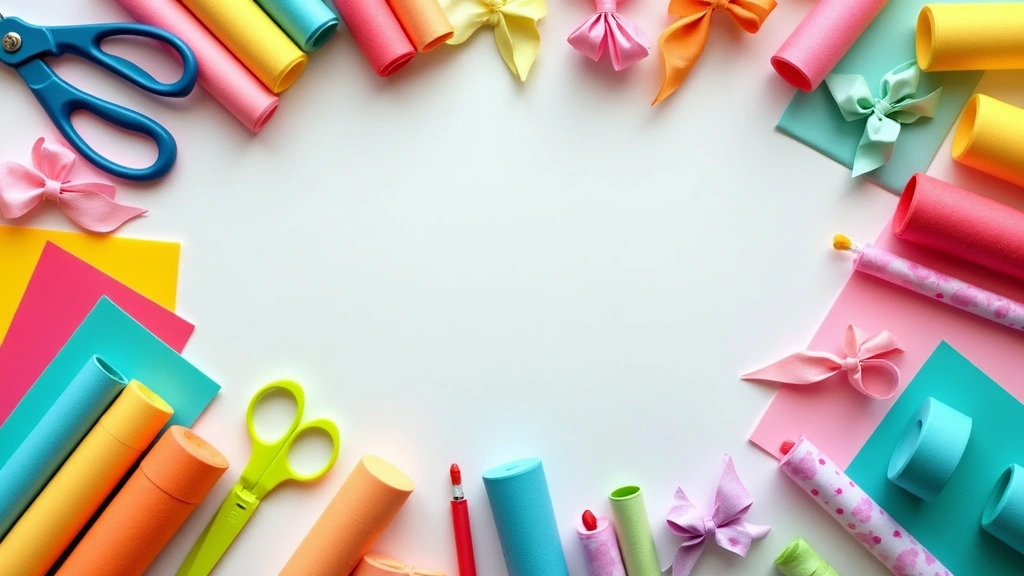
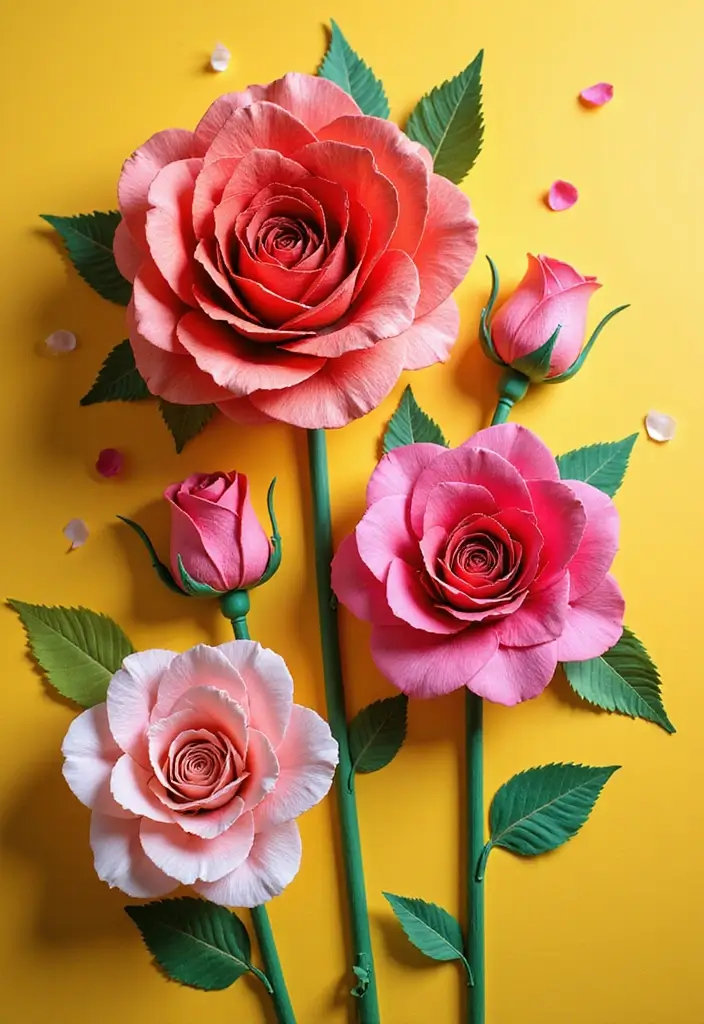
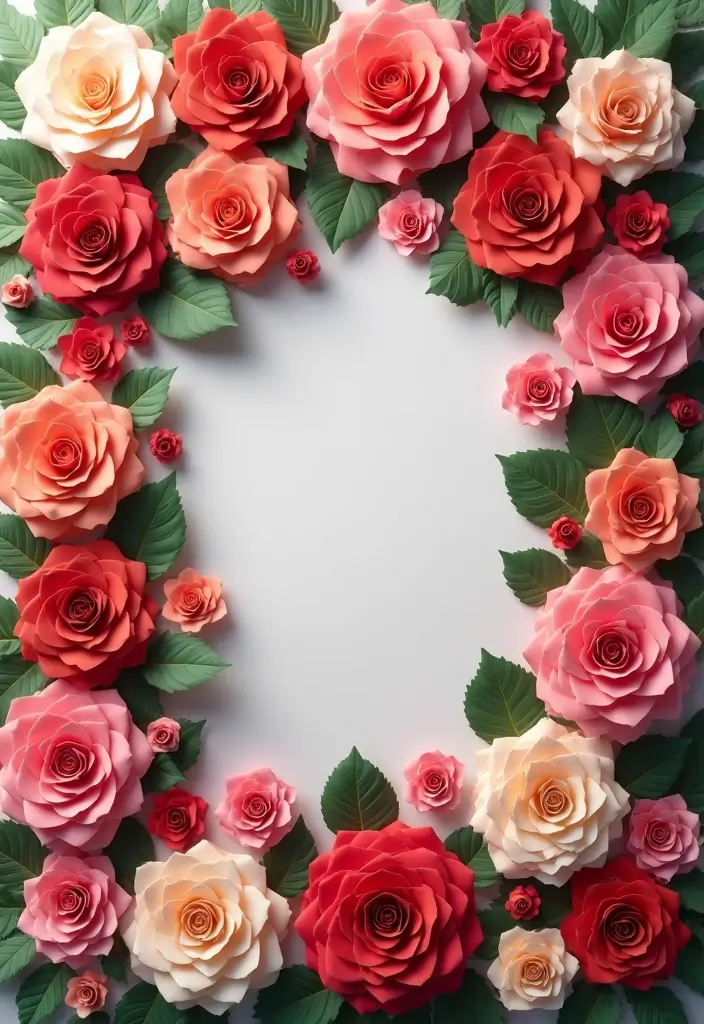
Spring has me craving flowers that stay fresh long after the season ends. I wanted roses that look real but won’t wilt, so I tried a bunch of paper petals and shapes until I found a method that feels romantic and doable. This post, 28 Paper Roses DIY Tutorial Ideas That Look Real and Romantic, collects the best ideas and shows you how to make them with simple materials.
Why I made this post I wanted a simple, budget-friendly way to bring romance into home and party decor. Real roses fade and real plans fade too. Paper roses stay strong, keep their color, and you can make a handful in an afternoon.
Who it’s for If you love DIY decor, party planning, or pretty spaces you can actually recreate, you’re in the right place. Whether you’re decorating a wedding table, a classroom bulletin board, or a little nightstand bouquet, these ideas fit. You’ll find beginner-friendly steps and small, satisfying wins for every level.
What you’ll get You’ll find 28 tutorial ideas for paper roses that look real and romantic. Each idea comes with easy-to-follow steps, color options, and tips for shaping petals to get that soft, lifelike curve. You’ll learn what papers to use—crepe, tissue, even cardstock—plus tricks to keep petals lightweight and sturdy. You’ll also see how to vary size and fullness so one project can become a whole bouquet.
Practical uses These roses shine on a tablescape, in a wall garland, or as a thoughtful handmade gift. A single rose can be a keepsake. A bundle makes a stunning centerpiece. Most projects take under an hour to complete, and you can batch them for a bigger installation.
Next steps Pick a color you love, grab a few sheets of crepe paper, scissors, glue, and a wire if you want stems. Start with one quick rose and follow the basic petal shaping steps. Then branch out to a few variations. If you try some, I’d love to see your results.
1. Classic Red Paper Roses
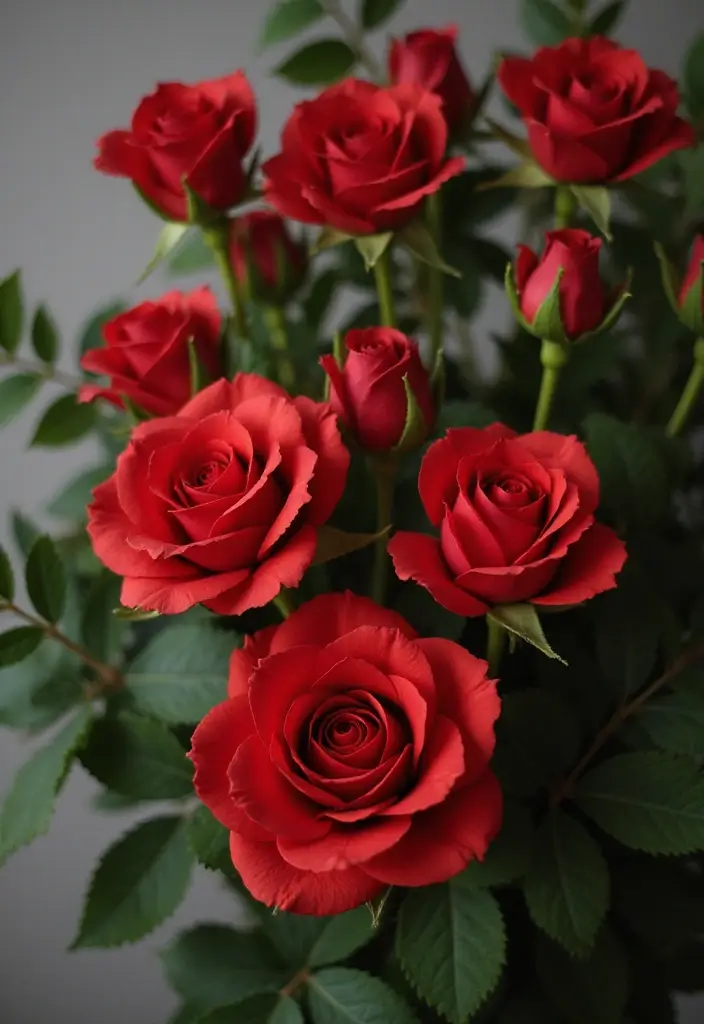
You want roses that stay bright and feel romantic. Classic red paper roses give that look without wilting. They also work as a simple DIY red paper roses project you can finish in an afternoon.
– Materials you need:
– Red cardstock or thick craft paper
– Scissors
– A hot glue gun
– Floral wire or a thin stem
– Green leaves or green cardstock for leaves
– Optional: a light shimmer spray for a soft glow
Here is how you make them:
1) Cut petal shapes in three or four sizes from the red paper.
2) Slightly crimp or curl the edge of each petal to add life.
3) Roll a small piece of paper to form a tight center. Glue it in place.
4) Layer petals around the center. Overlap and glue as you go to build depth.
5) Attach the rose to a stem. Wrap floral wire with tape so the stem stays strong.
6) Add leaves. A quick spray of shimmer can make them look dewy.
Tips to make them pop:
– Use two or three shades of red to create realistic depth.
– Curl outer petals a bit more for a natural shape.
– Keep glue light so petals bend easily.
– Place the bouquet in a vase or give it as a thoughtful gift.
Next steps: picture this paper rose centerpiece on your table or as a heartfelt gift on a special date.
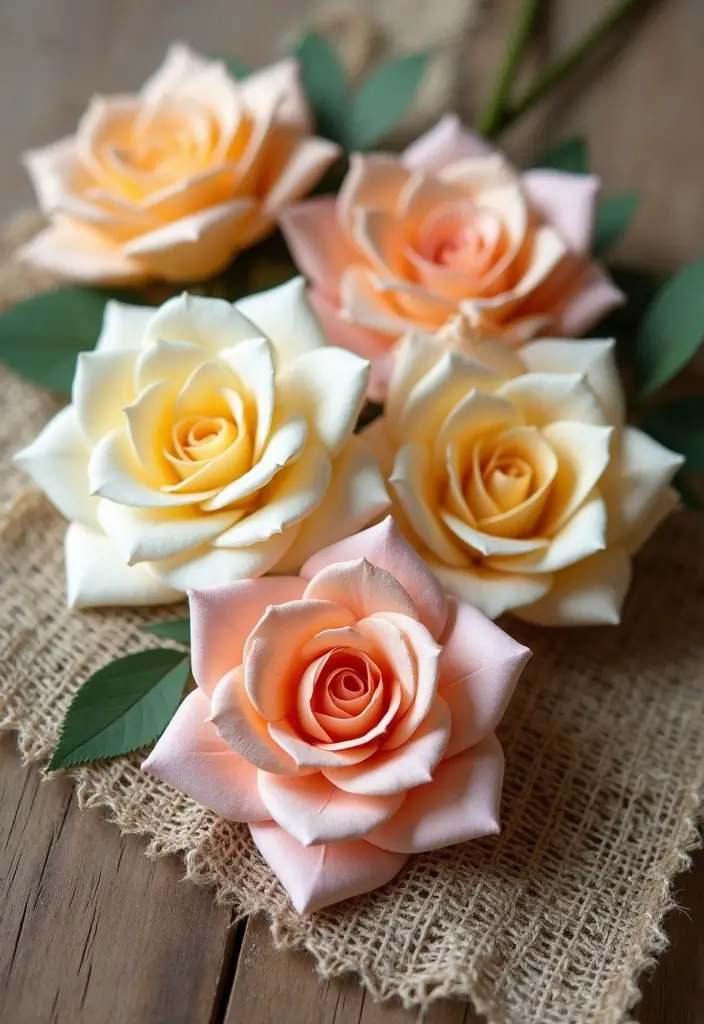
2. Pastel Paper Bouquet

Pastel shades bring soft light into any room. A pastel paper bouquet looks gentle and romantic. Use light cardstock in pink, blue, and lavender. Layer petals in three sizes to add depth, but keep the edges rounded for a dreamy vibe. This bouquet can be a centerpiece for a baby shower, a wedding, or a bright note at home.
Here is why this works: simple supplies, quick steps, and a touch of sparkle.
Materials
– pastel cardstock in pink, blue, lavender
– thin stems or floral wire
– green floral tape
– scissors
– craft glue
– optional glitter or tiny sequins
– a vase and filler like sand or marbles
Steps
– cut three petal sizes with rounded tips
– curl the edges to lift the petals
– glue layers to form each flower
Assembly
– make 5 to 7 blooms
– attach each bloom to a stem with floral tape
– trim stems to different lengths and bundle them
Display and finish
– place the bouquet in a vase with sand or marbles for balance
– add a sprinkle of glitter if you want a subtle shine
– adjust spacing for a natural look
Pastel paper blooms bring calm charm to any space and suit many celebrations. You can store extras flat for later use too.
3. Vintage Style Paper Roses
If you love a hint of old charm, vintage style paper roses can bring that feel to any space. They look subtle, warm, and real enough to touch. Here is how you can make them shine.
Materials
– Paper in muted tones: off-white, dusty pink, or antique yellow
– Tea or coffee for aging the paper
– Scissors, glue, and a little tape
– A few small beads or pearls for the center
– Optional: lace or burlap to pair with the roses
Here is why these choices work. Muted colors read vintage. A simple texture makes petals feel soft and worn, not flat.
Steps
– Cut three petal sizes: a large base, a medium, and a small petal
– Crumple each petal gently to add texture
– Curl the edges with your fingers for a natural look
– Layer the petals: start with the largest at the bottom, add the medium, then the small on top
– Glue them together and press a bead or pearl into the center
Next, let the flower dry fully. If you want an aged look, dip lightly in a tea bath and air dry.
Finishing touches
Pair your rose with lace or burlap for a full vintage vibe. You can place a tiny bead in the center or sew a small seed bead for a delicate sparkle. Use a few stems in a vase or scatter them as rustic wedding decor. If a rose loses shape, reshape petals with gentle pressure. These classics bring nostalgia without needing real flowers.
4. Monochrome Paper Roses
Looking for decor that feels chic and lasts longer than fresh blooms? Monochrome paper roses give a modern, romantic look without loud colors. Pick one color and build depth with lighter and darker tones.
Here is why this works: a single hue keeps spaces calm. You gain drama from shading, not from many colors.
– Color and shading – Choose one color. Cut petals in small, medium, and large sizes. Layer light to dark edges to add depth.
– Petal shapes and texture – Vary shapes. Some petals curl, others stay flat. Gently bend edges with a pencil to create soft folds.
– Assembling – Use a wire stem. Glue petals from smallest to largest around the center. Wrap the stem with floral tape for a clean, tidy look.
– Finishing touches – Display in a clear vase. A light spray of metallic shimmer on tips adds a modern twist. Let it dry before you arrange.
Next steps: try two shades of the same color, switch to white for a fresh feel, and use these roses in a minimalist wedding bouquet or on a coffee table.
You can tweak the tone by tinting edges darker or keeping tips white for a crisp look. Perfect for shelves too.
5. DIY Paper Rose Wreath
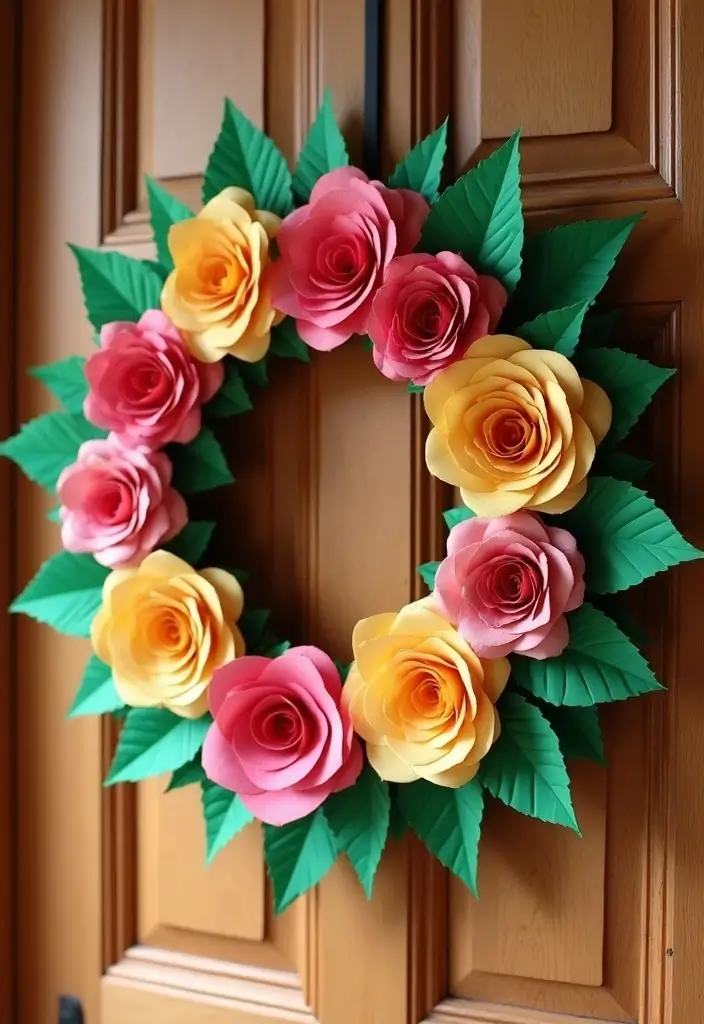
Wreaths aren’t only for holidays. A DIY paper rose wreath brings color and warmth to your front door decor or a cozy wall.
Here is what you need
– Wire wreath frame
– Lots of paper roses in your chosen colors
– Hot glue and a glue gun
– Scissors or a thin craft knife
– Greenery or small decorative sprigs
– A ribbon for hanging
How to build it
– Make several paper roses first. Glue the petals to form the bloom.
– Arrange the blooms in a loose spiral for a natural look.
– Attach each rose to the frame with hot glue. Cover the frame fully.
– Fill gaps with greenery and tiny accents like beads or ribbons.
– Add a finishing touch by tying a ribbon in a bow or hanging loop.
Smart tips
– Pick seasonal colors to keep the look fresh.
– Mix different rose sizes for depth.
– Add small butterflies or beads for extra charm.
– Lay out the design on a table first, then glue in place.
– Try different textures by adding small dried flowers or seed pods.
A well-made wreath greets guests with color and charm, turning any entry into a welcoming spot.
Care and display
– Keep the wreath away from direct sun to save color.
– When you store it, place it in a box with tissue so it stays full.
– Enjoy it for years, proudly.
6. Paper Rose Gift Box
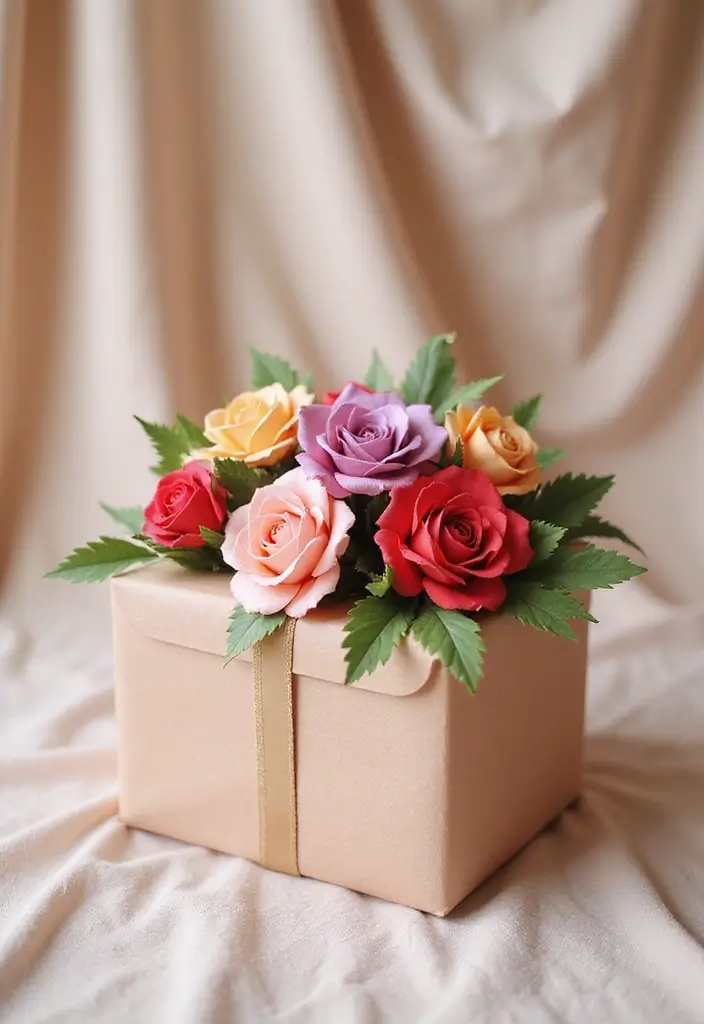
Looking for a way to wrap a gift that stands out? This paper rose gift box turns a plain container into a romantic keepsake. It’s a small project with a big payoff.
Here is what you need for paper roses DIY:
– A plain gift box
– Colored paper or tissue in rose shades
– Scissors
– Glue or hot glue
– Ribbon or small greenery
Steps
1) Choose your colors. A bold mix or a soft combo both work.
2) Craft several roses. Cut circles or petal shapes, stack them, and roll to form a bloom. Seal the base with glue so the flower stays strong.
3) Attach to the lid. Arrange one central rose and surround it with a few more. Press gently so they sit flush.
4) Adjust for balance. Shift petals until the layout feels right from every angle.
Extra ideas
– Add a tiny bouquet on the box side for depth.
– Tie a ribbon around the box and tuck a leaf sprig under it.
Why it helps your gift
It adds a personal touch with simple supplies and a big wow factor. It works for birthdays, anniversaries, or just because.
Next steps: pick colors, grab your box, and start building blooms. You’ll find this paper roses DIY both pretty and memorable.
7. Wall Art with Paper Roses
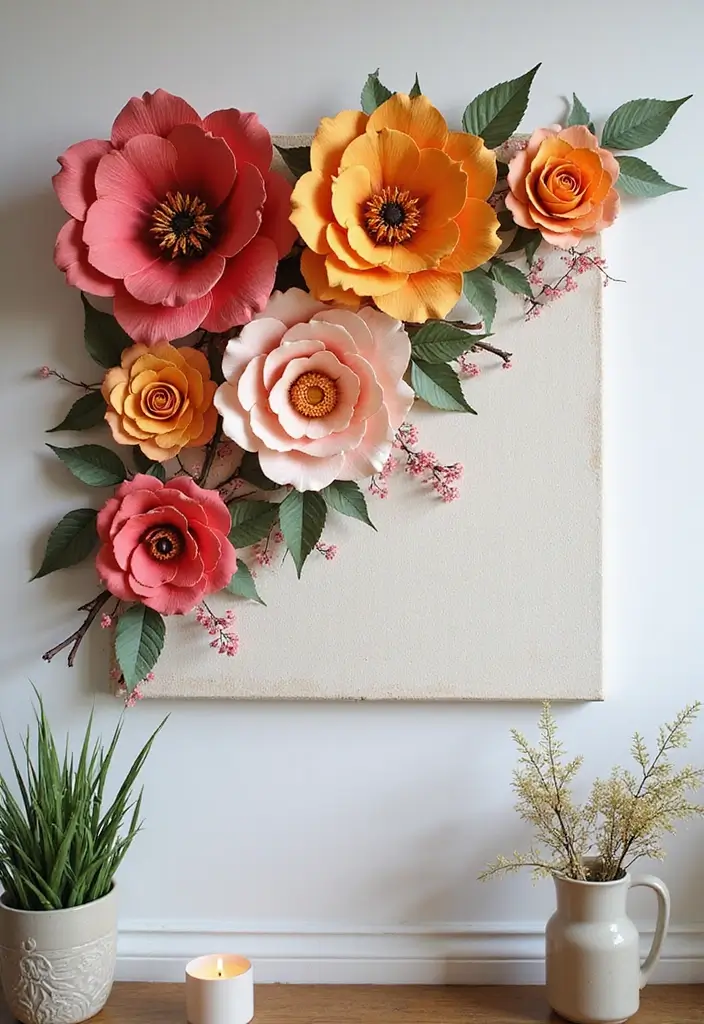
You want wall art that feels real and romantic. Paper roses can give you that without fresh petals. Start by making a mix of roses in different sizes and colors. Choose blush, ivory, coral, and a deeper rose to add depth. Pick a sturdy base such as a canvas or board. Plan the layout on the base before gluing.
– Prepare the roses: Create blooms in various sizes so the piece looks natural.
– Choose the base: A flat canvas or wood board gives a solid place to attach the roses.
– Plan the layout: Arrange blooms on the base to see how they fit, then adjust.
– Attach the roses: Glue each bloom firmly and press.
– Add depth: Layer blooms off the base or raise some on foam for a 3D look.
Tips:
– Use a hot glue gun for fast, strong holds.
– Leave small gaps between blooms so the arrangement breathes.
– A light spray coating adds durability and keeps colors bright.
This wall art brightens a room and shows your taste. It fits modern, cottage, or romantic styles. You can swap colors for seasons. Here’s how to start: measure space, pick colors, and map the layout. Your wall becomes a focal point that lasts.
8. Table Centerpiece of Paper Roses
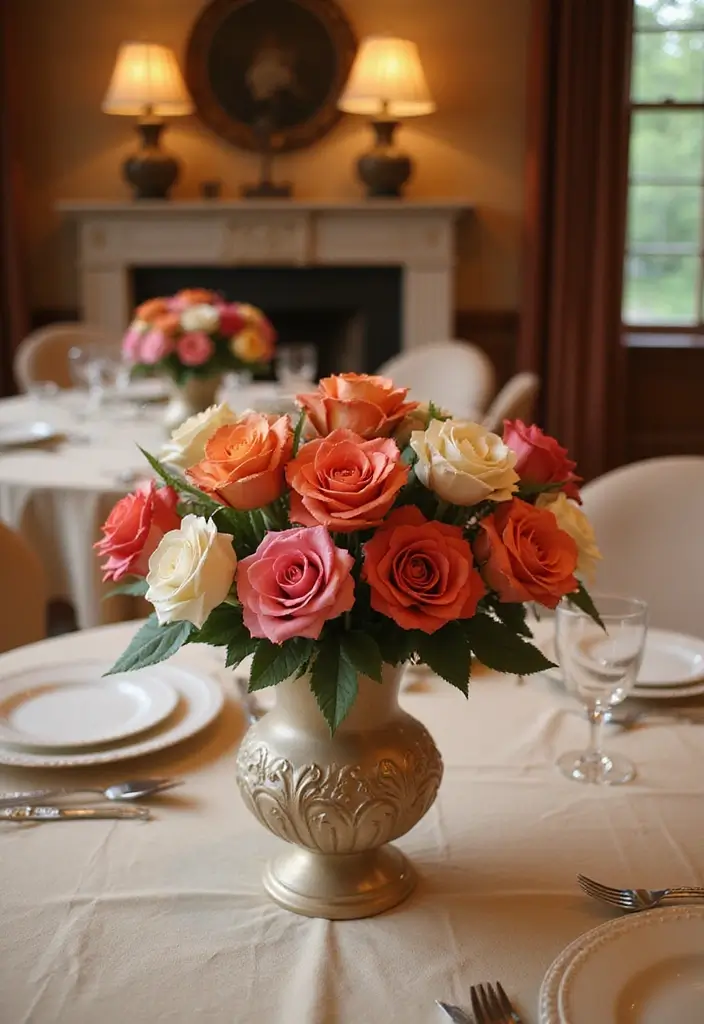
Want a table centerpiece that wows yet stays simple? Paper roses fit the bill. Make several roses in colors you love. Place them in a tall vase for drama or in a decorative bowl for a soft, garden feel. Mix large and small blooms to build volume. A touch of filler greens adds texture. Here is why this works: it looks lush, costs little, and can be done in an afternoon.
Here is how to build it:
– Choose two or three colors that match your plates or napkins.
– Cut a slim strip of paper and roll it tight to form the rose’s core.
– Layer curled paper around the center to create petals.
– Glue the end to keep the flower closed.
– Make a few roses larger and a few smaller for variety.
– Add a few sprigs of greenery or tiny filler flowers for texture.
Arrange the roses:
– Place the tallest blooms in the center of the vase.
– Surround them with mid-size roses.
– Tuck greens between stems to soften the look.
– If you use a bowl, spread the blooms evenly and add a bit of moss in gaps.
– Drape soft fairy lights over the stems for a gentle glow.
Essential tips:
– Use colors that pop against your table setting.
– Add warm lights for an inviting glow.
– Tie a ribbon around the vase for a finished look.
Next steps: set the centerpiece on your table, adjust spacing, and invite guests to notice the handmade touch.
9. Framed Paper Roses
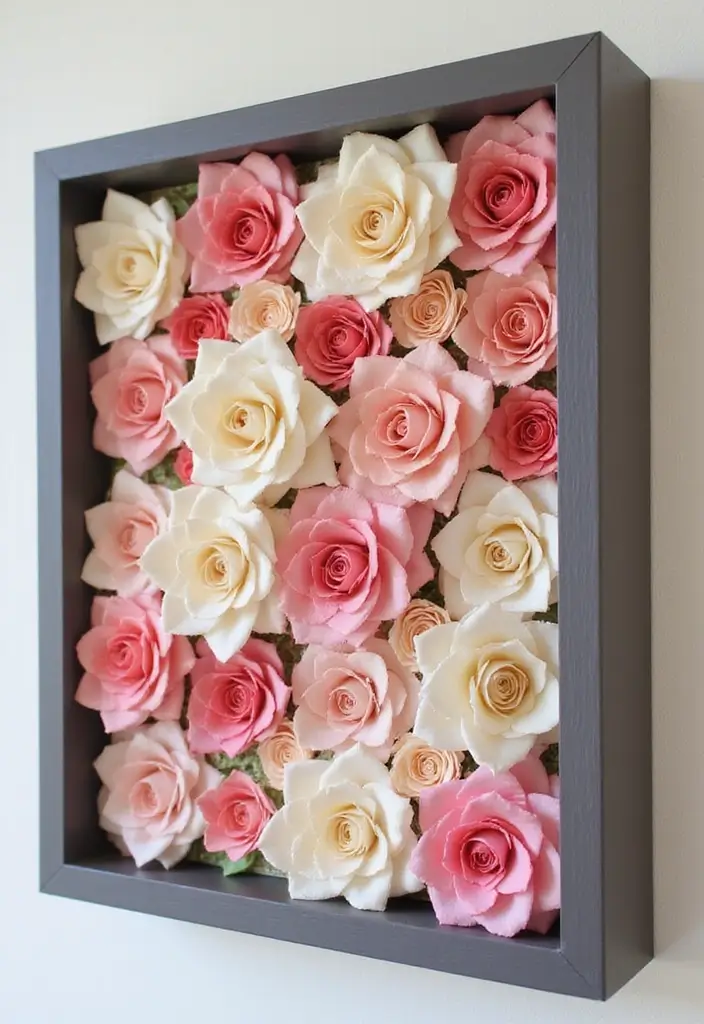
Want a touch of elegance that lasts without daily care? Framed paper roses give a soft, romantic look in a frame you can hang anywhere. They stay bright and calm the room, no watering needed.
What you need
– a shadow box or a standard frame
– sturdy backing or mat to hold the roses
– paper roses in a few sizes and colors
– glue dots or archival tape
– scissors and a craft knife
– a simple background page or fabric that matches your roses
How to frame your roses
1. Plan your layout on a plain backing first.
2. Place larger roses toward the bottom and smaller ones above for a natural arc.
3. Secure each bloom from the back with glue dots or tape.
4. Add a mat or a decorative background so the colors pop.
Tips for a standout piece
– Use different rose sizes to add depth.
– Mix colors to create visual interest.
– Include a short word or quote for a personal touch.
– Keep the background simple so the roses stay the focus.
Care and placement
Keep the frame away from direct sun and high humidity. Use acid-free materials to avoid aging the paper. Dust gently with a soft brush then hang at eye level for easy viewing.
This framed paper rose art brings warmth and quiet charm to any room. It’s a stylish, low-maintenance decor idea you can customize to your taste.
10. DIY Paper Rose Hair Accessories
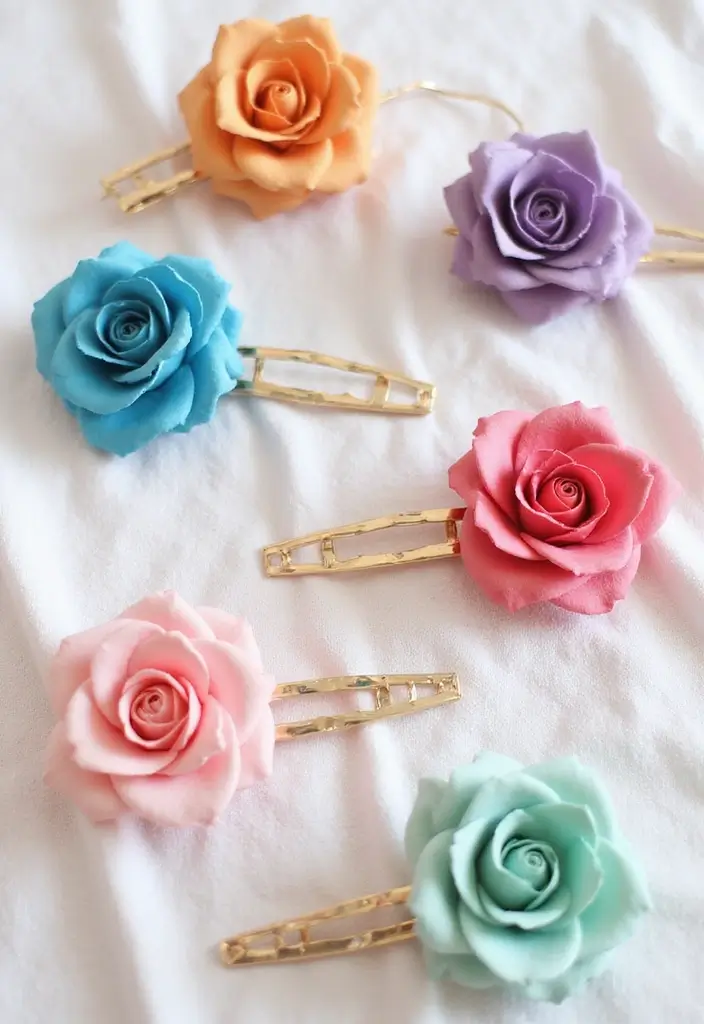
Want a small, romantic touch for your hair? Paper rose accessories give that soft, real look without a big price tag. You can wear them to a wedding, a party, or just because you love flowers. Start by making tiny paper roses and glue them to hairpins or small clips. Bend the petals a little to form a gentle curve, then press the glue to set. Add a green leaf behind the rose for depth and a hint of natural color.
Here is why this works: the right color, size, and texture make a fake bloom feel alive. Tips that help:
– Choose colors that match your outfit.
– Use different sizes to create balance.
– Mix paper types like crepe, tissue, and cardstock for texture.
To wear your creation, pin the rose at a focal point in your hair. Try a side bun, a half-up style, or a simple ponytail. Let the clip catch the light and your smile will show. Experiment with placement until you love the look.
Care tips: keep the pieces dry and away from moisture. Store them flat in a box so petals don’t get crushed.
Next steps: try a set of three roses in a row, or add tiny buds and leaves. Repeat these steps for a quick, stylish look that lasts all day.
11. Paper Rose Bookmark
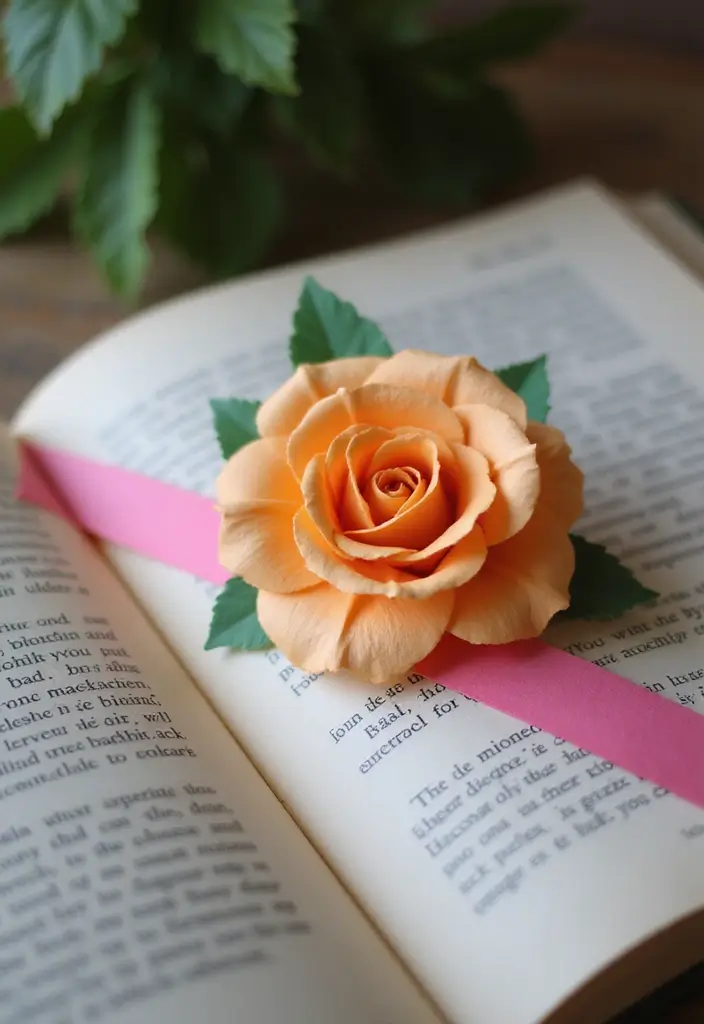
You want a bookmark that looks fresh and helps you keep your place. A paper rose bookmark does both. It’s simple, useful, and a touch romantic.
What you’ll need
– sturdy cardstock for the bookmark base
– a small ribbon or thread
– scissors and glue
– a pencil for shaping
– bright colors or patterned paper to make the rose pop
How to make it
– Cut a bookmark base about 6 by 1.25 inches. This size fits most books.
– Make a tiny paper rose. Cut a circle, draw a spiral inside, and cut along the line. Start curling the spiral from the outer edge to form petals. Glue the end to hold the rose shape.
– Attach the rose to one end of the bookmark base with a dab of glue. Press until it sticks.
– Add a ribbon or loop at the top. This keeps the page in place and looks neat.
– Decorate. Try bold colors, white edges, or a small quote printed on the base.
Here is why this works for you: it stays in place between pages, yet is easy to make in a quiet, cozy corner.
Tips to stand out
– Use bright colors for a bold look.
– Make roses in different sizes for variety.
– Personalize with a short quote or a color that fits your style.
These DIY paper rose bookmarks also make sweet gifts for friends who love to read.
12. Paper Rose Table Setting
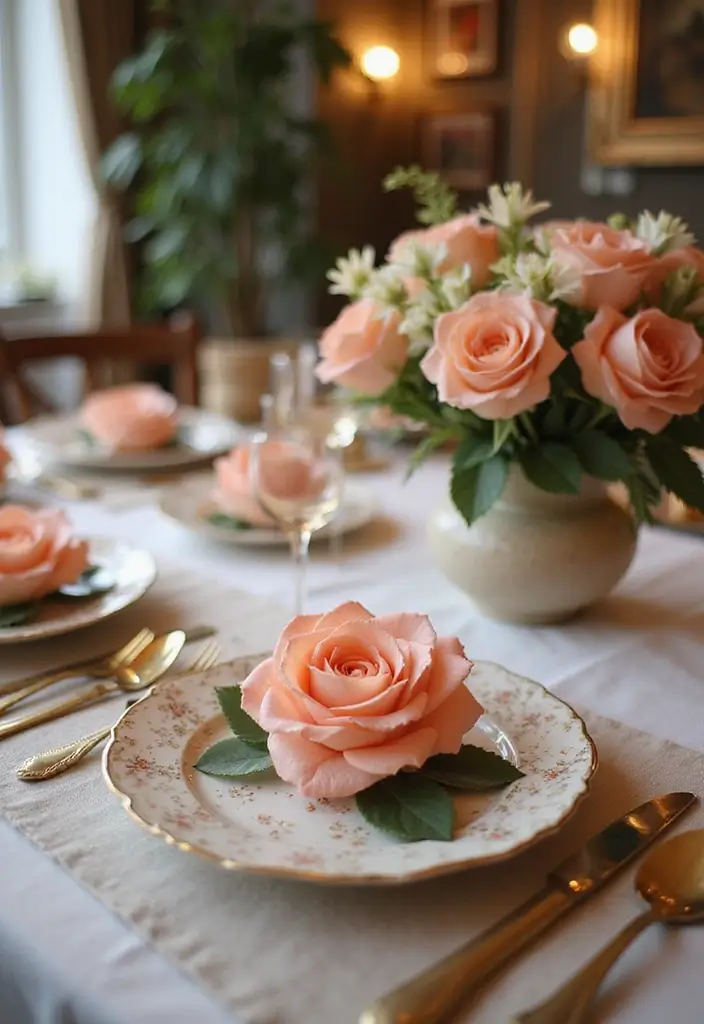
Here is why a paper rose table setting can lift your meals. It creates a warm, personal feel and it stays neat from dish to dish.
Next steps start with a plan. Pick a color theme that matches your decor or the season. Choose your paper: crepe paper makes soft petals, origami paper keeps shapes tight, cardstock adds stiffness. Cut and shape a handful of small roses. If you are short on time, use ready-made paper rose picks.
Place the roses where people notice them. You can set them on plates, tuck one into a folded napkin, or group a few into a low centerpiece. Try a single color for calm, or mix shades for a lively table.
– Napkin rings: wrap a mini rose around the napkin with a slim paper band.
– Centerpiece cluster: group 3–5 roses in a shallow tray or jar.
– Greenery touch: add leaves for depth.
– Seasonal color: switch to spring pastels or fall warm tones.
Practice a quick 20 minute setup for a fresh look. With these simple steps, your paper rose table setting becomes a welcoming stage for meals, game night, or family dinners. You can reuse the same roses for many gatherings. Guests will notice.
13. Paper Rose Gift Tags

Here is why you want paper rose gift tags. They add a warm, personal touch to any present. A tiny rose on the tag makes the gift feel thoughtful and complete.
What you’ll need
– sturdy cardstock or tag stock
– scissors and a hole punch or template
– a tiny paper rose (realistic-looking or mini)
– twine, string, or ribbon
– a pen for a short note
Steps
1. Cut tag shapes from the cardstock. Keep them simple with rounded corners.
2. Punch a hole near the top for the string.
3. Glue or attach a small paper rose to one side. Let it dry if you use glue.
4. Write a short, friendly note on the back.
5. Thread the twine through the hole and tie the tag to your gift.
Tips for style
– Use a mix of colors that match your gift wrap.
– Try different shapes and sizes to create variety.
– Add a tiny rhinestone or bead for a subtle sparkle.
Why this works
– They are affordable and easy to make in batches.
– They feel handmade, so the recipient sees care.
– They can be kept as a small keepsake after unwrapping.
Next steps
– Start with one tag for a small gift to test your look.
– Make a batch on a free afternoon so you have tags ready for future gifts.
14. Handcrafted Paper Rose Coasters
Are you looking for a small project that adds color and function to your table? Handcrafted paper rose coasters fit the bill. They protect surfaces and bring a soft, floral touch to your everyday meals and chats.
Here is how to make them simple and sturdy.
Materials
– Thick cardstock or a cork coaster base
– Paper for the roses (colored or patterned that match your decor)
– Craft glue or a hot glue gun
– Clear sealant or Mod Podge
– Optional: felt backing to cushion and protect surfaces
– Optional: a small brush for even coats
Steps
1. Cut bases from your chosen material.
2. Shape the paper into small rose petals and bunch them into a bloom.
3. Glue the rose to the coaster base.
4. Coat the top with a sealant and let it dry completely.
Tips
– Use waterproof materials for a longer life.
– Try round or square shapes to match your setup.
– Add a felt backing to prevent scratches.
– Keep excess moisture away and wipe dry after use.
These coasters mix function with a warm look. They brighten a coffee table and are easy to swap if you want a new color combo. You can make a set in minutes and stack them for guests. It is a small project you can finish in an afternoon.
15. Paper Rose Wall Hanging

Here is why this wall art hits the mark. It brings romance and texture without real flowers. It’s lightweight and easy to swap with the season. Here is the plan.
– Materials
– Sturdy colored paper in 3–4 shades
– Wire or a wooden dowel for the stem
– Twine or string for hanging
– Scissors, craft glue, and a pencil
– Optional green leaves
Next steps: make the roses, then attach them to the base, and hang.
– Make the roses
– Cut petals and a small center from paper.
– Layer petals to form buds and larger blooms.
– Curl the edges with a pencil and glue them in place.
– Mix light and dark shades for depth.
– Assemble the wall hanging
– Thread the blooms onto the wire or dowel.
– Space them evenly and secure with glue or tiny knots.
– Tie twine to the ends of the dowel so it hangs straight.
– Add green leaves between flowers for a natural touch.
– Display ideas
– Try a cascading layout with different string lengths.
– Hang at eye level in a living room or above a bed.
– Use a cohesive color palette for a calm, romantic feel.
– Tips
– Choose complementary tones and vary bloom sizes.
– Keep some blooms closer to the base for balance.
– This craft is flexible; swap colors anytime.
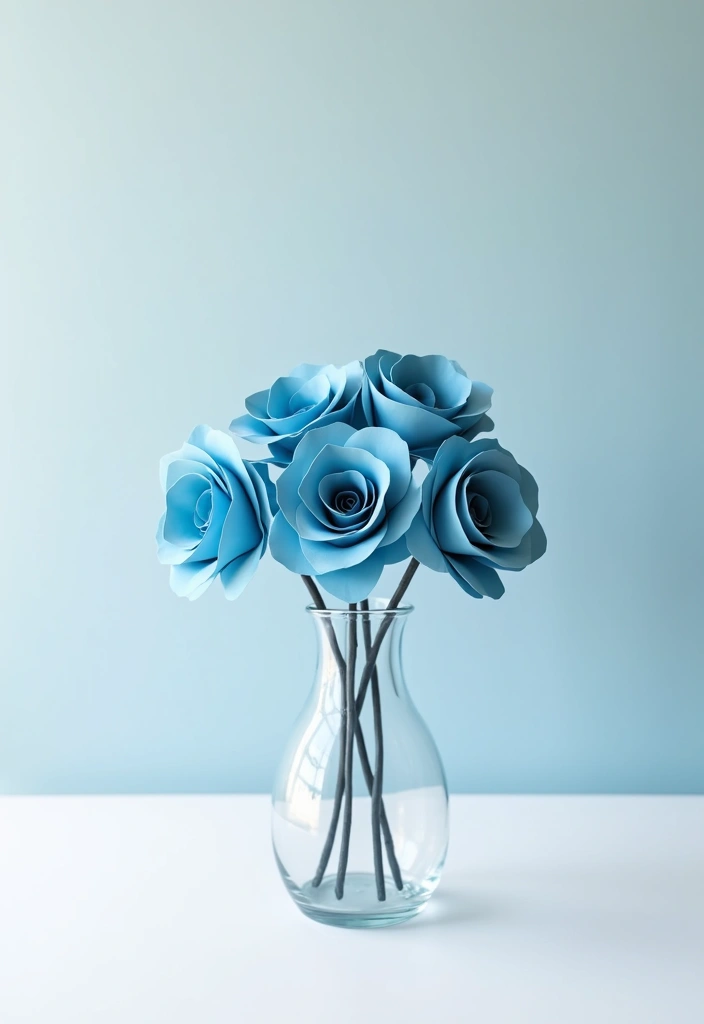
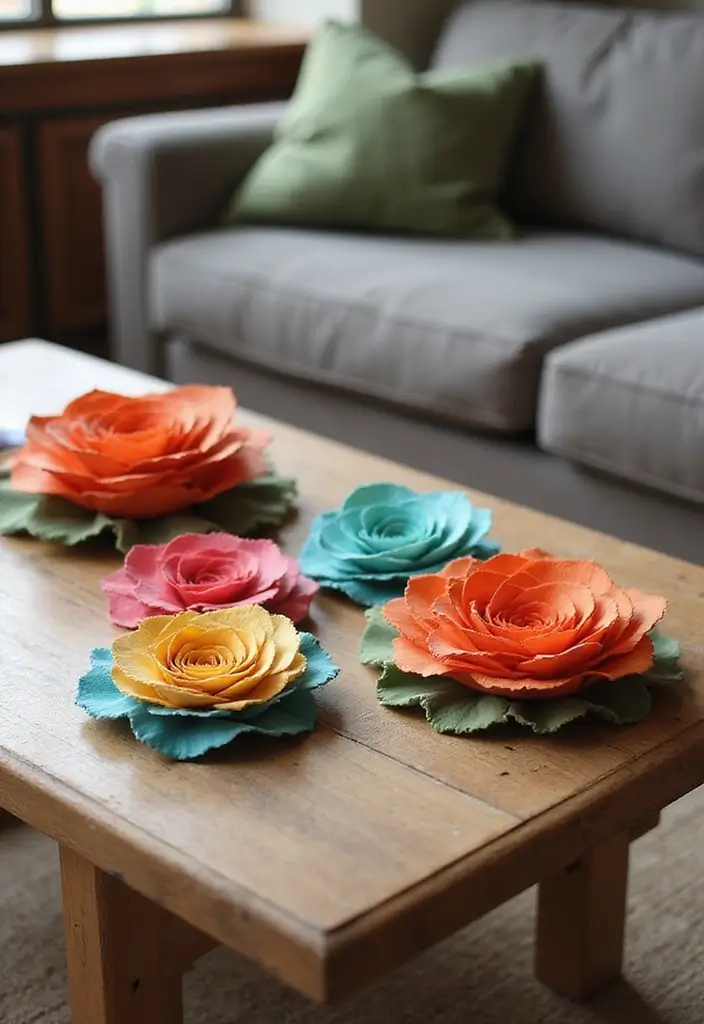
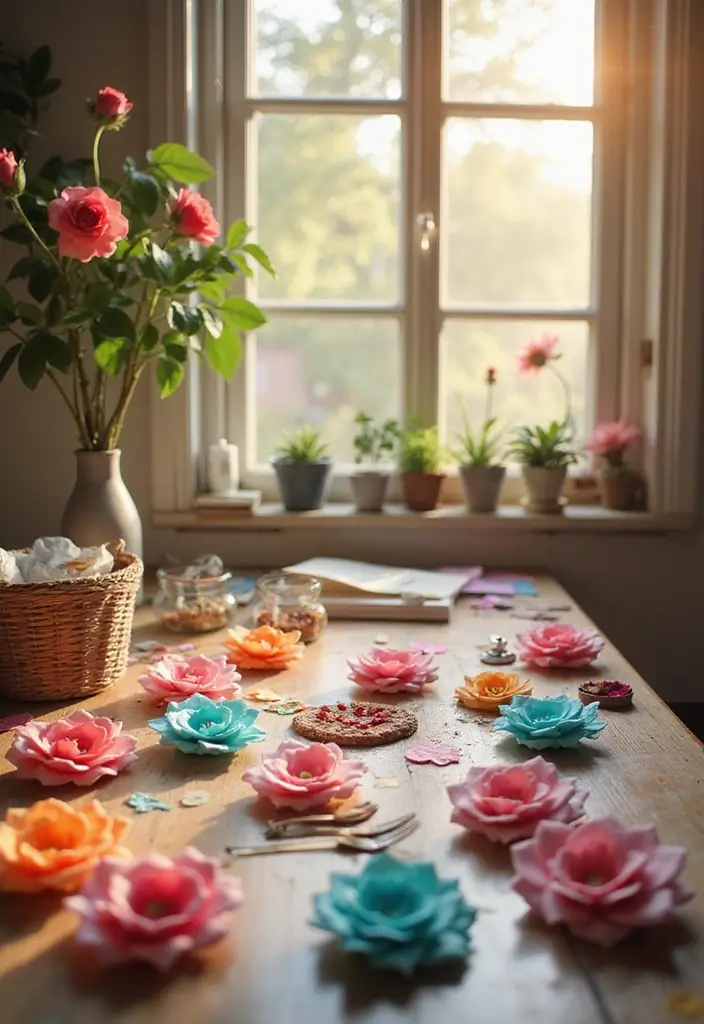
16. Mini Paper Roses in a Vase

Need a tiny bouquet that brightens your desk or shelf. Mini paper roses in a vase do that and they stay fresh forever. Here is why they work: they are quick and affordable, and you pick the colors. Let’s break it down.
– What you’ll need lightweight cardstock, scissors, a glue stick, a thin floral wire or skewer for a stem, a small vase, and a few decorative beads or stones.
– Make the roses cut small petal shapes. curl the edges with a pencil for a soft bend. glue petals around a tight center to form a bud. add a leaf if you want. make several buds.
– Assemble the vase slide the buds onto thin wires or skewers. insert them in the vase at different heights. keep the stems short so the flowers look compact.
– Color ideas mix bright shades for a playful look, or pick soft tones for a calm feel. Try two or three colors together.
– Decorative touches drop in a few beads or stones. choose a clear vase to show the stems, or a mug or small jar for a rustic touch.
– Tips for display group a few mini roses on a desk tray, or line a row on a windowsill. pair with a small candle or plant for balance.
Next steps: practice your petal shapes, trim stems to different lengths, and save leftovers for quick new arrangements.
17. Paper Rose Wall Art Collage
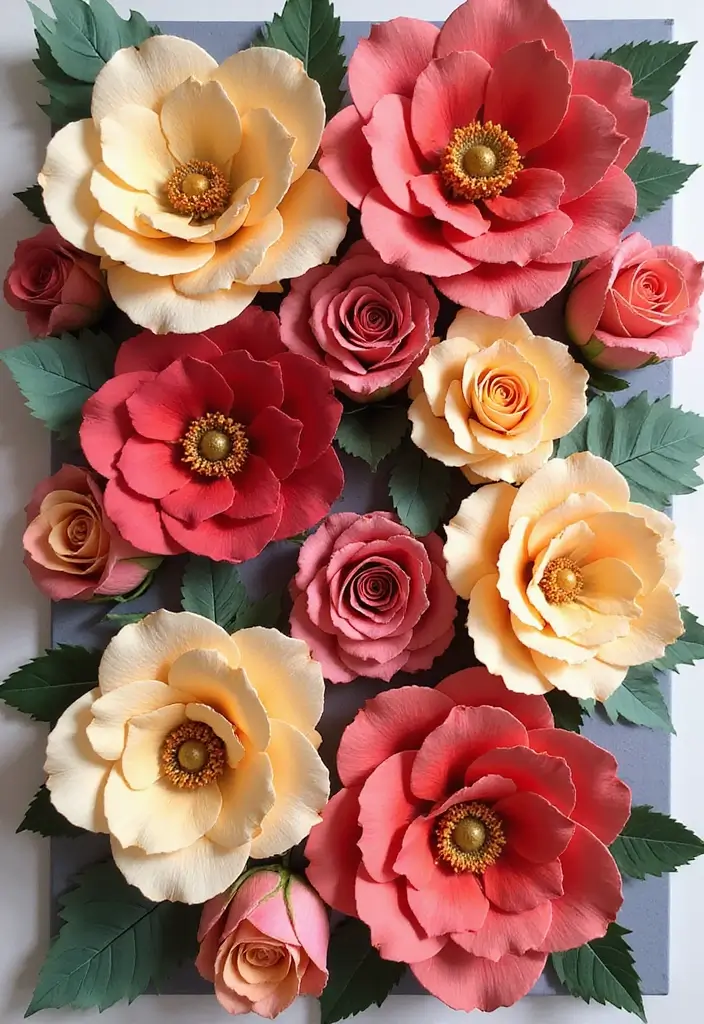
Paper Rose Wall Art Collage
You want a wall piece that feels personal and warm. This collage delivers. It blends color, shape, and texture into one striking statement.
Materials
– Paper roses in several colors and sizes
– Canvas or sturdy poster board
– Scissors and glue
– A solid background color
– Optional: geometric shapes or scraps for a modern touch
– Pencil for planning
Steps
1) Plan first. Lay out your roses on the board. Move pieces until they balance and guide the eye.
2) Prep the background. A single bold color makes the roses pop.
3) Build depth. Start with larger blooms near the center or back. Layer smaller petals on top.
4) Add accents. Tuck in a few triangles, circles, or lines for a modern twist.
5) Glue and finish. Press gently to set. Let the glue dry fully before hanging.
Tips
– Test layout on the surface before sticking anything down.
– Vary color tones. Mix light pinks with deep reds for contrast.
– Use light glue or double-sided tape for a raised look.
– Try a quick mockup on paper first if you’re unsure.
Why it works
Here is why this works. The piece reads cozy and handmade. Layering creates depth, guiding the eye from bloom to bloom. You can swap colors to match seasons or moods, keeping it fresh with little effort.
18. Holiday-Themed Paper Roses
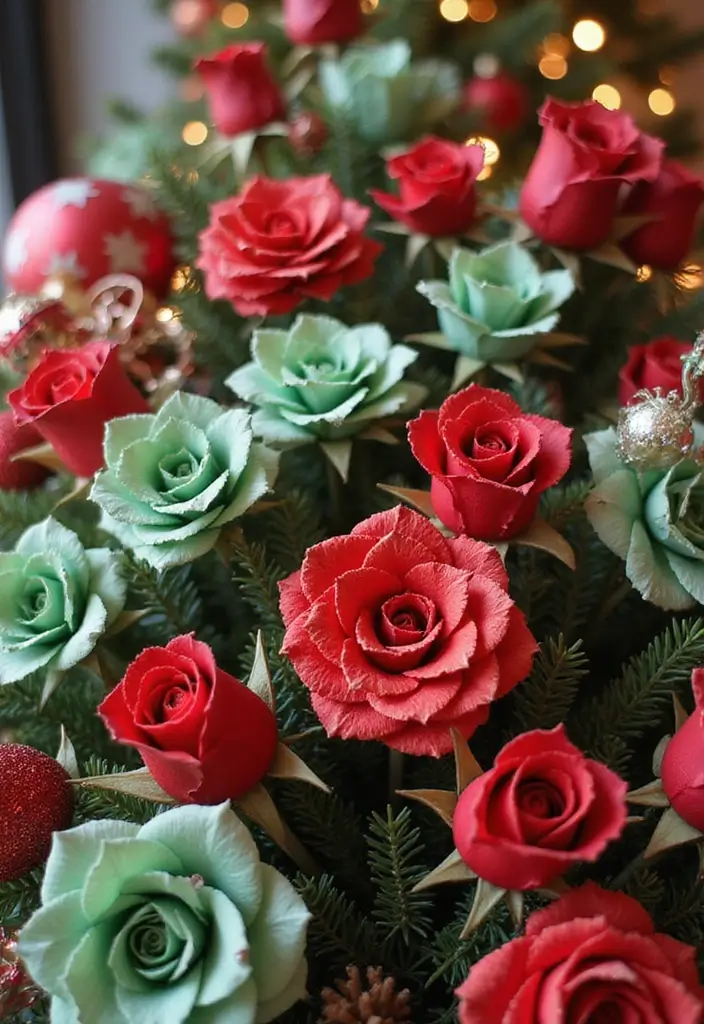
Here is why you’ll love holiday-themed paper roses. You want decor that lasts and fits any season. These roses can echo Christmas with red and green, or Easter with soft pastels. They bring color and warmth to your room.
Color ideas for festive vibes
– Use red and green for Christmas to echo the season.
– Try pastels for Easter and spring.
– Add metallic papers for a glam glow.
– Mix in glitter for sparkle.
– Use white accents to balance bold colors.
– Build color groups that match your holiday table.
How to assemble quickly
– Cut simple petal shapes and curl the edges to give life.
– Layer petals around a wire stem and glue from inside out.
– Wrap the stem in floral tape and top with a ribbon.
Styling tips for decor
– Cluster several roses to make a wreath.
– Place roses in a glass vase with greens for a centerpiece.
– Tie in small ornaments or ribbons to finish the look.
Realistic touches to try
– Choose double-sided paper so both sides look good.
– Lightly dust with glitter or foil for shine.
– If you like a scent cue, spray a tiny mist near the roses (optional).
– Keep a few extra petals on hand for tweaks.
Next steps. Pick a holiday, gather colors, and start crafting. Share photos of your finished roses to inspire others.
19. Paper Rose Phone Case Decor
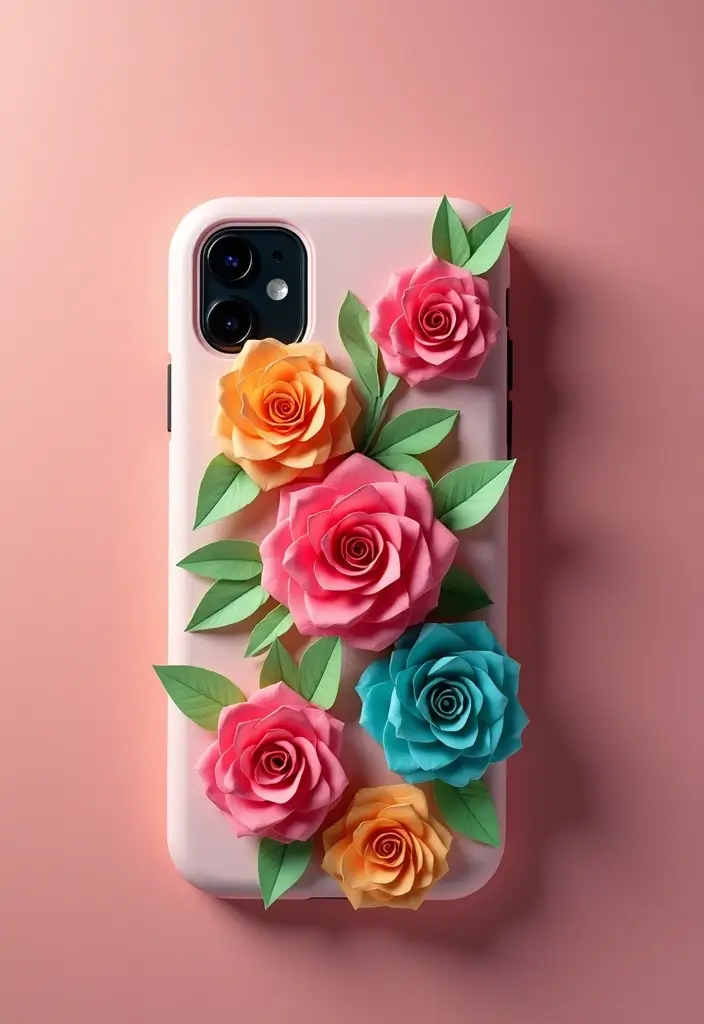
Want a phone case that feels one of a kind? You can add paper roses that look real and sweet. This project is light on materials, easy to do, and totally your style.
Materials
– Lightweight paper in your chosen colors
– Thin cardstock for sturdier petals
– Scissors and a glue stick or clear craft glue
– A clear phone case
– Small tweezers for precise placement
– Optional clear sealant to protect the design
How to make it
1. Pick colors that match your vibe and mood.
2. Cut tiny circles to make petals.
3. Shape each petal with your fingers or a toothpick.
4. Layer petals into a small rose with a dab of glue and a twist of the center.
5. Glue the rose to the case and hold it until it sticks well.
6. Add more roses or little green leaves if you want a fuller look.
7. Let everything dry completely, then add a thin coat of sealant if you wish.
Placement ideas
– Put a single rose on a corner for a clean look.
– Create a tiny bouquet along the edge for a border effect.
– Make a repeating pattern for a bold statement.
Tips and limits
– Use light paper so the case stays slim.
– A clear case helps the colors shine.
– Change the look later by removing or replacing the roses.
– If glue shows, wipe it quickly for a neat finish.
This DIY phone case decor stays charming and easy to update. Your friends will notice the personal touch.
20. Paper Rose Candle Holders
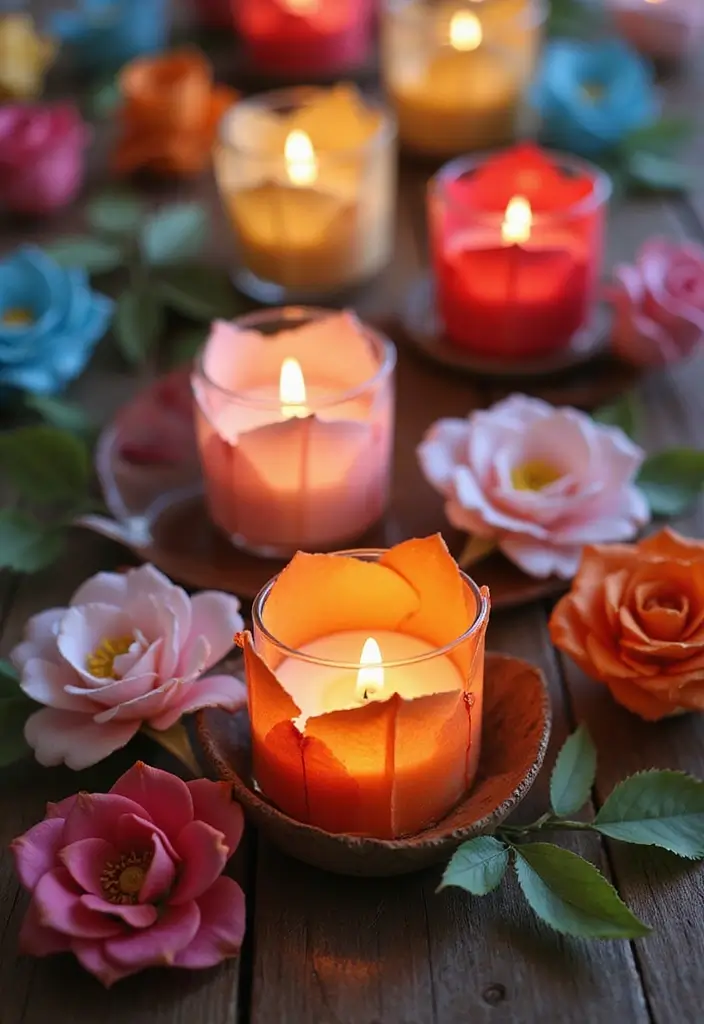
Paper Rose Candle Holders
Want a soft, romantic glow for your space? Paper rose candle holders blend flower charm with warm light. You get blossoms that look real, without delicate petals.
Here is how to build one.
What you need
– Glass candle holder or jar
– Paper roses you make or buy
– Glue or tape
– Scissors
– Greenery or leaves (optional)
– Battery-operated candles
Step-by-step
– Cut or shape several paper roses. Use smaller ones near the base.
– Attach each rose around the bottom edge of the holder with glue. Space them evenly to form a ring.
– Tuck a few greenery sprigs between the roses for depth.
– Place a battery candle inside and switch it on for a gentle glow.
– Set the holder on a table or tray. If you want more height, stack jars or add small stands.
Style tips
– Pick colors that match your room. Soft pinks and creams feel delicate; bold reds feel romantic.
– Use only battery candles. Paper plus an open flame is not safe.
– Mix rose sizes and spacing to create a natural, garden-like look.
Why this works
It’s safe, affordable, and instantly cozy. This idea fits date nights, dinners, and small celebrations.
21. Paper Rose Magnets
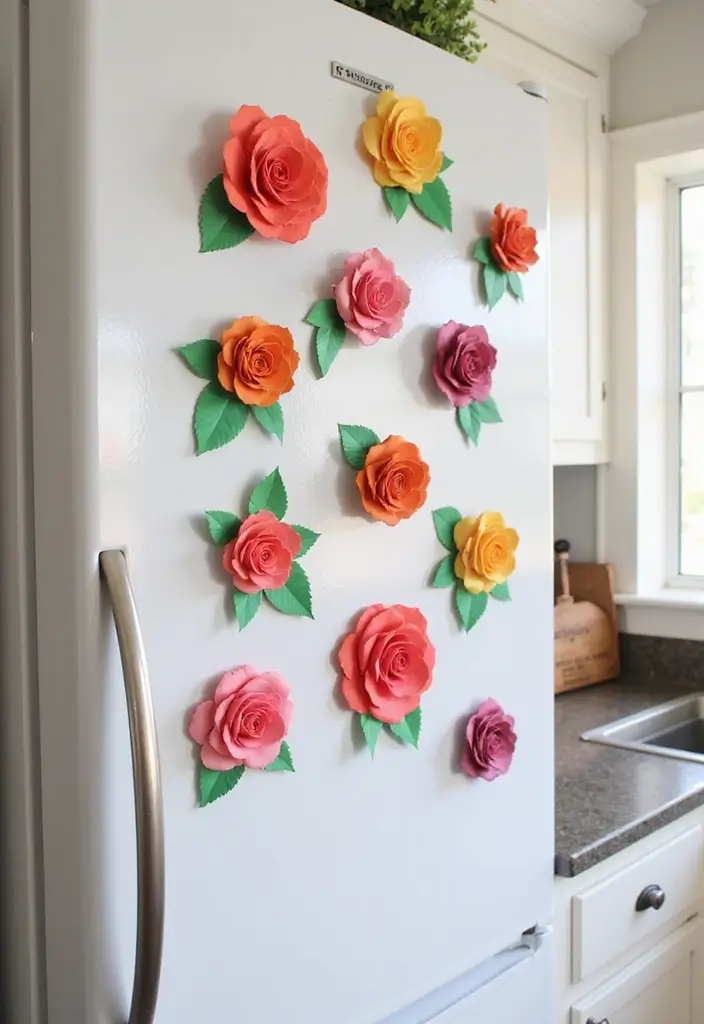
Want a quick, cute upgrade for your fridge? Try DIY paper rose magnets. They add color and a personal touch without a lot of work.
What you’ll need
– Colored paper or craft paper
– Scissors
– Clear-drying craft glue
– Small but strong fridge magnets
– Optional: sealant, extra leaves or color accents
How to make
– Cut a simple rose shape or several mini petals. Fold and twist to form a small rose, then pinch the center for a tight bloom.
– Glue the rose to the magnet. Let it dry completely before you use it.
– Test the magnet on a metal surface. If it doesn’t hold a photo, add a second magnet behind it or swap in a stronger magnet.
Tips to shine
– Use bright colors so the magnets stand out on the fridge.
– Mix sizes and add a few leaves for a more lifelike look.
– Try patterned or watercolor paper for unique styles.
– A light sealant coat can help the pieces last longer.
Ways to use
– Clip photos, grocery lists, or quick reminders.
– Create a small bouquet of magnets across the door for a cheerful display.
This simple project brings daily joy to your kitchen. It’s inexpensive, doable in one afternoon, and easy to adjust as your style changes.
22. Paint Your Roses
Paint your paper roses to give them depth and a romantic feel. A splash of color can make flat petals look real. You choose the shades, the style, and how bold you want them.
Here is why painting helps. It adds shading and life to the petals. Let’s break it down.
What you’ll need
– Paper roses you’ve made
– Watercolor paints or acrylics
– Small brushes (fine and flat)
– A cup of water and a cloth
– A clean, flat drying area
Steps
Let the base color dry before you add paint. This keeps colors clean and avoids smudges.
– Paint the edges first. A thin line or soft wash makes petals pop.
– Build color in light layers. Add a tiny bit of paint, then dry before the next layer.
– Try gradients for a modern look. Start lighter near the base and blend toward the tip.
– Add a metallic touch sparingly. A hint of gold on the edge adds a chic glow.
Tips
– Test on scrap petals to see how the paper reacts.
– Keep layers thin to avoid tearing.
– If the color runs, let it dry completely and fix with a light touch.
Next steps
Display your painted roses with simple greens or in a clear vase. They become a classy focal point in any room.
23. Paper Rose Hair Combs
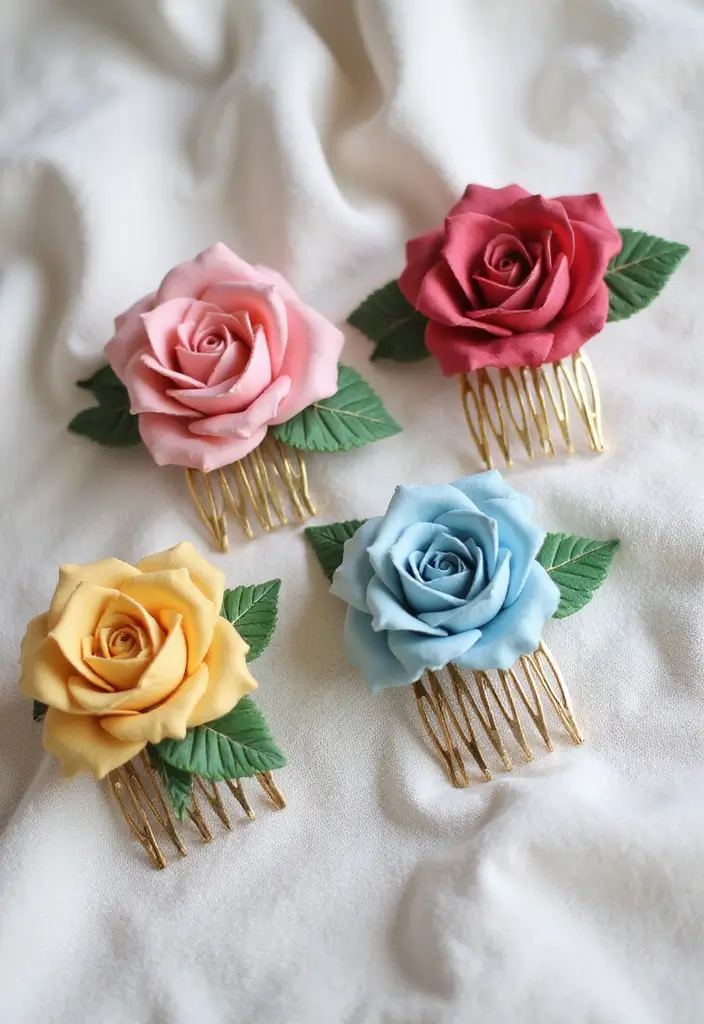
Want a hair accessory that feels romantic and easy to make? Paper rose hair combs can give you that soft, handmade look without a lot of fuss. They’re light, affordable, and you can pick colors that match your outfit or mood. Here is a simple way to create a charming, real‑looking rose on a comb.
What you need
– A plain hair comb
– Strong glue or a hot glue gun
– Thin paper or lightweight cardstock in your color choice
– Scissors and a toothpick for shaping
– Optional: floral wire for extra sculpting
– Optional: clear sealant to protect color
Steps
1) Cut a small rose bud from your paper. Shape the center with a twist of paper and a few tiny petals.
2) Glue the base of the rose and let it set for a minute. This keeps the bloom firm.
3) Attach the finished rose to the comb with a dab of glue. Hold until secure.
4) Repeat with more roses, placing them at different spots along the teeth. If you want a bendy look, wrap a bit of wire around the base before gluing.
Here is why this works: paper stays light, glue dries clear, and you can layer petals for depth.
Tips and ideas
– Use small roses for a delicate look.
– Mix colors for a sunset or garden vibe.
– Try placing a single rose at one end for a clean, modern flair.
– Let the glue cure fully before wearing to keep petals intact.
Wear and care
– Perfect for weddings, proms, or everyday outfits.
– Store flat and keep away from moisture to protect the petals.
– Gently dust with a soft brush if needed.
Next steps: pick your colors, cut your petals, and turn a simple comb into a romantic, runway-ready accessory.
24. Paper Rose Cupcake Toppers
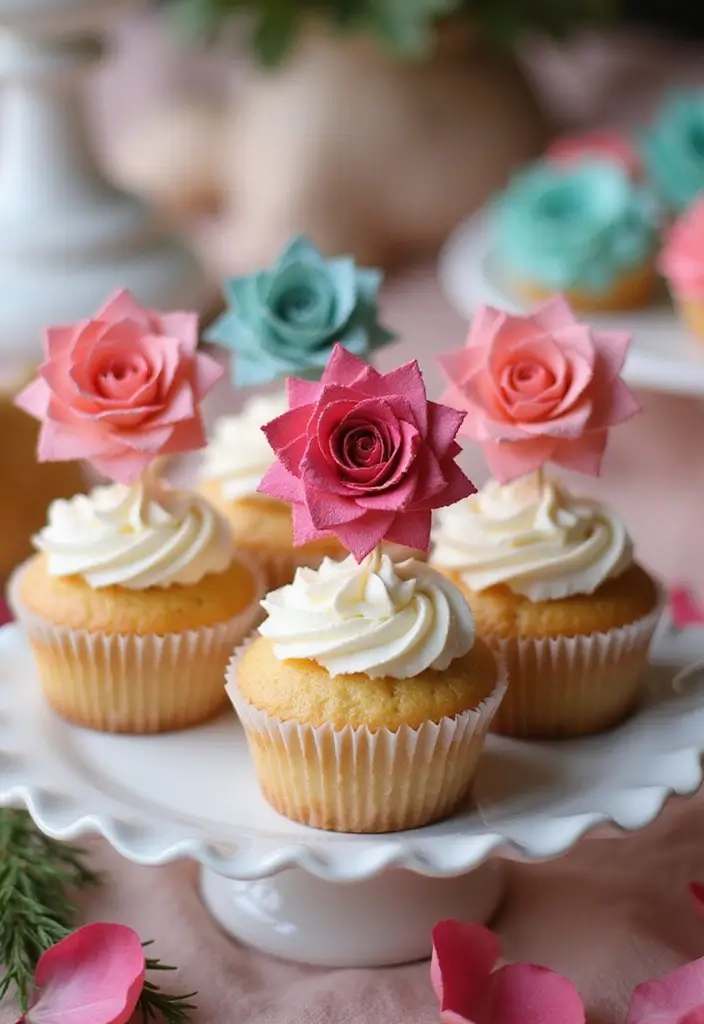
You want cupcakes that feel special without a big mess. Paper rose cupcake toppers add a soft, romantic touch to any dessert. Here is a simple way to make them look real and artful.
Materials
– Craft paper or cardstock in your chosen colors
– Scissors
– Toothpicks or thin floral wires
– A small dab of glue or clear tape
Steps
1) Cut several mini rose shapes from paper. Vary the sizes for depth.
2) Roll each shape to form a small bud. Secure with a dab of glue.
3) Attach a toothpick or skewer to the back. Wrap the base with a slim piece of tape or a tiny strip of floral tape.
4) Add a green leaf behind the rose for a natural look.
5) Here’s why this method works.
Tips
– Match colors to your theme, like blush pinks for a wedding or bright hues for a birthday.
– Mix sizes and group toppers for a bouquet-like effect.
– Insert toppers after frosting to avoid any contact with the cake.
– Press the rose gently as you shape it to keep the bloom neat.
– Store toppers flat in a shallow box so they stay in good shape.
Why it works
– Delicate looking decor that is easy to make in batches.
– Adds charm without high cost.
– Great for quick, elegant dessert tables.
Next steps
– Try a three-color set for a fuller bouquet on cupcakes.
25. Paper Rose Bridal Bouquet
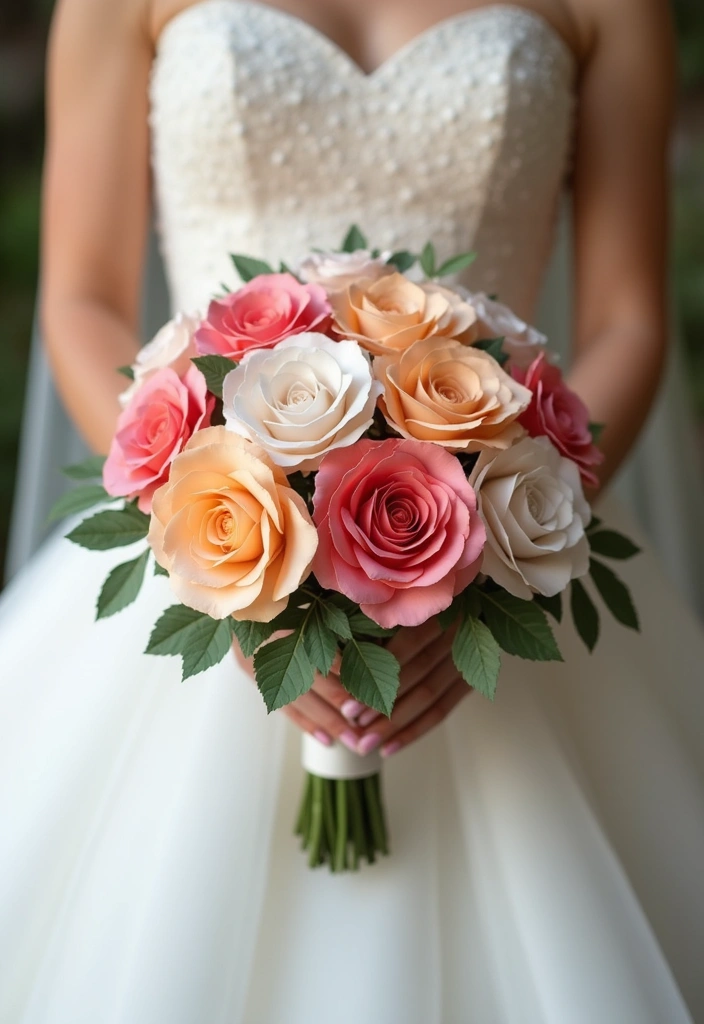
Want a bouquet that keeps its charm after your big day? A paper rose bridal bouquet gives romance without wilting. It lets you pick your colors and add a personal touch, while staying neat for photos and keepsakes. Here is why this works for you. Next steps.
– Materials Gather paper, thin floral wire, floral tape, scissors, glue, some greenery, ribbons, and small pearls or rhinestones.
– Color plan Choose two to four wedding colors and match rose shades. Mix large, medium, and small blooms for depth.
– Make the roses Cut sturdy paper into petal shapes. Curl the edges for a soft bend. Build a wire core and wrap it with tape as you layer petals. A dab of glue holds the petals in place.
– Assemble the bouquet Start with one central rose. Add others around it, turning slightly as you go. Vary stem heights to mimic a real arrangement.
– Finish and accents Wrap the stems with floral tape until secure. Tuck in greenery for a fresh look. Add pearls, rhinestones, or a ribbon bow for a touch of sparkle.
– Care and storage Keep the bouquet in a dry place away from direct sun. For photos or keepsakes, store in a shallow box with tissue.
26. Paper Rose Centerpiece for Weddings
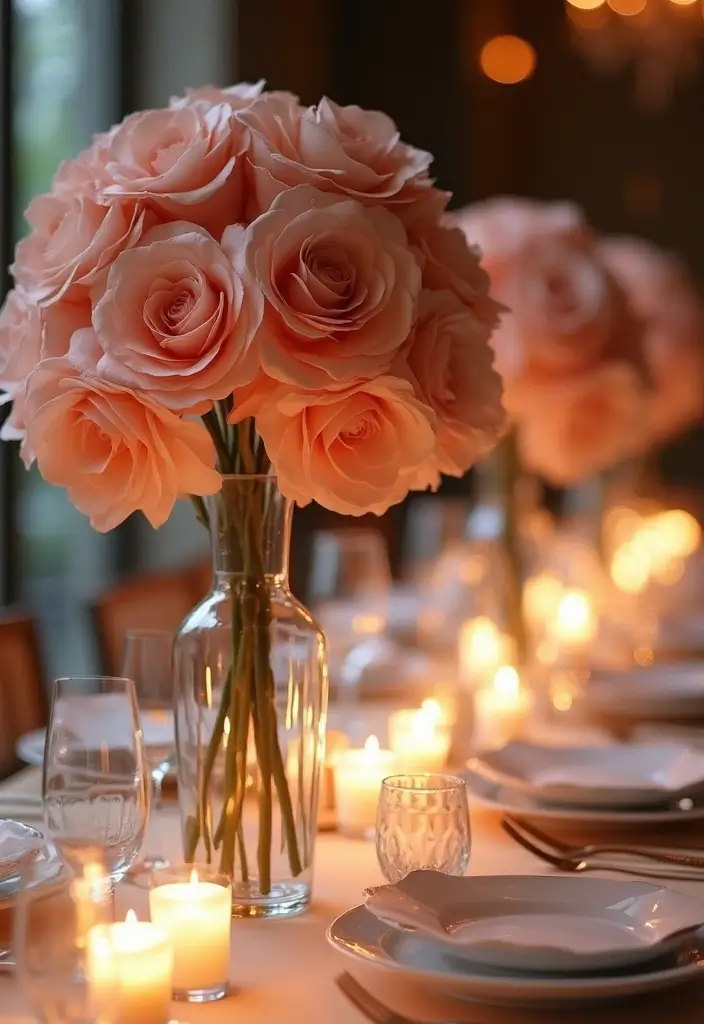
Do you want wedding tables that feel warm and romantic? Paper rose centerpieces can do that. They look real, they stay beautiful long after the cake is cut. You can pick colors to match your theme and add lights for a gentle glow.
Here is why they work:
– Vary heights for visual interest. Use tall vases, medium ones, and small bowls. A mix of heights catches the eye.
– Add greenery for a fresh touch. Tuck in a few sprigs of eucalyptus or ferns. Green makes the roses pop.
– Choose a range of colors. Soft blush, ivory, and dusty rose work well. Add a bold accent if you want drama.
– Incorporate a warm glow. Place candles in clear holders around the centerpiece. Or weave tiny fairy lights through the blooms.
– Use stones or sand for charm. Fill the base with glass beads, decorative sand, or river stones for weight and charm.
– Plan practical placement. Center each table and group centerpieces in odd numbers. Leave space for place cards and conversation.
If you plan ahead, you can make these with simple tools and keep a chic, timeless look for your big day.
Keep in mind a few limits. Paper can warp in heat or humidity. Store pieces flat when not on display.
Next steps: pick a palette, gather supplies, and test a small version before the big day.
27. Paper Rose Wall of Fame
You want a wall that grabs attention and stays welcoming. A paper rose wall of fame can do that. It creates a colorful, handmade backdrop for any room.
Here is why it works. Paper roses add texture, color, and a personal touch. You can swap colors and sizes to keep it fresh.
Let’s break it down.
– Gather paper rose templates in 3 to 5 sizes and a mix of colors.
– Decide whether to mount on a large canvas or attach roses directly to the wall.
– Plan a layout by sketching a simple guide, then place the first roses.
– Use glue dots or a hot glue gun to secure each rose.
Next steps help you finish the wall with confidence. Make it your signature space. You will love the result.
– Build a balanced spread by placing bigger roses toward the center and smaller ones around the edges.
– Mix warm and cool tones to mimic real petals and add depth.
– Add frames or decorative borders around the canvas for a polished look.
– Change the arrangement with the seasons for year-round appeal.
This display shows your love for crafting and becomes a bold focal point in your home.
28. Paper Rose Art Project for Kids
If you’re chasing a kid-friendly craft that feels like real art and gives kids something bright to take home, try a paper rose project. It’s simple, colorful, and the finished roses light up a room.
What you’ll need
– Colorful craft paper in several shades
– Kid-safe scissors
– Glue or glue sticks
– Optional petal templates or a simple center circle
– Green paper for stems and leaves
How to make it
– Cut several petal shapes from different colors
– Curl the edges slightly to add depth
– Start the bloom with a small circle or tight roll for the center
– Glue petals around the center piece to form the rose
– Attach a green stem and leaf pieces
– Let the flower dry, then display it proudly
Safety and tips
– Always supervise when kids use scissors
– For younger children, use pre-cut shapes and larger petals
– Use glue sticks to cut mess and speed things up
– Let kids pick colors to boost pride and creativity
Why this helps
– The project builds small hand control and focus
– It can be done in small groups to practice sharing and teamwork
– Kids finish with a real-looking rose they can keep or gift
Next steps
– Try a mini bouquet by making three or four roses in one session
– Display them on a mantel or classroom board to celebrate effort
Give it a try this week and watch creativity bloom
Conclusion
Creating stunning paper roses is not only a fantastic way to express your creativity but also a sustainable choice that allows you to enjoy the beauty of flowers without the environmental impact.
With these 28 paper roses DIY tutorial ideas, you can transform everyday spaces, gifts, and celebrations into something truly special. Embrace your crafting spirit and get inspired to share your creations with the world!
Note: We aim to provide accurate product links, but some may occasionally expire or become unavailable. If this happens, please search directly on Amazon for the product or a suitable alternative.
This post contains Amazon affiliate links, meaning I may earn a small commission if you purchase through my links, at no extra cost to you.
Related Topics