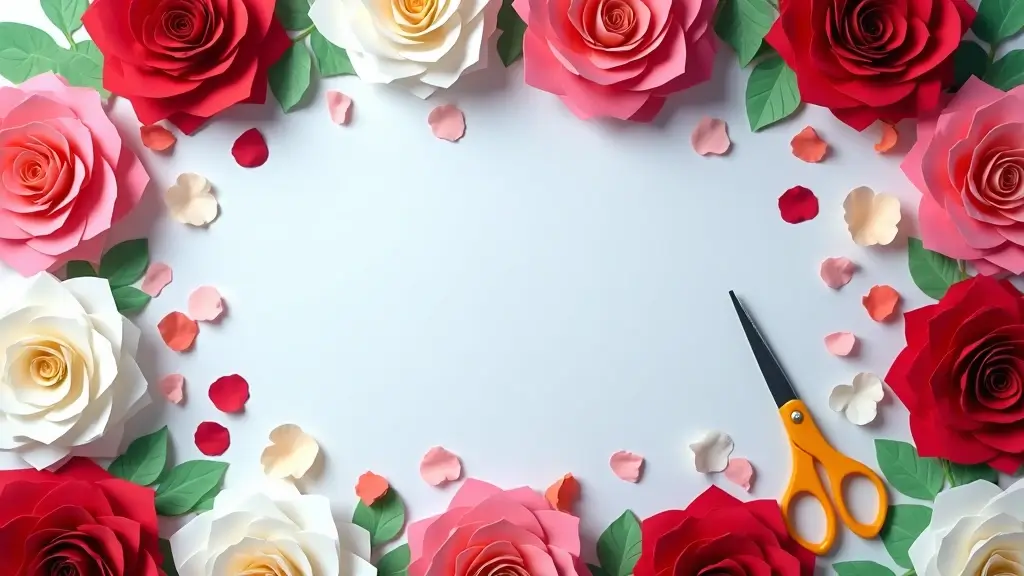
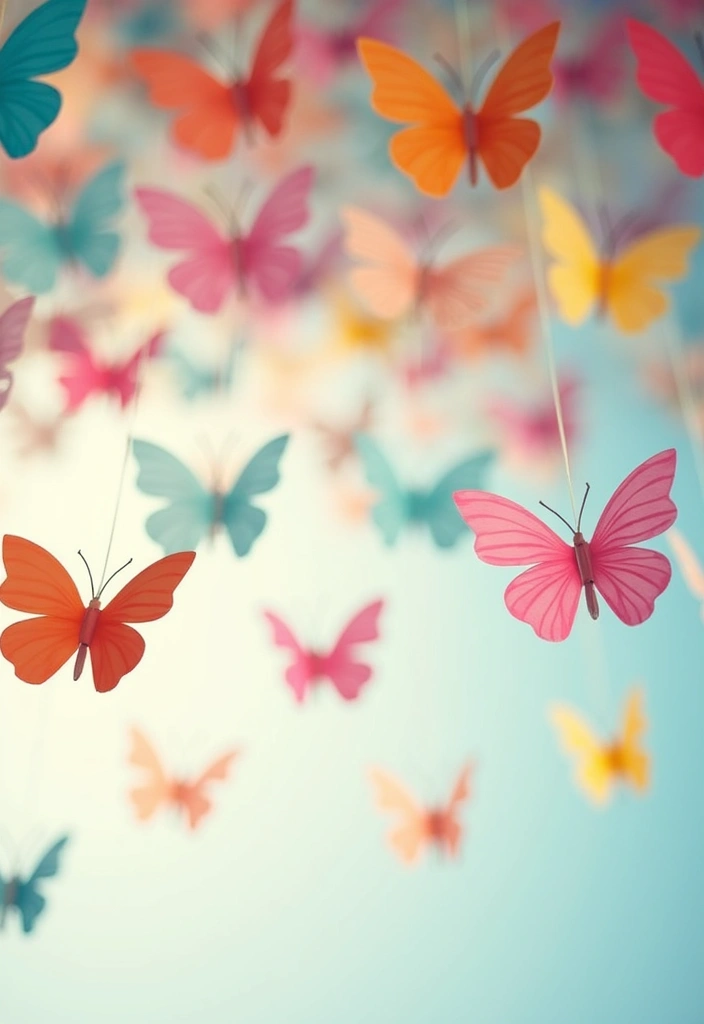
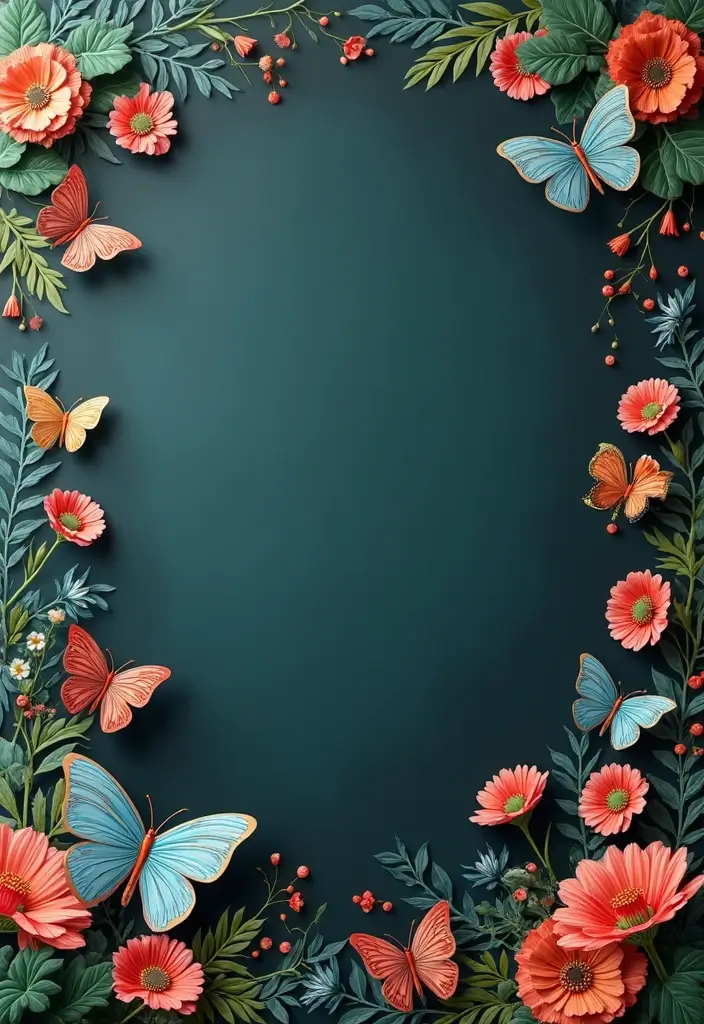
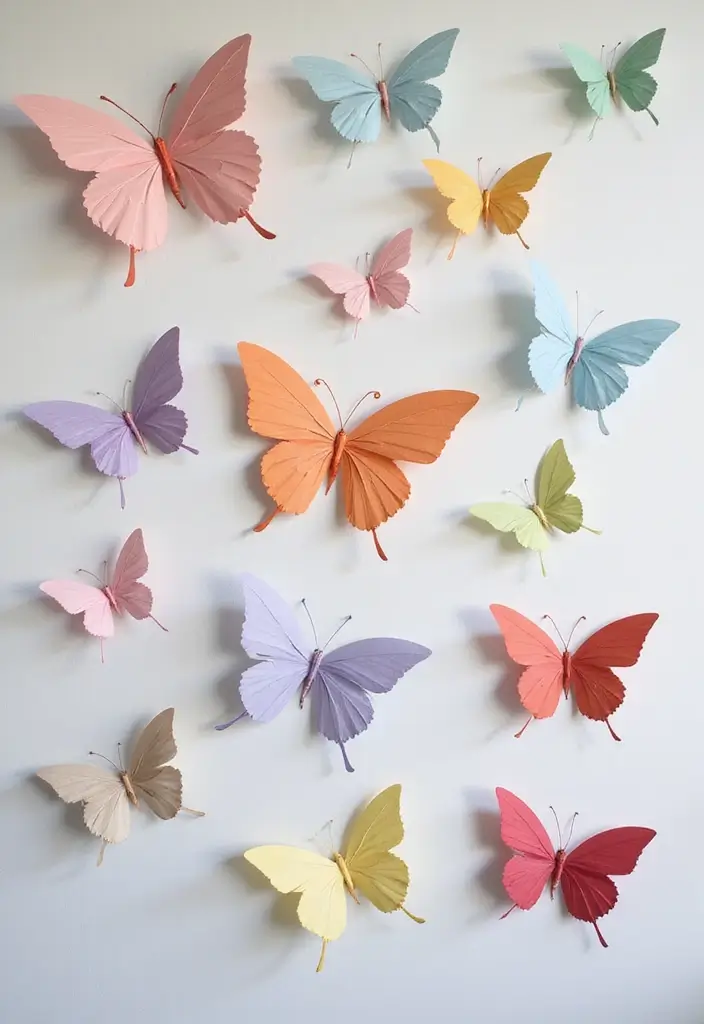
I put this post together because blank walls keep nagging at me. I want decor that feels fresh, not fussy, and that you can finish in a weekend. Paper butterfly wall decor fits that brief. I pulled together 30 DIY ideas that are easy, affordable, and a little magical to look at.
This is for you if you love quick crafts, small spaces, or renter-friendly changes. If you care about texture and color and a soft touch of whimsy, you will enjoy these ideas.
What you’ll get: Here are 30 ideas that cover styles from airy cutouts to bold layered shapes. You’ll learn what papers work best, how to mix sizes, and simple ways to hang them without nails. You’ll also get tips on color schemes and how to group pieces for a balanced wall. All the ideas fall under the umbrella of paper butterfly wall decor that brings life to rooms.
Why this matters: these butterflies catch light and shadows, bringing walls to life. They add motion to a static surface. You can form a loose swarm along a hallway or a neat grid for a gallery vibe. Use them in bedrooms, living rooms, or study nooks to lift the mood.
How to use them: start with one focal cluster and grow from there. Pick papers you have or grab color from a craft store. Try a mix of sizes and use white space for depth. For hanging, start with removable tape or light clips so you can rearrange without damage. You can even string a few into a garland for a quick seasonal touch.
Keep expectations honest: light paper can fade in bright sun and humidity can warp tissue. If you move a lot, use easy, removable methods. This guide is about doable ideas, not a perfect mural. Pick a space, pick a vibe, and try one idea this week.
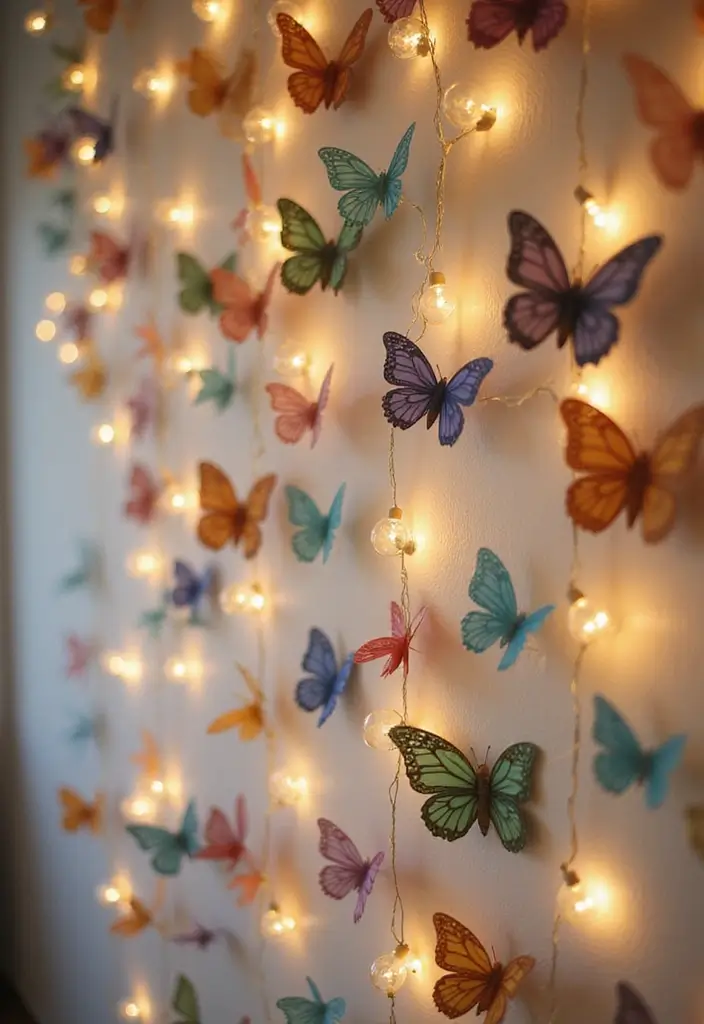
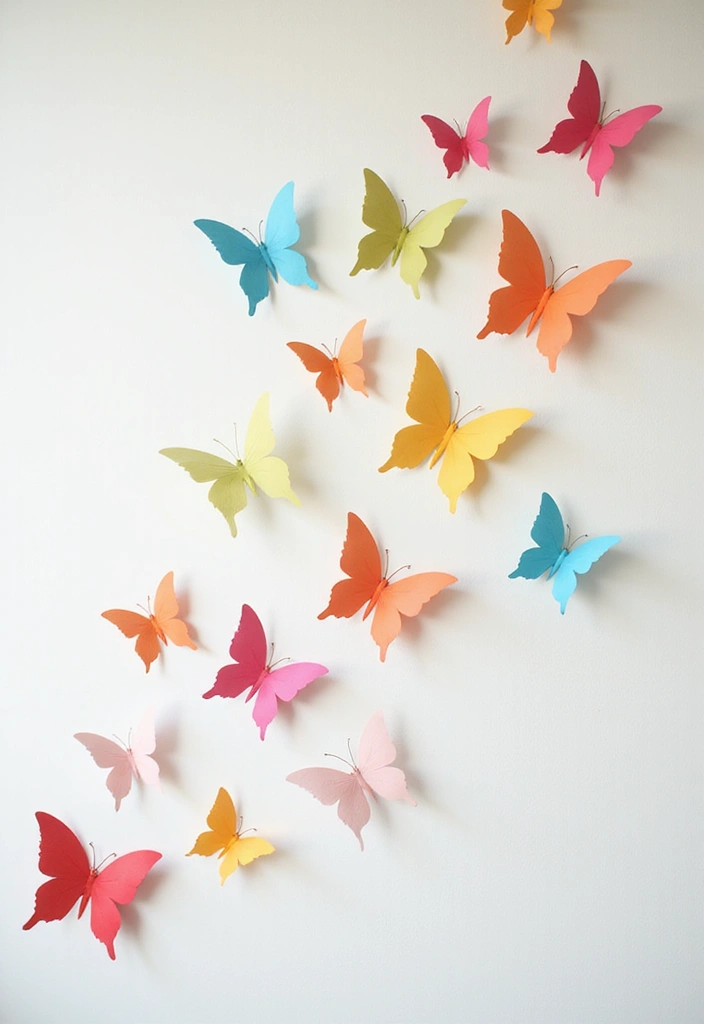
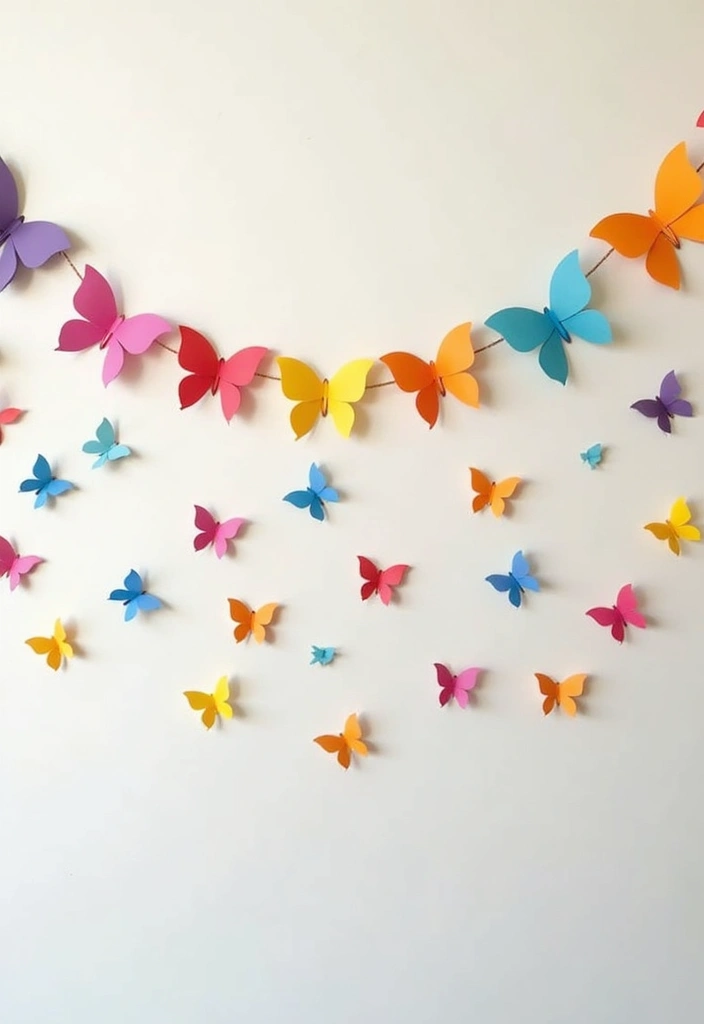
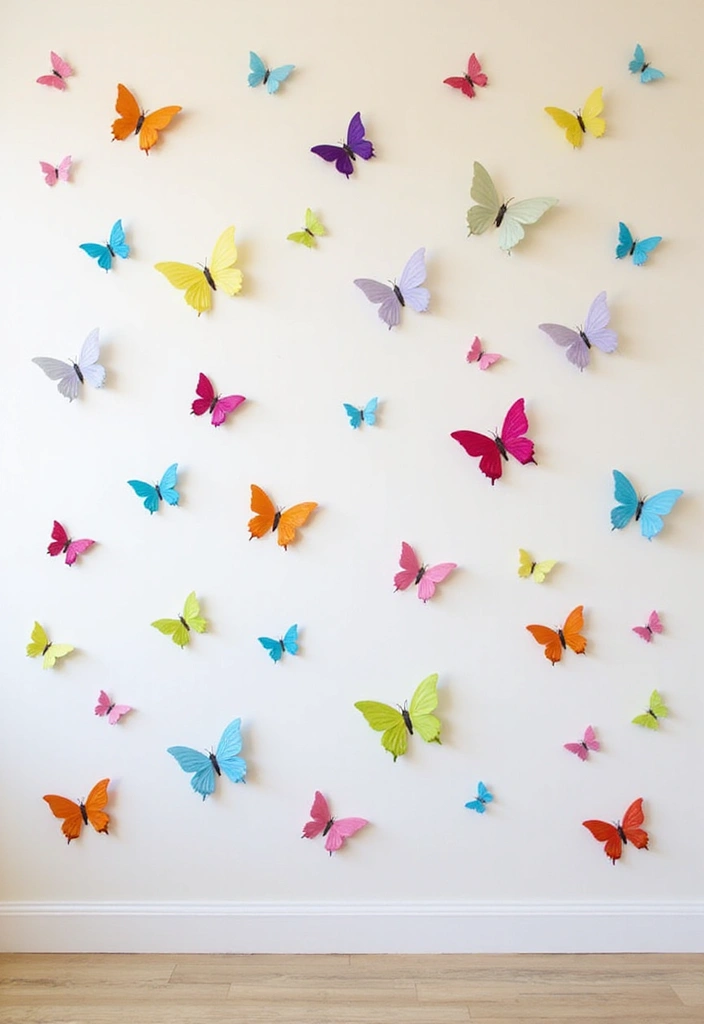
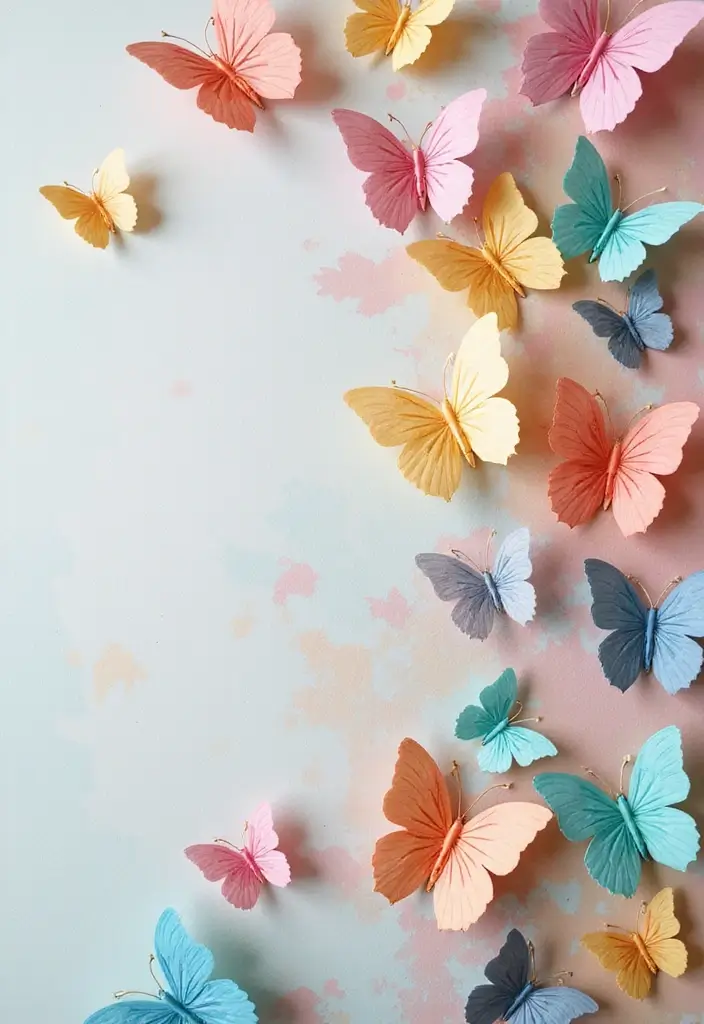
1. Rainbow Butterfly Cascade
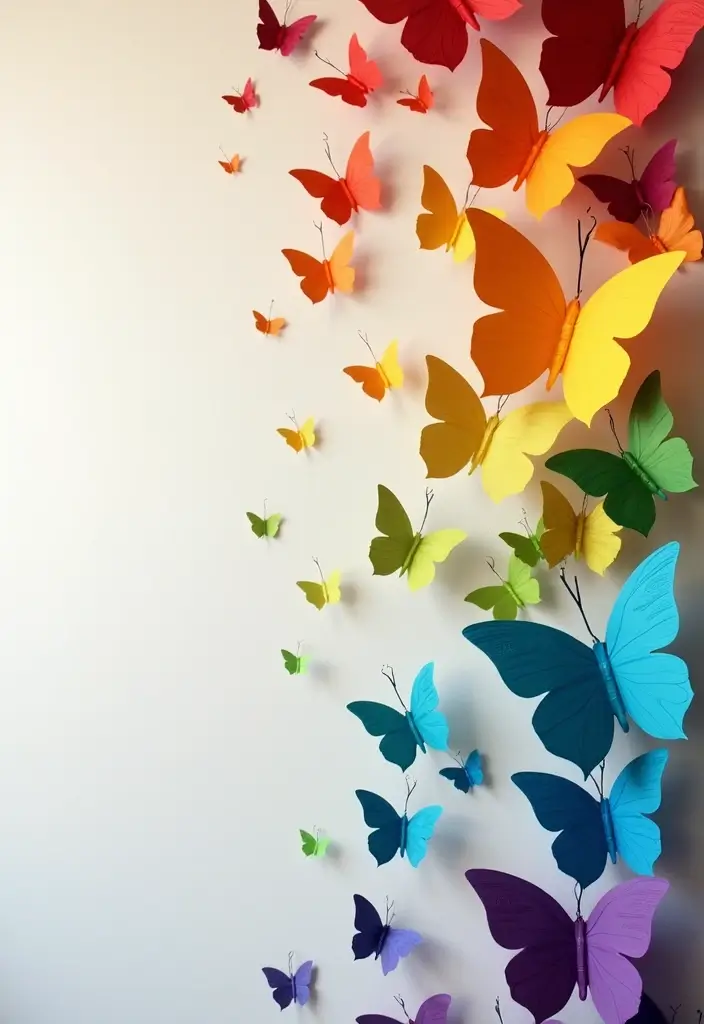
Here is a simple way to turn a blank wall into a color jump with butterflies. You want decor that stands out but is easy to update. A rainbow butterfly cascade gives life to a room without a lot of fuss.
What you need
– colored craft paper in shades from red to violet
– scissors
– light removable adhesive that can be moved
– optional glitter or tiny stickers for extra shine
Step by step
– Cut butterflies in different sizes. Some are small, some bigger. This makes the wall feel alive.
– Plan a gentle diagonal line. Start with red at the top and end with violet at the bottom.
– Attach the butterflies with the repositionable adhesive. Test several layouts before you fix them in place.
– Add depth. Layer the wings a bit and tuck some pieces under others for a 3D feel.
– Add sparkle if you want. A few glittery butterflies catch the light.
Why this works
The color gradient guides the eye and the slight 3D effect adds texture. It creates a bold focal point and warms any room.
Next steps
Try soft pastels for a calm vibe or go with metallics for a modern look. You can also expand the cascade across a whole wall.
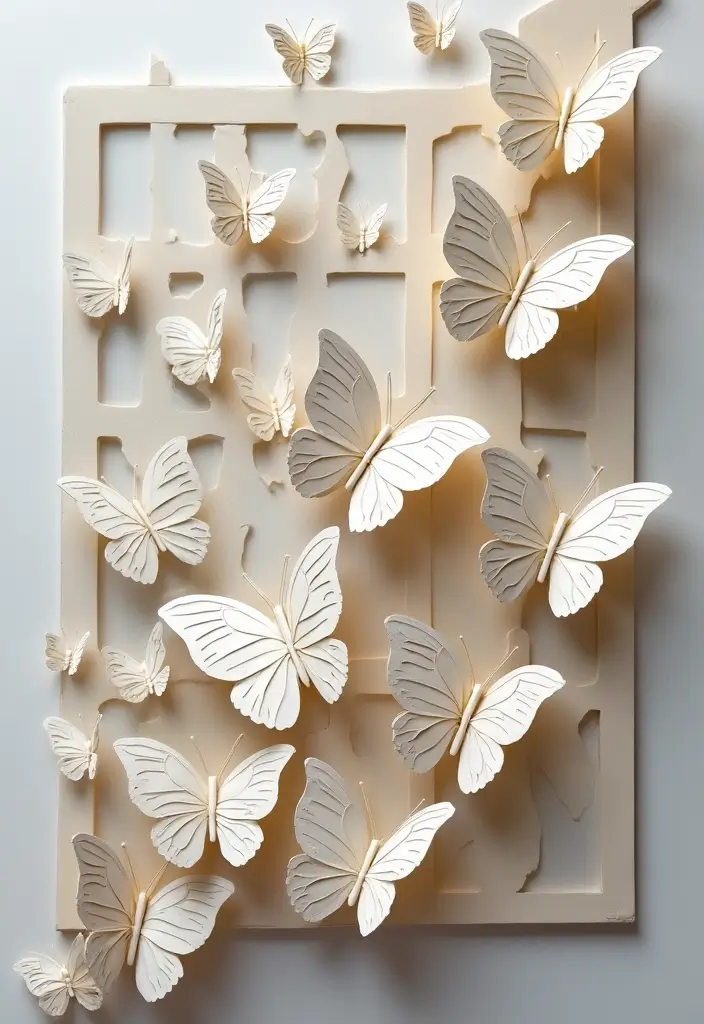
2. Elegant Monochrome Butterflies
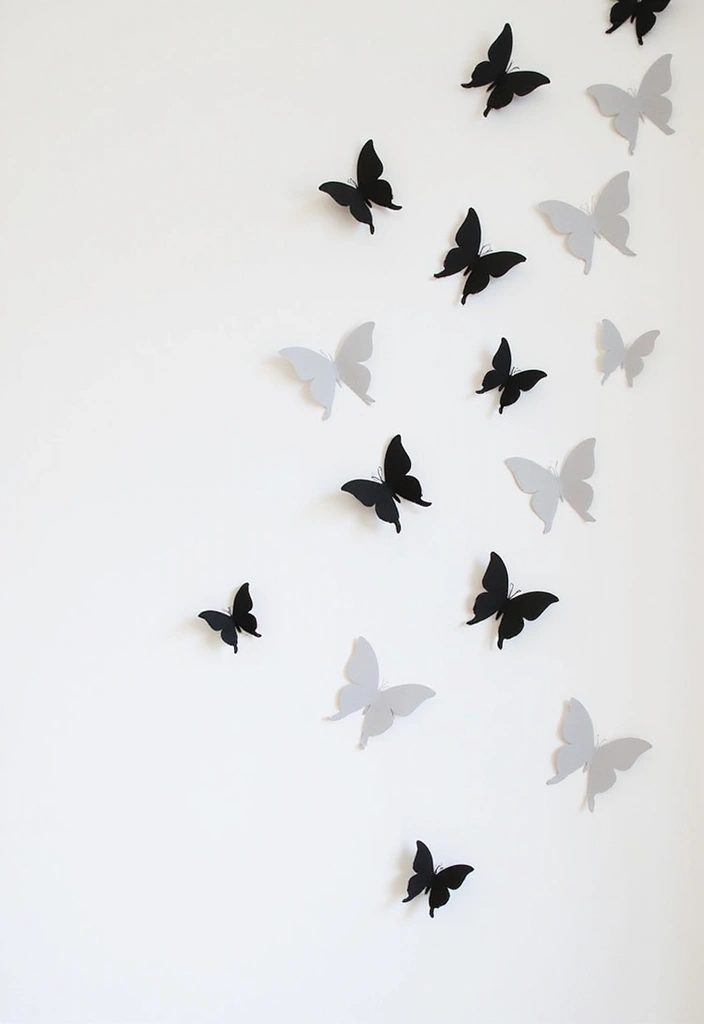
Struggling to make a wall feel calm and stylish? Elegant monochrome butterflies offer a clean, versatile look that fits many spaces. Black, white, or gray tones stay quiet yet clear, so the art never fights with the room.
How to Create:
– Cut butterflies from black and white cardstock in different sizes.
– Place them on the wall in a scattered flight. Let some rise high, others settle lower.
This setup works well in a home office or a contemporary living room. A restrained color palette keeps the art easy to pair with other decor. If you want a softer feel, add a few light gray shapes; for a stronger look, keep it pure black and white.
Materials and tips:
– Use thick cardstock for sturdy wings.
– Keep a pencil handy to mark positions before cutting.
– Sharp scissors help with clean edges.
– Use removable putty or soft tape to move pieces easily.
Placement and tweaks:
– Test the layout on the floor first before committing to the wall.
– Mount with putty or tape so you can adjust without damage.
– Lift a few pieces with tiny foam dots for subtle depth.
With a limited color palette, the wall stays calm. The shapes, light, and shadow do the talking. It’s easy to update and works well for renters or quick refreshes.
Next steps: choose a wall, cut the shapes, and start your flight plan.
@media(max-width:480px){
3. Butterfly Shadow Box Art
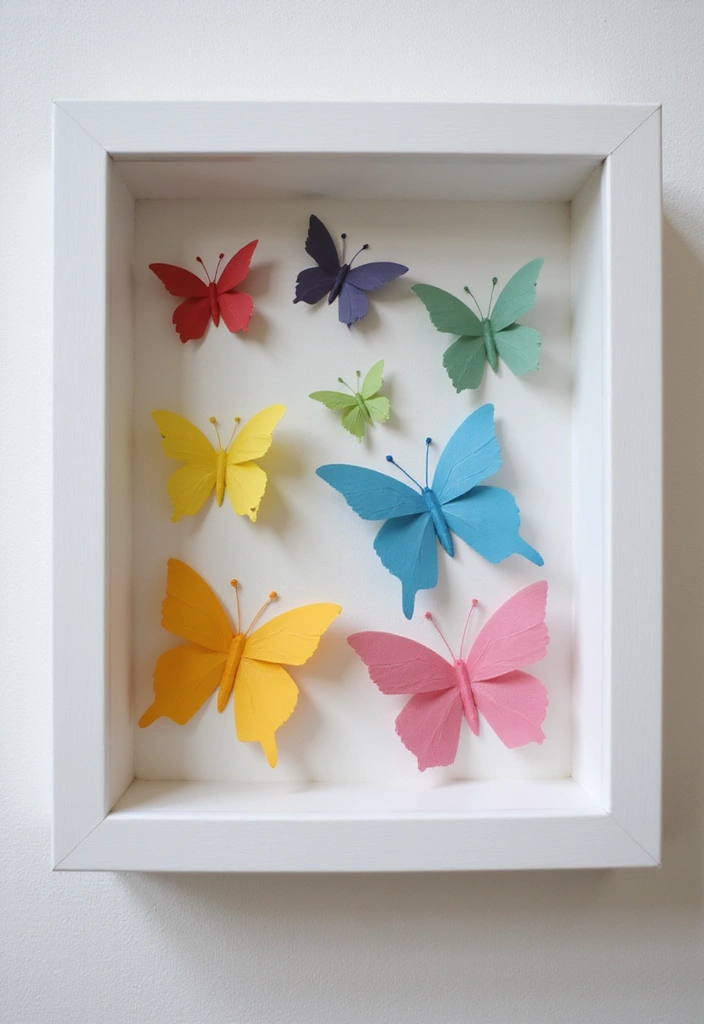
Want a wall piece that adds texture and a touch of whimsy? Butterfly shadow box art fits. It adds depth to a flat wall and lets you show off color and pattern. Here’s a simple way to make it your own.
– What you’ll need
– Shadow boxes in 1–3 sizes
– Colorful paper or lightweight card stock
– Scissors and a craft knife
– Hot glue gun and sticks
– Foam squares or glue dots
– Optional: tiny photos or a short quote
– Optional: a small LED light for the box
– Steps
– Cut several dozen butterflies from bright paper. Use different sizes for a lifelike look.
– Place them inside the box at different distances from the back.
– Lift some with foam squares to add depth.
– Glue a few butterflies near the front edge so they seem to fly out.
– If you like, tuck a tiny photo or a short quote in the lid or back of the box.
– Mount the finished shadow box on the wall. Consider grouping a few boxes for a small wall display.
This little project pays off fast. It gives you a warm feel without a big mess. Swap colors with the seasons or your mood to refresh the look. Next steps: pick a wall, gather supplies, and start creating your museum-worthy butterfly scene.
@media(max-width:480px){
4. Butterflies in a Jar
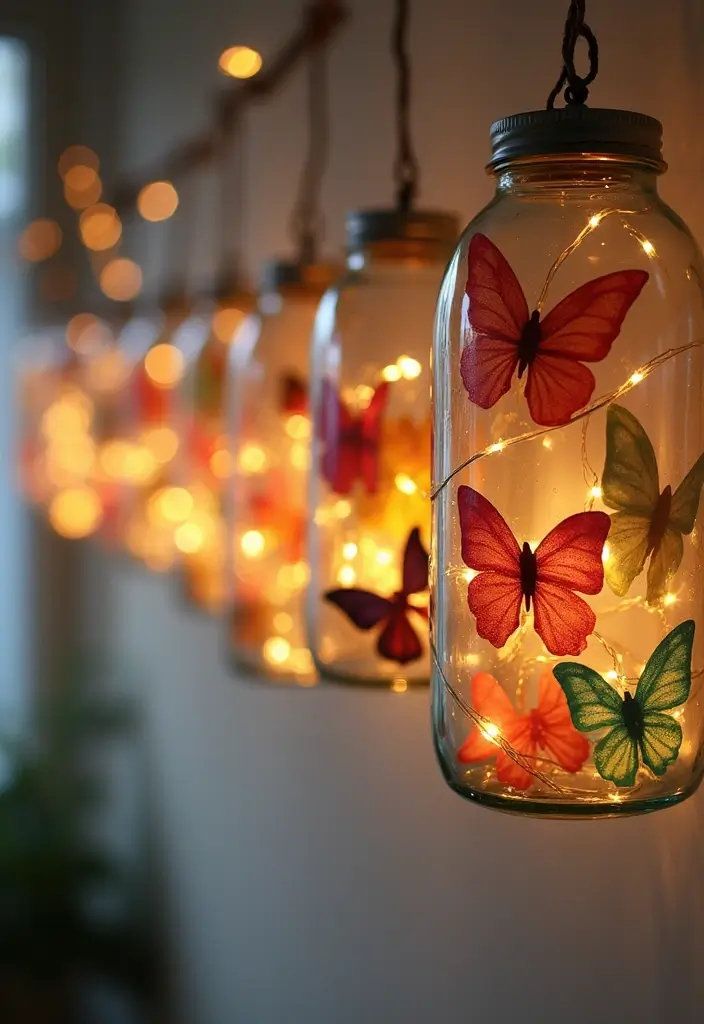
Butterflies in a Jar
If you want a playful wall accent that stays light and friendly, this idea is easy to try and fits many rooms. Clear jars hold cut-out butterflies so they seem to flutter inside your space.
Materials Needed:
– Transparent jars or terrariums
– Paper butterflies in bright colors
– Twine or fishing line for hanging
– Optional: fairy lights for a gentle glow
Here is why this works. The glass keeps the scene airy, and the colors pop as you pass by. Let’s break it down.
– Cut out butterflies in different colors and sizes.
– Poke a small hole in each butterfly and thread a short piece of line through it.
– Attach the line to the inside lid or a tiny hanger so the butterfly floats in the middle of the jar.
– Close the lid and use more lines to suspend extra butterflies at different heights.
– Hang two or three jars on the wall or place them as a gallery cluster on a shelf.
Next steps: add fairy lights inside to create a soft night glow. Use lightweight jars and keep the setup simple, so it’s easy to move or adjust with the seasons.
5. Fluttering Butterfly Mobile
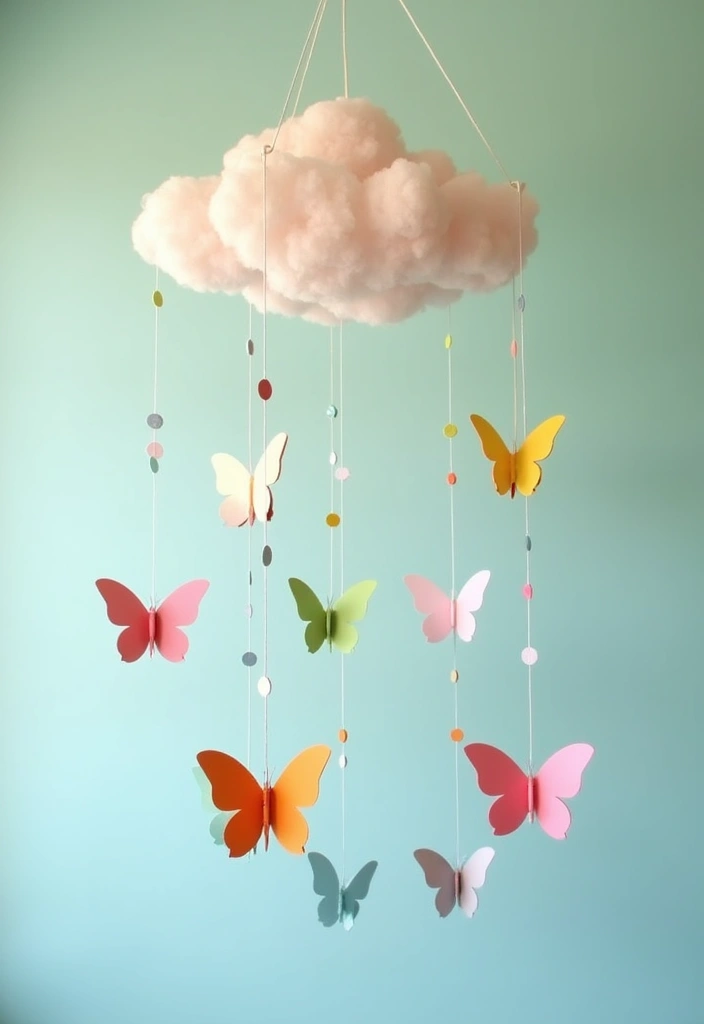
Looking for a wall accent that softly moves with the air? A paper butterfly mobile adds gentle motion and a touch of whimsy to any room. It works in a child’s bedroom, a cozy reading nook, or above a sofa to catch the eye.
Materials
– Thin but sturdy paper or lightweight cardstock for butterflies
– A circular hoop, embroidery hoop, or a small branch
– Clear thread or fishing line and small knots
– Scissors, scissors, and a hole punch or needle
– A ruler and pencil for even spacing
Here is why this idea shines. The flutter of each butterfly creates a calm, playful vibe. Light dances on the wings, and the piece feels alive even when still.
Steps
– Cut 8 to 12 butterflies in different sizes for variety.
– Punch a small hole near the top or attach a tiny loop with thread.
– Cut several strands of thread to different lengths.
– Tie a butterfly to the end of each strand.
– Attach the strands to the hoop or branch at different heights so they sway independently.
– Hang in a spot with a gentle breeze or near a window.
Next steps. Adjust spacing as needed so the mobile feels balanced. Use colors that match your room so it blends nicely.
Tips for best results. Mix light and bright shades for a sunny look, or go monochrome for calm vibes. Keep it away from strong fans to preserve the fluttering effect.
@media(max-width:480px){
6. Clustered Butterflies in Frames
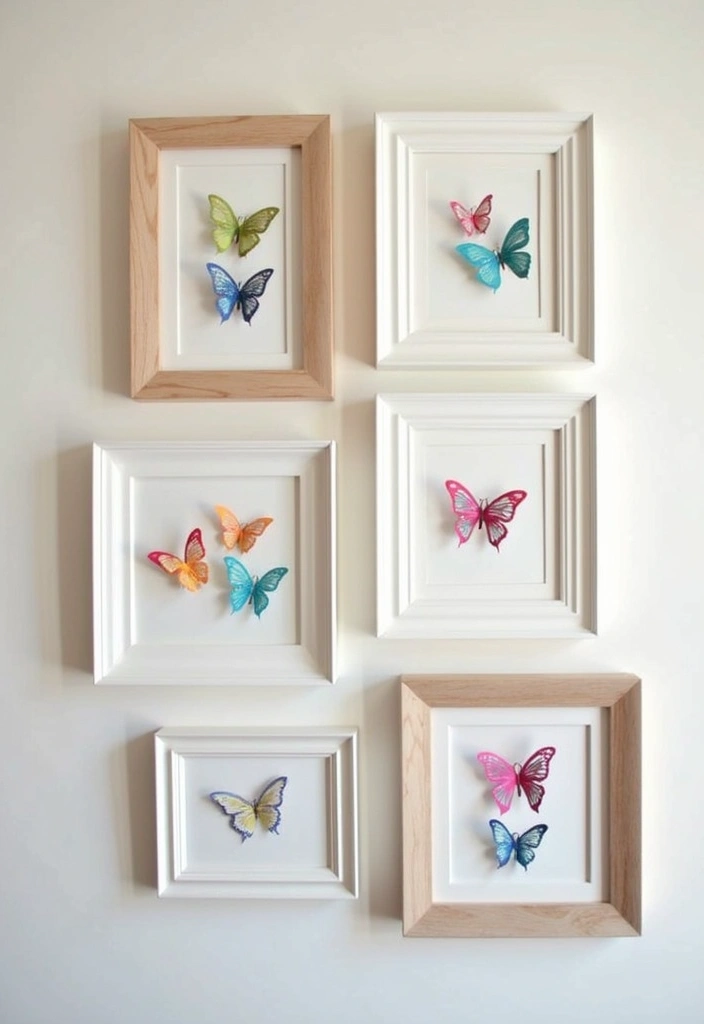
Want a wall that feels alive? This cluster of paper butterfly decor inside frames adds life to any room. You control color, size, and layout, so the look fits your space. It is a simple form of butterfly wall art you can make at home.
What you’ll need Gather lightweight frames in mixed sizes, colored paper, scissors, glue dots or foam tape, and a pencil.
– Choose frames in different sizes and styles to build a varied, cohesive base.
– Cut butterflies from bright paper in several sizes to create depth.
– Arrange in frames by placing cutouts inside and layering them for a soft 3D effect.
– Hang and adjust the set on the wall and tweak spacing until the group feels balanced.
– Finish with depth let light kiss the frames so a gentle shadow adds dimension.
This setup adds texture and a friendly vibe to your wall. It is a simple project that shows your style without a big mess. You can swap in new colors later for a fresh look.
– Tips Use a soft, neutral wall to let colors pop.
– Variations Try a vertical line or a loose arc to fit your space.
– Care Keep frames light for easy hanging and removal.
7. Wreath of Butterflies
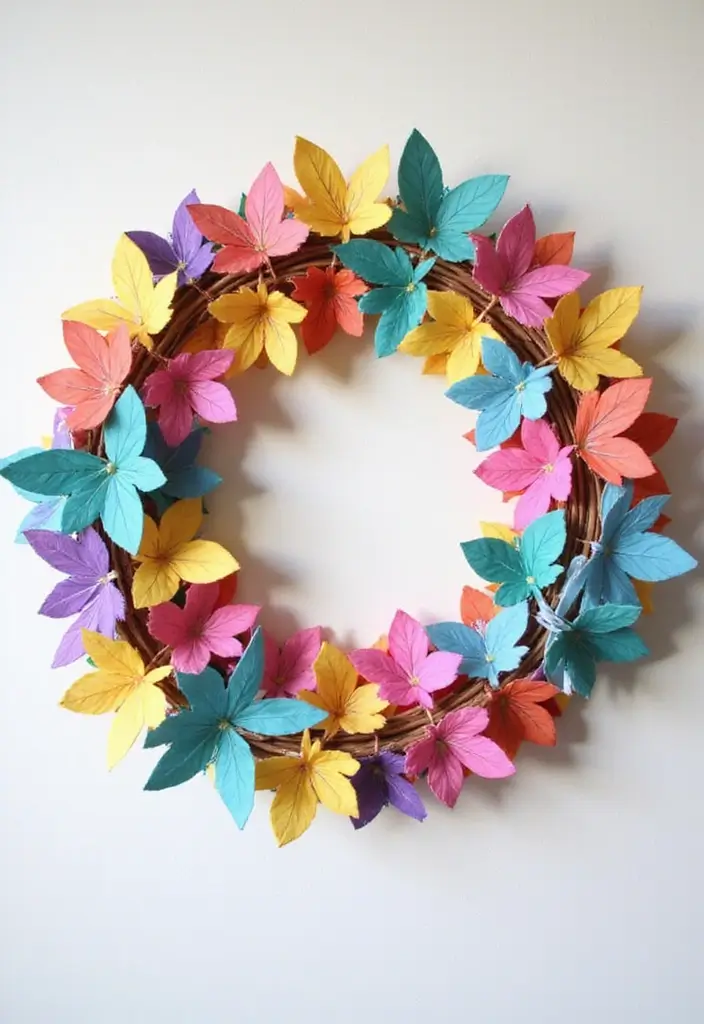
You want a warm welcome for your door or wall. A paper butterfly wreath makes a bright wall decor piece and it’s a simple DIY project. Here is why it works: you get a bold focal point that fits any room or season.
What you’ll need
– A circular base: cardboard or a foam wreath form
– Paper butterflies: cut from scrapbook paper or printed sheets
– Glue or double-stick tape and scissors
– Optional: a light ribbon for hanging or a pen to mark spacing
Next, set up your project. Choose a color plan. You can use one theme or mix seasonal hues. Here is how to lay it out: start with a center cluster and space butterflies evenly around the ring. Let wings face outward for a lively look. Use even gaps so the wreath feels balanced.
Step-by-step
– Prep the base. If you use cardboard, cut a clean circle.
– Prepare butterflies. Fold a few wings for a 3D touch.
– Attach butterflies. Work from the inside out, keeping even space.
– Add finishing touches. Tie a ribbon or add a bow.
Here is why this makes sense for you: it’s lightweight, easy to store, and you can swap butterflies with the season. Next steps: hang it where guests see it first and enjoy the cheerful vibe.
8. Light-Up Butterfly Wall
You want a soft glow on your wall without a big project. A light-up butterfly wall gives that magic with simple steps.
Materials you need
– Colorful paper butterflies
– Warm white string lights
– Removable wall adhesive or mounting putty
– Small hooks or double-sided tape
– Pencil and ruler
Steps
1) Plan your layout. Pin butterflies on the wall with tape to see how they’ll look.
2) Attach the butterflies with removable adhesive. Press gently so they stay but come off cleanly later.
3) Weave the string lights among the wings. Tuck cords in gaps so they disappear from sight.
4) Plug in and adjust. Step back and move any butterflies until the glow is even.
Here is why this works: the light shines softly through the paper, making colors sparkle. The butterfly shapes create a gentle sense of motion, even in a quiet room. It fits a reading nook, above a bed, or along a hallway for a subtle night glow.
Tips
– Use warm white lights for a cozy feel.
– Pick butterfly colors that match your decor.
– Hide cords along edges or behind furniture for a clean look.
– If the light is too bright, trim the strand or switch to a shorter set.
Next steps
Place this above a bed or in a cozy corner to guide your night routine. It’s easy to redo if you want a new color mix or layout.
9. Butterfly Lattice Wall Art
Looking for wall art that adds depth without crowding your space? Butterfly lattice wall art gives you texture and motion with a simple setup. You pair a lattice base with delicate butterflies and let shadows do the rest.
What you’ll need
– Wooden lattice panel or a shallow frame
– Paper or fabric butterflies in mixed sizes
– Craft glue or double‑sided tape
– Small foam dots or adhesive blocks
– A pencil and ruler for spacing
– Optional soft lighting or a warm LED strip for glow
How to build
– Start with the base mounted on a sturdy wall or panel
– Plan a layout with larger butterflies near the center
– Attach creatures in layers, using foam dots to lift some pieces
– Vary angles; let some face up while others tilt for depth
– Step back often to check shadows and balance, then adjust
Display and care
– Hang with level and sturdy hooks so the piece sits flat
– Dust gently with a soft brush every few weeks
– Swap in new butterfly colors for seasons or moods
Tips and variations
– Pick a single color family for a calm look, or soft pastels for an airy vibe
– Mix sizes to boost depth and movement
– Add a dim light nearby to cast soft shadows that bring the lattice to life
10. Butterfly Trail
Need a wall decor idea that is easy to pull off and looks charming? A butterfly trail adds movement and whimsy to any room. Using paper butterflies in a winding line turns a flat wall into a tiny flight path.
What you’ll need
– Colored craft paper in 3–4 shades
– Scissors
– Pencil and ruler
– Removable adhesive dots or double-sided tape
– Optional: washi tape to map the path
Plan your space before you cut. A butterfly trail works best on long walls or above seating. Let the path dip around a corner or wrap a window sill with small curves.
How to build the trail
– Cut out butterflies in three sizes: small, medium, and large
– Lightly draw a curving line across the wall to guide placement
– Cut 12–20 butterflies to fit the path
– Place them along the line, spacing about 2–4 inches apart
– Attach each butterfly with removable dots or tape. Start at one end and work along
– Let the trail flow around furniture or windows for a natural look
– Press gently to secure and adjust as needed
Tips for a smooth look
– Begin at a corner or above a sofa to give the trail a clear start
– Use 3 colors to add visual depth
– If you want to move it later, peel off and reposition without damage
When you finish, you have a lively paper butterfly wall decor that brightens the room and is easy to update as your style changes.
@media(max-width:480px){
11. Butterfly Mosaic Art
Looking for a wall decor idea that feels alive and personal? Butterfly mosaic art gives you color, texture, and a friendly challenge. You turn plain paper butterflies into a bigger picture you can enjoy every day. Pick a shape you love and build the image with tiny winged pieces. It brightens a dull space fast.
What you’ll need
– A sturdy backing board or small canvas
– Paper butterflies in different colors and textures
– Scissors and craft glue
– A pencil and a ruler for neat spacing
Steps:
– Choose a shape like a sun, heart, or flower.
– Lightly draw an outline on the board.
– Cut butterflies in varied sizes and colors.
– Place them on the board to test the layout, then adjust as needed.
– Glue the butterflies down, starting from the center or from one edge and moving outward.
– Let the glue dry, then frame the piece or hang it as a bold wall accent.
Tips
– For depth, place light colors toward the edges and darker colors inside.
– Mix shiny foil papers with matte papers for texture.
– Add a thin glass cover or frame to give it a finished look.
Next steps: Enjoy your new wall art, and consider gifting a mosaic to someone special.
@media(max-width:480px){
@media (max-width: 600px) {
.visual-quiz-iframe { min-height: 995px !important; height: 1100px !important; }
}
12. Hanging Butterflies from the Ceiling
You want a bright, playful update for a room without a big project. Hanging paper butterflies from the ceiling does just that. They float above you and move with the air, catching the eye as you enter.
What you need
– colored paper or card stock in different sizes
– scissors
– clear fishing line or thin thread
– tape or glue dots
– removable ceiling hooks or a lightweight rod
How to do it
– Cut out several butterflies. Mix small, medium, and large shapes for depth.
– Tie each butterfly to a piece of string at different lengths.
– Attach the top of each string to removable hooks or a ceiling rod. Leave space so they hang at varied heights.
– Check the balance as you hang. Rearrange until the group forms a soft drift, not a solid line.
Next steps: Use a calm color palette that fits the room. Place butterflies over a reading corner or above a bed for a dreamier feel. Keep a safe distance from fans and furniture.
Tips
– Choose light colors for an airy look, or bold hues for a lively, bold effect.
– Dust the butterflies with a soft cloth to keep them bright.
– Change the arrangement every few weeks to keep the room feeling fresh.
13. Paper Butterfly Garland
You want a bright wall piece that is easy to make. A paper butterfly garland fits. It adds color and a sense of movement. Hang it over a mantel, along a wall, or by a doorway. It works for parties and for everyday cheer.
Materials
– Butterflies cut in different colors and sizes
– String or twine
– A hole punch or glue dots
– Tape or clips for hanging (optional)
Steps
1) Cut out several butterflies in a mix of colors and sizes. Let some wings be open wide and others tucked in for variety.
2) Punch small holes or place a tiny dot of glue on each butterfly.
3) Thread them onto the string. Leave space between each one so they look airy.
4) Tie the ends of the string and hang your garland where it can flutter in a light breeze or a gentle fan.
Style tips
– Mix warm and cool colors to match your room.
– Vary butterfly sizes for depth and texture.
– Create two shorter garlands on a single rod for a fuller look.
– Clip or tape the garland in place if you want to move it later.
Where to use
Drift it across a shelf, frame a doorway, or line a window. The fluttering butterflies bring a playful touch that brightens any space.
Next steps: start with a few colors you love, then expand for larger walls.
14. Painted Butterfly Wall Art
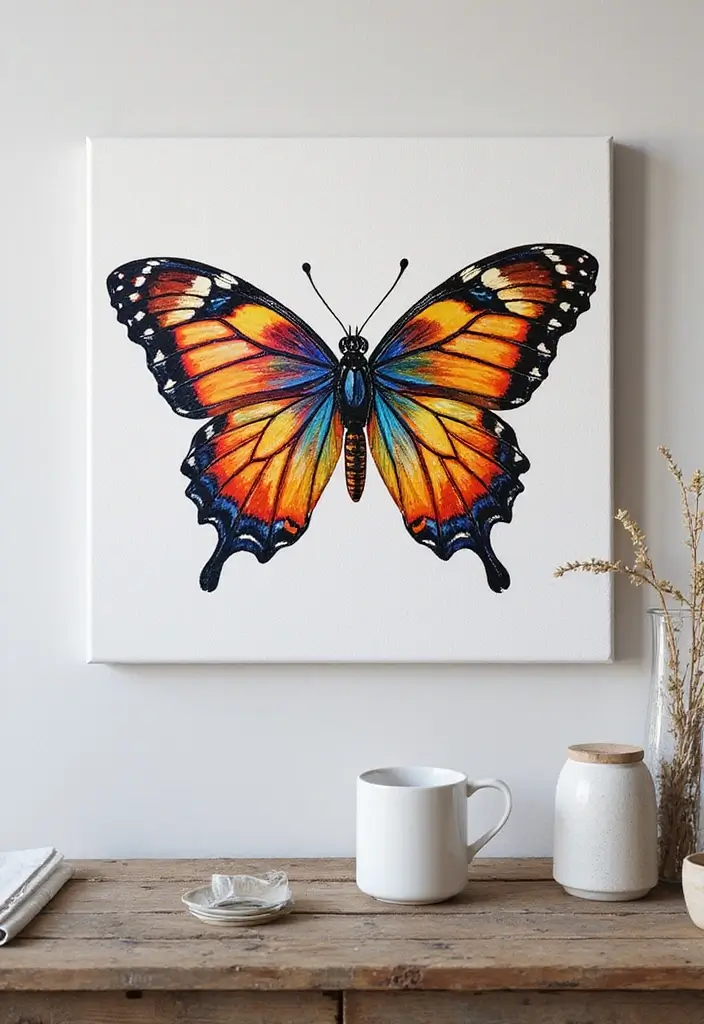
You want wall art that fits your space and shows your touch. Painted butterfly wall art does that. It blends simple painting with nature’s beauty.
Materials
– Canvas or panel
– Acrylic paints in a color family
– A few brushes (small for details, bigger for backgrounds)
– Pencil or chalk for sketching
– Clear sealer to finish
Steps
– Lightly sketch a butterfly on the canvas.
– Choose a color family. Soft pastels glow, bold hues wake a room.
– Paint the butterfly with clean strokes. Build color in thin layers; let it dry.
– Add patterns—dots, lines, and tiny scales—for character.
– Create a soft background that helps it stand out. A gentle wash works.
– Seal the art when dry. It guards color and dust.
Tips
– Keep colors balanced with the room.
– If you’re new, trace from a photo and adjust the size.
– Add texture with a dry brush or a touch of metallic paint.
– For a watercolor look, dampen brushes and apply light washes.
Here is why this works: you can finish it in a weekend and tailor every detail. Next steps: pick a wall, choose your palette, and start your painted butterfly today.
@media(max-width:480px){
15. Butterfly Desk Decor
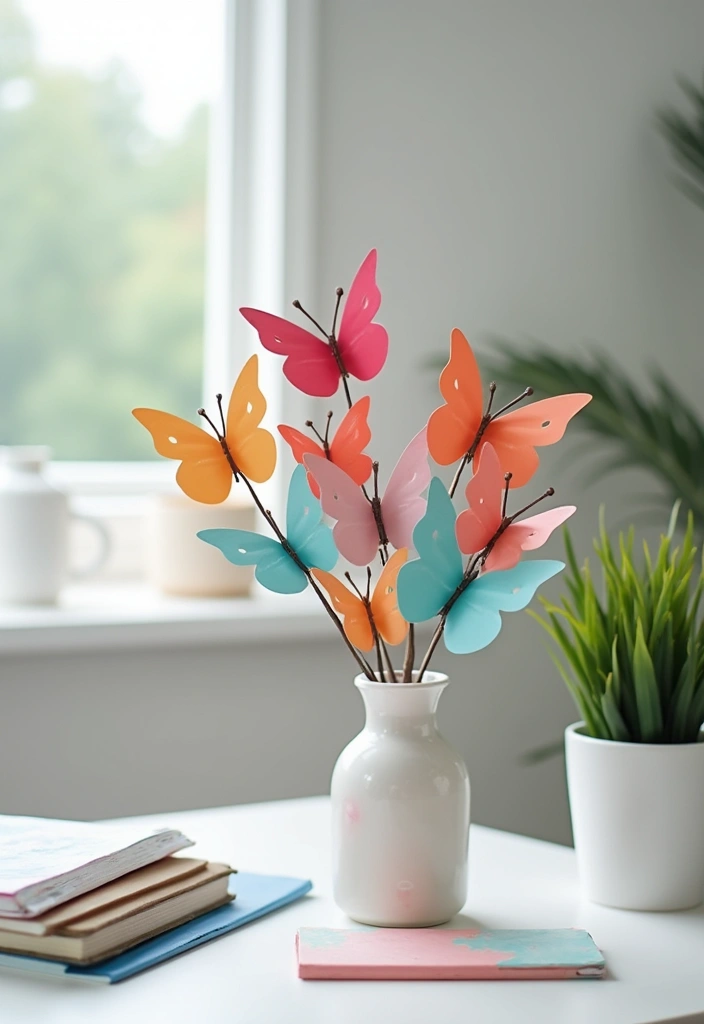
Feeling like your desk could use a fresh spark? Butterfly desk decor offers a simple, cheerful upgrade. A few paper butterflies can lift mood and help you focus without slowing you down.
What you need
– Colored paper in 2–3 tones
– Scissors
– Glue or clear tape
– A small vase, jar, or sturdy desk holder
– Optional: markers or fine pens for tiny details
How to create
– Cut easy butterfly shapes from your colored paper.
– Fold them gently to add a bit of depth.
– Add tiny details with markers, if you like.
– Place the butterflies in a vase or holder to make a tiny bouquet.
Ways to display
– Set the bouquet on your desk near a window for natural light.
– Clip a few butterflies to a pinboard or a branch in a jar.
– Create a mini wall display by leaning a small trio of butterflies against a notebook.
– Switch colors with the seasons to keep the look fresh.
Next steps
– Pick a simple color theme that matches your desk.
– Reserve 20 minutes to cut and fold your first batch.
– Rotate butterflies every few weeks to keep the vibe lively.
Why it helps
– It’s a gentle reminder to take short breaks.
– It adds charm without clutter.
– It’s easy to update as your taste or season changes.
16. Butterfly Wall Decals
Looking to refresh walls fast and cleanly? Butterfly wall decals fit the bill.
Why butterfly decals work
– They stick to smooth walls and lift off without painting.
– They let you change the look in minutes.
– They suit many rooms and ages.
Ways to use them
– Plan a flight path across a wall or cluster butterflies in a corner.
– Create a border along a doorway or ceiling line.
– Mix sizes for a natural fluttering look.
DIY option make your own butterfly decals
– Print butterfly designs on adhesive-backed paper or printable vinyl.
– Cut out cleanly with scissors or a craft knife.
– Peel and press them in place, adjusting spacing before final press.
Tips for best results
– Start with a clean, dry wall.
– Test layouts with low-tack painter’s tape.
– Press from the center outward to remove air bubbles.
– Pick a finish that matches your room, like matte.
Removal and care
– Gently peel from the edge.
– If any sticky spots remain, wipe with a damp cloth.
FAQs
– Are these removable? Yes, they lift off without ripping paint.
– Do they work on textured walls? Best on smooth surfaces.
– Can kids help? Yes, kids enjoy placement and rearranging.
Start with a simple group, then add more as you like. You can mix colors and sizes to fit your taste.
17. Butterfly Overlays
Butterfly overlays give you a soft, dreamlike wall scene. You cut butterflies from translucent paper and stack them on the wall. Light passes through the wings, making the art feel airy and calm.
What you need
– translucent paper in two or three shades
– scissors
– double-sided tape
– removable mounting putty or tape
– a small ruler for spacing
The steps
– Pick light colors for the top layers and darker ones for the base.
– Cut a mix of sizes for a natural look.
– Start with the base layer on the wall.
– Add lighter layers on top, offset a bit for depth.
– Press gently and adjust as you go so pieces breathe.
Why it works
The see-through layers blend colors softly. The result is a three dimensional feel without frames. It’s easy to tweak later—move pieces to match the season or mood.
Pro tips
– Shape the display in a gentle arc or a vertical line.
– Use warm LED light above or beside the group.
– Keep a few extra butterflies handy to adjust the pattern.
Common questions
– Do you need many pieces? No. A small cluster can still stand out.
– Is it easy to remove? Yes, lift gently and reuse the tape.
Next steps
Gather supplies, sketch a quick plan, and start layering. Your wall can glow with light, translucent butterflies.
@media(max-width:480px){
18. Butterfly Garden Scene
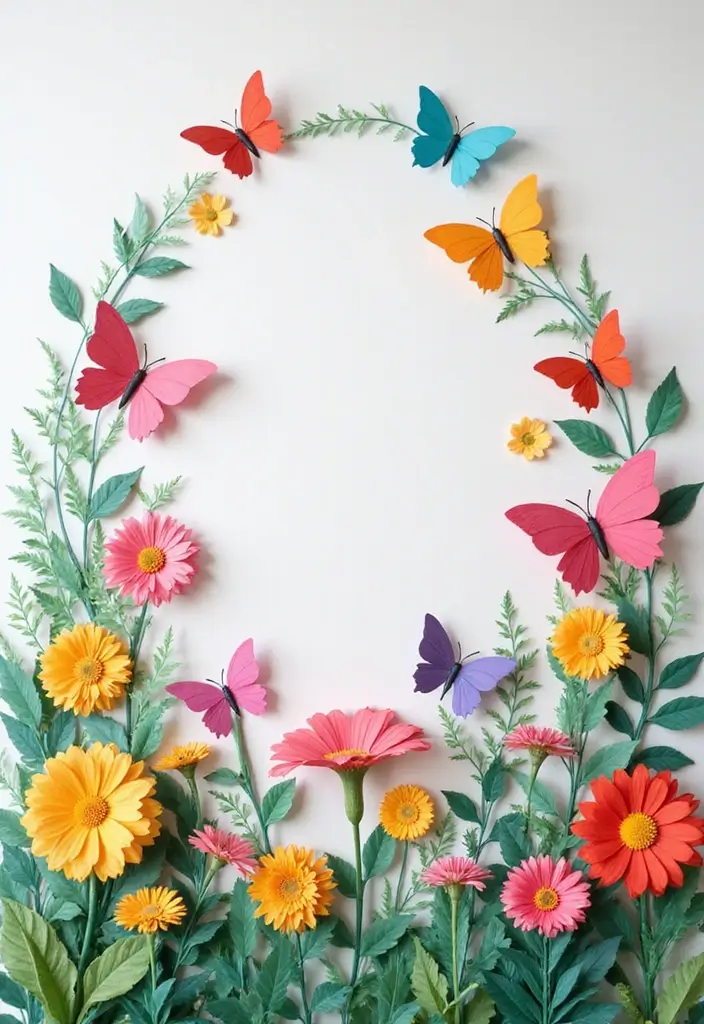
You want a wall that feels alive without a lot of fuss. A butterfly garden scene on your wall can do that. Use paper butterflies and paper flowers to build a mixed media display. It adds color and a touch of nature to any room.
What you will need
– Colored paper in a mix of sizes
– Scissors and glue or a craft glue stick
– Card or lightweight backing to mount the scene
– Optional: thin twine, foam shapes, or a bit of felt for texture
– Removable wall adhesive or washi tape for easy hanging
Here is how to start. Cut out a variety of flowers and butterflies from bright paper. Choose colors that complement your room. Fold some butterfly wings a little to make them stand up. Layer a few petals to give depth. This mix of flat and 3D pieces creates a real garden feeling.
How to arrange
– Lay out a rough garden shape on your backing first.
– Place bigger pieces toward the back, smaller ones up front.
– Vary the heights by curling wings and petals with a light turn of your fingers.
– Use a few greens or leaves to fill gaps and make the scene feel fuller.
Next steps for a kid-friendly project. Let children pick colors and place pieces. They learn balance as they choose spots for every butterfly. This makes a family project that’s easy to pause and resume.
A note on limits. Paper can bend or fade with sun. Use lightweight paper and keep the piece away from direct light. Use removable tape when you change the scene.
When you’re done, you have a warm, inviting butterfly garden wall decor you can enjoy and update seasonally. Try different color schemes or add tiny words to label flowers for a playful touch.
@media(max-width:480px){
19. Butterfly Window Decor
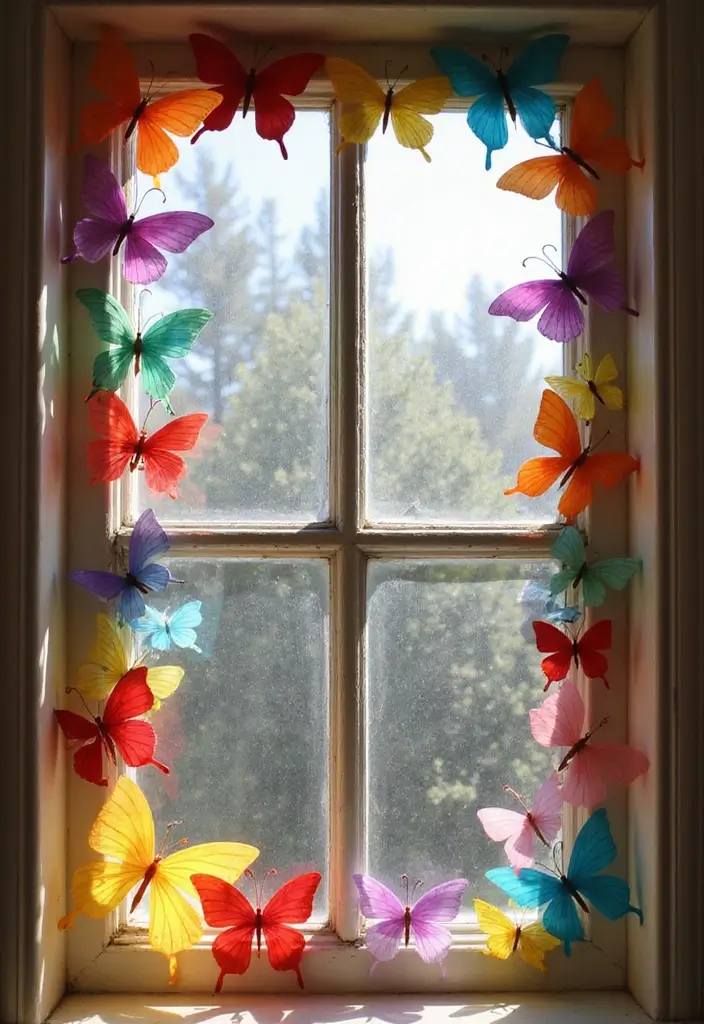
You want a window that stays bright and lively. Butterfly window decor makes that easy. It adds color and motion to any room.
Materials
– Choose lightweight paper in colors you love.
– Keep scissors sharp for clean butterfly shapes.
– Use removable adhesive or tape so you can move them later.
– Mark a light guide line on the glass with a pencil.
How to set it up
– Cut several butterfly shapes in small, medium, and large sizes.
– Draw a soft line along the edge of the window to guide placement.
– Attach the butterflies to the glass with small dabs of removable adhesive.
– Space them so they look like they are fluttering around the frame.
– Step back and adjust until the arrangement feels balanced.
Placement ideas
– Start near the corners and let the line flow across the glass.
– Create a gentle curve that follows the window frame.
– Mix colors to catch the light as the sun moves.
Care and removal
– Gently lift the butterflies to avoid tearing the paper.
– Store the cutouts flat in a folder or between sheets when not in use.
– Reuse by reattaching to the glass with new tape.
Here is why this works: it adds motion and color without blocking light. Next steps: try different sizes or swap colors with the season. The view stays bright, and your room gains a playful touch.
20. Butterfly Chalkboard Art
Want a quick way to make your chalkboard pop? Butterfly chalkboard art blends drawing with paper wings for a fresh display. You get color and a scene you can tweak. It’s affordable and easy to switch with the season.
Materials you need
– Chalkboard or chalk wall
– Paper butterflies in different sizes
– Scissors
– Glue dots or light tape
– Pencil for a soft sketch
– Optional: washi tape
Steps to create
– Plan a butterfly themed scene on the chalkboard. Think a garden or a night sky.
– Lightly sketch the scene with chalk so you can adjust as you go.
– Cut 6 to 12 butterflies, mixing big and small in warm and cool tones.
– Place the butterflies around the scene to frame it. Tap them in place with glue dots or light tape.
– Step back and tweak until you love it.
Keep it fresh
– Change the butterflies with the seasons. Spring greens and pinks brighten; autumn golds and oranges warm the board; winter blues calm it.
– Store the cutouts in a folder so you can reuse them later.
– Add a simple border with washi tape to finish the look.
Next steps: try a meadow scene or a night flight map. You’ll gain a focal point you can update easily.
@media (max-width: 600px) {
.normal-quiz-iframe { min-height: 570px !important; height: 570px !important; }
}
21. Butterfly Cluster on a Canvas
If you want wall art that feels personal but not fussy, try a butterfly cluster on a canvas. It blends painting with paper cutouts for a piece that looks soft yet full of life. Here is why this works: texture, color, and a little handmade charm all in one. Let’s break it down with a simple plan.
What you need
– a canvas, 8×10 or 12×12 works well
– soft acrylic paints
– a flat brush and a small detail brush
– scissors or a craft knife
– sturdy paper or cardstock for butterfly shapes
– patterned paper or color scraps for variety
– white glue or Mod Podge
– a pencil for drawing light butterfly templates
– optional: a clear sealant to protect the finish
Here we go:
How to create
1) Paint a calm background on the canvas. Use gentle colors or a subtle gradient.
2) Cut out butterflies in different sizes and styles. Try round wings and long, curved ones.
3) Lay out the cluster. Start with a central butterfly and add others around it until the group feels balanced.
4) Glue the pieces in place. Press edges down so they sit flat.
5) Add a touch of depth. A light edge in gray or a darker hue makes some shapes pop.
6) Seal the art when dry. A quick spray or brush coating protects it.
Display ideas
Place the canvas where guests look first. It works as a focal point in a living room or a soothing piece above a bed. A simple frame or no frame at all both fit this style.
Next steps: pick your colors, set up a clean workspace, and start your butterfly cluster today.
22. Butterfly Name Banner
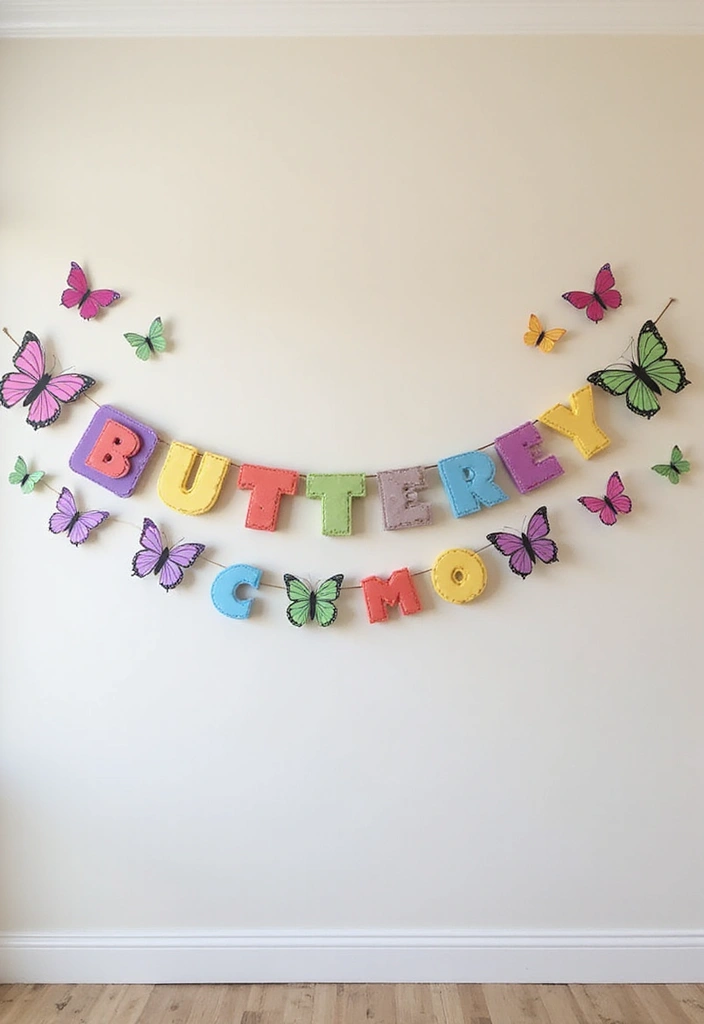
If you want a personal touch on a wall, a butterfly name banner is a perfect DIY. It’s easy to make and cheerful. It adds warmth to a kid’s room or play area without a big job. Here is why it works: it feels custom and cozy.
Materials
– Cardstock in your chosen colors
– Colored paper or foam butterflies
– Scissors and glue
– A thin string or ribbon
– A ruler and pencil
How to Make
– Cut letters that spell a name or simple word from cardstock.
– Space the letters evenly on a strip of paper or on a string line.
– Trim butterflies to orbit the letters. Layer for a light 3D effect.
– Glue or tape the butterflies so they frame the letters, not crowd them.
– Tie or pin the ends to a string for hanging.
Tips
– Pick a color scheme that matches the room. Pastels calm; bright tones energize.
– Use a mix of big and small butterflies for rhythm.
– Try a white or pale backing to make colors pop.
Next steps
– Hang above a bed or reading nook to create a focal point.
– Swap in a different name or word for birthdays or seasonal decor.
– Store extra butterflies for quick updates later.
This banner stays affordable, quick to make, and totally unique to your child.
23. Butterfly Quote Art
You want a butterfly wall decor piece that lifts the mood and is easy to make. Butterfly quote art blends a warm message with colorful paper butterflies. It feels personal and fits any room, from a cozy bedroom to a bright living room.
Steps to Create:
– Choose a quote that makes you smile and write it on paper or a small canvas.
– Cut twenty to forty paper butterflies in two to four colors. Use different sizes for depth.
– Lightly sketch where the text will sit. Arrange the butterflies around the words to create a gentle swirl or frame.
– Glue each butterfly in place. If you worry about mistakes, start with removable dots so you can move pieces.
Here is why this works for you. Butterflies in soft colors move the eye toward the quote. Keeping space around the words helps the message stay clear.
Materials you need:
– Thick paper, poster board, or a small canvas
– Colored scrapbook paper in two to four shades
– Scissors and glue or glue dots
– Pencil and ruler for neat writing
– Optional clear spray sealant for protection
Hang it at eye level and keep it simple so the quote shines. Try a plain wall or a thin mat to make the colors pop. This easy craft stays affordable and can be changed with seasons or quotes.
24. Butterfly Bulletin Board
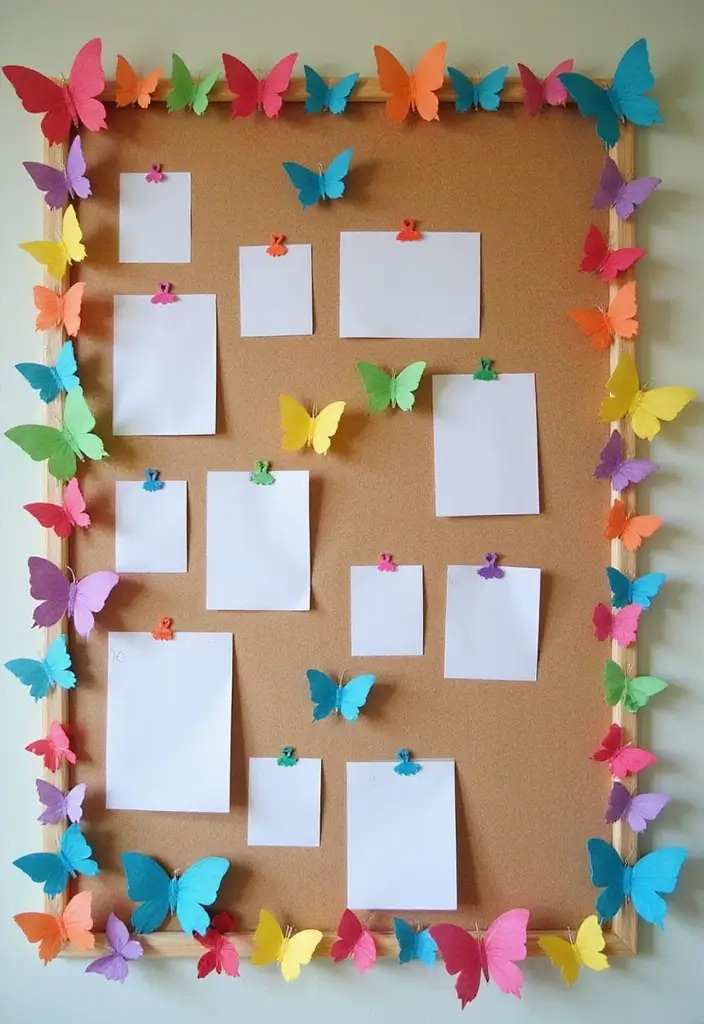
Struggling to keep walls neat and lively? A butterfly bulletin board can solve that. It blends a simple corkboard with pretty paper and cute shapes, so your space feels warm and organized.
Here is how to make it.
– Choose a corkboard that fits your space. Think about a size that sits nicely on a desk, kitchen wall, or a kid’s study area.
– Cover with decorative paper the board. Pick colors or patterns that match your room and mood.
– Create butterfly cutouts from sturdy paper or print and cut. Attach them around the edges and across the board using glue or double-sided tape. Add a few tiny magnets if you want to hold notes.
– Add note clips or colored pins to keep reminders handy. This turns the board into a small command center.
Where to put it? In an office for quick reminders, in the kitchen to track chores, or in a kids’ room for art and homework notes. It stays useful without taking up a lot of space.
Next steps: rotate the butterflies with the season, swap in new paper to refresh the look, and keep a small box of spare butterflies and pins so you can update as needed.
Benefits: It keeps your space tidy, adds charm, and makes it easy to see what you must do. It’s a practical piece of paper wall decor that fits many styles.
25. Textured Butterfly Art
If you want walls that catch the eye, textured butterfly art is for you. You mix papers, fabrics, and other scraps to add depth that you can feel. Here is how to build it.
What you’ll need
– A canvas or wood board.
– A set of butterfly shapes cut from paper, fabric, or textured material.
– Clear-drying glue and foam dots for lift.
– Paints or markers for color.
– Fabric scraps, lace, tissue, magazine pages, burlap, buttons, beads.
– Pipe cleaner or thin wire for antennae.
– Sealant or Mod Podge to protect.
Steps
– Choose three or four butterfly sizes. Cut from different materials.
– Lay them on the base to plan a layered look.
– Glue the smallest first, then add the larger pieces. Use foam dots to lift layers.
– Add texture by pressing fabric, lace, or tissue onto the wings.
– Shape a body with a pipe cleaner or thread. Bend and glue.
– Seal the art so colors stay bright.
Practical tips
– Work on a flat surface first. Take photos to guide the final layout.
– Choose a color family to keep the piece cohesive.
– Dust gently with a soft brush when needed.
Where to use it
– Living rooms, hallways, children’s rooms, or entryways. Hang in a grid or a curved arc.
@media(max-width:480px){
26. Seasonal Butterfly Decor
You want walls that match the seasons with little fuss. Seasonal butterfly decor does that. Paper butterflies in season colors give your home a calm, year‑round look.
What you need
– Colored craft paper or pre-cut butterfly shapes
– Scissors and a pencil
– Removable wall tape or small sticky dots
– String or fishing line for a hanging garland
– A ruler or masking tape for even spacing
How to create
– Pick two seasonal palettes: spring pastels, summer brights, autumn warms, and winter cools.
– Cut or punch butterflies in three sizes for visual interest.
– Lay out the design on the floor first. Move pieces until you like the flow.
– Transfer the layout to the wall using tape. Start from a center line or a soft arc.
– Change the look as the year turns. Swap colors, add new shapes, or shift the arrangement.
Style tips
– A soft curve guides the eye.
– Group small butterflies near light to catch shadows.
– Mix flat and folded butterflies for texture.
– Keep the line light and airy.
Smart tips and limits
– If wall space is small, start with a short garland or a compact cluster.
– For busy rooms, limit to 12–18 butterflies to avoid clutter.
– Store leftovers flat in a folder so you can reuse them later.
Try a simple seasonal swap this weekend. You can refresh the room fast.
@media(max-width:480px){
27. Butterfly Picnic Scene

Want a playful wall piece that brightens a room? A butterfly picnic scene crafted from paper is a simple way to bring spring to life on your walls. It feels cheerful and inviting, and you can customize it to fit any space.
What you’ll need
– Paper butterflies in three sizes, plus paper flowers, birds, and tiny picnic elements (blanket, basket, fruit)
– Soft paints or colored paper for color variety
– Scissors, craft glue, and removable mounting putty
– A clean wall space or a prepared board to plan on
How to build it
– Plan the layout first. Decide where the sky will live, where the grass starts, and where the picnic will sit.
– Cut shapes in simple forms. Use large, medium, and small butterflies. Add a few flowers and a small bird or two. Cut a tiny checkered blanket and a small basket.
– Attach the background pieces. Stick butterflies higher in the air and closer to the blanket for depth.
– Place the picnic items. Put the blanket near the bottom of the scene, set the basket on the blanket, and scatter a few paper fruits.
– Add final touches. Tuck a couple of butterflies around the flowers and let some birds perch on the blanket edge.
– Check the balance. Step back and adjust so nothing looks crowded. Use removable putty so you can move pieces if needed.
Where to use this wall art
– It fits nicely in a child’s room, a play space, or a cozy living area.
– It creates a sense of whimsy without taking over the room.
Tips to make it last and look right
– Use light glue so pieces stay easy to reposition.
– Vary butterfly sizes and angles to suggest motion.
– Keep several pieces slightly off the wall to show depth.
FAQ
– Can I change this later? Yes. Use removable putty so you can rework the scene as you like.
– What if I’m short on space? Create a small corner vignette on a bare wall or use a narrow panel as a backdrop.
This butterfly picnic scene keeps things approachable and fun. You get a fresh, nature-inspired look with a gentle touch of whimsy that can lift your mood every day.
28. Butterflies with Quotes
If you want a wall that feels hopeful and calm, try pairing paper butterflies with quotes you love. This combo adds a soft mood and a daily nudge to smile. You get color, movement, and a message in one art piece. It’s simple to make and easy to adjust over time.
This decor idea works in bedrooms, hallways, or living rooms. It creates a gentle focus point that changes how a space feels.
How to Create:
– Pick short, meaningful quotes and print them in a clean, easy-to-read font.
– Make butterfly cutouts from colored paper or light cardstock, varying sizes so some wings look bigger.
– Match butterfly colors to the mood of each quote, using bright hues for energy and pastels for calm.
– Lay out the butterflies on a wall or a blank canvas, trying a loose cluster or a curved line.
– Attach them with safe glue, washi tape, or tiny nails, and use removable tape for renters.
This wall art acts as a daily breath of kindness. Every glance can lift your mood and spark a small conversation. It’s easy to tweak: swap quotes with the seasons, add a new butterfly, or shift the layout to fit a new space.
Tips for success:
– Keep spacing even for a tidy look.
– Mix sizes and stagger rows for natural flow.
– Swap out quotes seasonally to refresh the wall.
With a little color and care, your walls will feel alive and inviting.
29. Butterfly Patterns on Pillows
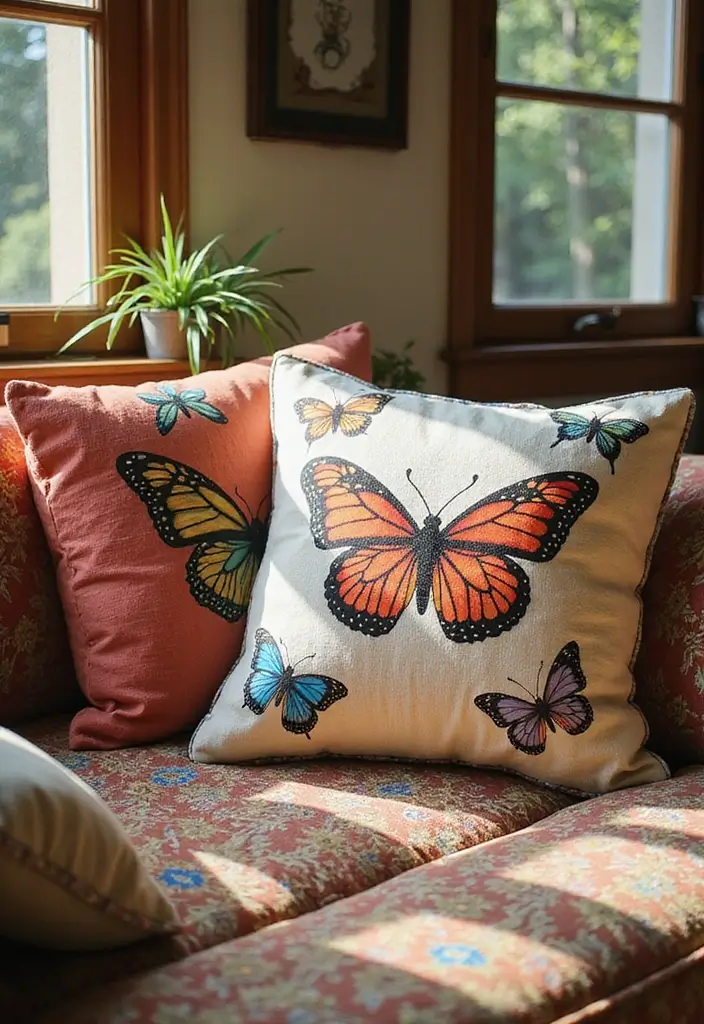
You’re looking to bring butterflies into your space, but you want a simple update. Pillow covers are an easy path. They let you test patterns, swap colors, and refresh the room with little effort.
How to Create
– Pick plain pillow covers in cotton or linen.
– Choose butterfly designs you love, printed or drawn by hand.
– Use fabric paint or fabric transfer paper to apply the design.
– If you use paint, tape a light stencil or freehand the wings. Let colors blend for a soft look.
– If you use transfers, lay the sheet on the fabric, rub to transfer, then heat set as directed.
Here is why mixing patterns and hues works. Try a light blue butterfly on a coral cover, or emerald wings on gray. Vary sizes to add interest.
Place two to three butterflies on a cover, or go with a large butterfly centered on the front. Keep the back plain so you can swap covers easily.
Optional embellishments can lift the look. Try tiny embroidered edges, or clip-on felt butterflies for texture. You can also add a matching throw blanket to tie the theme.
Care tips: heat set the paint if needed, and wash on a gentle cycle. Air dry when possible.
This approach adds texture and charm without grabbing all attention. It stays friendly to your budget and makes it easy to update with the seasons.
Next steps: test a bold color combo, or add a thin stitched outline for extra depth.
@media(max-width:480px){
30. Butterfly-Themed Table Setting
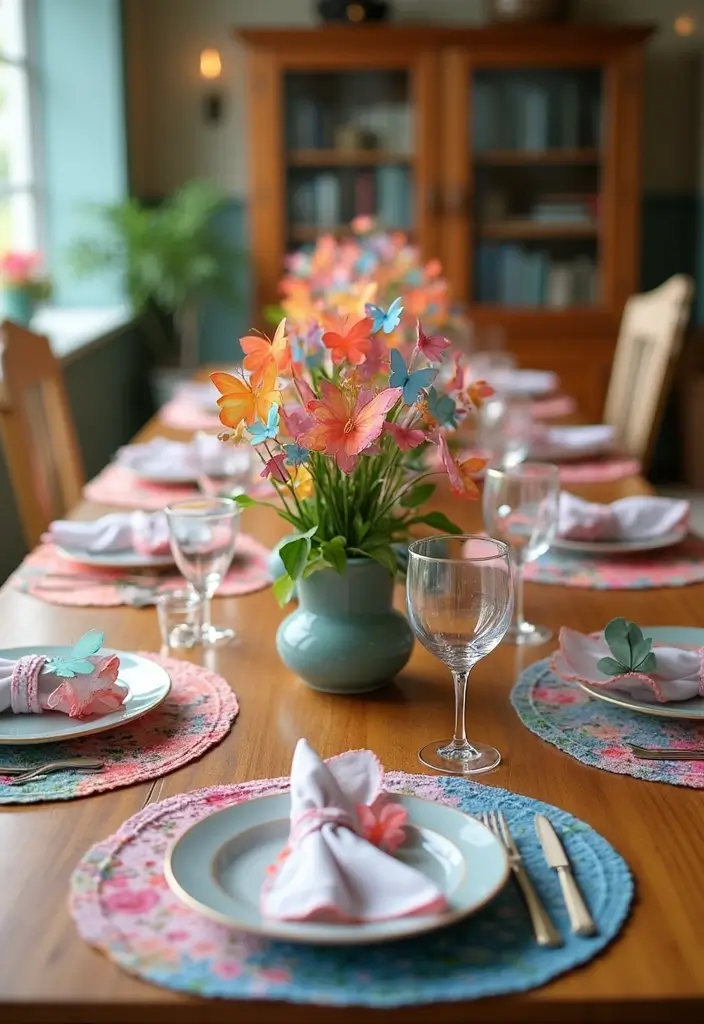
Looking for a simple way to make meals feel special? A butterfly themed table setting adds color and charm with little work. You can use paper butterflies that are cheap and easy to place. It works for casual dinners and small parties alike. Here is why it works. The flutter of paper wings catches light and makes the table feel lighter.
How to Create:
– Create butterfly placemats or a table runner.
– Add butterfly centerpieces by attaching cut-out butterflies to sticks or wires.
– Use butterfly napkin rings or place cards to finish the look.
– Place paper butterflies on the table at varying heights for depth.
– Create a light butterfly garland to run along the table edge.
Materials to gather:
– Colored paper or cardstock
– Scissors and glue
– Toothpicks or floral wires
– Tape or clips
– Optional markers for detail
For good effect, mix sizes and colors that match your plates and the room’s lighting. Keep the paper light so it stays easy to move during meals. If you have helpers, turn it into a mini craft project for kids and guests.
Next steps: use this idea for spring dinners, birthdays, or casual gatherings. It is a simple, affordable way to bring a nature touch to your dining space.
@media(max-width:480px){
Conclusion
Paper butterfly wall decor offers endless possibilities for creativity and personalization in your home. From vibrant garlands to enchanting mobiles, these ideas can easily bring a fresh vibe to any room.
No matter your style, there’s a butterfly DIY project that can resonate with your space, adding charm and character to your walls. Dive into these projects and let your imagination take flight!
Note: We aim to provide accurate product links, but some may occasionally expire or become unavailable. If this happens, please search directly on Amazon for the product or a suitable alternative.
This post contains Amazon affiliate links, meaning I may earn a small commission if you purchase through my links, at no extra cost to you.
Related Topics
paper butterfly wall decor
DIY wall art
eco-friendly crafts
creative home decor
beginner friendly
weekend projects
butterfly decorations
colorful wall designs
textured art
seasonal decor
easy DIY
whimsical accents