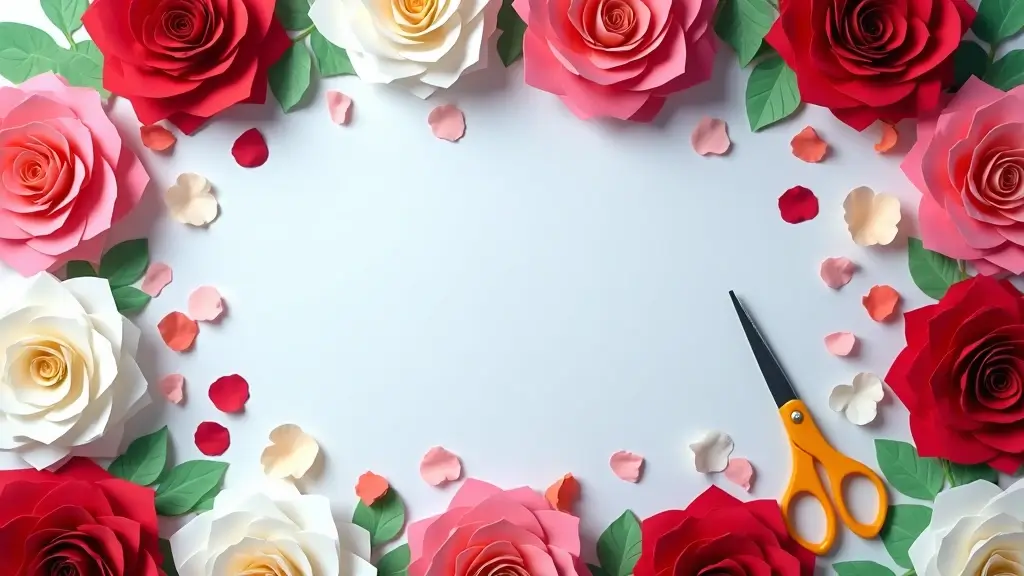
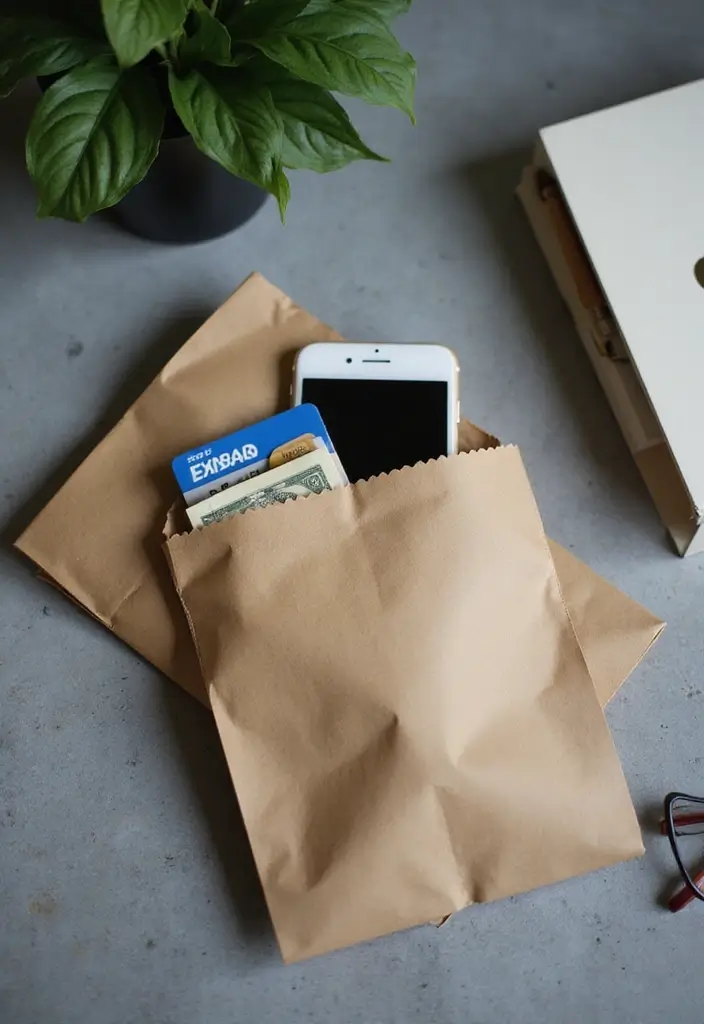
I put this together because I keep spotting paper bags after trips to the store, and I want to show a kinder, cheaper way to reuse them. You can turn a plain grocery bag into something stylish with just a bit of color and care. When you do, you cut waste and you end up with something useful you can use every day.
If you love quick, doable projects and care about the planet, this post is for you. You don’t need a fancy studio or a long shopping list. This is for parents, students, renters, and anyone who wants a warm, handmade vibe at home.
What you’ll get here are 29 stylish and sustainable ideas. From storage bins to wall art and gift toppers to plant holders, each project uses a paper bag and a few common supplies. I kept the steps simple so you can finish in an afternoon or a slow weekend.
Here is how it works. Start with a sturdy bag, pick a look—modern, cozy, or colorful—then choose a technique like painting, stamping, knotting, or decoupage. Finish with a seal so it lasts. You can swap colors to match a room, or add a tag with a name for a gift.
This matters because sustainable living is something you can do without a big budget. Reusing what you have cuts waste and gives your space a one-of-a-kind feel. It also sparks creativity for the whole family, letting kids learn by making and adults enjoy a small, tactile thrill as the bag transforms.
Here is why this will help you and what to do next. You’ll find clear steps you can use tonight. Next steps are simple: choose one idea, gather the basics—paper bags, scissors, glue, paint or markers—then start. If a project clicks, try another and mix ideas to fit your style. Tell me which bag idea you try first and how it goes.
1. Upcycled Gift Bags

You want gift wrap that looks good and cuts trash. Upcycled gift bags from old paper bags do just that. They feel personal and keep waste low. Here is why this idea fits busy families and budget-minded crafters. Let’s break it down and start.
– How to make upcycled gift bags
– Step 1: Cut the bag to the size you need. Fold the top and seal with a bit of tape so you get a sturdy bag.
– Step 2: Decorate with eco-friendly paints, stamps, or stickers. Pick water-based inks that dry clear and are safe for kids.
– Step 3: Make a tag from scrap paper or fabric. Attach it with natural twine or string for a rustic touch.
– Step 4: Add small natural details. A sprig of dried flower, a piece of twine, or a pine cone adds charm.
– Step 5: Turn this into a kid-friendly craft. Set up a small station with supplies and let them design.
– Ways to vary the look
Next steps for variety: Use different sizes and shapes for a lively set. Mix bold colors with soft tones. Try simple patterns or stripes. Keep it simple so it still feels nice.
– Style options
Styles you can try: clean modern looks; rustic farmhouse vibes; fun kid-friendly prints.
– Eco tips to keep it green
Keep it sustainable: reuse bags, clean paints well, and save scraps for tags. This keeps the project affordable and Earth-friendly.
If you want a quick answer: Yes, it holds light to medium gifts. For heavier items, reinforce the base with extra folds and tape.
2. Paper Bag Wall Art
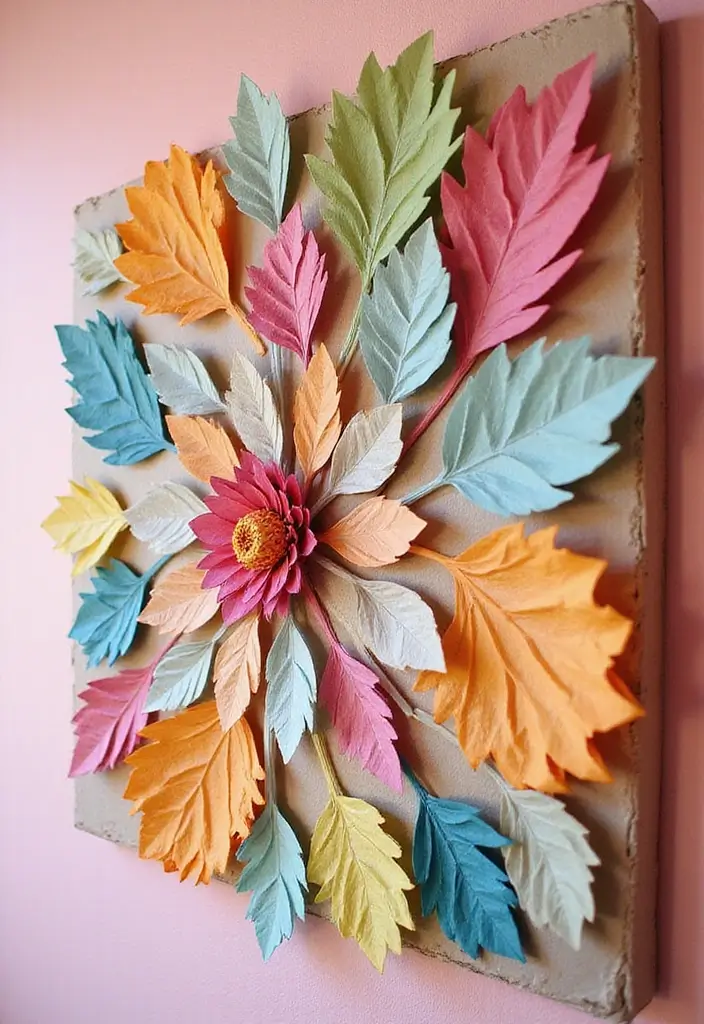
Want a bold wall piece that is affordable and eco friendly? Paper bag wall art fits the bill. It saves bags from the trash and adds character to any space. Here is why this works: bags cut easily, glue sticks well, and the result is light and safe for walls.
– You will need plain paper bags that are clean and flat.
– You will need scissors or a craft knife to cut shapes.
– You will need glue to secure pieces.
– You will need a display surface, like a canvas or a clean wall.
– You may add spray paint or natural dyes for color.
What you need
Next, here is how to do it.
– Start by flattening the bags so they lie flat.
– Cut circles, petals, or leaf shapes in different sizes.
– Arrange the shapes in a simple pattern or a loose cluster.
– Spray paint for bold color or leave natural for a soft look.
– Glue pieces in layers to create depth.
– Let the glue dry completely before hanging.
How to design it
– Keep a cohesive color palette across all shapes.
– Mix smooth and crinkled pieces for texture.
– Add a few larger shapes with smaller ones around them.
– Try a diagonal layout or a centered arrangement.
Care and display
– Place the art away from humidity or direct steam.
– Dust gently with a soft cloth.
– Finish with a simple frame or matte board if you like a neat look.
This craft is simple and stylish, and it signals you care about the planet. It’s a ready-made conversation starter that brightens any room.
3. Stylish Storage Baskets

Need stylish storage that fits a green mindset? Paper bag baskets give you a neat solution you can make at home. They use scraps and stay strong when you choose the right bags.
How to build your paper bag basket
– Gather sturdy lunch bags or thick grocery bags.
– Cut each bag into long strips about 1 inch wide.
– Start with a small base. Weave strips over and under to build the circle, then add more strips to form the sides.
– Keep the weave tight. It helps the basket hold its shape.
Finish and style
– Reinforce the bottom with a piece of cardboard for stability.
– Add handles made from ribbon, fabric scraps, or leftover bags.
– Paint the exterior or wrap with fabric for a comfy look.
– Experiment with color by painting stripes or wrapping with fabric strips.
Ways to use
Use these baskets for magazines, yarn, toys, or craft supplies. They look warm on shelves or under the sink.
Care tips
Let the basket dry fully if you wash it lightly. Avoid soaking, as paper can warp.
Next steps
Next steps: You can scale up with bigger bags or mix colors for a cheery family set. These baskets last with light use. They dry quickly after a spill.
@media(max-width:480px){
@media (max-width: 600px) {
.visual-quiz-iframe { min-height: 995px !important; height: 1100px !important; }
}
4. Paper Bag Planters
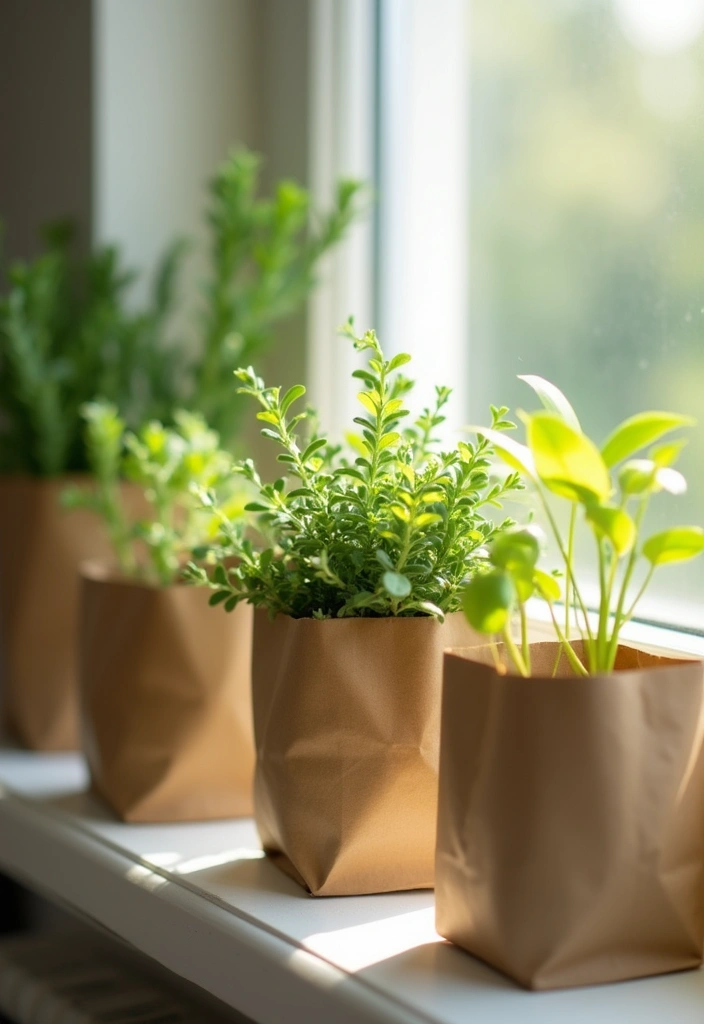
Why paper bag planters work
You want greenery that fits your space and your footprint. Paper bag planters can do that. Here is why they work: they are light, cheap, and easy to make.
– Start with a sturdy paper bag, preferably kraft or brown, to hold soil.
– Fold the top down to create a firm rim you can grip.
– Poke 2 to 4 drainage holes in the bottom so water can escape.
– Line the bag with a plastic bag or a plant liner to stop leaks and add durability.
– Fill with potting mix and plant your favorite small plant, herb, or succulent.
– Water gently and keep the bag on a tray to catch drips.
Step-by-step setup
Make them match your home.
– Decorate with acrylic paints or markers to suit your style.
– Add a simple seal or clear varnish to handle occasional watering.
– Write the plant name on a label so you can remember what you tucked in.
Herbs on a kitchen window sill are a popular combo.
– Use smaller bags for herbs so they stay tidy.
– Place them where they get bright, indirect light.
– Check moisture and water from the tray rather than soaking the soil.
Care tips for herbs
– Keep bags away from direct heat which can dry soil too fast.
– Use a tray or saucer under each bag to catch extra water.
– Move plants a bit as the sun shifts through the day.
Start today and build a little green corner you can be proud of.
@media(max-width:480px){
5. Decorative Paper Garlands

Need an affordable way to brighten a room without waste? Decorative paper bag garlands fit the bill. They’re simple to make and you can reuse them after the party. They store flat and travel well for your next event.
Here is why they work: you can color, shape, and size them to fit any theme.
– Shapes and colors: Cut bags into stars, hearts, circles, or triangles. Mix shapes and sizes for depth. Use colorful bags for a lively vibe or kraft bags for a soft, chic look. Add sparkle with metallic tape or foil.
– Assemble: Glue, tape, or sew the pieces together. If you sew, a long stitch in holes works best. For fast results, glue two shapes back-to-back and slide string between.
– Stringing: Punch holes or slots at the top and thread string. Leave gaps so each shape can swing a bit.
– Where to hang: Drape across a wall, above a window, or along a doorway. Try a line above a dessert table for party charm.
– Family tips: Let kids pick colors, cut shapes, and tie ends.
Next steps: measure the space, cut pieces, and thread. Your room will feel warmer in minutes.
@media(max-width:480px){
6. Creative Artwork Frames

Want a stylish frame that also cuts waste? Give paper bags a new life as photo frames. It’s simple, cheap, and personal. You can mix colors and textures to match any photo or room.
– What you’ll need
– A paper bag
– Scissors
– A ruler
– Glue or double-sided tape
– A photo or small artwork
– Steps
– Cut the bag into a rectangle that is a bit larger than your picture.
– Cut a window in the center, leaving about a 1 inch border.
– Fold the border inward to make a frame lip.
– Slip the photo behind the window and secure with tape from the back.
– Add a back stand or a small hanger with tape so it can sit or hang.
– Decorate
– Paint the frame, stamp a pattern, or add textures from the bag’s surface.
– Tie a ribbon, glue a button, or press a few beads for a little charm.
– Keep the look simple for a clean wall, or go bold for a playful shelf display.
– Tips
– Choose colors that match your space.
– Use clear tape on edges for neat lines.
– Try different bag sizes to fit 4×6 or 5×7 photos.
Why try this? It saves waste, adds a homemade touch, and makes great gifts when you place a favorite photo inside. It’s a small project with a big effect for any home.
7. Eco-Friendly Coasters

Eco-Friendly Coasters
Want coasters that protect your tables and spare the planet? Paper bag coasters check both boxes. They’re sturdy, inexpensive, and fun to customize.
– Cut circles or squares from thick paper bags.
– Stack two or three cutouts for extra thickness.
– Glue with white craft glue and press flat to dry.
– Let them dry fully before decorating.
– Paint simple patterns or solid colors to match your space.
– Seal with mod podge or a clear topcoat to resist moisture.
– Add a thin cork backing for grip and surface protection.
These steps turn a plain bag into durable, reusable coasters. They’re biodegradable and fit well in an eco-friendly home.
– Use different shapes for visual interest.
– Choose colors that echo your decor to make a cohesive set.
– Create a matching set for a clean, pulled-together look.
Next steps: grab a few bags, brushes, a glue bottle, and a sealant. Start with one coaster, then make a whole set for your next gathering. These DIY coasters make a great home project and a thoughtful, sustainable gift.
Care helps them last. Let the finish dry for 24 hours before use. Wipe with a damp cloth after a party. Store the set flat in a cool, dry place.
8. Charming Paper Bag Puppets
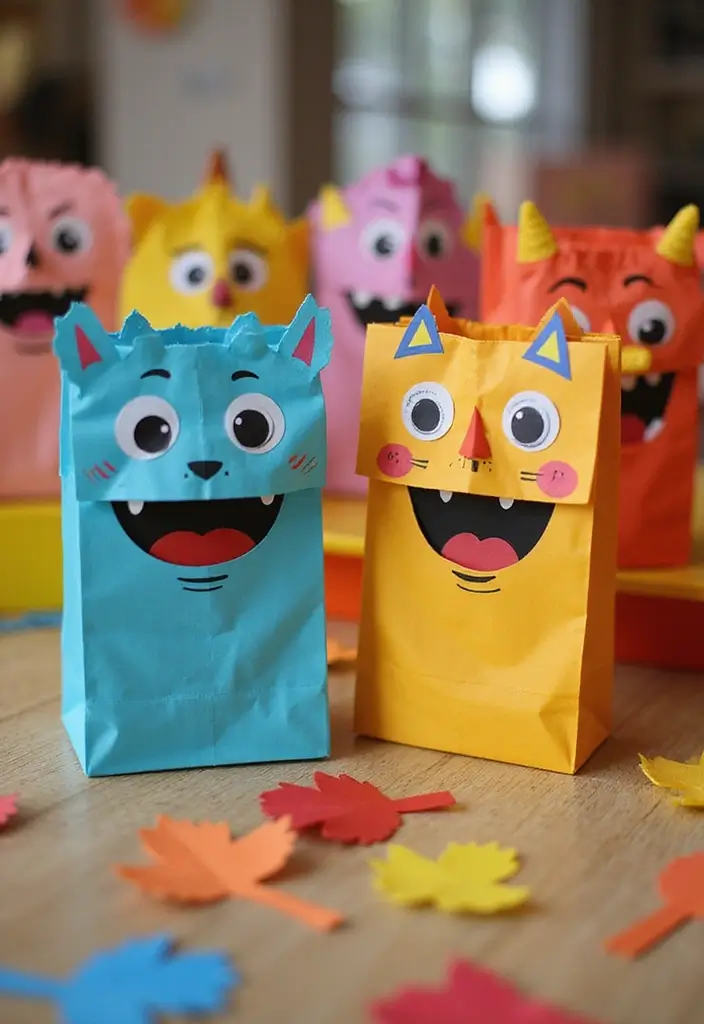
Charming Paper Bag Puppets
Want a quick, kid-friendly craft that uses what you already have at home? Paper bag puppets fit the bill. They turn a simple bag into a tiny character ready for a story or a playful show. You get a creative project and a little theater all in one.
Here is how you can make them today.
– Pick bags of different sizes so you can build a small puppet family or a whole cast.
– Color the face and clothes with markers, paints, or scraps of colored paper. Let kids choose bold shades for a lively look.
– Add eyes with googly eyes or small buttons. Draw mouths with a marker for quick expression.
– Use yarn for hair and fabric bits or felt for hats and outfits. Dress the puppets to fit your story.
– Attach the pieces with glue or tape. If you want to stand out, glue a stick to the bottom to transform the bag into a hand puppet.
– Try a mini puppet show to tell a short tale. A simple plot holds attention and builds confidence.
– Use puppets at parties or playdates to spark storytelling and cooperation.
– Encourage kids to dream up their own characters and outfits. Different sizes and colors spark imagination.
Tips and practical notes
– Reinforce the bag edges with a bit of tape to prevent tearing during play.
– Let paint dry fully before handling to avoid smears.
– Keep a small box or bin nearby for finished puppets so clean-up is easy.
With these steps, you’ll get a fun, sustainable activity that kids will want to repeat. It’s a simple way to recycle and spark storytelling in one go.
9. Elegant Paper Jewelry
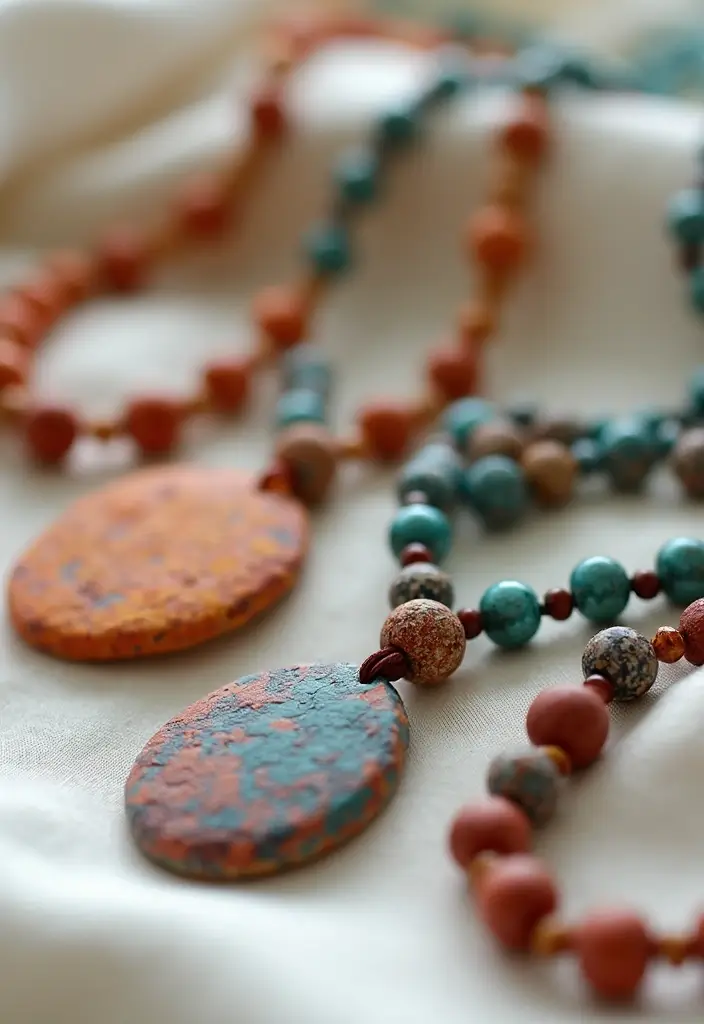
Elegant Paper Jewelry
You want jewelry that looks good and is eco-friendly. This DIY paper jewelry uses simple paper bags to make beads and pendants. You can turn bags into a necklace, a bracelet, or a charm set. It’s a stylish way to show your taste and your care for the Earth.
Here is why this works. Bags are light and easy to shape. You can color them or add decorations for a personal touch. The pieces stay affordable and unique.
What you’ll need
– Paper bags (uncoated works best)
– Scissors
– Ruler
– Pencil
– Craft glue or white glue
– Clear varnish or sealant
– String, thread, or thin jewelry wire
– Optional paints, markers, stamps
How to craft beads and pendants
– Cut bags into long strips or small shapes.
– Roll a strip tightly to form a bead; seal with glue.
– For pendants, cut a shape and fold it to add thickness; punch a tiny hole.
– Glue the ends and let dry.
– Apply a thin coat of varnish for gloss and durability.
Putting it together
– Thread beads on string or wire.
– Arrange a simple necklace, a bracelet, or a dangling charm.
Tips to level up
– Mix paper pieces with wood charms or metal spacers for contrast.
– Paint or stamp patterns before you roll for bold looks.
– Seal everything well to keep colors bright longer.
Care and practicality
– Wipe with a damp cloth and avoid soaking in water.
Next steps: grab a bag today and start small. You’ll surprise yourself with how stylish eco-friendly jewelry can be.
10. Functional Tablet or Phone Stand
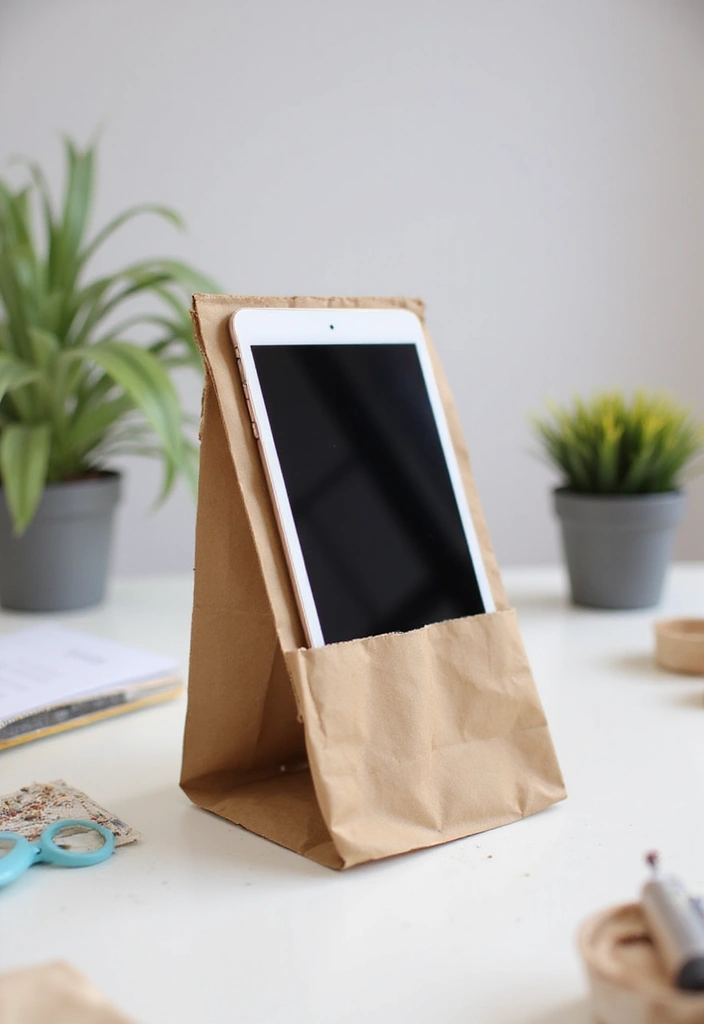
You’re looking for a simple, hands-free way to use your tablet or phone while you cook, bake, or read. A stand made from paper bags can give you that without costing a lot. It’s a small habit that helps your space stay neat and green. Here is why this works: it stays sturdy, light, and easy to adjust.
Materials
– 2 heavy paper bags
– Scissors, a ruler, a pencil
– Optional paints, markers, or tape to decorate
Build steps
– Flatten one bag and cut a wide tab along the top. This becomes the back support.
– Cut two small side panels from other bags. These sit on the base to hold the device.
– Fold the pieces into a triangle that can stand on your desk. Press the joints to lock them in place.
– Add a small lip at the bottom so the screen won’t slide off.
Test and finish
– Place your tablet or phone in portrait or landscape. If it tilts, trim a bit more or use a heavier bag.
– Decorate with color, patterns, or labels that match your space. A little paint makes it feel like a real desk accessory.
Uses
– Perfect for scanning recipes, following tutorials, or watching videos hands-free.
– Great for video calls or reading guides while you work.
@media(max-width:480px){
11. Paper Bag Bookmark

Are you looking for a simple, eco friendly way to mark your pages? A paper bag bookmark fits the bill. It’s cheap, creative, and kind to the planet. You can turn a plain bag into a unique accessory that matches your mood, your book, and your style.
Here is what you need to get started:
– A clean paper bag
– Scissors
– Markers, pens, or stickers
– Clear tape or a basic laminate
– A ribbon or string for the top
Let’s break it down into easy steps:
1. Cut a long strip from the bag.
2. Trim the strip to your preferred width and length.
3. Decorate with drawings, quotes, stickers, or color blocks.
4. Seal with tape or laminate so it lasts.
5. Punch a small hole at the top edge.
6. Tie a ribbon or string through the hole.
Design ideas
– Draw a tiny scene like a tree, cup of tea, or a pet
– Write a favorite line in clear letters
– Add a simple border with dots or stars
– Use washi tape strips for a bright, modern look
Pro tips
– Use stronger clear tape if you plan to carry it everywhere
– Round the corners after sealing for safety
– These bookmarks make thoughtful gifts for book lovers
Play with it, then reuse more paper bags for other crafts. Share your designs with friends and inspire others.
@media(max-width:480px){
12. Paper Bag Party Hats
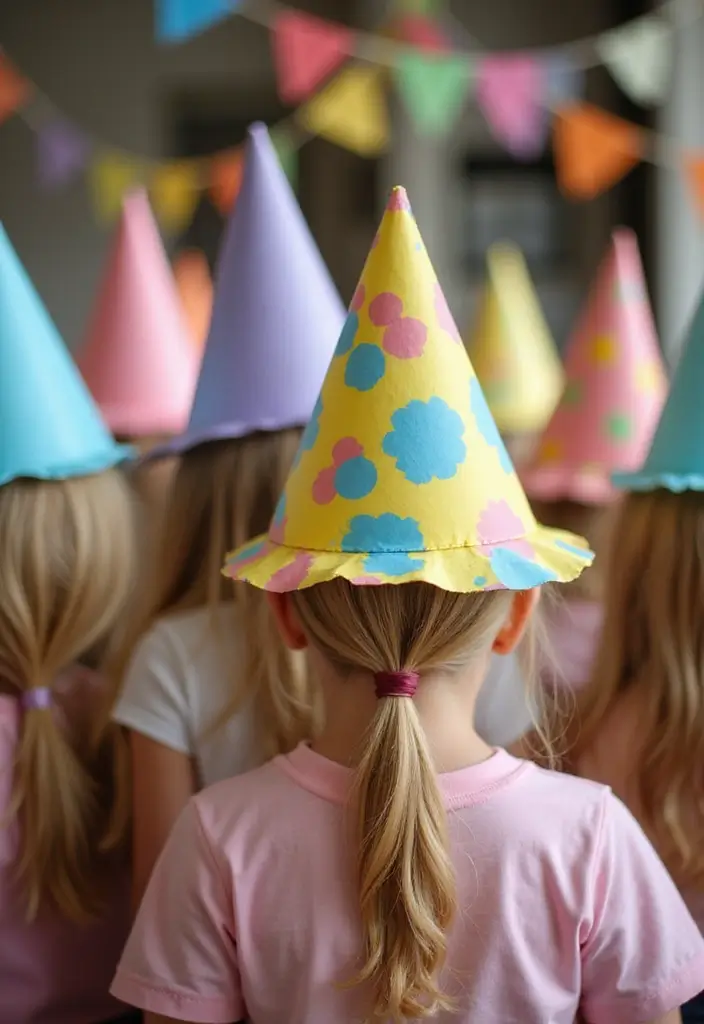
Why you want paper bag party hats
Planning a party? Paper bag party hats give a quick, low‑cost, eco friendly touch. A stack of plain bags becomes bright, wearable cones for every guest.
What you need
– Paper bags (lunch or grocery)
– Scissors, tape or glue
– Elastic cord or string
– Paints, markers, stickers, a little glitter
Here is how you do it
– Cut a bag into a cone, leaving the seam a bit wide so it slides on easily.
– Tape or glue the seam to finish the cone.
– Punch a small hole on each side and thread elastic to keep it on.
– Let guests decorate with color and shapes.
Here is why it works for you
– It uses recycled materials and cuts waste.
– It adds a personal touch your party needs.
Tips to level up
– Use bold colors, stripes, or dots.
– Personalize with names or simple designs.
– Add a feather or pom pom for texture.
Common questions
– Can adults wear them? Yes, with a little elastic.
– How to store after the party? Lay flat, then re-pack for next time.
Next steps
Try this at your next gathering. Snap photos and enjoy the playful, sustainable vibe.
@media(max-width:480px){
13. Paper Bag Scrapbook

Want a simple, meaningful way to save family memories? A paper bag scrapbook uses everyday bags as pages. You get a unique book that’s easy to make and gentle on the planet. It fits kid art, travel notes, and photos.
What you’ll need
– Paper bags in different sizes, scissors, glue, tape, photos, drawings, and markers
– Optional extras: clips, washi tape, a hole punch, binder rings, and a small notebook for extra notes
How to build it
– Plan pages: pick a theme for each bag page, such as a trip, a birthday, or a nature walk
– Build a page: flatten a bag, decorate front and back, cut a pocket, glue sides
– Add memories: tuck in photos, stubs, notes
– Bind the book: punch two holes and tie, or use a ring binder
– Make it interactive: add pull tabs, flaps, or mini envelopes
– Finish and store: add a cover, a title, and keep on a shelf
Tips
– Theme ideas: birthdays, holidays, field trips, nature days
– Make a cover page with the year and a favorite photo
– Vary bag sizes and colors to change the look
– Let kids sign pages and add their own touches
– Use pockets for memorabilia and date each page
– Start a small notes section for dates and memories
Keep it simple and fun. It’s a green keepsake you can grow.
@media(max-width:480px){
14. Paper Bag Seed Starters

Want an easy, cheap way to start seeds and cut plastic from your garden? Paper bag seed starters do the job. They use waste you already have and give you sturdy little pots.
What you need
– Clean, ink-free paper bags
– Scissors, a tray, seed starter mix
– A marker for labeling
Step by step
– Cut a bag into a 4 by 4 inch square.
– Fold the square into a small pot with a flat bottom.
– Fill halfway with soil.
– Place 1 seed, or 2 tiny seeds. Lightly cover.
– Water gently. Keep the soil moist, not soggy.
– Set the pots on a tray. When roots show at the bottom, they are ready to move.
Transplant plan
– Plant the whole pot in the ground or a bigger pot. Paper will soften in soil and feed the roots.
Tips to succeed
– Color code or label each plant type.
– Write plant name and date on the pot.
– Check ink safety. Skip bags with heavy ink.
– Make extra pots for crowded trays.
Why it helps
– Eco friendly, budget friendly, and great for greens, herbs, and small veggies.
15. Paper Bag Table Runner

Here is why a paper bag table runner is a smart craft for your home. It adds texture, color, and a personal touch to meals without a lot of cost.
What you’ll need
– Flat paper bags
– Craft glue and scissors
– Paint, stamps, or markers
– Clear sealant or spray finish
– Optional: ribbon, twine, fabric backing
Step-by-step prep
– Flatten bags and join them end to end to match your table length, neatly.
– Glue the edges to form a single long strip. Let it dry completely.
Decoration ideas
– Add color with paint or stamps. Try stripes or chevrons.
– Keep the design simple for a clean look.
– Echo your plates or napkins with matching patterns.
Seal and protect
– Apply a clear finish to guard against spills. Let it dry fully.
– For extra protection, place a thin liner of parchment or fabric under the runner.
Care and styling tips
– Blot spills and wipe with a damp cloth.
– Use the runner on dry surfaces to avoid soaking.
Style variations
– Mix bag tones for contrast. Add fringe along the sides.
– Create a seasonal look with red and green or a touch of gold.
Next steps
– Set the runner on your table, add a simple centerpiece, and enjoy a handmade, eco-conscious tablescape. Snap a quick photo to share with friends.
@media (max-width: 600px) {
.normal-quiz-iframe { min-height: 570px !important; height: 570px !important; }
}
16. Eco-Friendly Wall Organizer
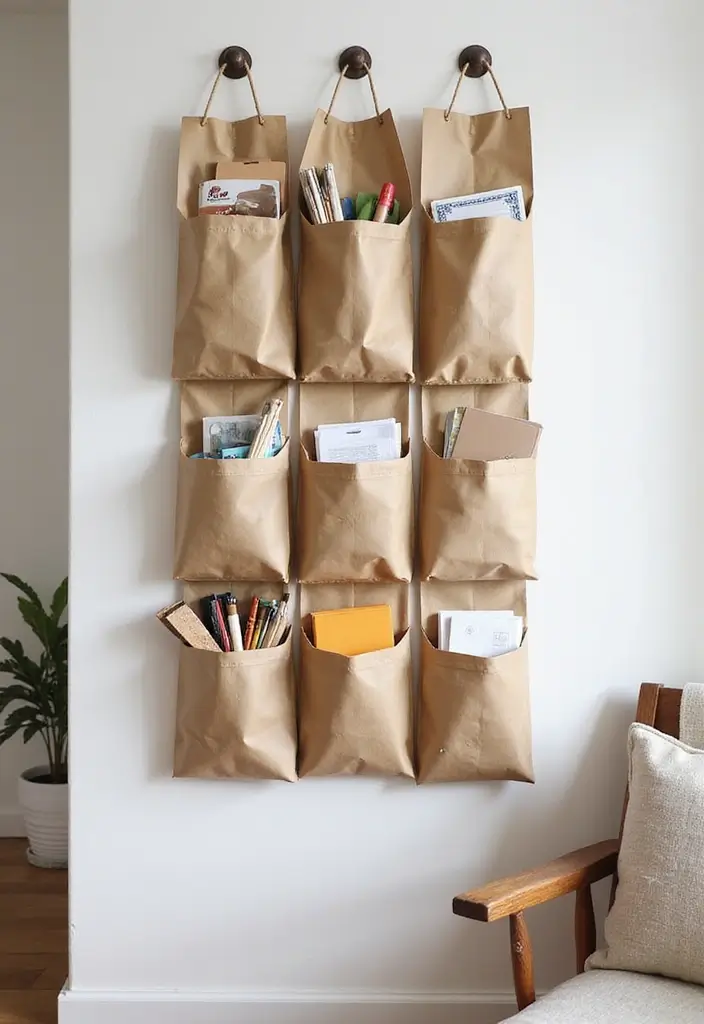
Want a neat space without buying new furniture? A wall organizer made from paper bags can do the job. It is an eco-friendly wall organizer that uses items you already have. It gives you quick access to letters, art supplies, and small tools while keeping surfaces clear.
Here is why this works and how to build it.
What you need
– Paper bags, flattened
– A wood board or sturdy backing
– Scissors, glue, or tape
– A ruler and pencil
– Paint, markers, or fabric scraps for style
Steps
– Cut each bag into a pocket. Fold the top edge to make a small lip.
– Attach pockets to the board with glue or tape in neat columns.
– Let the pockets dry before loading them with items.
Ways to customize
– Vary pocket sizes for letters, receipts, or pens.
– Add color with paint or patterned tape. Bold patterns add flair.
– Clip hooks under pockets for keys or chargers.
Practical notes
– This method reuses paper bags and cuts clutter fast.
– It stays light and easy to move if you rearrange a room.
– Reinforce dull edges with a strip of cardboard if pockets tear.
Next steps
– Mount the board on wall nails or screws at a reachable height.
– Keep a small cleanup cloth handy to wipe dust from the surface.
@media(max-width:480px){
17. Paper Bag Trivets
You want a stylish, eco friendly way to protect your counters. Paper bag trivets do that. They turn waste into a pretty, practical tool. Let me show you a simple method you can finish in one afternoon.
What you need
– Paper bags (plain brown or printed)
– Scissors
– Strong craft glue
– A few colors of acrylic paint or markers
– Clear sealant (optional for extra durability)
How to make it
1) Cut each bag into long strips about 1 to 2 cm wide.
2) Braid several strips to form sturdy cords.
3) Coil the cords into a circle or square. Glue the ends to hold shape.
4) Layer and glue more braids to build the size you want.
5) Let it dry completely. If you want color, paint the surface now and let it dry. Finish with a clear sealant if you plan to wash it gently.
Tips and variations
– Try 3 or 4 strand braids for different textures.
– Mix bag colors or use patterned bags for a unique look.
– Add a fringe or a border for flair.
Keep in mind
These trivets are good for warm dishes on the table. They are not heat proof forever, so avoid direct flame. With care, they last a while.
Share your finished piece with friends. A well colored trivet makes a nice gift.
@media(max-width:480px){
18. Paper Bag Keychains
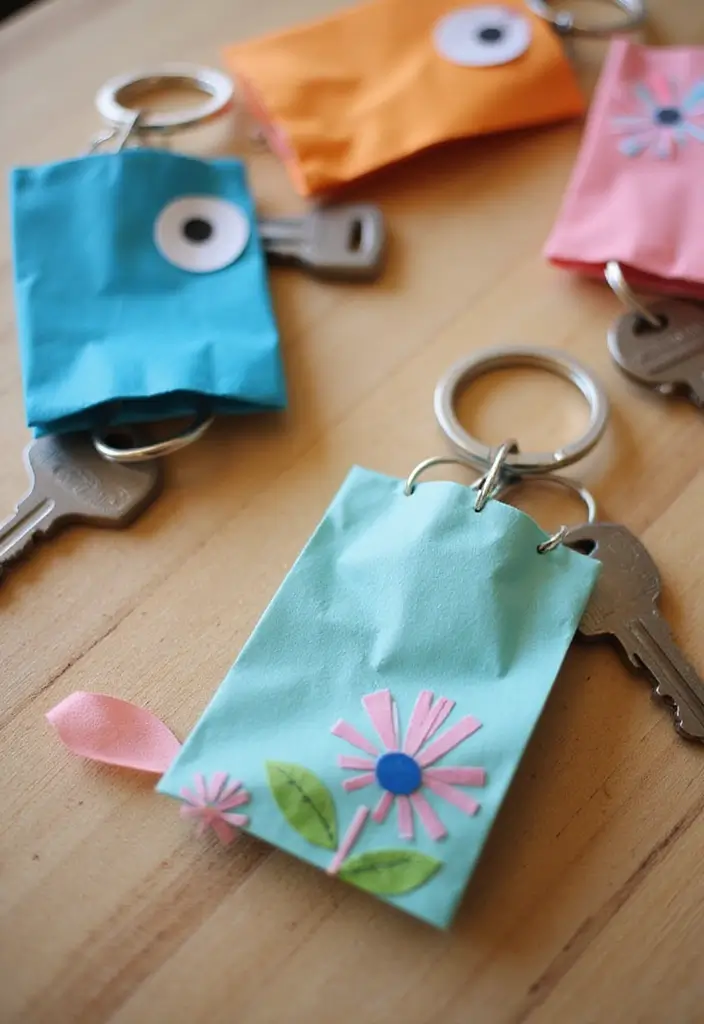
Want a cute, cheap way to personalize your keys? Paper bag keychains fit the bill. They use recycled materials, are light to carry, and you can whip them up in minutes. You get a small project with a big payoff. Here is why this craft works.
What you’ll need
– Sturdy paper bag from the store
– Scissors or a craft knife
– Markers, paint, or stickers
– Clear waterproof sealant or spray
– Hole punch and a small keyring or jump ring
– Beads, tassels, or cord for flair
Steps to make it
– Cut a small shape from the bag
– Decorate the shape with colors and a name or theme
– Seal the piece with a clear coating and let it dry
– Punch a hole near the edge and attach the keyring
– Add beads or a cord to finish the look
If you are helping kids, keep designs simple and let them choose colors. The shapes stay light, so they won’t bulk up your keys. This craft works well for party favors, birthdays, or a small gift.
Note that paper can wear in rain. Keep keychains indoors or add an extra coat of sealant for more durability. Next steps: plan a batch for an event or make a set as a thoughtful, low-waste gift.
@media(max-width:480px){
19. Paper Bag Notebooks
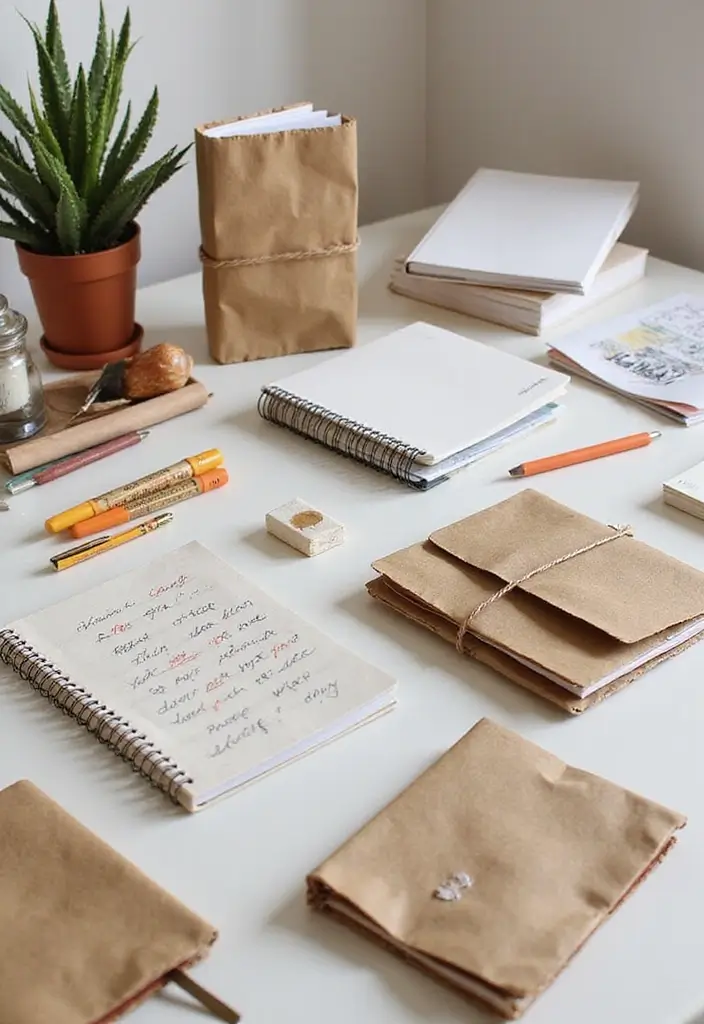
Materials and tools
– Grab one or two sturdy paper bags.
– Gather blank paper sheets, cut to size.
– Have a hole punch ready.
– Bind with twine or thread.
– Scissors and markers for trim and decoration.
– Have a ruler handy to trim evenly.
Steps to assemble
– Stack pages inside the bag.
– Fold the bag to cover the pages.
– Punch holes along the spine.
– Thread twine through holes to bind.
– Tie a knot and trim.
Decoration ideas
– Decorate with markers or paint.
– Add a back-cover pocket for notes.
– Bind with colored thread for extra style.
Tips
– Try different sizes for notes and sketches.
– Use thicker pages for durability.
– Label the spine with a name or date for quick finding.
Limitations
– The binding is simple.
– It may loosen with use.
Next steps
– Start small, then grow.
– Share photos of your notebook design with friends.
@media(max-width:480px){
20. Paper Bag Wreath
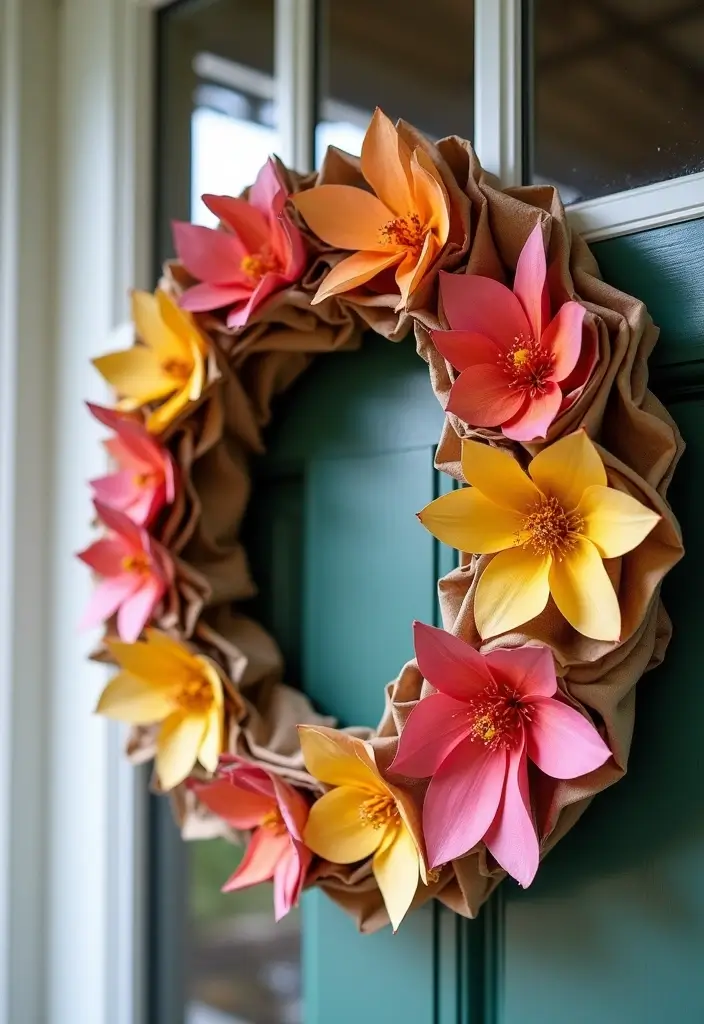
Looking for a wreath that catches the eye and stays kind to the planet? A paper bag wreath fits the bill. It’s simple to make, inexpensive, and surprisingly chic. You can go bright and bold or soft and neutral. Hang it on your door or wall to greet guests with a sustainable touch. Here is why this idea works: simple bags hold color well, and turning them into petals adds texture and depth fast.
What you need
– Paper bags (brown or colored)
– A circular base (cardboard, foam, or a wire ring)
– Scissors
– Glue or a hot glue gun
– Optional extras: ribbons, faux flowers, leaves, or pinecones
How to make it
1) Gather your supplies and pick a base that fits your space. A larger circle creates a bold statement; a small one feels cozy.
2) Cut the bags into petals. Flatten a bag, then slice into several petal shapes. The more petals you cut, the fuller your wreath becomes.
3) Glue petals onto the base. Start at the outer edge and work in. Layer petals for depth and keep the spacing even.
4) Choose a color theme. Mix neutrals for a calm look or add a few bright petals for a pop of mood. You can also paint the base first for extra polish.
5) Add embellishments. Tie a ribbon, tuck faux flowers in, or add tiny leaves for texture.
6) Hang the wreath where you’ll see it daily. Swap in seasonal accents as the year changes.
Next steps: keep this craft simple, swap colors with the seasons, and enjoy a stylish, sustainable display.
@media(max-width:480px){
21. Paper Bag Curtains
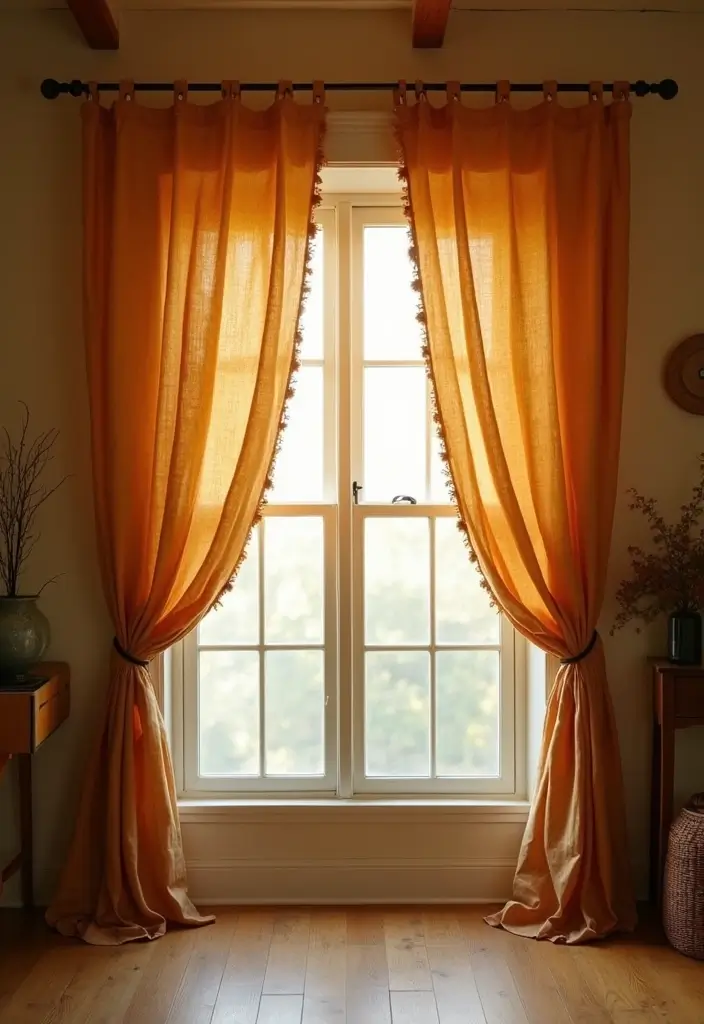
You want windows that look finished without a big budget. Paper bag curtains add texture, warmth, and a cozy, rustic feel. They save waste, are simple to make, and let in soft light. You choose the level of privacy you need.
Here is how to do it.
Materials
– Paper bags
– Scissors
– A thin curtain rod or string
– Needle and thread or a simple knot method
– Optional dye or fabric paint
– Ruler or tape for even spacing
Two simple methods
– Fringe curtain: cut bags into long strips about 1 inch wide. Tie strips to a string or rod at 1-inch intervals. Let the fringe hang freely for a relaxed look.
– Weave panel: open a bag flat. Cut strips and weave them over a thin loom or string to form a light, textured panel.
Color and finish
– Dye strips with fabric dye for a bold look, or use tea or coffee for a warm, natural tone. Layer different colors for depth.
Install and style
– Use a tension rod in the window frame. Slide the top of the fringe or the woven panel onto the rod. Trim to fit.
– For more privacy, place a sheer layer behind the bag curtain.
Care and limits
– Brush or shake out dust. Air dry if you dye. Handle gently — these are light and can tear if pulled.
– They do not block all light or insulate well. They shine for mood and style more than function.
Next steps
– For a fuller look, plan 30–50 strips per panel depending on width.
– Keep a few extra bags for patches or changes.
22. Paper Bag Magnets

You want a small project that’s easy, keeps a wasteful habit from piling up, and adds a cute touch to your fridge. Paper bag magnets do all that. They turn old bags into mini works of art you can touch and use. It’s a family-friendly task, and you’ll end up with magnets you’re proud to show off.
Materials
– Paper bags (brown or colored)
– Lightweight magnets or magnetic discs
– Strong craft glue or a hot glue gun (adult supervision recommended)
– Scissors
– Markers, stickers, and bits of felt for decoration
Here is why these materials work. Paper bags are light and easy to cut. Magnets let your art cling to steel doors. A strong glue fixes the magnet so it lasts. Now, let’s break it down.
Steps
– Cut simple shapes from a bag. Hearts, stars, animals, or abstract blocks work well.
– Decorate the front. Color with markers, add stickers, or glue on felt for texture.
– Glue a magnet to the back. Apply a thin, even layer and press flat. Let it dry completely before use.
– Finish by testing on your fridge. If it’s loose, add a second dab of glue and let it cure.
Tips and ideas
– Use a mix of shapes for a playful set.
– Pair felt with paint for a soft, tactile look.
– Clear sealant keeps colors bright and helps durability.
– Display photos or notes between magnets for a rotating gallery.
Next steps: make a mini collection for family members, or create a themed set for holidays. These DIY magnets show how small, eco friendly ideas can brighten everyday spaces.
@media(max-width:480px){
23. Paper Bag Puzzles
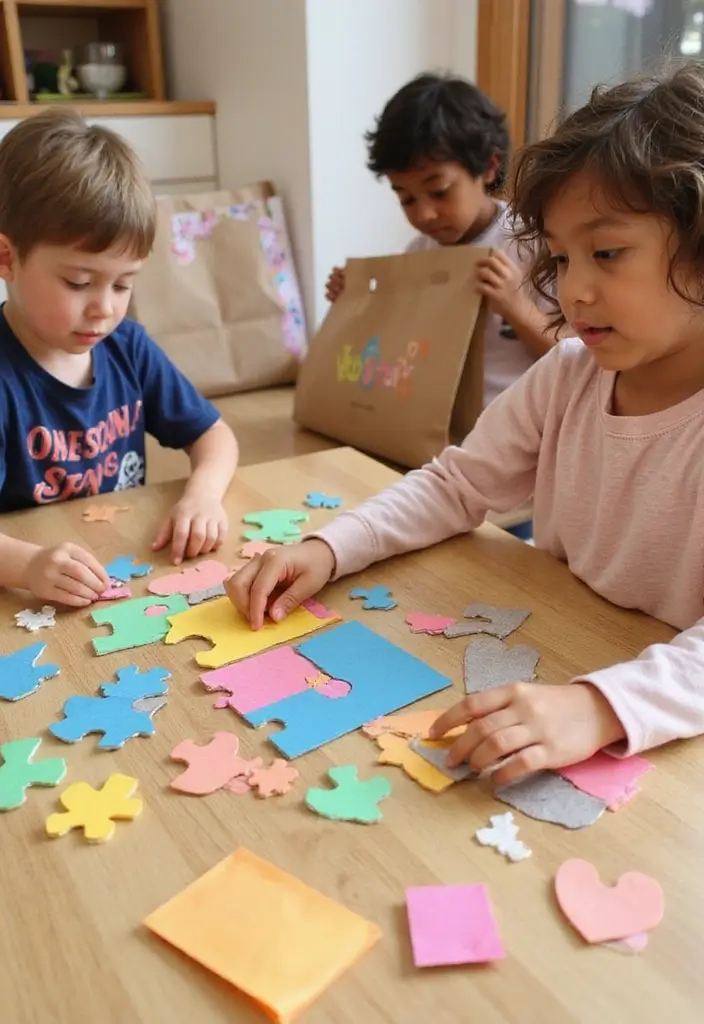
Want a calm, eco-friendly DIY activity that keeps kids busy indoors? Paper bag puzzles do that and more. They turn simple bags into quick brain games that spark thinking and creativity.
Here is how to make them:
– Use thick bags. A sturdy grocery bag or brown kraft bag lasts longer.
– Plan a small scene or shapes on the bag before cutting. This gives you a clear puzzle to solve.
– Cut the bag into puzzle pieces.
– Decorate the pieces. Color each piece with markers or crayons.
– Try themed puzzles. Animals, landscapes, or objects work well.
– Keep it simple for younger kids. Start with one bag, or use two.
How to play and store:
– Mix the pieces in a box or a decorated bag.
– Kids rebuild the scene, then smile at the finished picture.
– When done, store all pieces in the same decorated bag for quick cleanup.
Here is why this works:
– It fits a rainy day indoors and uses items you already have.
– It builds fine motor skills and reasoning.
– It shows recycling in action.
Next steps: grab bags, pick a theme, start puzzling. You’ll have a fun, sustainable activity in minutes.
@media(max-width:480px){
24. Paper Bag Business Card Holder

Do you need a simple, eco-friendly way to share your cards at events? A paper bag business card holder can do the job. It’s inexpensive, easy to customize, and no plastic touches your contacts.
What you need
– One sturdy paper bag, clean and flat
– Scissors, a ruler, and some glue or tape
– Optional decorations: markers, washi tape, or a small clasp
How to make it
– Start by flattening the bag. Trim it into a neat rectangle about 6 by 4 inches.
– Fold to create a small wallet shape. A front pocket and a shallow inner slot will hold most standard cards.
– Glue or tape the sides to form a pocket. Leave a thin top edge so cards slide in easily.
– If you want more style, add a decorative clasp, a ribbon, or color with markers. Let glue dry before use.
Personalize and strengthen
– Use two bags for extra strength. Glue them back to back for a firmer holder.
– Match colors to your brand by choosing specific markers or tape.
– Try a soft lining inside for better card grip. A little texture helps keep cards from slipping out.
Why this works
– It’s sustainable, lightweight, and travels well.
– It makes a unique first impression at meetings.
– It’s a practical DIY project you can finish in minutes.
Next steps
– Test how many cards fit and adjust the pocket size if needed. Then start sharing your cards with confidence.
25. Paper Bag Flower Bouquets
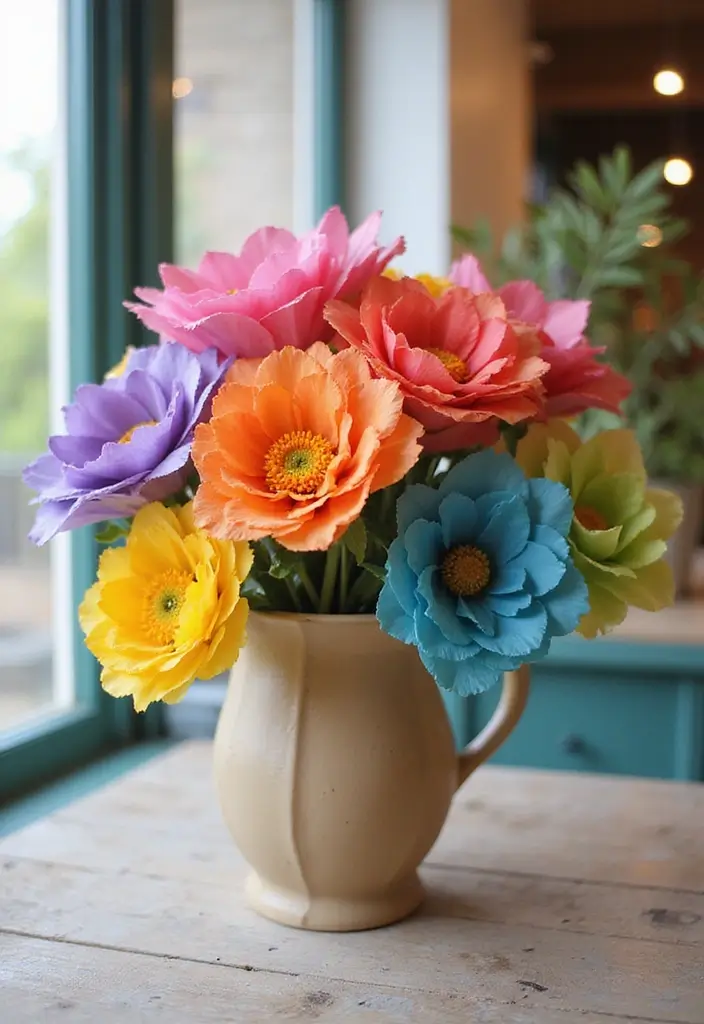
Want a bouquet that lasts and helps the planet? Paper bag flower bouquets stay bright and bring color to any room for a long time. They’re easy to make, and you can swap colors to fit any vibe. Here is why this craft fits today’s style: it’s budget-friendly, customizable, and kind to the Earth.
Here is how you can make them.
– Paper bags work as petals. Cut them into flower shapes.
– Layer petals to build a full bloom. A few layers look rich and sturdy.
– Add color with paint, markers, or tissue paper. You can mix tones for a lively look.
– Use floral wire for stems. Wrap the wire with tape so it stays firm.
– Finish with a simple tag or string. Personal messages make the bouquet feel special.
To assemble the bouquet, start with a small paper bag center. Glue the petals around the center to form a flower. Secure the bloom to the stem wire. Repeat to create several flowers you like. Then gather the stems into a hand‑held bouquet and tie them together. You can trim the stems to the length you want. This keeps the arrangement neat and ready to display.
Tips and ideas to try next: choose a olive, pink, and cream color mix for a soft look. Go bold with red, orange, and yellow for a sunny vibe. Add paper leaves for depth. Use brown kraft bags for a rustic feel.
Next steps: set up a quick workspace, cut a few shapes, and see which combos you love. This eco-friendly paper bag bouquet is a simple, stylish gift or home decor you can keep making again and again.
26. Paper Bag Phone Wallets
Are you looking for a cheap, eco-friendly way to carry your phone and a few cards? A paper bag phone wallet fits the need. It keeps your pockets light and cuts waste. You can make it in minutes with supplies you already have.
– What you start with: a sturdy paper bag. Flatten it and trim it to fit your phone and essentials.
– How to shape: cut a front pocket, fold the bottom up for a card slot, and seal with clear glue so it stays shut.
– Finishing touches: decorate with color, pattern, or stickers. Let it dry completely. A thin coat of clear glue helps it last longer.
– Wearing it: add a strap. Tie a string or cord to secure it on your wrist or hook it to a bag.
– Practical checks: test the fit with your phone. Add a second layer for strength. Make a small notch to grab your phone quickly.
– Care and use: keep it dry and clean with a soft cloth. It stays renewable and handy.
Next steps: try a quick prototype with a scrap bag. Record the result, then try a bigger version if needed. Want more tips? Keep experimenting and share your results online.
@media(max-width:480px){
27. Paper Bag Table Decorations

Paper Bag Table Decorations you can actually make
If you want table decor that looks stylish and stays kind to the planet, this idea is for you. Paper bag decorations are easy, affordable, and totally customizable. They work for everyday meals and big events alike.
What you’ll need
– Paper bags (flat or light colored)
– Scissors
– Tape or glue
– Biodegradable glitter
– String or ribbon
– Small jars or vases for centerpieces (optional)
– Seasonal accents like dried leaves or berry sprigs (optional)
How to make shapes and accents
Here is why shapes matter. They shape the mood of your table. First, flatten a bag and cut out simple shapes such as stars, hearts, or leaves. Next, you can scatter these shapes across the table for a casual look, or group a few together to form a small centerpiece. If you want a formal touch, fold a bag into tiny lanterns or stack a few shapes around a jar to make a mini sculpture. Add a dab of glue and a sprinkle of biodegradable glitter for a gentle sparkle.
Arranging tips you can use
Place the shapes in a loose pattern so guests can see and talk over them. Mix shapes with a few real leaves or flowers for texture. If you have a centerpiece jar, fill it with tissue and tuck a star or heart on top to echo your theme. Change the colors and shapes to fit the season or holiday.
Simple finishers
– Keep glitter to a minimal, eco-friendly sparkle
– Turn it into a family project by inviting everyone to cut or place shapes
– Tweak the look for different events or seasons
Next steps: try a small test layout first, then slowly expand to a full tablescape. With Paper Bag Table Decorations you get a chic, sustainable touch that’s easy to pull off.
@media(max-width:480px){
28. Paper Bag Face Masks

If you want a quick, cheap craft that sparks imagination, paper bag face masks fit the bill. They’re perfect for playtime or themed events and are not meant to protect you from germs.
Step-by-step guide
Here is how you can turn a bag into a wearable mask.
– Pick a bag and plan the shape you want.
– Cut out eye holes and trim the edges so it sits comfortably on a child’s face.
– Decorate with safe tools. Use non-toxic markers, colored paper, stickers, or fabric scraps.
– Add a strap. Tape or punch small holes and weave elastic or string so the mask stays put.
– Test the fit and adjust. Make sure the mask sits away from the eyes and mouth and feels comfortable.
Get creative with themes. Turn the mask into a superhero, a funny animal, or a fancy carnival mask. You can layer colors, add texture with tissue paper, or glue on googly eyes.
Safety tips: supervise scissors use, keep edges smooth, and avoid small decorations that can come loose. If a child dislikes the feel, swap materials or skip the strap.
Set up a mini craft station, pick a theme, and have a dress-up day. These paper bag masks bring simple play to life without a big mess or cost.
29. Personalized Paper Bag Notepads

You need a note pad that’s cheap and easy on the planet. This idea gives you both. Turn plain paper bags into personalized notepads you can use at work, at home, or give as a small gift.
– It looks one of a kind.
– It cuts waste.
– It fits quick ideas, reminders, or quick doodles.
What you will need
– A few paper bags in different styles
– Printer paper or light notebook sheets cut to size
– Scissors and glue or a small tape runner
– A hole punch, needle, or mini stapler
– Twine, string, or binder rings
– Markers, stamps, or stickers for decoration
How to make
1) Cut a bag into a cover panel.
2) Cut pages to match the cover.
3) Stack pages, then add the cover on top.
4) Bind the spine with two or three holes and twine, or with binder rings.
5) Decorate the cover with a drawing or a short message.
6) Trim rough edges and press flat.
Tips
– Use bags with rough texture for a rustic look.
– Mix sizes to build a small pad set.
– Give a set of three as a simple gift.
Next steps: keep these notepads in your desk or bag. They’re handy, unique, and easy to make.
@media(max-width:480px){
Conclusion

These 29 paper bag crafts not only offer a sustainable way to express your creativity but also bring character to your home. Each project celebrates upcycling, proving that eco-friendly choices can be stylish and functional.
Whether you’re making decor, gifts, or everyday items, there’s plenty of inspiration to spark your DIY journey. Dig into your collection of paper bags and let your imagination run wild!
Note: We aim to provide accurate product links, but some may occasionally expire or become unavailable. If this happens, please search directly on Amazon for the product or a suitable alternative.
This post contains Amazon affiliate links, meaning I may earn a small commission if you purchase through my links, at no extra cost to you.
Related Topics
paper bag crafts
eco-friendly decor
upcycled projects
sustainable DIY
creative reuse
kids crafts
budget-friendly
home organization
easy crafts
decorative ideas
environmentally friendly
crafting with paper