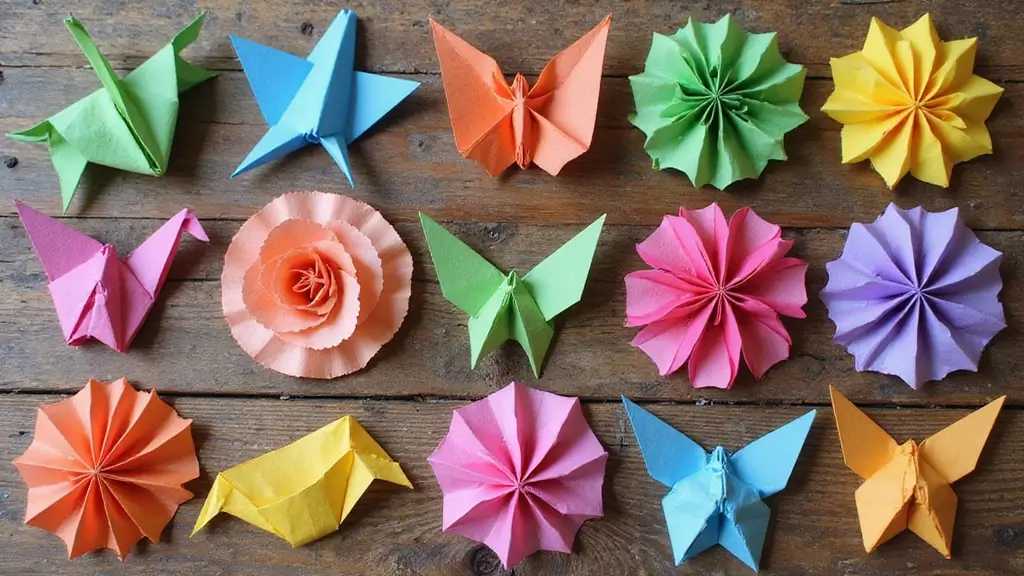
The daily grind left me craving a simple, pocket-size craft to lift the mood. So I made this post about 30 origami paper crafts you can finish in a short break. Each idea is easy, colorful, and ready to bring a little joy to your desk or kitchen table.
If you love tiny, tactile projects, this one’s for you. Whether you’re a parent, a student, or a teacher, you can fit these into a busy day. These origami DIY projects work for beginners and for anyone who wants a quick, calming focus.
I pulled together 30 ideas with clear steps and simple supplies. You’ll learn how to pick paper, choose colors, fold cleanly, and add tiny extras like a ribbon or a sticker. You’ll also find tips for turning your folded pieces into desk decor, ornaments for holidays, or small gifts.
You can start with a fold you finish in five minutes. Then move to a step up when you have more time. I’ve included tips to keep folds neat and to store scraps so the craft stays easy.
Folding helps calm the mind. Colorful shapes brighten a room. Share a project with a friend or a student and spread a little joy.
Ready to begin? Here is what you can do next. Choose a project from the list and gather a square of paper; bright or soft colors both work. Keep a small setup at your desk or kitchen table. With these ideas, you will bring more joy to your day.
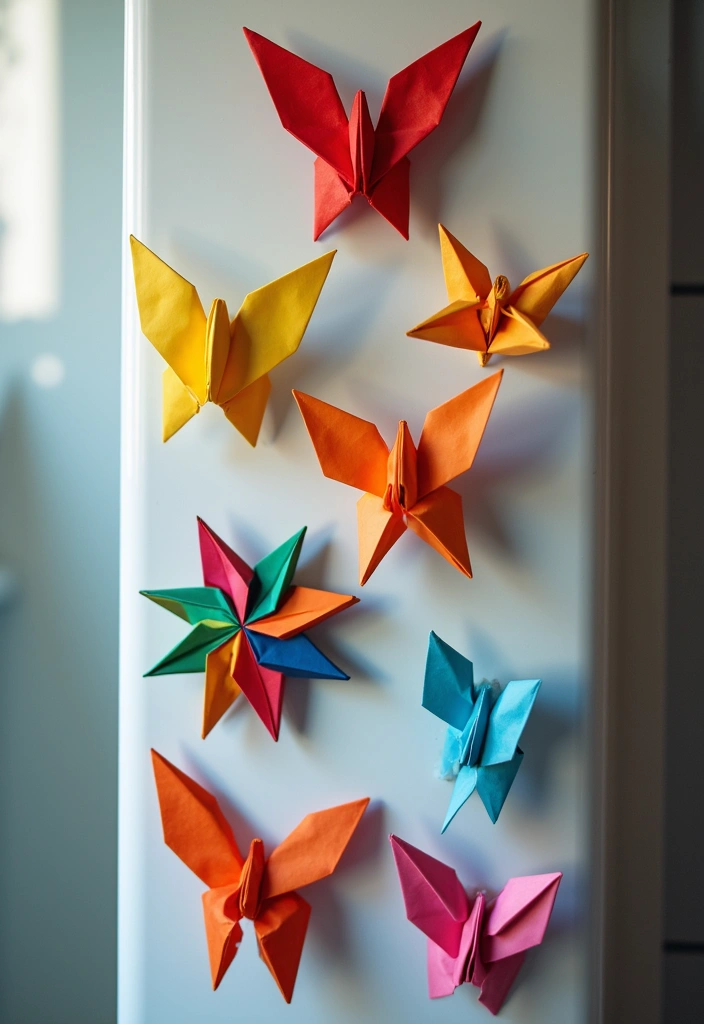
1. Delightful Origami Cranes
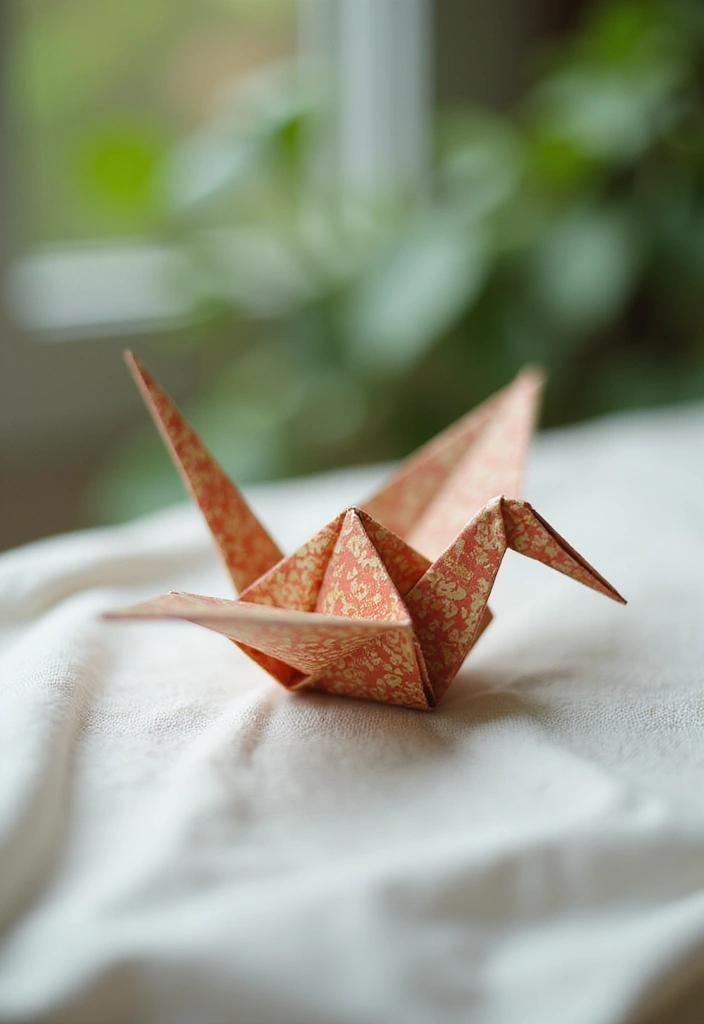
You want a calm, creative project that lifts your day. The origami crane fits that need. It stands for peace and hope, and making one can feel very rewarding.
All you need is a square sheet of paper. Lighter-weight paper folds with less effort and keeps its shape as you crease. Look for a short, clear tutorial online.
Here is how to start. Fold to make a simple base, then add a few folds to shape the wings, head, and tail. With care, the crane becomes a delicate bird you can hold.
Tips for success
– Use light, smooth origami paper for easy folding.
– Follow a clear online tutorial to stay on track.
– Try linking several cranes into a mobile or garland for a bright room accent.
Want a quick decor idea? A string of cranes on a wall or ceiling brightens a room and sends a calm, hopeful signal.
Color and display
Here is why color matters. Pick soft pastels for calm, or bold tones for energy.
Two-sided paper adds contrast as light shifts.
Store sheets flat and use glue only if you plan a long display.
Next steps
Save a favorite crane tutorial, grab a square, and practice a few folds. Then make a small mobile to brighten a shelf.
2. Fun Origami Flowers
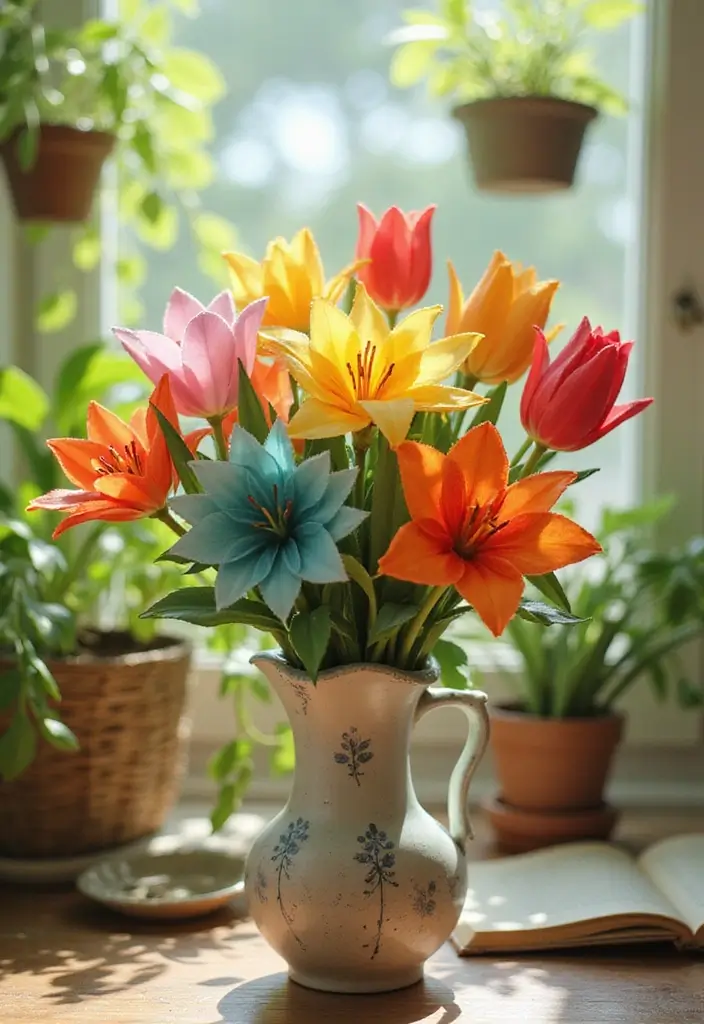
Feeling stuck on what to do with plain paper? You can fix that with origami flowers. They bring color to any room and make easy, heartfelt gifts.
What you need is simple. Square sheets of colored origami paper work best. You can use patterns for extra texture, too. You don’t need scissors or glue for classic folds. A clean clear workspace helps you stay organized.
Here is how you can get started. You can create many flower types, from tulips to lilies, using the same folding tricks. Start with a small bloom, then add a larger bloom beside it to build a mini bouquet. Layer petals by placing a tiny flower in front of a bigger one to add depth.
– Pair different flower designs to make a bouquet that feels full and lively.
– Use patterned paper for more visual interest.
– Create a 3D effect by stacking petals and tucking one bloom inside another.
These paper crafts aren’t just pretty. They’re a smart way to recycle scraps. Turn stray colored sheets, old greeting cards, or junk mail into petals and stems. You’ll cut waste and get a fresh look at the same time.
Next steps. Pick two or three flower styles. Fold five pieces of paper for a tiny cluster. Arrange them in a small vase or pin them to a card for a cheerful gift.
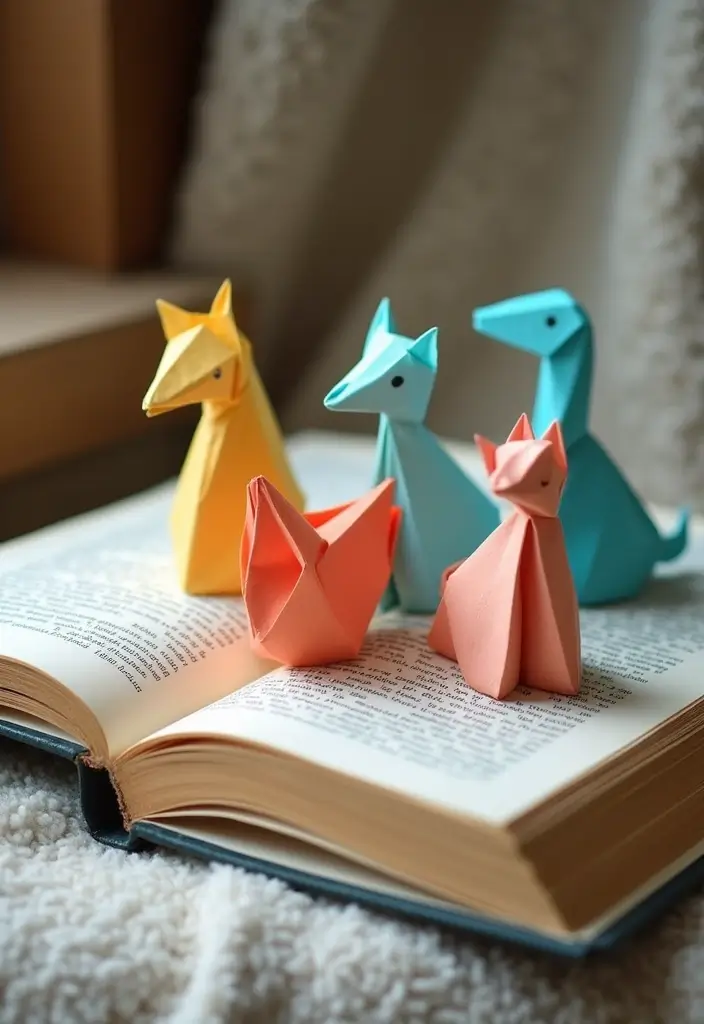
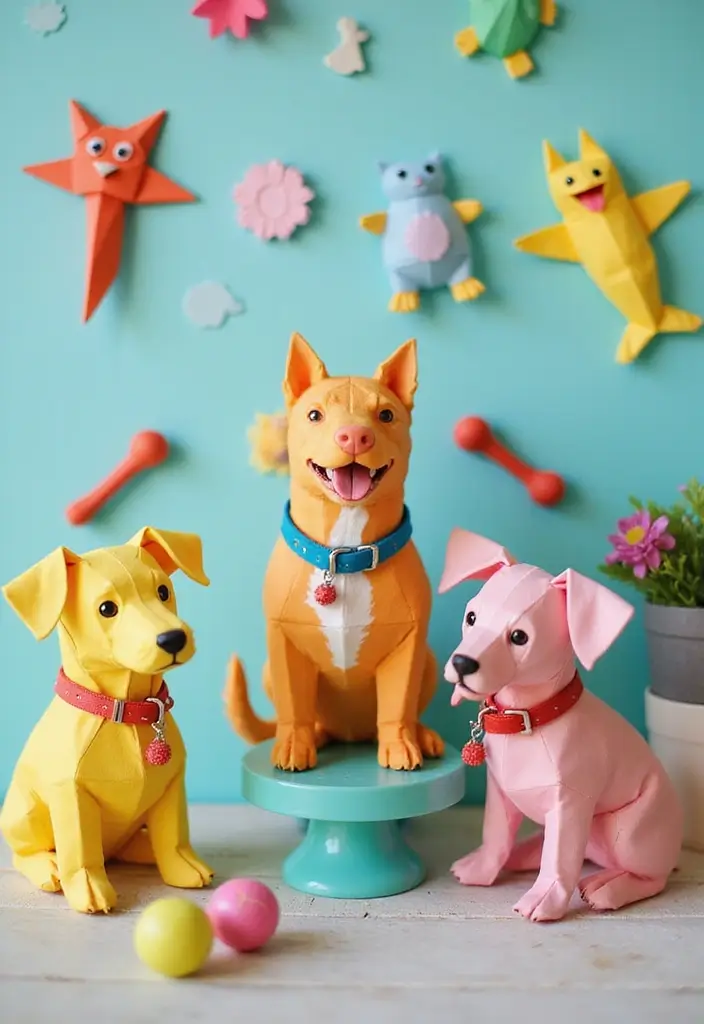
3. Whimsical Origami Animals

Whimsical Origami Animals
Need a small burst of joy in your day? Whimsical origami animals lift a room with color and charm. A jumping frog, a curious bunny, or a tiny fox fit on a shelf and make you smile.
Here is how you can start.
– Pick an animal you actually want to fold.
– Gather bright origami paper or mixed-color sheets.
– Find a short, easy origami tutorial that shows the simple folds.
– Fold slowly and press the creases so the shapes hold.
– Create a mini zoo on a desk, a mantel, or a windowsill.
– Try different paper kinds for texture, from smooth origami paper to scrap paper with a grain.
– Use recycled paper to keep the craft friendly to the planet.
Frogs that leap, bunnies with long ears, and birds with tiny wings are popular first choices. You can swap colors, add small eyes with a marker, or even make a tiny pair of origami friends.
Next steps: display your set, remix with colors, or gift a friend a tiny animal scene.
Keep your workspace tidy. Lay the finished animals on a soft cloth so the points stay neat.
With practice, you fold faster and try bolder colors.
Your shelf glows at night.
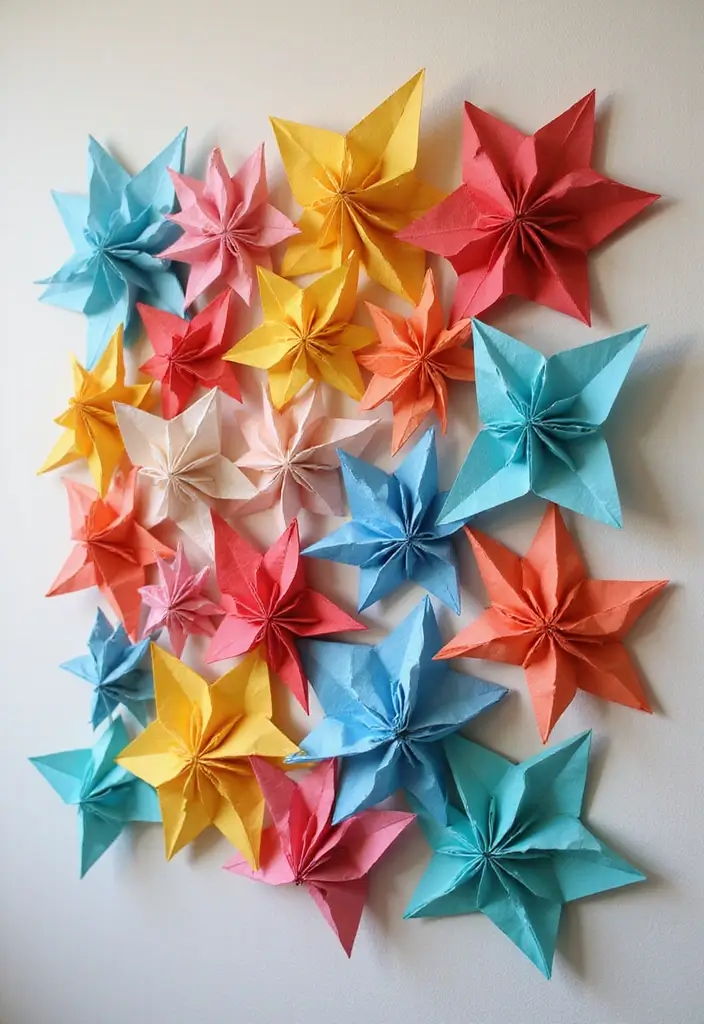
4. Decorative Origami Stars
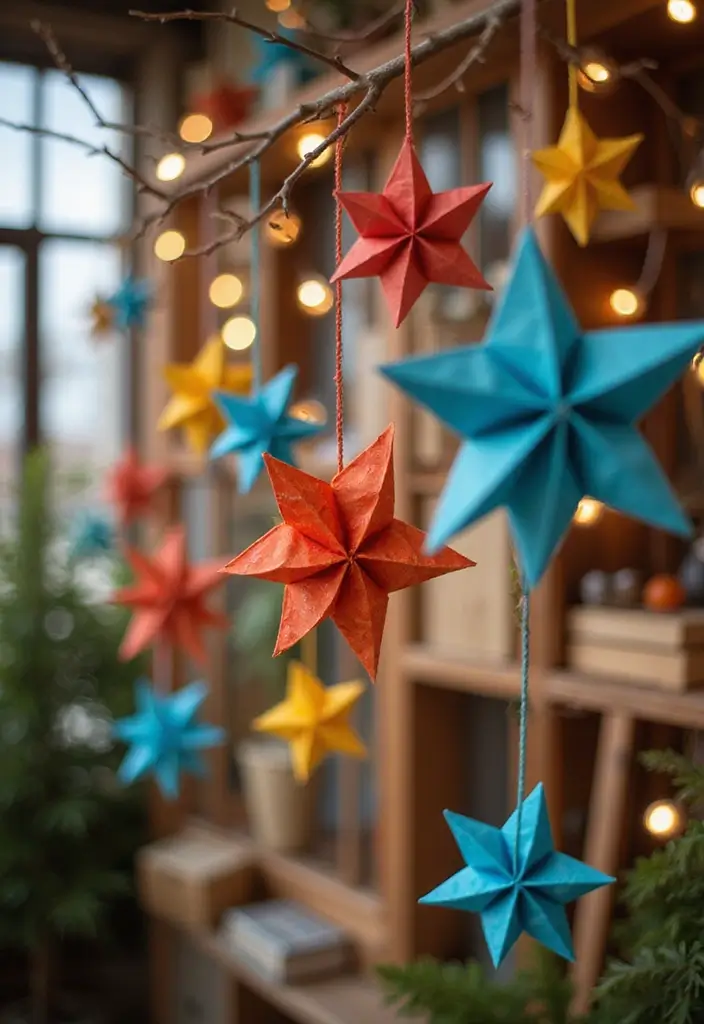
If you want quick, eye-catching decor, decorative origami stars are a perfect pick. They catch the light and drift in the breeze, adding a soft sparkle to any room.
Here is why you will love them:
– They cost little and are easy to customize.
– You can make a whole garland in one sitting.
– You can mix colors and sizes for depth and charm.
Materials
– Small square sheets of paper. For bold stars, use 4-inch squares; for a delicate look, go with 2-inch squares.
– Metallic or glitter paper for a festive touch.
– String, thread, or twine to link the stars.
– A simple hole punch or a needle to thread the line.
How to make the stars
– Start with a square sheet. Smaller paper gives more intricate stars.
– Fold the square in half to create a crisp crease, then unfold.
– Fold each corner toward the center to shape the star points. Press flat.
– Turn the star over and punch a tiny hole. Thread a piece of string through, and secure it with a knot.
– Repeat with different colors and sizes to build a collection.
Ways to use them
– Drape a garland across a window, mantel, or doorway.
– Create a hanging mobile for a kids’ room.
– Add as sparkly accents to gift wrap or party décor.
Tips and care
– Pair metallic with matte colors for contrast.
– Use three sizes to add visual rhythm.
– Store flat in a dry box so they stay crisp.
Next steps are simple: pick colors you love, cut a few squares, and start threading. Soon you’ll have a cheerful star display that brightens every day.
5. Origami Gift Boxes
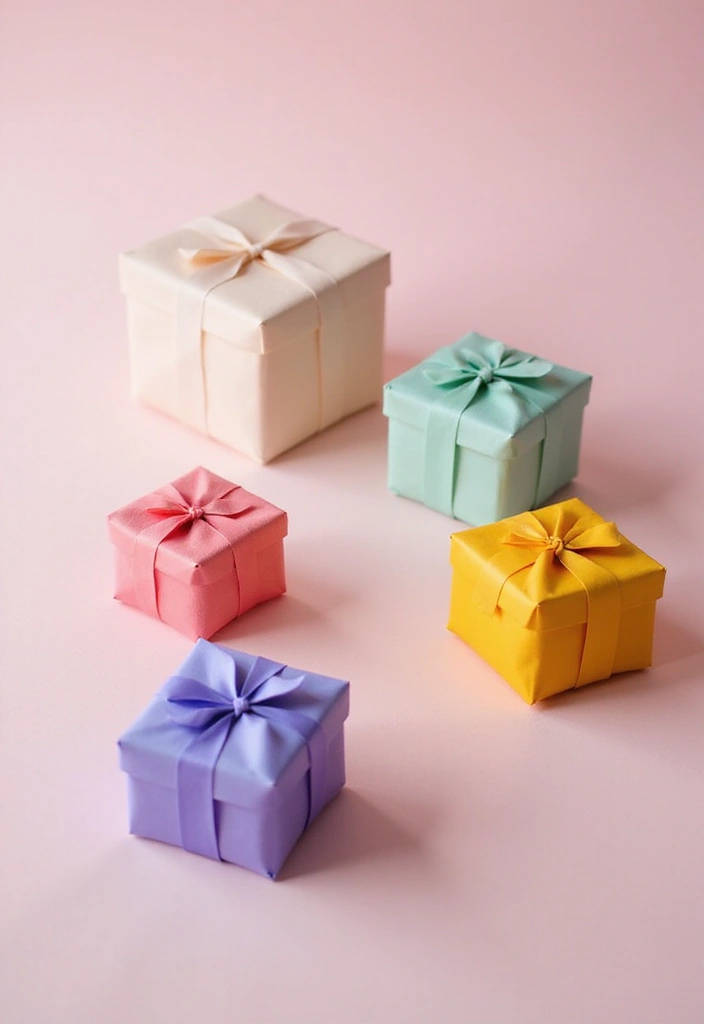
You want a gift that feels personal. A handmade origami gift box does it. It looks neat and uses little paper. You fold it from one square sheet. It can hold jewelry, candy, or a small keepsake.
Here is why this works. You control the look, the size, and the wrap.
What you need
– A square sheet of paper (larger for bigger gifts)
– Patterned paper or recycled wrapping paper for style
– Optional decorations: ribbon, stickers, stamps
How to fold a simple origami box
– Start with a square sheet.
– Fold the top and bottom edges toward the center and crease well.
– Fold the left and right edges toward the center and crease.
– Lift the sides to form a box and tuck the corners to lock the walls.
– For a lid, use a slightly larger square so it fits over the box.
Ways to use it
– As party favors with tiny treats
– As wedding or shower gifts that feel extra personal
– For jewelry or small keepsakes that sit nicely in your hand
Tips for a perfect box
– Use double-sided paper for a clean look
– Press folds hard with a spoon or bone folder
– Pick a size that fits your gift; test with a scrap first
– Tie a tiny ribbon or add a tag to finish the look
Next steps: grab paper, pick a design, and give this easy origami gift box a try. It adds care without costing a lot.
6. Origami Bookmarks
You want a bookmark that is small, cheap, and easy to make. Origami bookmarks fit that need. They stay flat in your book and slide on page cleanly. Here is why this little craft helps your reading routine: they are light, colorable, and take only minutes to finish.
Materials
Let’s break it down. Gather simple supplies so you can start fast.
– Lightweight origami or printer paper in colors you like
– Scissors for trimming (optional)
– Markers, colored pencils, or washi tape for decoration
– A small punch or ribbon if you want a tassel
Three quick ideas
Try these designs tonight.
– Option 1: Simple corner bookmark. Cut a 2×6 inch strip of light paper. Fold it in half lengthwise. Fold the top edge down about 0.5 inch to make a tiny tab. This tab helps grab the page.
– Option 2: Colorful tab with a flap. Use a 2×6 inch strip. Decorate the front. Fold over a 1 inch flap at the top. The page slides under the flap and stays put.
– Option 3: Tiny animal or decorative touch. Cut a small shape from light paper. Glue it near the top of a corner bookmark to add charm.
Tips for use
Keep bookmarks flat and light. Try different sizes for big or small books. They also make nice gifts for friends who love to read.
Next steps
Pick two colors, fold one bookmark, and test it in a book you own.
7. Enchanting Origami Lanterns

You want a warm glow in your space. Origami lanterns give that glow softly. They are quick to make with a square sheet of paper and a few folds. Here is a simple path to bright results.
– Materials
– Square origami paper in colors you like
– A small LED light or a string of lights
– Clear tape or a light cord
– Thin ribbon or string to hang
– How to make them
– Step 1: Place the paper on a flat surface. Fold in half, then unfold. Make vertical accordion folds to create even panels.
– Step 2: Bring the sides together. Shape the paper into a lantern. Use a small ring or a tape strip at the top and bottom to hold the form.
– Step 3: Put the light inside. A low-heat LED works best. Tuck the battery pack in a safe pocket.
– Display ideas
– Hang a row of lanterns from the ceiling for a party vibe
– Set different sizes on a table to make a soft centerpiece
– Try translucent sheets to let light glow through
– Quick tips
– Pick bold colors for daytime cheer or pale tones for a gentle mood
– Use LED lights, and avoid open flames
– Mix sizes and place a few near windows for a bright border
These lanterns lift a room and invite your hands to create.
8. Origami Wall Art
Need a fresh look for your walls? Origami wall art adds color and calm without a price tag. You can build a gallery that fits your space and taste.
Here is why it works:
– Simple folds you can learn in an afternoon.
– A mix of colors and sizes creates depth.
– You can frame pieces or mount them directly for a clean, modern vibe.
Let’s break it down using easy steps:
– Pick a theme and palette. Choose 2 to 4 colors that fit your room.
– Decide shapes and sizes. Try squares, triangles, and diamonds. Balance big and small.
– Start with a small batch. Aim for 4–6 pieces to test the layout.
– Mount or frame. Mount on a lightweight board or use removable tape so you can swap later.
Practical tips:
– Use recycled paper, old wrapping paper, or greeting cards.
– Leave a little space between pieces so the wall can breathe.
– Mind the light. Place near a lamp or window to cast soft shadows.
Next steps:
– Gather paper, practice a few folds, plan layout, and add a personal piece.
9. Origami Hearts for Loved Ones
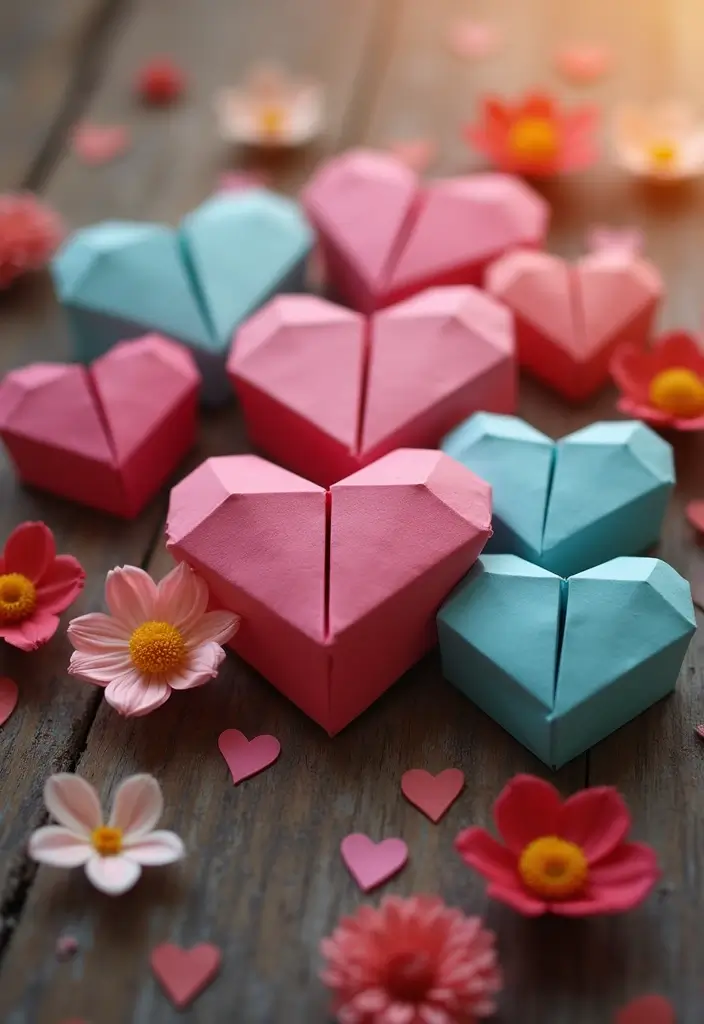
You want a small, heartfelt gift. Origami hearts fit. They speak with a soft touch and bright folds. Use one square of paper and a few clean folds.
– Materials: A square sheet of paper. Pick a color you love.
– Personal touch: Write a short message on the paper before folding. A name or note adds warmth.
– Gift ideas: Shape the heart, then attach a tiny note or thread it onto a key ring. Pack several in a small envelope for a surprise.
– Bouquet option: Link several hearts into a small bouquet. Tie with a ribbon.
– Display ideas: Hang a heart on a gift, on a string, or on a pin.
– Finishing tips: Press the folds gently to keep edges crisp. A light crease helps the heart hold its shape.
These origami hearts for loved ones are fast to make and easy to share. They work for Valentine crafts or just because.
Next steps: start with one heart today. Then try two or three. Display them on a table, fridge, or window. With simple origami tutorials, you can grow this into a sweet gift idea for anyone special.
Today, share the joy with someone you truly love.
10. Origami Mobile for Nurseries
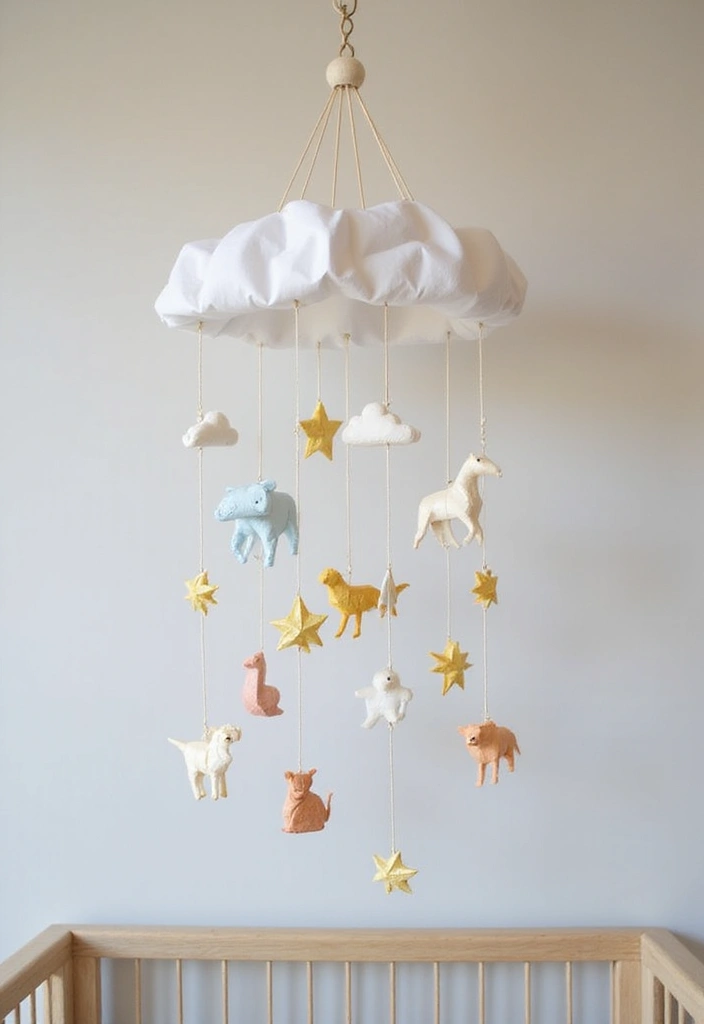
Looking for a calm, personal touch for a nursery? An origami mobile offers soft movement, gentle color, and a handmade feel. It’s quiet enough for naps and bright enough to spark curiosity.
Here is why this works in a nursery. The pieces catch light, drift with the breeze, and help create a soothing backdrop for sleep and play. You can tailor it to your room and keep it lightweight and safe.
Let’s break it down into simple steps.
What you’ll neednn
– A wooden hoop or a clean, slim branchnn
– Soft origami paper in pastel colorsnn
– Light yarn or clear fishing linenn
– Non-toxic glue or thin tapenn
– Scissorsnn
– Optional: a small peg or clothespin for quick changesnn
Next stepsnn
1) Pick 6 to 10 simple shapes like clouds, stars, or tiny animals. Keep lines clean and easy to fold.nn
2) Plan a light color palette. Soft blues, pinks, and creams feel calming in a nursery.nn
3) Fold each shape with steady hands. Aim for uniform sizes so the mobile feels balanced.nn
4) Attach shapes to strings. Tie neat knots or loop the strings so pieces won’t slip.nn
5) Clip or tie the strings to the hoop at varying lengths for depth and motion.nn
6) Hang the mobile high above the crib. Give it a gentle spin with a puff of air to test movement.nn
Safe and lasting tipsnn
– Use non-toxic paper and glue. Check for loose pieces regularly.nn
– Keep the mobile high enough so little hands cannot reach it.nn
– Dust occasionally with a soft brush to keep colors bright.nn
Make it yoursnn
– Switch colors by season to refresh the look.nn
– Add a few extra shapes when you have time to expand the mobile.nn
– Save scraps for future paper crafts or small decor accents.nn
This origami mobile blends craft skills with soothing style. It’s a simple, sustainable project you can finish in an afternoon and enjoy for years.
11. Origami Coasters

Here is why you want origami coasters. They protect your table and add a touch of style. You can use paper you already own. This quick project fits in a cozy afternoon. You will feel proud when you set a colorful square on the table.
– Pick colorful or patterned paper that fits your style.
– Cut each square to match the size of your mug bottom.
– Fold a simple origami coaster pattern for a sturdy edge.
– Seal with a clear waterproof coating or use waxed paper for extra protection.
– Make a set of 4 or 6 so you can cover a whole table.
– Add a cork or felt pad on the bottom to grip the table and protect surfaces.
– Try different folds to adjust thickness and look.
Here is how to get the best finish. Start with sturdy paper for long life. Let the coating dry fully in a breeze. Clean with a damp cloth when needed. If you want eco options, choose recycled paper. These coasters also make thoughtful housewarming gifts.
Color and calm in one small project. They brighten a coffee spot and invite friend chatter. You can store extras in a box and pull them out when guests arrive.
12. Origami Phone Stand

Need a simple, eco friendly phone stand? This origami craft gives it to you. It keeps your device upright and handy while you work or watch videos.
Why this works: a single sheet makes a sturdy, compact stand. It is easy to learn and you can finish it in one sitting.
What you’ll need
– A sturdy square sheet of paper (cardstock works well)
– Optional: double sided paper for a nicer look from both sides
How to fold it
1) Start with the square color side up. Fold in half to crease, then unfold.
2) Fold the left and right edges toward the center to form a narrow rectangle.
3) Fold the bottom edge up to create a small pocket for the phone.
4) Fold the top edge down to create a lip that rests on the phone.
5) Press flat and adjust the folds so the phone sits at a comfortable tilt.
Tips to customize
– Pick paper that matches your desk or mood.
– Use a two toned sheet so it looks good from any side.
– Try bigger sheets if you have a larger phone.
Next steps
– Test it with your phone and tweak the angle for comfort.
– Store the stand flat when not in use to save space.
13. Origami Gift Tags

You want a personal touch on gifts without waste. Origami gift tags add charm with a simple fold.
– Use colorful origami paper or scrap paper.
– Add a thin ribbon or twine.
– Use a hole punch or a needle to make a loop.
– Write a short note with a pen.
– Shapes to try.
– Star tags catch the eye.
– Heart tags feel warm.
– Flower tags look cheerful.
– How to make quickly.
– Cut a 3×3 inch square.
– Fold into the tag shape you want, starting with basic folds.
– Punch a small hole near the top or slip in a thread.
– Write a quick message on the inside or back before you finish.
– Attach and finish.
– Thread twine through the hole and tie around the gift.
– Trim ends for a neat look.
– Place the tag where the wrapping shows the best.
– Eco note.
– These tags use recyclable paper and cut down on plastic wrap.
– Tips for tidy folds.
– Press each fold firmly.
– Line up edges before you crease.
– Pre-tuck any loose corners to keep shapes neat.
– Seasonal ideas.
– Use bright colors for birthdays.
– Metallic paper or soft pastels for holidays.
– What to do next.
– Gather paper, scissors, and string.
– Try three shapes this weekend and share a photo.
You will see smiles when someone reads the tag.
14. Origami Picture Frames
Looking for a simple, eco-friendly way to show your favorite photos? Origami picture frames bring color to any wall or desk and keep waste low.
Materials
– Colorful origami paper
– Clear glue or a glue stick
– Scissors
– A photo that fits your frame
– Optional: washi tape, markers, small stickers
How to make it
1) Choose your photo and a frame size.
2) Cut a square of origami paper larger than the photo.
3) Cut a window in the paper that matches the photo size.
4) Glue the photo to the back so it shows through the window.
5) Decorate the border and add a stand or hanger.
Tips and ideas
– Try different sizes for a mini gallery on a shelf.
– Mix solid colors with patterned paper for drama.
– Use recycled paper to keep your project green.
– Add tiny embellishments like dots or borders for a personal touch.
These frames make great gifts for friends and family. They are quick to finish and easy to customize with their favorite colors. Next steps: print a few photos, grab scraps of paper, and start folding. A small project can brighten your day in minutes.
15. Origami Puzzles

You want a craft that sharpens your thinking and still looks great when it’s done. Origami puzzles fit that need. They train your mind and become small works of art you can display.
– Materials: Use square origami paper in several colors. Keep a flat workspace so folds stay neat.
– Plan: Pick a simple final image, like a flower, sun, or animal. Break it into 4 to 6 puzzle pieces.
– Color plan: Choose bright colors for each piece. Contrast helps you see how pieces fit.
– Make the pieces: Fold each piece with clean, crisp edges. Small folds add up to a tight fit.
– Assemble: Fit the pieces together to form the whole design. If a piece does not sit right, adjust its folds a touch.
– Display and gift: Show the finished puzzle on a shelf or frame it. It also makes a fun, interactive gift.
– Care and storage: Store pieces flat in a folder or box. When not used, you can hang it as wall art.
– Tips and questions: Start with 3 or 4 pieces. It’s kid friendly with a little help. If colors clash, pick high contrast. If a piece tears, fold a fresh one.
This kind of puzzle blends play with craft and leaves you with a neat piece of art you can share.
16. Origami Table Decorations
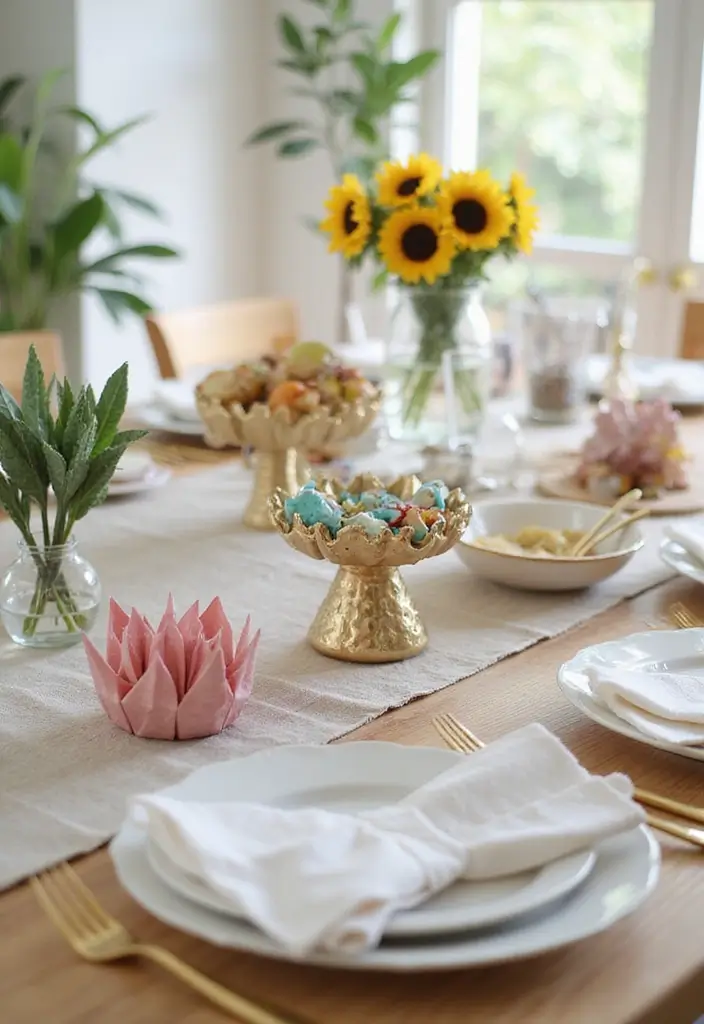
Facing a dull dining table? You can fix it with origami table decorations that are pretty and easy.
– Start with 2 or 3 colors that match your place setting. Bright tones catch the eye, soft tones feel calm.
– Pick simple shapes. Small cranes, stars, or flowers work well as napkin accents or tiny centerpieces.
– Mix sizes. Add a tall centerpiece with one bold piece and several small shapes around it. This creates depth and visual interest.
– Dress up napkins. Fold napkins into a neat origami shape, then tuck a tiny origami piece inside. It adds a playful surprise.
– Create a themed mix. For a spring meal, use bright papers and floral shapes. For a cozy dinner, use warm metallics and star folds.
Here is why this works: origami decorations are light and flat. They won’t crowd your plates. They can be reused after the meal. They also give you a chance to show your style.
Next steps. Gather square papers or fabric squares. Choose a few easy folds to start. Practice before guests arrive. Arrange the pieces along the center of the table or near napkin rings. Rotate designs for different occasions.
Materials to consider. Recycled paper keeps costs down. Folded fabric scraps can form soft, tactile accents. You’ll enjoy a festive look without a lot of waste.
17. Origami Keychains
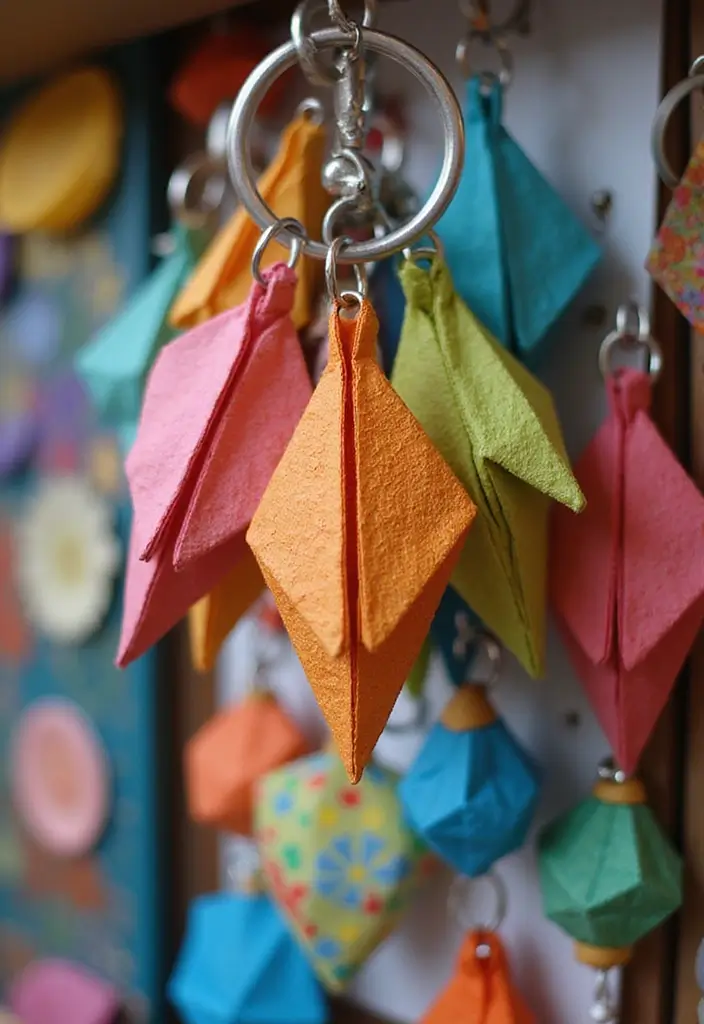
Want a tiny gift that travels well and shows you care? Origami keychains fit that need. They are simple, cheap, and fun to make. You can fold them in a few minutes and have a bag charm or a key ring ready to go.
What you need
– Bright origami paper or patterned washi paper
– Small metal keyrings or clips
– A jump ring for extra security
– Clear sealant or glue for durability
– Scissors and a pencil for crease guides
Steps to make
1) Fold a clean, crisp origami shape like a heart, crane, or star.
2) Press the fold flat so the piece sits neatly.
3) Attach a keyring or clip. If you use a jump ring, keep it tight.
4) Lightly coat with a clear sealant and let it dry completely.
Tips for durability and style
– Choose thin paper to keep folds sharp.
– Add a second layer for strength.
– Try patterned paper to show color and texture.
– Seal only the outer surface to avoid stiff, bumpy folds.
Ways to use and share
– Clip the charm to your keys for an easy find.
– Attach it to a backpack, purse, or tote.
– Gift a mini set in a small box or sleeve.
Next steps
Experiment with shapes and colors. You’ll build a little line of cute, personal accessories that fit your day.
18. Origami Magnets
If you want a quick way to brighten your fridge and keep notes in view, origami magnets fit the bill. They turn simple paper into small works of art you can move on any magnetic surface.
Here is why this works: the shapes grab attention and the magnets keep notes handy.
What you need
– Origami paper or colorful scraps
– Small magnets or magnetic discs
– White glue or double-sided tape
– Scissors
How to make
Start with a tiny square of paper. Fold a simple shape such as a heart, a star, or a crane. Glue the folded shape to a magnet disc. Let it dry before you test it on the fridge.
Design ideas
Mix colors, shapes, and sizes. Go bright or keep it soft. Try animal silhouettes, leaves, or geometric forms. You can even add a tiny pattern on the back with a marker. They work well in a kid’s room or as party favors.
Tips for longer life
Choose thicker paper for durability. Laminating or sealing the top helps. Use strong magnets if you pin photos or a few notes. If you plan to hold several photos, test the weight first.
Uses and gifts
These magnets hold notes, photos, or to-do lists while adding style. They also make small, thoughtful gifts for friends who like a personal touch.
Next steps
Grab supplies and start a mini origami magnets session today.
19. Origami Table Organizers
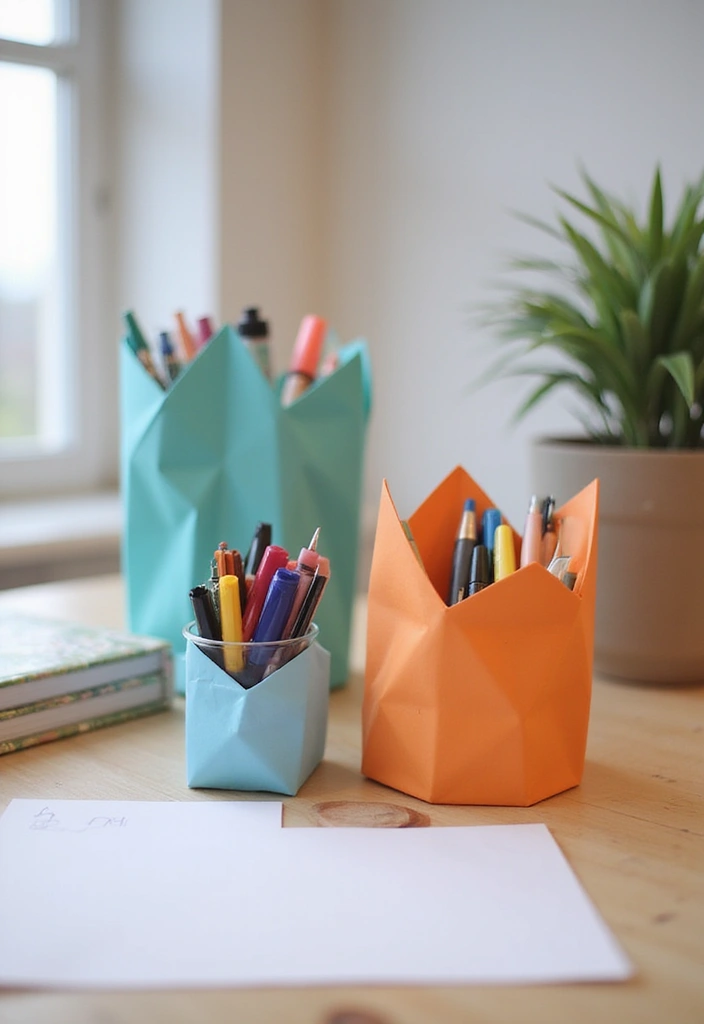
Tired of a messy desk? You want a neat look that fits your style. Origami table organizers can help. They act as tiny trays that hold pens, scissors, brushes, and small craft scraps. They’re pretty and practical.
Here is why they work for you. First, they save space. A few foldings make compact organizers that sit flat on your table. Second, they decorate your spot. Pick colors or patterns that match your room. Third, they recycle old paper. Strong sheets can be reused once you fold them into shapes.
What you need. Choose sturdy paper or light cardstock. You can also use laminated sheets for extra strength. Pick two or three sizes so you have trays for different items. Have a glue stick or tape handy to steady edges. A ruler helps you fold clean lines.
How to make them. Start with a square base or a small rectangle. Fold up sides to form a tray. Create short walls by folding the edges again. Fold one corner into the center to lock the walls. Repeat for another tray if you want a pencil cup or brush holder. Decorate with color or patterns after it dries.
Tips you can use today. Use double sided tape for neat edges. Place your organizers where you reach for tools. Check each fold for a firm bend. And recycle the paper when you’re done with them.
20. Origami Jewelry

Origami Jewelry: Wearable Art You Can Make
You want jewelry that is unique and easy to make. Origami jewelry gives you wearable art that’s light and kind to the planet. You control colors, shapes, and how bold the piece feels. Let’s dive in and make pieces you’ll love to wear.
Materials you’ll need
– Lightweight origami paper or double-sided craft paper
– Clear jewelry glue or strong clear adhesive
– Simple findings: earring hooks, jump rings, and a short chain or cord
– Small jewelry pliers and scissors
– Optional gloss spray or sealant for extra durability
Here is why this works: paper stays light, so your earrings and necklace stay comfy all day. Double-sided paper creates two-tone looks, and you can mix colors to match outfits.
Design ideas to try
– Fold a small crane pendant for a delicate center piece
– Create two matching folded shapes and connect them for dangle earrings
– Make a simple star or hexagon to sit flat as a pendant
– Use bold patterns for a statement piece
How to assemble
– Fold your chosen design, then let glue dry for a few minutes
– Seal edges with a thin line of glue to prevent fraying
– Attach a jump ring and hook onto an ear wire or attach to a chain
– If you want extra shine, spray lightly with sealant after drying
Care and gifting
– Keep pieces away from water and store in a soft pouch
– These make thoughtful gifts for friends who love handmade items
Next steps: start small with a single pendant and build from there. With each fold you’ll gain skill and soon you’ll have a little line of origami jewelry to wear or share.
21. Origami Wall Clock
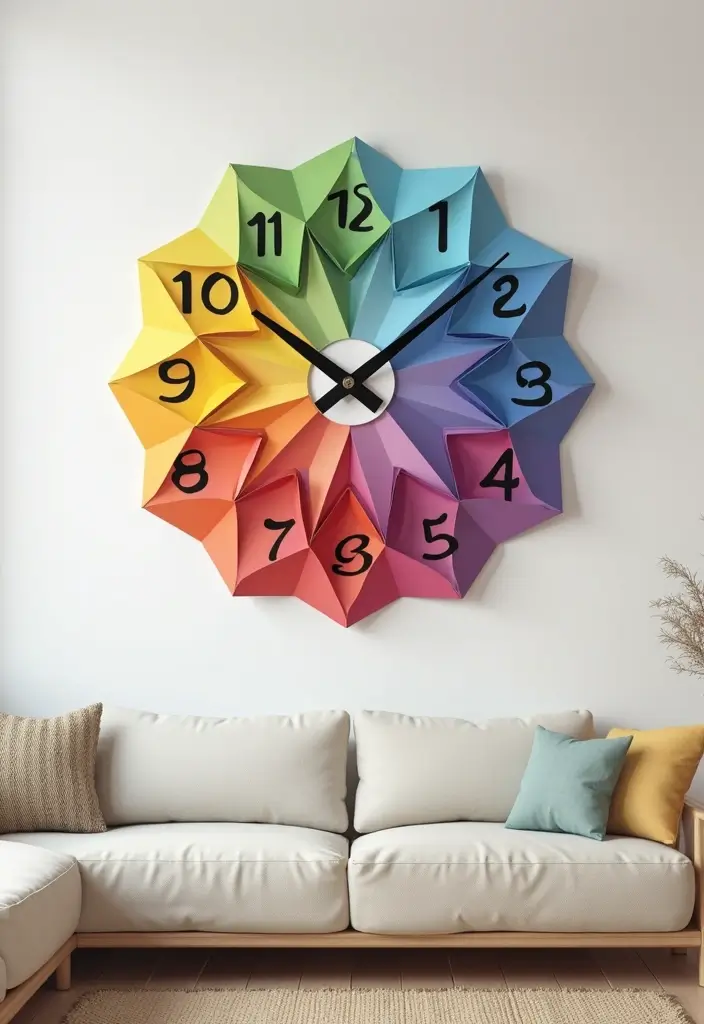
You want a wall clock that looks nice and helps you stay on time. An origami clock does both. It adds color and texture to your space while giving you a clear moment to check the hour. This project feels personal and fresh, not just someone else’s decor.
Here is why it works. You fold paper into numbers and markers that form a unique clock face. You choose colors that fit your room, and you place each piece on a simple base. The hands move as usual, so you still tell time at a glance. Plus, you control the look—bold, soft, or playful.
Materials
– Round backing or a wooden disk, a clock mechanism, and origami paper in several colors.
– Glue or double‑sided tape, scissors, and a ruler for clean lines.
– A pencil for light guides and a small center hole for the hands.
Steps
– Gather supplies and pick a size, like 8 to 12 inches across.
– Cut or prepare a plain base to hold the origami pieces.
– Fold numbers or markers from colored paper, using different colors for contrast.
– Arrange the folds around the center to form the clock face.
– Attach each piece to the backing and install the clock mechanism in the middle.
– Hang the clock and set the time. Enjoy the bright, handmade vibe.
Next steps: try a single color for a minimalist look or mix loud prints for a playful room. Either way, you’ll get daily joy with every glance.
22. Origami Bird Feeders
Are you hoping to invite birds to your yard with a simple project? Origami bird feeders offer an easy, sweet fix. They attract birds and add a bit of art to your garden. Here is why they work: they are light, fun to make, and easy to reuse old paper.
What you’ll need
– Waterproof or coated origami paper, or regular paper sealed with a clear spray.
– Safe glue or tape to hold folds.
– String or twine for hanging.
– A small scoop for seeds.
How to make and use
– Start with a square. Fold it into a small boat or pocket that can hold seeds.
– Seal the seams so seeds don’t spill.
– Punch two tiny holes at the top and thread string.
– Fill the pocket with a seed mix. Don’t overfill; birds need room to pick.
– Hang the feeder from a branch or hook. Place it where you can watch birds.
Care and tips
– Put it in a shaded spot so seeds stay dry.
– If rain soaks the paper, let it dry and replace with a new feeder.
– Clean the feeder and refresh seeds.
Enjoy watching guests arrive. These origami feeders show you care for nature and add a small art touch outside.
23. Origami Soap Holders
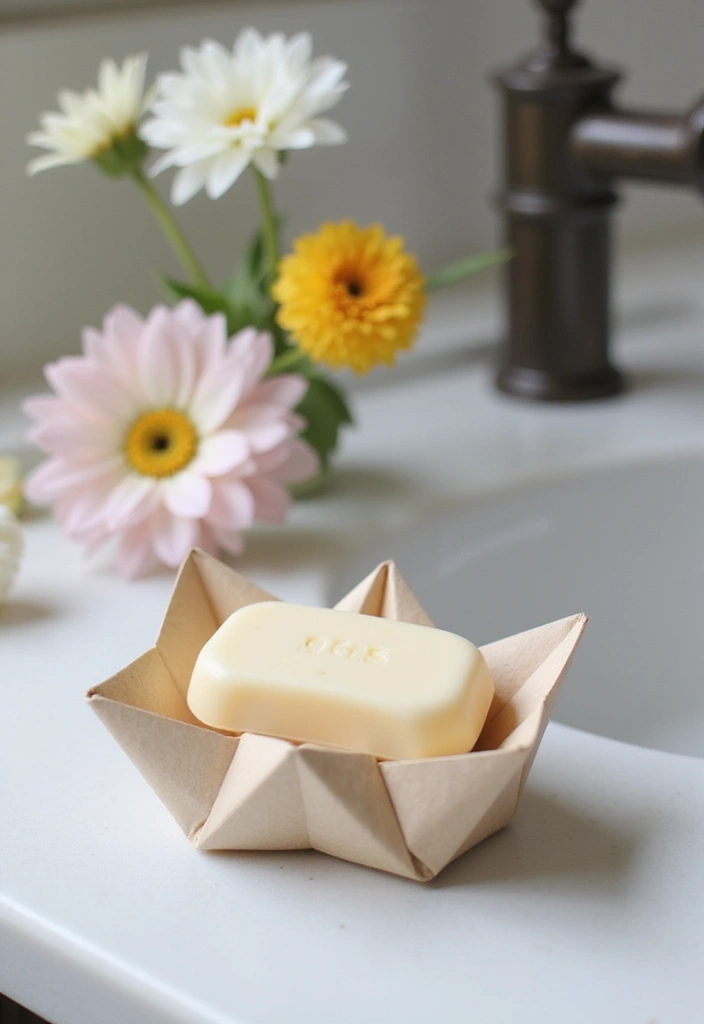
Origami Soap Holders You Can Make Today
You want a bathroom accessory that is simple, useful, and kind to the planet. An origami soap holder fits that need. It cradles soap bars while you save waste.
Here is how to make one that lasts.
– Use sturdy paper that holds shape in a damp room.
– For the pocket, measure your soap and leave a little room so it can breathe.
– Fold a shallow box.
– Start with a square base and raise two sides, then add a tiny lip to keep the bar inside.
– Add a small drainage notch at the bottom so water drains away.
– If you want extra protection, apply a light seal or clear coat and let it dry.
Color choices matter too. Pick hues that lift your bathroom vibe. You can make several holders for different soap varieties or to fit different sinks.
Beyond your own bath, these make nice gifts for friends who reuse and recycle. They offer a playful, easy-green touch.
Next steps: test a holder with a real soap bar, adjust size as needed, and keep a quick-dry area to extend life.
Let it dry completely after use.
24. Origami Bowls

You want a quick way to add color and tidy up small items. Origami bowls meet that need. They stay light, look nice, and hold tiny things well.
What you need
– Square origami paper works best for a light bowl.
– Choose colors or patterns you love.
– For damp spots, use waterproof paper.
– Optional lining inside for clean edges.
How to make a bowl
1) Start with a square sheet of lightweight origami paper.
2) Fold it in half diagonally, crease, then unfold.
3) Fold all four corners toward the center to form a smaller square.
4) Gently lift the corners outward to shape a shallow bowl and smooth the rim.
5) Let it rest flat or press lightly to set the form.
Styling ideas
– Make a set of three bowls in different sizes.
– Display them on a tray or shelf.
– Line the inside with a thin, contrasting sheet.
– Choose waterproof paper for extra durability.
Care and limits
– These bowls work best for tiny items like rings, coins, or candy.
– Don’t pile heavy objects inside.
– Keep them away from direct sun to avoid fading.
Next steps
– Pick colors you love and fold a small batch today.
– Try a few sizes to see what display works best in your space.
25. Origami Recipe Holders
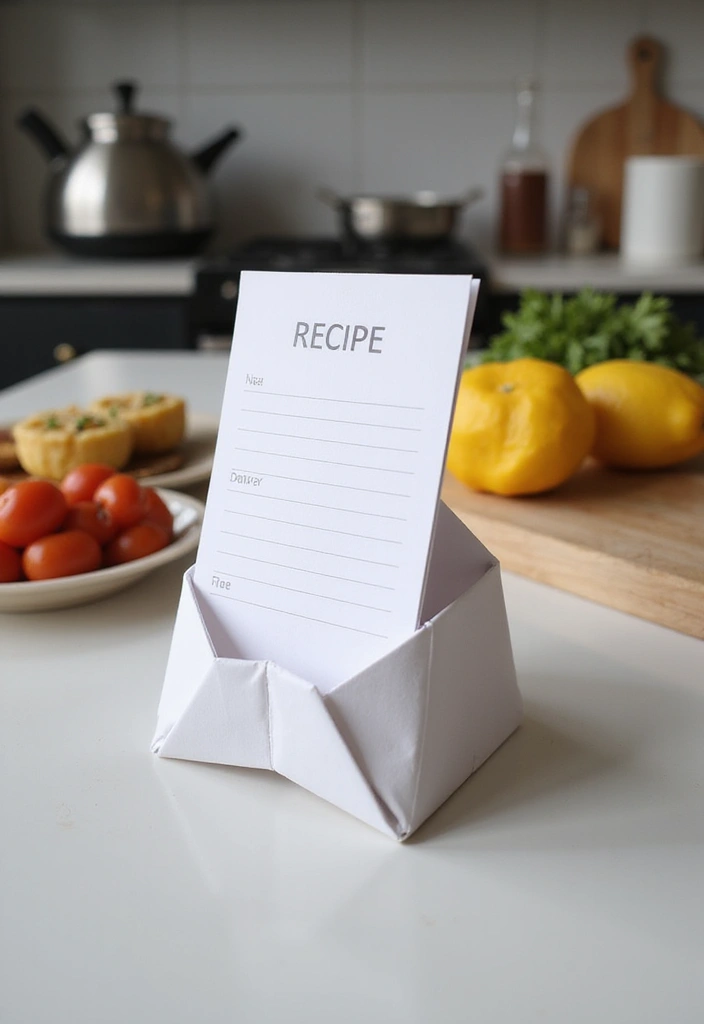
You cook a lot and need your recipe cards where you can see them. A standing origami recipe holder does that job. It keeps cards upright, so your hands stay free and your pages stay clean. You can make several origami recipe holders for different recipes.
What you need
– Thick craft paper or card stock
– A pair of scissors
– Optional: a little masking tape or glue for extra hold
– Bold colors to match your kitchen
How to make
– Here is why we start with a sturdy sheet. It stays flat and holds up under steam and splashes.
– Cut a rectangle about 6 by 9 inches. This size fits most recipe cards.
– Fold a small front lip by bending the bottom edge up 1 inch. This makes a place for the card edge to rest.
– Fold the back edge to make a simple stand. The crease should be strong but not too tight.
– Stand the holder on your counter and slide a recipe card in from the top.
Ways to use
– Make 2 or 3 holders for different meals or courses.
– Pick colors that match your kitchen or label each holder with a small tag.
Tips
– Laminate the cards for extra protection.
– Keep a spare on hand in case you cook often.
– Clear away spills quickly and let the paper dry.
Next steps
– Try a quick DIY origami video if you want a visual guide.
– Share a photo of your finished holder with friends.
26. Origami Travel Wallets

Are you tired of hunting for your passport and tickets in a messy bag? An origami travel wallet can fix that. It keeps your documents in one tidy pocket and adds a small, craft-friendly touch to your trip.
Materials
– Sturdy craft paper or thick origami paper
– Optional: a thin rubber band or small sticker to keep it closed
Let’s break it down
– Start with a rectangle of strong paper. Fold to create a main pocket for the passport and a slim slot for boarding passes.
– Add a top flap that tucks in. Use a band or sticker if you want extra security.
– Pick colors or patterns that match your trip. Bright prints for beach trips, calm tones for city tours.
Here is why this helps
– Your essentials stay together and easy to reach.
– It’s lightweight and quiet in a bag, so you don’t slow yourself down.
– You can gift a wallet to a friend who loves to travel, too.
Practical tips
– Matte craft paper feels sturdy and wears well in a pocket.
– Don’t overfill the wallet; keep edges neat so it slides in and out smoothly.
Next steps
– Make a wallet for your next journey. Try a second one for a friend and compare notes on what fits best.
27. Origami Pet Accessories
You want pet gear that is cute, light, and safe. Origami pet accessories add color without heavy parts.
What you’ll make
– A lightweight origami collar wrap that clips onto a fabric collar to give it a pop of color.
– Tiny origami charms or tags that hang from a leash with a soft ribbon.
Materials you’ll need
– Bright origami paper that is non-toxic and pet-safe.
– Non-smudging markers for clear names or designs.
– Clear tape to seal edges and keep folds neat.
– A soft ribbon or string to attach the piece.
– A basic fabric collar or a safe clip for mounting.
How to build them
– Fold a simple shape like a heart or crane to keep it light and small.
– Write your pet’s name or initials on the flat sheet.
– Attach the folded shape to the collar using the ribbon.
– Check the fit and trim any loose edges.
Safety tips
– Use only non-toxic paper and avoid tiny parts your pet could chew.
– Do not leave the accessory with your pet unsupervised.
Gift idea
– They make thoughtful gifts for pet lovers who enjoy crafts.
28. Origami Therapy Tools

Here is why origami works as a calm tool. It gives your hands a task and your mind a path to focus. Simple folds slow your breathing and bring you into the moment. You can make calming pieces with just paper and patience. It also supports mindfulness by keeping your attention on the next crease.
What you need
– A few sheets of origami paper
– A clean table and good light
– A quiet space for a short break
How to start
– Pick a design you feel ready for. Easy shapes take about 5 minutes; tougher ones need more time.
– Follow a simple fold sequence. Each fold trains your focus.
– Breathe as you fold. In through the nose, out through the mouth.
Ways to use it
– Create small pieces you can touch and study during a brief meditation.
– Use a tiny origami box as a calm tray for a short breath routine.
– Fold with a friend to share quiet time and conversation.
Tips for success
– Keep a small kit handy for quick breaks.
– Choose soft colors and smooth paper to feel good in your hands.
– Aim for focus, not perfect folds.
Limitations
– Origami helps mood and stress, but it is not a cure for deep anxiety. If you feel overwhelmed, seek professional help.
Next steps
– Try a 5-minute folding session today and notice how your attention shifts.
29. Origami Game Pieces
Here is why you should try origami game pieces on game night. They add color, stay on the table, and are easy to customize.
– Durable stock Use card stock or heavy origami paper so pieces stay firm during play. If you want extra stiffness, try double-thick paper.
– Tokens and dice Create tokens with numbers or icons for quick scoring that you can track at a glance. For dice, fold small cubes and label faces with dots.
– Personalize Choose colors that match your game theme and add initials to tell pieces apart. A simple color key helps you reuse pieces across games.
– Gift idea Fold a complete set and pack it in a small pouch for a thoughtful friend gift. Include a short guide on how to use them at the table.
– Storage Keep pieces in a simple box or pouch so you can grab them quickly. A small tray keeps them easy to find between games.
– Care tips Start with thicker stock and handle pieces gently to extend life. Store them flat when not in use.
– Color and finish Pick colors that stand out on the board. A mix of bright and muted tones helps players spot their pieces quickly.
– Play testing Try a quick test round to see how the pieces roll or slide. Note any tweaks you want for the next try.
– Next steps gather paper, choose a design, fold a few, and test them at your next game night.
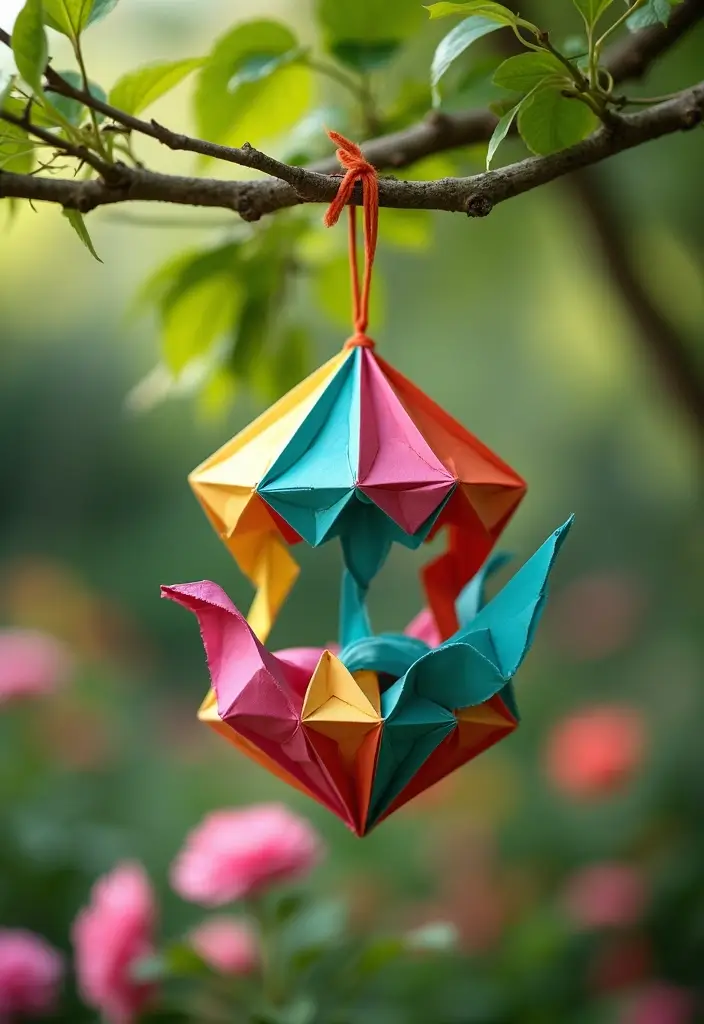
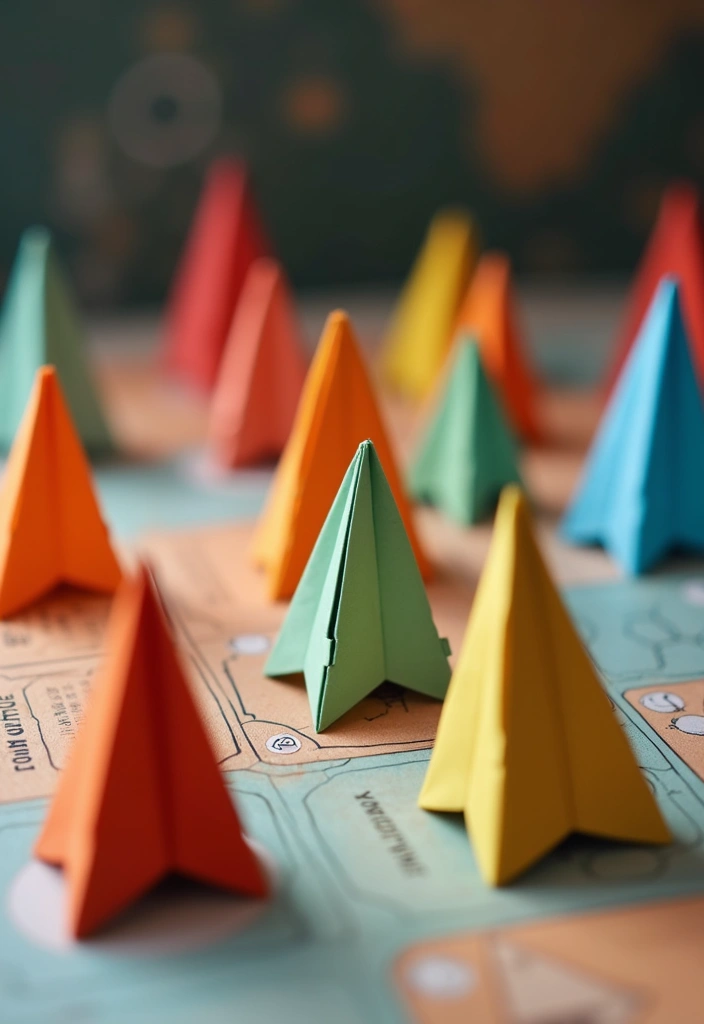
30. Origami Event Decorations

Planning a party and want decor that pops without a big budget? Origami event decorations fit the bill. They are easy to set up and light to move. This decor fits any theme, budget, and space.
Top ideas you can make
– Centerpieces: stack folded paper flowers or cranes in a vase. Use 4×4 inch sheets for small tables or 6×6 inch pieces for a focal point.
– Garlands: string folded shapes along walls or across the ceiling. Thread them on string or ribbon. Two colors look neat; three colors add energy.
– Hanging elements: make paper lanterns or a mobile of cranes. Hang them over the dessert table or at the entry.
– Party favors: fold a tiny crane or heart and tuck a note in a pocket. Guests take home a handmade keepsake.
Materials and tips
Choose bright origami paper or thin cardstock to hold folds. Keep scissors, string, and tape for finishing touches. Pick colors that fit your theme. Scraps can recycle into new shapes later.
Practical notes
This approach saves money and reduces waste. It works for weddings, birthdays, and holidays. It does take time, so start early and practice a few folds.
Next steps
Plan your color palette, pick 2–3 shapes, and test a small setup at home before the big day.
Conclusion

Origami paper crafts are more than just a creative outlet; they’re an eco-friendly way to bring joy into your life and the lives of those around you.
With these 30 DIY projects, there’s something for everyone, whether you’re looking for functional items or delightful decorations.
So why not grab some paper and start folding your way to happiness? Let your creativity soar and share your finished pieces with others!
Note: We aim to provide accurate product links, but some may occasionally expire or become unavailable. If this happens, please search directly on Amazon for the product or a suitable alternative.
This post contains Amazon affiliate links, meaning I may earn a small commission if you purchase through my links, at no extra cost to you.
Related Topics