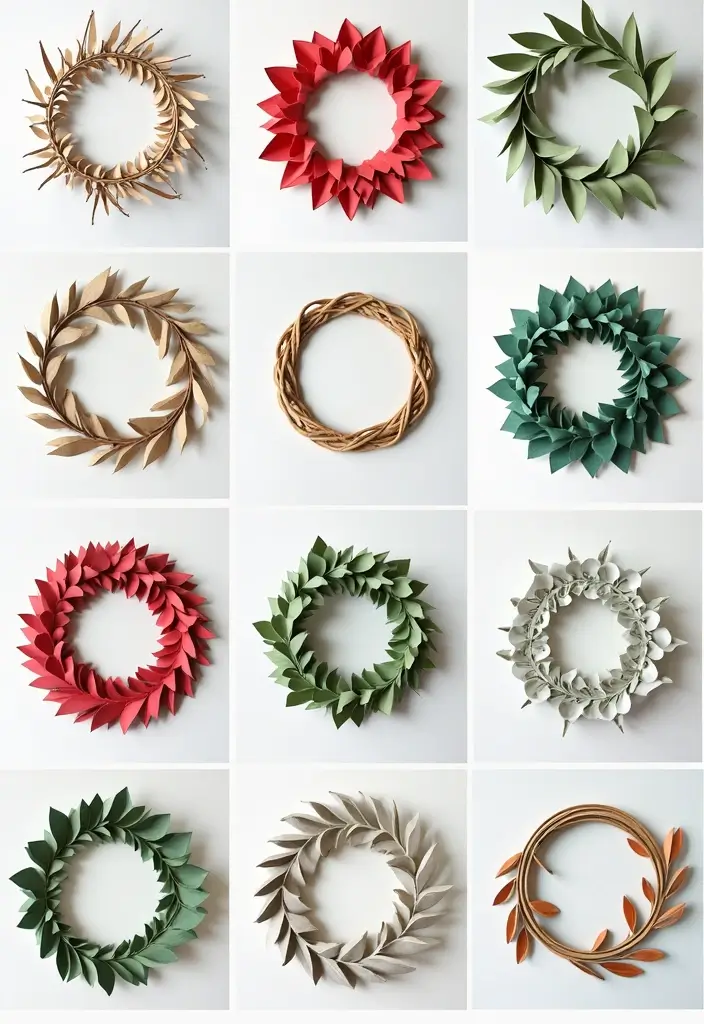
Door decor that feels warm and inviting shouldn’t be hard to pull off. This post grew from a simple craving for easy, affordable charm. I put together 29 DIY paper wreath designs that add charm to any door. They cover a range of moods, from bold and playful to soft and calm.
If you love quick crafts, budget-friendly projects, or decorating spaces you rent, this is for you. If you want a strong first craft win without special tools, you’ll enjoy this.
Here is why this matters. You’ll get 29 designs that are simple to make, adaptable to any door, and kind to your wallet. Each design uses common supplies and clear steps that you can follow in a weekend. You’ll see choices that suit bright colors, warm neutrals, and everything in between.
Let’s break it down. You can start with a simple paper wreath made from a circle of cardboard and layers of folded paper. You can reuse scraps from magazines, scrapbook paper, or kraft paper. Tools are basic—scissors, glue, and a bit of string or ribbon. The result is a light, textured piece that sits flat on the door and catches the eye.
Next steps. Plan your color theme, gather a few sheets, and pick one of the wreath designs that matches your door. They store flat when not in use, so you can switch with the seasons. If you want extra zing, mix patterns or add a small embellishment.
Ready to try one? Grab some paper and a pair of scissors and pick a design that feels right. This intro is here to spark ideas, not to overwhelm. Dive into the full collection and start crafting a wreath that makes your door feel welcome and a little more you.
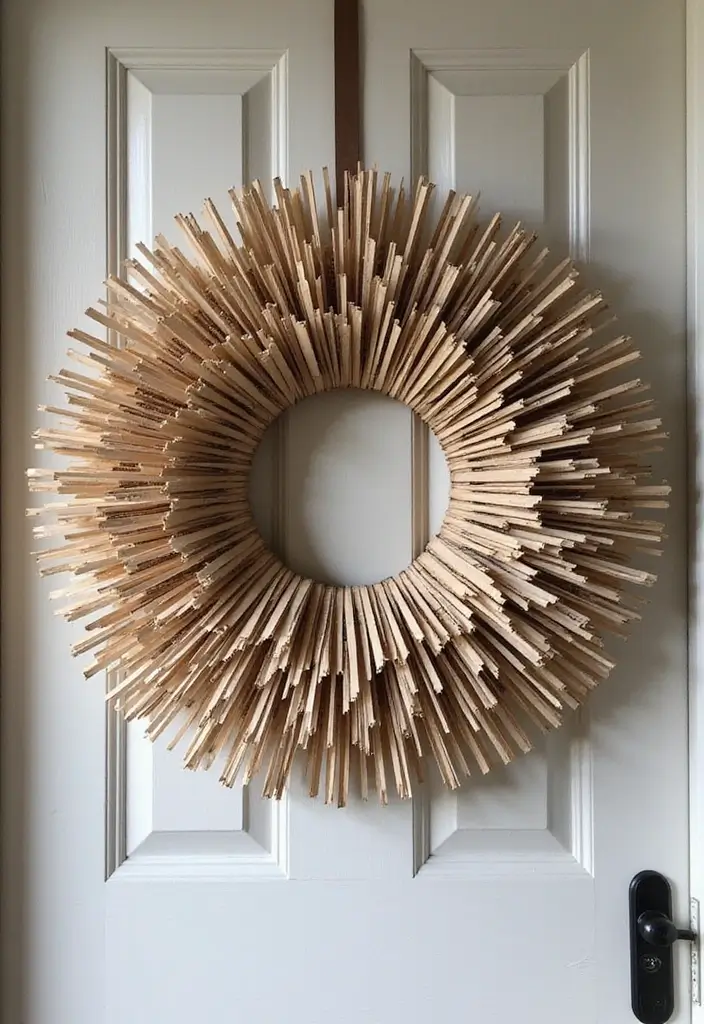
1. Vintage Newsprint Charm
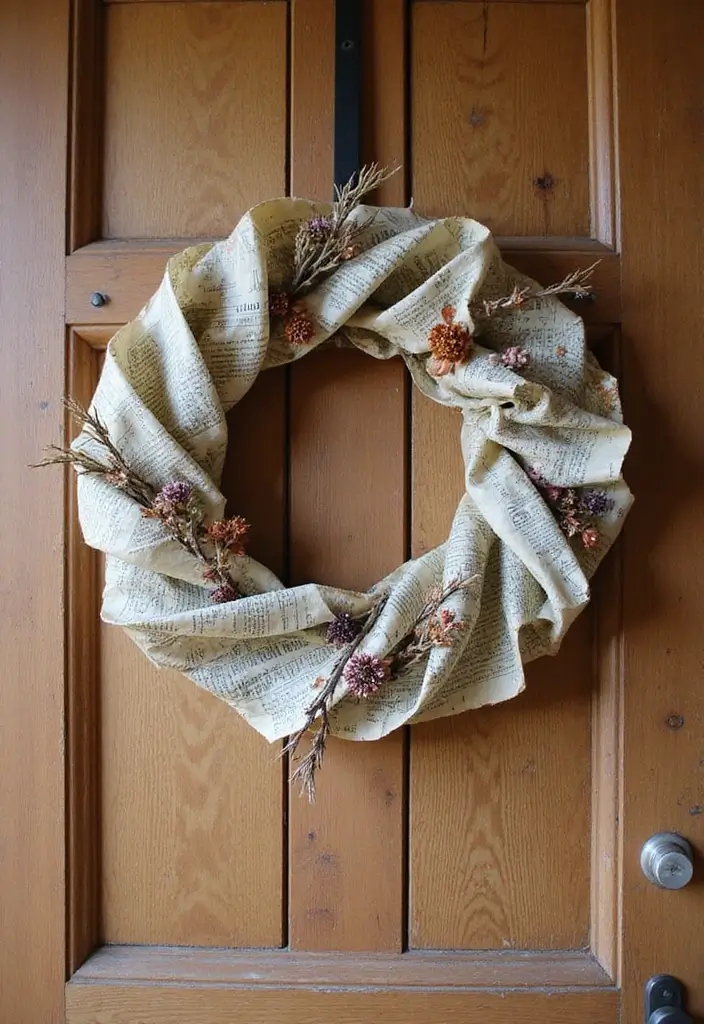
You want a door that feels warm and a little old, not dusty. A vintage newsprint wreath can give that mood. It uses simple scraps to stay light and friendly.
Here is why this works: newspaper adds charm, and fabric adds texture. You can make it with stuff you already have.
– Materials you need: old newspapers, scissors, craft glue, a cardboard or wire wreath base, fabric scraps, dried flowers or small twigs, pastel paint, a soft brush, and a hanging loop.
– Make the base: form the ring from the base; keep it sturdy but light so the paper can bend.
– Cut and coil: cut long strips or spirals from the newsprint. Twist each piece into a loose coil.
– Layer for fullness: pile coils around the ring. Overlap pieces in different directions for depth.
– Add texture: tuck in fabric bits, tiny twigs, and dried blooms between layers.
– Color edges: dab soft pastel paint on the edges of some strips. Let it show just a hint.
– Attach and hang: glue pieces firmly to the ring. Tie a loop for hanging.
– Care tips: store flat when not in use. Gently press curled edges back into place.
Next steps: hang the wreath where light hits, and swap in sprigs for the seasons.
@media (max-width: 600px) {
.visual-quiz-iframe { min-height: 995px !important; height: 1100px !important; }
}
2. Colorful Magazine Explosion
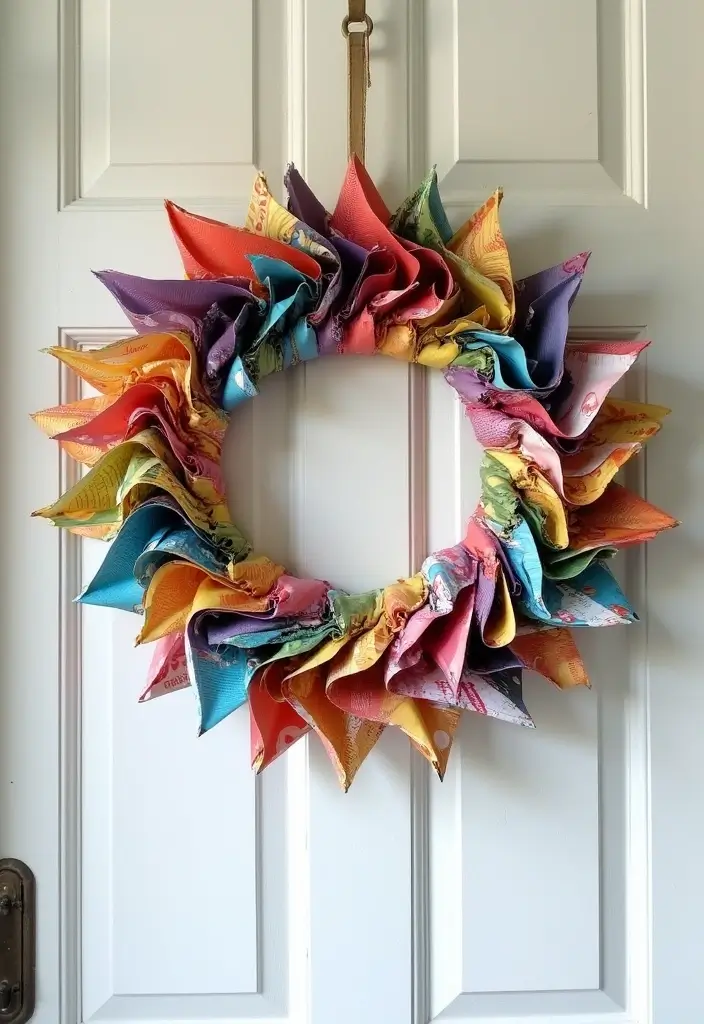
Here is why you should try the Colorful Magazine Explosion. You want a door that welcomes visitors, and this project uses pages you already have. It’s quick, fun, and easy to adjust for different seasons.
Here is how to do it:
– What you need: old magazines, scissors, a hot glue gun, and a circular base.
– Shape options: cut pages into circles, triangles, or leaves for texture.
– Texture tricks: tear edges unevenly to add depth and interest.
– Layering: start at the base and glue pieces in loose, overlapping rows.
– Overlap: press pieces so edges tuck under a bit for a tidy look.
– Color plan: pick a color family or a simple theme to guide your choices.
– Mixing styles: pair bold colors with softer tones to match your entry.
– Finishing touch: tie a bow from ribbon or fabric at the top for a finished feel.
– Care tips: let the glue dry before moving the wreath. Keep it indoors if possible.
Next steps: hang it where light hits the colors. If you want a quick swap later, store extra pieces for a fresh look. This wreath invites compliments without much fuss.
Here is a quick tip. Lay out the colors on paper to see the flow. Put larger shapes in the middle and smaller pieces around the edge for balance. If you run out of pages, mix in gift wrap scraps for a new look.
@media(max-width:480px){
3. Eco-Friendly Fabric & Paper Combo

Eco-Friendly Fabric & Paper Combo
You want a wreath that feels warm and lasts. This eco-friendly mix uses recycled fabric and paper to achieve that.
– Begin with a sturdy cardboard base cut to your door size.
– Wrap the base in old fabric scraps, smoothing so it sits flat and neat.
– Make paper flowers from old book pages or wrapping paper, curling the edges for texture.
– Attach the paper blooms to the fabric base in small clusters with a strong glue.
– Mix fabric patterns and flower sizes to add depth and contrast.
– If the wreath will hang outdoors, secure every bloom well and add a ribbon or cord for extra hold.
– Finish with a light seal or keep the piece indoors to protect the fabrics.
This combo of soft fabric and delicate paper creates depth, shadow, and charm. Swap colors or patterns for seasons or moods.
This approach saves waste and lets you refresh the look with the seasons. Try different textures like burlap or velvet for a bold touch. If indoors, you can swap in more paper flowers for a lighter feel.
Next steps: gather scraps, trim shapes, and test a small cluster on your door to plan the layout.
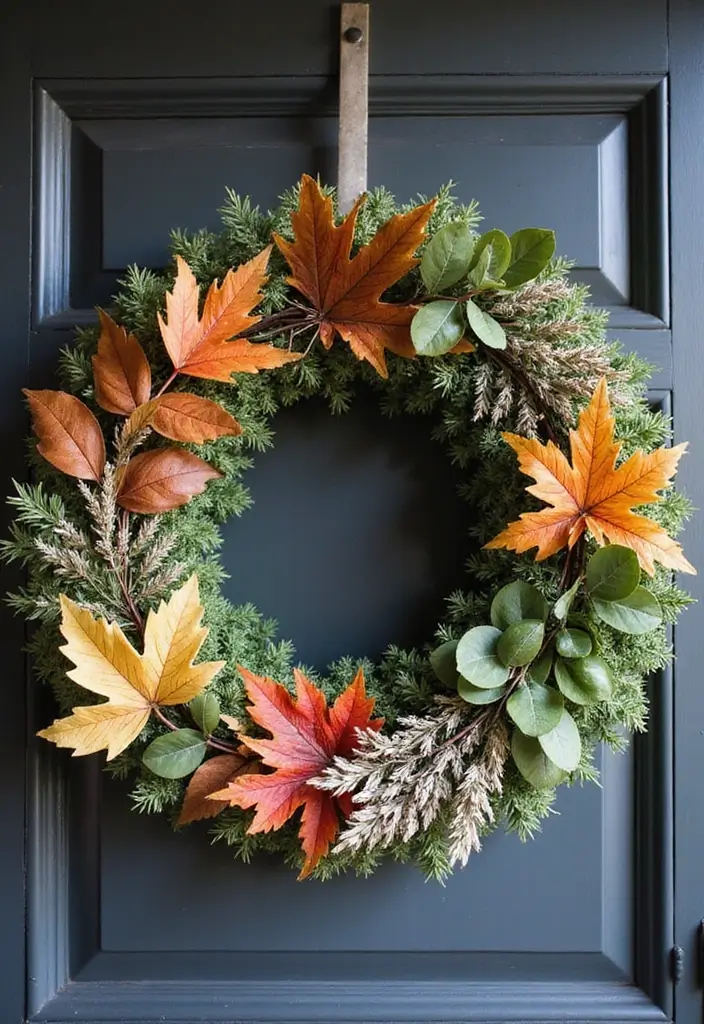
4. Nature’s Touch

You want a wreath that makes your door feel calm and inviting. This nature-inspired design uses paper leaves and small birds to echo the outdoors.
Materials
– green and brown craft paper
– a circular base (foam or cardboard)
– glue or tape
– scissors
– optional real twigs, pinecones, and small sprigs
– string or ribbon for hanging
How to make
1) Cut leaf shapes from green and brown paper. Vary size for depth.
2) Crumple each leaf a touch, then press flat. This adds a natural 3D look.
3) Glue leaves around the ring. Build in layers so the wreath feels full, not flat.
4) Add tiny birds cut from paper. Tuck in a twig or two for texture.
5) If you have real twigs and pinecones, attach them where you want extra charm. They bring a scent and a rugged feel.
Tips
– A little hot glue helps items stay put.
– Leave small gaps so light can play on the surface.
Here is why this design works: it uses simple materials and real nature cues. You get a door decoration that looks outdoorsy, with little cost and little mess. Next steps: try different leaf shapes, swap in red berries, or switch the base color to match your entry rug.
5. Whimsical Watercolor Delight
Want a door that feels warm and creative? A watercolor paper wreath brings color with a soft art vibe. You can use watercolor paper you make yourself or sheets from a craft shop. Cut the paper into petal shapes and place them in a circle.
– Materials: watercolor paper or craft sheets, scissors, glue, a round wreath base, paints and brushes, optional spray sealant.
– Petals: cut petals in two or three sizes. Mix big and small shapes for a fuller look.
– Color and dry: paint petals with light watercolor washes. Let them dry completely to keep edges clean.
– Assemble: start around the base and layer petals as you go. Overlap them to create depth and a natural feel.
– Finish: attach a loop of ribbon or twine for hanging. A quick spray seal helps colors stay bright longer.
– Color ideas: blend bright hues with soft pastels. Warm tones give a sunny mood, cool tones feel calm. This mix helps the wreath fit many occasions.
Tip: place the wreath indoors to keep colors bright longer, away from sun and rain.
Here is why it helps your decor: the soft edges and varied color levels catch the eye without shouting.
Next steps: try different petal sizes, add tiny centers, or swap colors for each season to refresh your look.
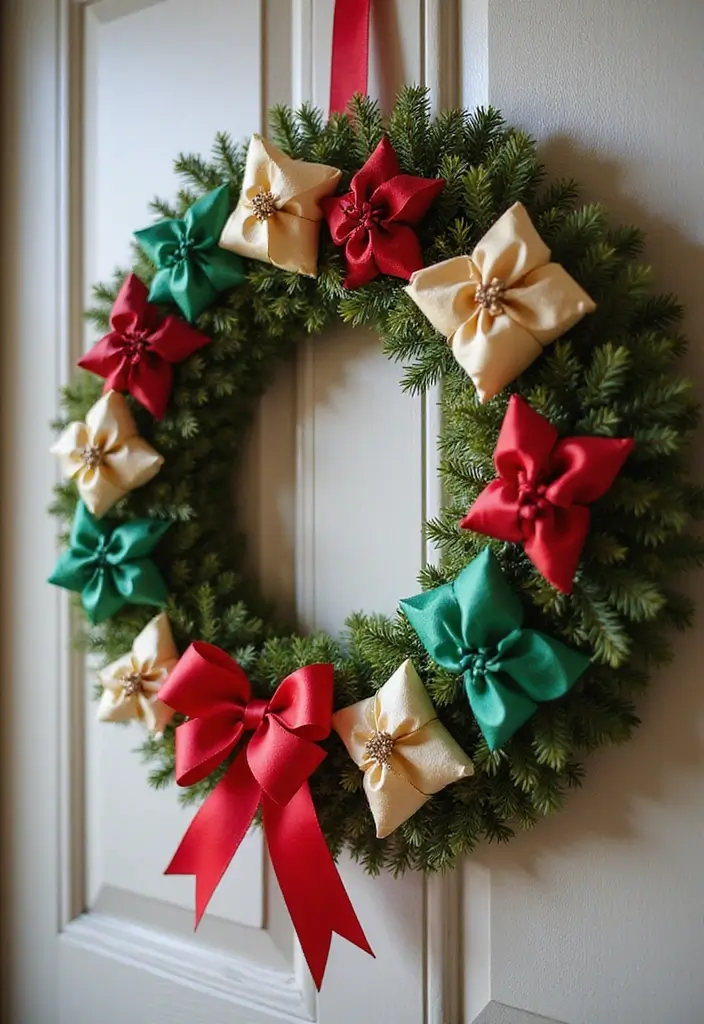
6. Holiday Cheer with Festive Papers
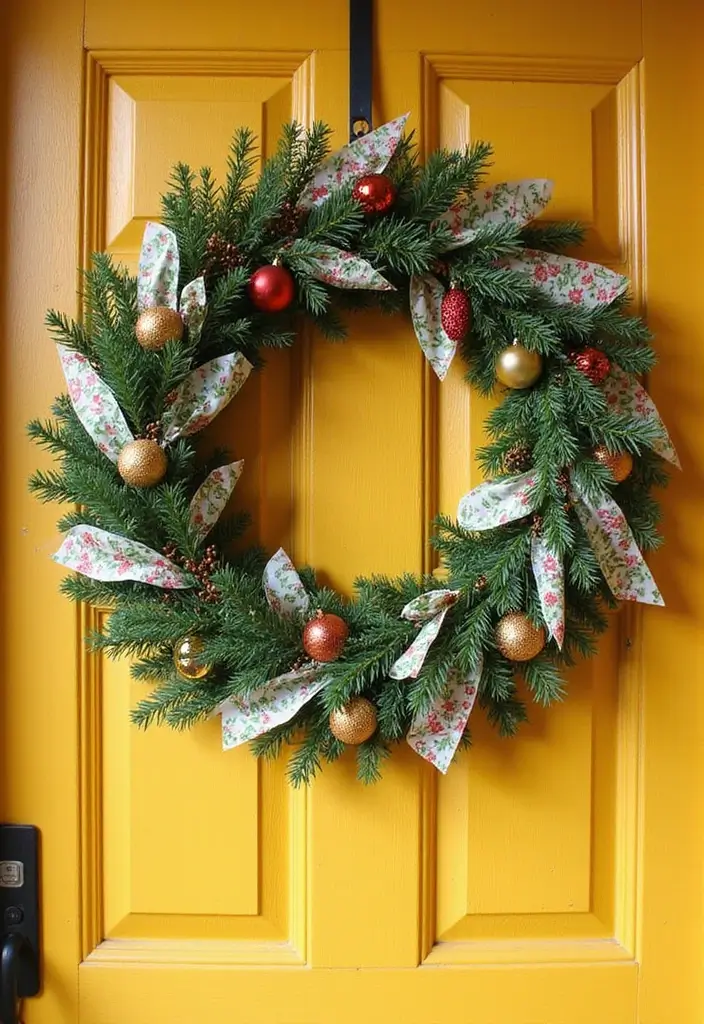
Want a festive wreath that brightens your door and helps the planet at the same time? Try a DIY wreath made from recycled gift wrap. It gives old paper new life and adds charm to your holiday look. Here is how to do it.
– Materials — Recycled gift wrap, a circular base, scissors, glue or tape, and a hanging ribbon.
– Make the pieces — Cut the wrap into circles and small shapes. Mix two to three prints for color and fun.
– Add texture — Toss in pine needles or tiny ornaments for depth and scent.
– Assemble — Glue the shapes to the base in overlapping layers. Start on the outer edge and work inward.
– Choose a size — A wreath twelve to sixteen inches wide makes a bold statement. Smaller sizes feel cozy on any door.
– Finish ideas — Tie a neat ribbon for hanging and add a scented touch like cinnamon sticks.
– Care — Store the wreath flat to keep colors bright. Reuse the base next year by refreshing the wraps.
– Color ideas — Use two prints and one solid. Pair deep red with forest green and cream for balance. Keep the palette tight so the look stays clean.
– Hanging and placement — Use a sturdy ribbon and a door hook. Place it where light makes the colors pop.
– Budget-friendly tweaks — Use scraps for extra bows. Pre-cut pieces in a single session to save time.
This eco approach saves waste while you get a warm, welcoming door. It’s simple, actionable, and fun to customize year after year.
@media(max-width:480px){
7. Minimalist Elegance

Minimalist Wreath in a Monochrome Style
You want a wreath that feels calm and modern. Minimalist design uses simple shapes and clean color. A monochrome palette keeps the look quiet and chic. Picture rolled paper cones arranged in a circle, each cone pointing outward. The surface is smooth and the texture comes from the folds. A touch of gold or silver with metallic accents adds a dash of glam without crowding the design. The secret is space. Let every piece breathe and focus on form over busy detail. This style fits clean-lined rooms and contemporary doors.
Here is how to build it:
– Choose a single color in a matte finish.
– Cut paper into cones about 1.5 to 2 inches tall, with a clean point.
– Roll each cone tightly and glue the seam.
– Arrange the cones around a circular base, starting with the largest and moving toward the center.
– Space the cones evenly to keep the circle balanced and open.
– Add metallic accents on a few cones for a subtle sparkle.
– Hang the wreath on a door with a slim ribbon or twine.
– For depth, use slightly lighter and darker shades of the same color.
This minimalist wreath stays light on materials and is easy to store flat when you switch decor. It works on doors, walls, or small entryways.
@media(max-width:480px){
8. Geometric Shapes Extravaganza
Geometric shapes give a wreath a bold, fresh look. You cut colored paper into triangles, squares, circles, and other forms. Then you press them around a foam or cardboard circle. The result feels clean and modern.
Here is why it works: clean edges and bright colors catch the eye. You can plan a layout before gluing. Try a tight mosaic, a neat grid, or a spiral. Lay pieces on the base first, then choose an arrangement. Practice first on scrap paper.
Color plan: choose two or three hues that match your door or season. For spring, think airy pastels. For fall, warm oranges, browns, and gold. For winter, icy blues and metallics.
Attachment is simple. Use craft glue sticks for a flat, sturdy look. For lift, add foam dots under some shapes. You can tape the back with clear tape to keep edges clean.
Add depth with texture. Mix matte and shiny papers. Add a few shapes in contrasting sizes to guide the eye.
Seasonal twists are easy. Circles become snowflakes in winter, diamonds shift to stars for holidays, or triangles become leaves in autumn.
Tips: cut shapes in advance, use a template, store the wreath flat away when not in use.
@media(max-width:480px){
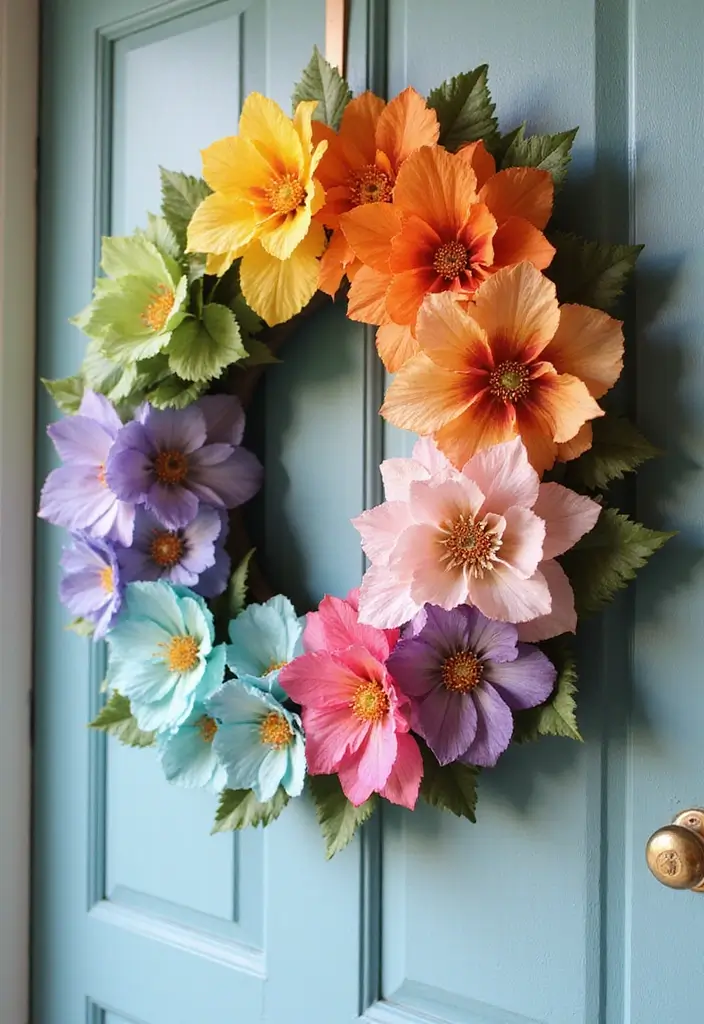
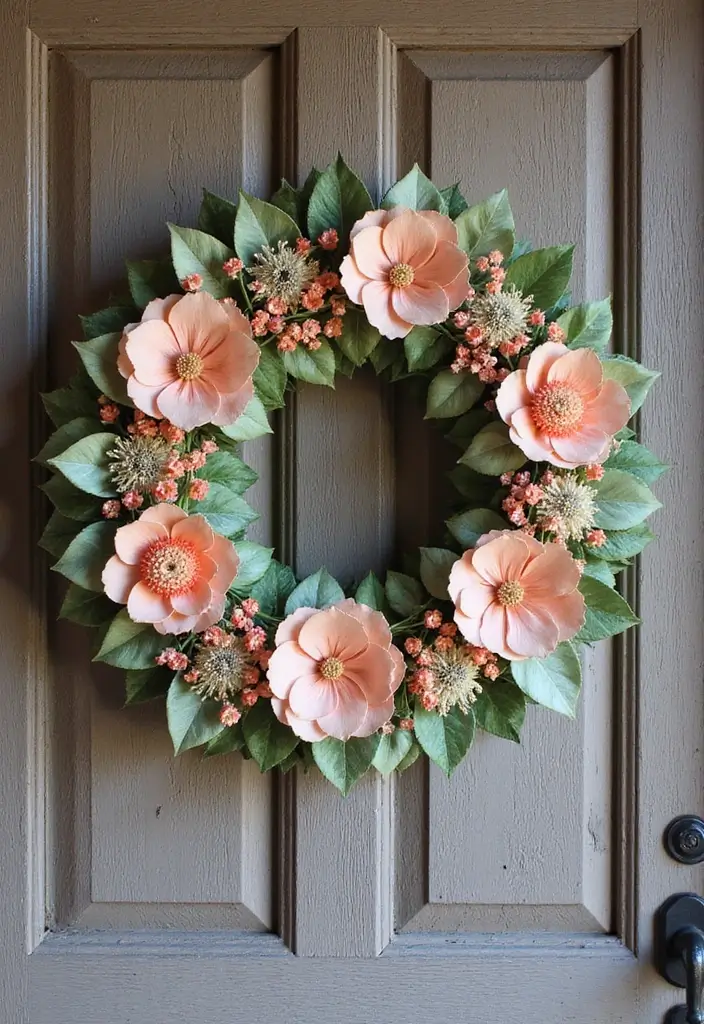
9. Sweet Floral Fantasy

You want a door that welcomes guests with a soft, floral touch. A paper wreath made of blooms can do that. Here is a simple, sturdy approach you can try this weekend.
– Gather supplies: a firm ring or cardboard base, tissue paper in pinks and yellows, old book pages for a vintage look, glue, and a bit of greenery.
– Make the flowers: cut small circles from tissue and twist them into petals, then stack several petals to form blossoms. Or fold book pages into layered petals for a rosy, antique vibe. Press the petals gently to keep them flat for glue.
– Build the wreath: place your largest blooms first in a circular pattern. Add smaller blooms around them. Keep the centers visible so you see the petals.
– Add greens and accents: tuck in a few green leaves between clusters. A touch of eucalyptus or fern shapes adds contrast and depth.
– Finish and hang: glue blooms securely to the base. Check for even spacing and a balanced look. Let the glue dry before you hang it on your door.
– Tips: use a variety of flower sizes and a mix of colors for a lively, modern feel. Space blooms evenly, not crowded. If you want a longer life, use high-quality tissue and seal with a light spray of clear craft finish.
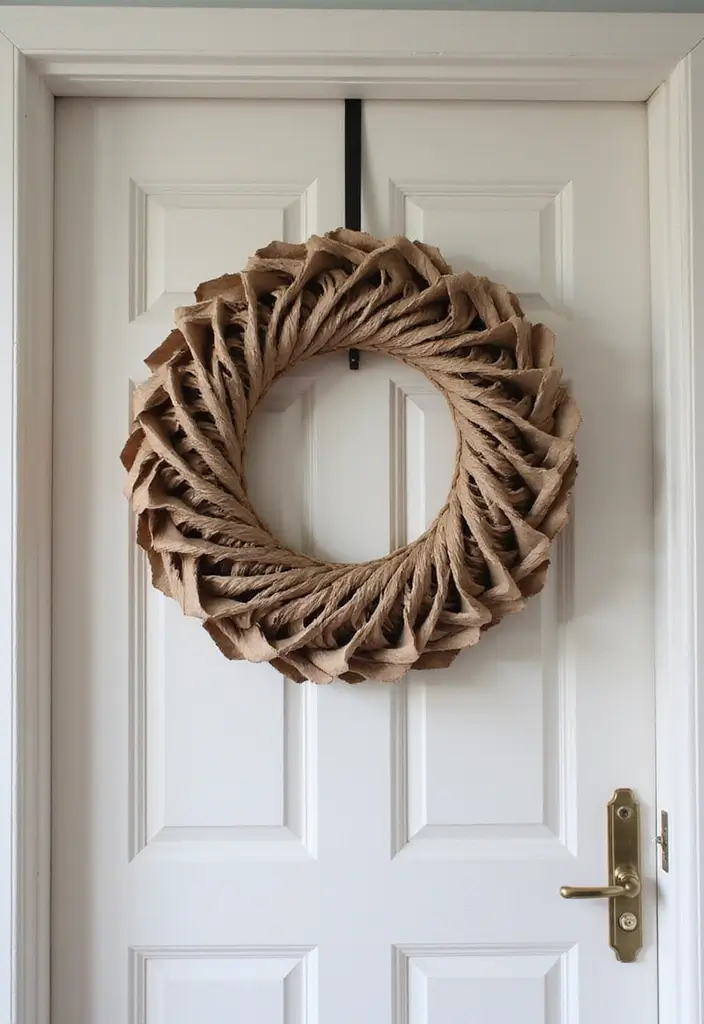
10. Rustic Twine and Paper

You want a door that feels warm and inviting. The rustic twine and paper wreath can give that cozy vibe without a big budget. Here is a simple plan you can follow.
– Materials you’ll need
– Circular base (foam ring or sturdy cardboard)
– Natural twine
– Recycled paper (old books, magazines, or scrapbook pages)
– Glue or hot glue
– Optional accents: burlap strip, lace, a small chalkboard tag
– Scissors and a pencil
Here is why this setup works. The twine gives a soft, farmhouse feel. The paper adds color and light texture. Recycling paper makes a greener project you can feel proud of.
– Step-by-step assembly
1) Wrap the base with twine, keeping the rows tight and even.
2) Cut paper into simple flowers or leaf shapes.
3) Glue the shapes in small clusters around the ring.
4) Layer a strip of burlap or a bit of lace behind some pieces to add depth.
5) Attach a chalkboard tag if you like. Write a seasonal greeting and hang the wreath.
Next steps are to decide on colors. Earthy browns and creams read farmhouse. Soft greens or muted blues work well too. Use light glue so pieces stay flexible.
– Tips for a polished finish
Keep pieces light so the wreath hangs evenly. Seal the glue with a little clear spray if you expect rain en route to your door. Store flat when not in use to keep shapes from drooping.
This design is friendly for DIY beginners and great for year-round door charm.
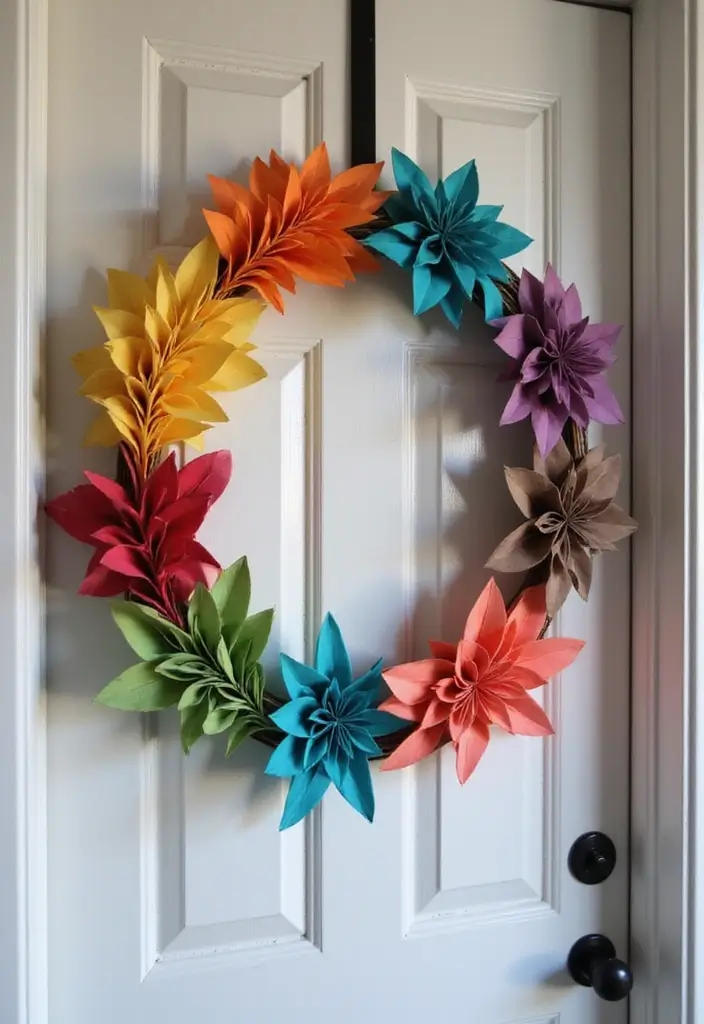
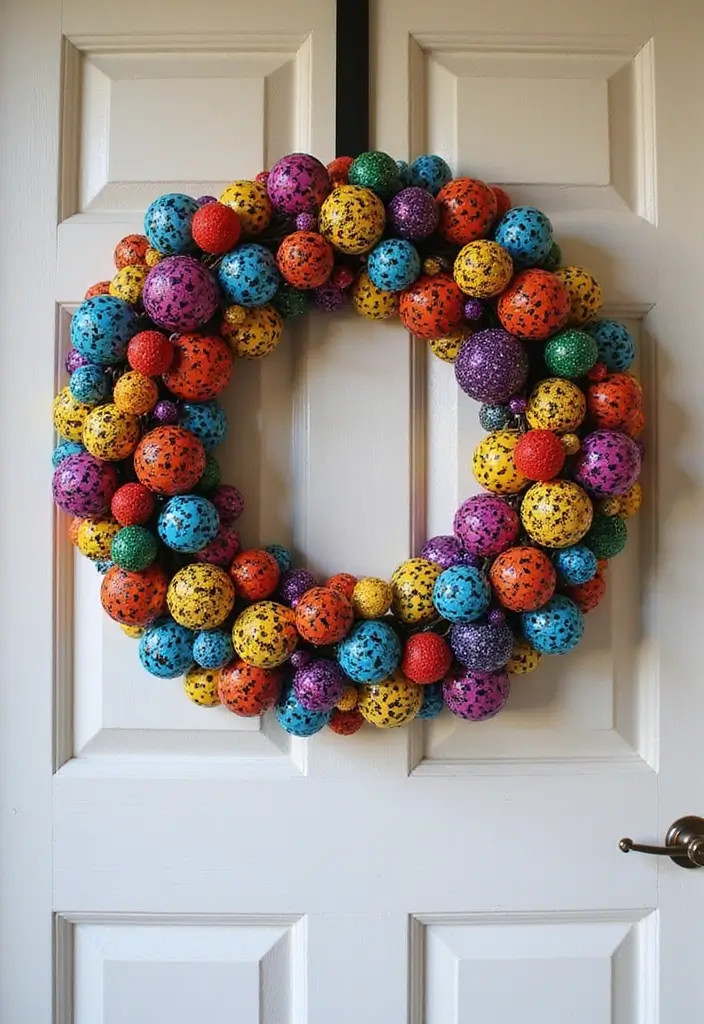
11. Rainbow Dream

Rainbow Dream
Want a bright, easy wreath you can finish in an afternoon? This rainbow wreath uses simple paper and glue to bring color to your door. It feels playful and welcoming.
Here is why it works well for kids’ rooms or any space that loves color. The smooth color gradient catches the eye. The paper rustles softly when you move by it. It’s light, so you can hang it anywhere.
Materials
– Colored craft paper in red, orange, yellow, green, blue, indigo, violet
– A sturdy circular base (cardboard or foam)
– Scissors and glue
– Optional: glitter paper for extra sparkle
Steps
1) Create a round base by cutting a circle from cardboard or foam. Make it as big or small as you like.
2) Cut shapes in rainbow colors. Circles, squares, hearts, or diamonds all work.
3) Lay the pieces around the ring from red to violet. Aim for a smooth color transition so the arc reads like a rainbow wrapped around the circle.
4) Glue each piece in place. Press gently and let glue dry. Fill any gaps with extra pieces for a fuller look.
5) Add a few sparkly glitter shapes if you want more shine. They catch the light and add whimsy.
Tips
– Keep the color flow steady for the best rainbow effect.
– Mix matte and shiny papers for texture.
– Hang on a door or wall where light moves across it for extra glow.
Where to use
– Front door for a sunny welcome.
– Kids’ room to spark imagination.
– Playroom walls for a cheerful focal point.
Next steps: store flat when not in use and rehang as a seasonal refresh. This DIY paper wreath stays affordable, friendly to kids’ crafts, and easy to customize.
12. Dried Flower Accents
You want a wreath that feels fresh and fits the season. A paper wreath with dried accents delivers that balance. It stays light, so you can hang it easily on any door. Here is why this mix works: paper blooms bring color, while dried stems add texture and a natural look.
Mood and color
Pick dried pieces that set the mood you want. Lavender lifts the scene with calm notes. Wheat or [amber grasses] warm the feel for autumn. Mix in a small touch of greens or pale blossoms for summer days. Keep the weight even so the wreath sits flat when you hang it.
Materials and base
– Base options: grapevine for rustic charm or a lightweight wreath form for a cleaner look
– Paper flowers: simple, folded blooms you can make in 3 sizes
– Dried accents: lavender sprigs, wheat stalks, small grasses
– Adhesives: hot glue or craft glue, and a thin floral pin if you need quick adjustments
– Finishing: ribbon or jute for a loop
Here is how you put it together. Start with a few paper blooms in a loose arc. Tuck dried stems between them to create depth. Add more color with a couple of paper blooms here and there. Avoid crowding; let some base show through.
Finish and care
Glue everything securely but don’t squeeze too tight. Add a simple ribbon for hanging. Keep the wreath dry and store it in a box when not used. Next steps: test the balance, adjust if needed, and enjoy a unique, seasonal welcome for your door.
@media(max-width:480px){
13. Seasonal Seasonal Changes
Want a wreath you can swap? Start with a sturdy wire frame. It keeps pieces easy to swap.
Four seasonal sets
– Winter: snowflakes cut from white or light-blue paper.
– Spring: simple flowers and buds in soft greens and pinks.
– Summer: sun motifs in bright yellows and bold blues.
– Fall: leaves in orange, brown, and gold.
Keep shapes flat so they rest neatly on the frame. Attach with reusable fasteners. Use small Velcro dots, clip-on tabs, or a magnetic ring. They let you add or remove pieces in seconds. You can layer pieces for depth or keep a flat look if you prefer.
How often should you swap? Try every equinox. Or do a quick two-piece swap each month. It’s your call.
Storage helps. Put each season’s pieces in labeled bags or a box. Label the bag with the season and year so you pull the right set next time.
Benefits are clear: you get a living feel for your door without buying new décor each season. It saves money and keeps the entry neat.
Next steps: gather craft paper, a wire frame, glue dots, and bags. Plan your four seasonal sets, cut the shapes, and test the swap routine on a weekend.
@media(max-width:480px){
14. Nautical Vibes

Want a door that feels like a salt breeze from the sea? A nautical wreath made of blue and white paper can bring the coast to your doorstep. This simple project uses easy shapes and a calm color scheme. It helps you capture summer memories, even on busy days. Here is why it works on any door: the blue and white pop catches the eye, and paper keeps it light and affordable. Next steps give you a maker-friendly plan you can finish in an afternoon.
Materials
– Blue and white craft paper for waves and foam.
– A sturdy cardboard ring as the base.
– Glue and scissors for cutting and sticking.
– String or twine to hang it.
– Optional: seashells, rope, or driftwood accents for extra coastal charm.
Steps
– Cut blue strips and white foam shapes to resemble waves.
– Cover the ring with paper, gluing pieces in a flowing, sea-like pattern.
– Add shells or rope for a real beach vibe.
– Let the glue dry completely before hanging.
– Attach a string or ribbon for easy display.
Placement tips
– Put it where it can welcome guests, near coastal decor.
– Try a front door that faces the breeze to keep colors bright.
– Pair it with driftwood decor or marine-themed art for a cohesive look.
– This wreath is a friendly welcome for beach lovers all year round.
15. Personalized Touches

You want a wreath that feels like you, not just a pretty piece. A simple trick is to add family photos and small memory shapes to a sturdy base. This makes your door a tiny gallery and a keepsake.
– Materials:
– Use a foam ring or thick cardboard hoop.
– Cut paper shapes like hearts or stars.
– Print small photos of family moments.
– Use glue dots for a flat, clean finish.
– Steps:
– Plan the layout first to see where each shape goes.
– Attach shapes to the base, then add photos to the shapes.
– Press firmly so everything sticks and lies flat.
– Tips:
– Choose a simple color palette to avoid clutter.
– Try black and white photos for a clean look.
– Rotate photos with the seasons to keep the wreath fresh.
– You can mix sizes too, small photos near the rim and bigger ones toward the center.
This project invites everyone to join. Family members pick a memory and help place a shape. The result sparks conversation and shows your family’s story over the years. It also gives you a simple way to celebrate a new memory. If a photo fades, swap it for a newer print. When the season ends, store the photos flat to reuse them next year. Keep the wreath indoors or under a sheltered spot to protect the prints.
16. Upcycled Book Pages

Your door could use a warm, bookish touch. This upcycled book page wreath gives new life to old pages and adds a soft literary vibe to any entryway, study, or reading nook.
Here is why this works
– Tear pages into petals and small shapes. Vary the sizes for texture.
– Glue them to a round frame. Build in layers from the edge toward the center.
– Use pages from many books. The mix of fonts and tiny illustrations is charming.
– Edge painting adds depth. A light gradient helps the petals stand out.
– Keep the base light. A cardboard or foam ring makes the wreath easy to lift.
Next steps
– Choose a frame size you like. A 12-inch circle is easy to handle.
– Gather pages you don’t mind aging. Tea staining adds warmth if you want a vintage feel.
– Plan your color hints. Soft creams, browns, and a touch of gray go with most doors.
– Glue and dry. Check after 15–20 minutes and adjust if needed.
Display ideas
– Hang by the front door to greet guests.
– Place in a reading corner to boost the literary vibe.
Care tips
– Dust gently with a soft brush. Keep the wreath away from high humidity.
17. Pom-Pom Accents
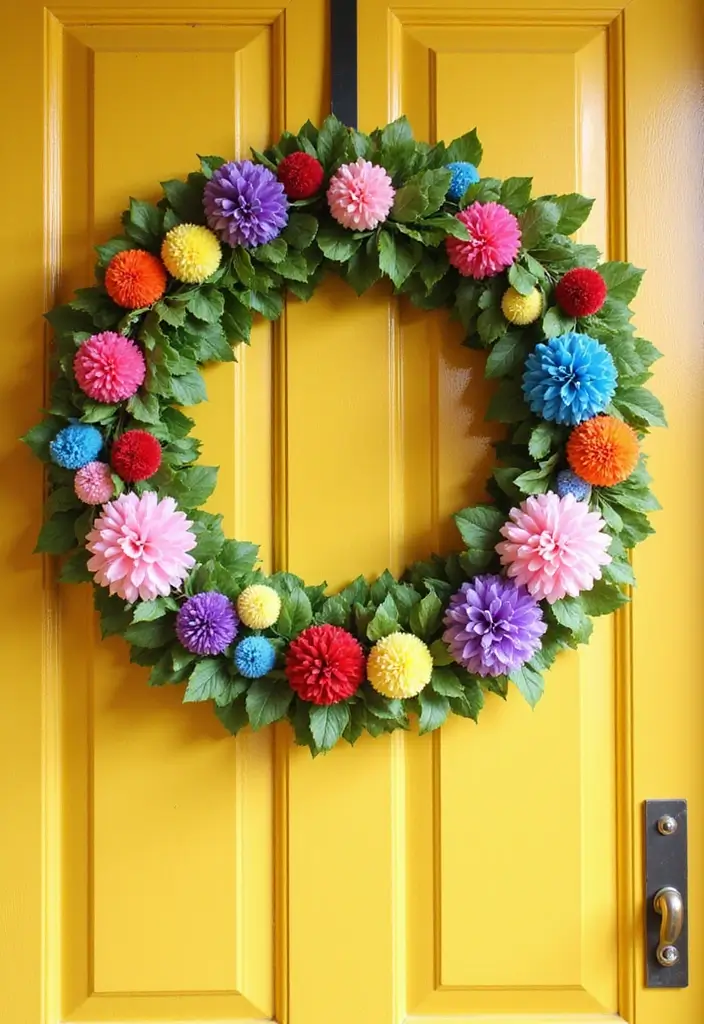
You want a door that feels joyful without a lot of work. Pom-pom accents paired with a paper wreath bring that playful look to life fast.
Here is why it works: paper gives a sturdy base, yarn adds soft texture, and the color mix catches the eye.
Next steps are simple and fast.
– Step 1: Start with a simple paper wreath base, using shapes you like such as cut flowers, circles, or stars.
– Step 2: Make a batch of yarn pom-poms in a range of sizes and colors so your wreath feels lively.
– Step 3: Plan a layout first by laying the pom-poms on the base, mixing big and small pieces.
– Step 4: Attach the pom-poms with glue; press and hold so they stay put.
– Step 5: Finish with a dab of glue on the back of each pom-pom to fix it, then hang.
Keep it indoors. Pom-poms shed a few fibers, so use fabric glue and press well.
Try it on doors in the kitchen, hallway, or kids room. Use bold pinks, sunny yellows, or soft blues. Pair simple paper shapes with plain bases for a clean look. This keeps the project quick and easy so you can finish it in an afternoon. Your door will smile for days.
18. Fringed Delight
Want a wreath that adds texture to your door without a lot of fuss? Fringed Delight does just that. The layered fringe catches light and moves with air, giving your entry a friendly feel. Here is why it works and how you can make it.
What you need
– Colored paper or cardstock in your chosen palette
– Scissors and a ruler
– A circular base about 12–14 inches wide (cardboard or foam)
– Glue or glue dots and clear tape
– Optional ribbon for hanging
How to cut the fringe
– Cut strips about 1/2 inch wide and 6–8 inches long
– Leave a solid top edge about 1/2 inch to anchor each strip
– Fringe each strip by making small cuts from the bottom toward the top
Assemble the wreath
– Start by attaching fringe around the outer edge of the circle
– Layer rings toward the center for depth and fullness
– Secure every strip well so it stays put when the door moves
Color and texture
– Try a gradient from light to dark or go single color for a clean look
– Mix crepe paper for softness with cardstock for sturdiness
– Vary strip lengths for a more lively finish
Finishing and hanging
– Press each fringe gently to keep it flat against the base
– Add a dab of glue at the tips if needed
– Use a small hole or tie a ribbon on top for hanging
Next steps
– Hang your wreath and adjust spacing as needed for balance.
@media(max-width:480px){
19. Holiday Theme Swap

You want a wreath you can use for many holidays without making a new one each time. Here is a simple plan that keeps your door fresh and easy to update.
Switchable base
– Choose a sturdy ring made from cardboard or foam.
– Add tiny clips, fabric loops, or Velcro dots for fast swaps.
– Keep swap pieces in a labeled box.
– This setup keeps the look tidy while you swap.
Color plan
– Pick a color plan that fits many holidays.
– Go with red, green and gold or navy, white and metallics.
– Use neutrals with small pops of color.
– A steady palette makes every swap feel deliberate.
What to swap
– For Christmas, add bows and tiny ornaments.
– Valentine’s Day needs hearts.
– Easter loves flowers and eggs.
– Thanksgiving gets leaves or acorns.
– Halloween gains pumpkins or bats.
– Keep a few pieces ready for fast changes.
– It saves time on busy days.
Swap steps
– Gather the pieces you plan to use.
– Remove the old bits.
– Clip on the new pieces.
– Store extras in labeled bags.
– Label each bag so you know what goes with what.
Start with a simple switch this month.
See how easy it is to keep your door welcoming.
You can swap a few pieces in minutes.
Next steps.
Now you can change the look with just a few cuts and clips.
Next steps.
20. DIY Gift-Wrapping Wreath
DIY Gift-Wrapping Wreath
You want a wreath that doubles as gift wrap. It adds charm to your door and saves time. Pick colors that match your wrapping paper or the season. Use sturdy, colorful paper you already have. You can keep the look simple or mix prints for a bold look. This idea blends decor with a practical touch.
Here is how you make it.
– Step 1: Build a base. Use a foam ring or sturdy cardboard. Wrap the ring in plain paper so the edge stays clean.
– Step 2: Create wrap pieces. Cut small flowers or squares from your papers. Add a few tiny bows for texture.
– Step 3: Attach pieces. Use double-sided tape to place items. This keeps glue off the surface and helps when you unwrap gifts.
– Step 4: Add the wrap look. Put a big bow in the center and a few accents around. A tiny tag tucked in adds a personal note.
– Step 5: Finish. Add a string loop to hang it. It sits on a door and also acts as wrap for a wrapped gift.
Next steps: store flat when not in use. Swap colors for each season to stay fresh without buying new paper.
Now you can gift with style and ease.
@media(max-width:480px){
21. Interactive Wreath

What this interactive wreath offers
Looking for a wreath that invites people to share messages, not just look at it? This DIY paper wreath adds charm and warmth to your door and invites voices.
– Start with a sturdy base: a foam or wire ring. Cover it with ribbon or colored paper so it looks finished.
– Create a simple note holder: attach a narrow pocket or use clips that slide slips in and out.
– Make bright notes: cut colorful paper. Leave a marker or chalk near the wreath.
– Invite participation: you write a line, then family members add theirs. Quotes, kind words, or season greetings work well.
– Keep content fresh: change the notes with each season or event. Remove old slips and add new ones.
– Stay organized: punch holes and tie with string, or use small clothespins. If your door is metal, magnetic clips work too.
– Practical ideas: affirmations for kids, funny doodles, daily reminders, or a tiny photo.
– Care tips: laminate notes if you want them to last, and avoid heavy tape that peels paint.
Next steps: choose a wall or door, gather supplies, and test how the notes fit. Watch how your door turns into a small gather space.
It is easy to change and fun to look at daily.
22. Bright and Cheery Sunshine

Bright and Cheery Sunshine
Want a warm welcome for your door this season? A sunny wreath made from yellow and orange paper can do the trick. It radiates cheer and sets a friendly mood for spring and summer. You can create this look with simple cuts and bold color.
Here is why you should try it. The long sun rays pull the eye outward. A round, bright center adds a playful face or a sun symbol. A few green leaves around the edge give contrast and a touch of nature. Hang it where morning light catches it, and the colors wake up the entryway.
Materials
– Yellow craft paper
– Orange craft paper
– A round wreath base or sturdy cardboard
– Long strips of paper for sun rays
– Glue or tape
– A sun-face sticker or a marker to draw a face
– Green paper leaves or scraps
– Scissors and a pencil
– Optional: a ribbon for hanging
Step-by-step
– Cut a circle base to fit your door.
– Cut 8 to 12 long sun rays from yellow and orange paper.
– Glue the rays around the edge, tips pointing outward.
– Add a bright center with a sun face or a round disc.
– Place green leaves along the outer edge for depth.
– Finish with a small accent like a smile or a tiny charm.
– Hang where the light hits in the morning for extra glow.
Tips and ideas
– Try all yellow with orange tips for a bold look.
– Mix matte and shiny paper for texture.
– If it’s for outdoor use, seal edges with clear tape to slow wear.
Next steps: display this sunny wreath on a door that greets you with light, and keep it stored flat when not in use.
@media(max-width:480px){
23. Retro Pop Art Wreath
Retro Pop Art Wreath
You want a door that catches the eye with style. This retro pop art wreath gives that punch with simple steps and bold color. It fits into many home looks and is easy to swap with the seasons.
Here is why it works. Bold colors and big shapes read well from a distance. Comic style prints or abstract patterns add instant drama. Layering shapes creates depth that draws the eye closer.
Next steps:
– Gather bright craft paper in two or three colors that clash in a good way.
– Choose prints such as speech bubbles, wide stripes, or large dots.
– Cut basic shapes: circles, rectangles, triangles, and speech balloons.
– Prepare the base with a foam wreath form or a sturdy cardboard ring.
– Lay down large shapes first, then tuck in smaller pieces for balance.
– Add 3D accents like pom-poms, fringe, or yarn to give texture.
– Make sure some pieces sit up a little with glue dots to create dimension.
– Let everything dry before you hang it on a door.
Tips: Halftone dot paper echoes classic pop art. Keep spacing even so the big look stays clean.
Next steps: hang where the light shows off the colors, and enjoy the playful vibe.
24. Simple Twisted Wreath
If you want a clean, welcoming wreath for your door that’s simple to make, try a twisted paper design. It uses just a few strips twisted into a circle and it stays neat. You can keep it monochrome or pick soft pastels for a refined look. Tie it off with a bold bow for a crisp finish.
What you need
– Paper strips, about 1 inch wide and 11 to 12 inches long
– Glue or clear tape
– Scissors and a ruler
– Optional: a ribbon for the bow
How to make it
– Cut several long strips and set them aside.
– Twist each strip lightly to add texture.
– Form a ring by threading or gluing the twists around a circle.
– Space the twists evenly for a smooth shape.
– Secure the ends with a dab of glue. Add the bow if you like.
– Hang the wreath on your door with a small hook or tape.
Style ideas
– Use a single color for a calm, modern vibe.
– Mix two pastels for a soft seasonal look.
– Add a tiny focal accent like a faux leaf for interest.
Why this works
– It’s quick to make and adapts to many seasons.
– It’s easy to refresh by swapping colors or the bow.
Next steps
– Pick colors you love, grab your supplies, and start twisting. Hang it up and enjoy.
25. Whimsical Balloon Wreath
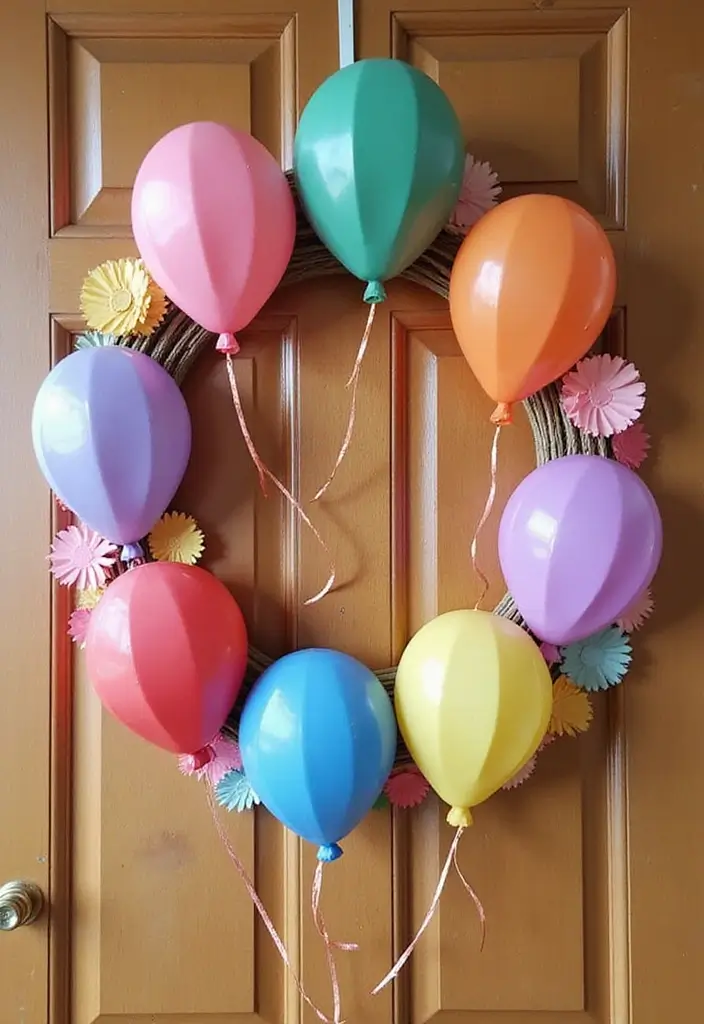
Want a door wreath that feels festive but is easy to make? A balloon-inspired paper wreath fits perfectly. It brings bright energy to birthdays and casual gatherings alike. You’ll get a cheerful welcome with just a few supplies and a short build time.
What you’ll need
– Colored craft paper or tissue paper
– Round paper cutters or scissors
– A sturdy wreath base (foam or cardboard)
– Glue, tape, or a glue stick
– A length of string or thin ribbon
– Optional: a small tag for a message
How to make it
– Cut circles in three sizes to look like balloons. Use 2–3 colors for variety.
– Start with the base. Lay out the circles in a circular pattern, but don’t glue yet.
– Glue the largest circles first, then fill with medium and small ones until the wreath feels full.
– Add strings to resemble balloon ties. You can draw them with a marker or tape thin strips of paper.
– If you like, tuck a tiny paper flag or name tag into the design for a personal touch.
– Hang the wreath on your front door with a ribbon or a simple hook.
Ways to use it
– Perfect for front doors, entryways, or party photo walls.
– Swap colors for seasons: bright for summer, jewel tones for fall, pastels for spring.
Care and tips
– Store flat when not in use to keep shapes neat.
– For kids’ parties, go bold with bright hues. For a chic vibe, mix metallics with matte colors.
– Plan about 60 to 90 minutes from start to finish.
Next steps: gather supplies, pick a color plan, and start crafting your inviting DIY paper wreath.
@media (max-width: 600px) {
.normal-quiz-iframe { min-height: 570px !important; height: 570px !important; }
}
26. Sentimental Memory Wreath

Looking for a door wreath that doubles as a keepsake? A sentimental memory wreath does both. It uses simple paper shapes and your photos to tell your family’s story. Every time you pass by, you glimpse moments that matter.
What you’ll need
– A sturdy base: a wire ring or foam ring
– Colored craft paper in a palette you love
– Scissors, glue dots, or tiny photo corners
– Photos or small mementos to mark each memory
– A pen for captions or dates
How to build it
– Cut hearts or stars from the paper in different sizes
– Attach photos and mementos to the shapes
– Arrange the pieces around the ring in a pleasing circle
Add memory notes
– Write a short line near each item, like a date, a thought, or a favorite quote
– Keep notes concise so they read well from a short distance
Display and care
– Hang it on your front door to greet guests
– Bring it to gatherings or anniversaries as a warm focal point
– Refresh yearly with new memories or swap in fresh photos
This wreath makes memories feel nearby. It is easy to craft, budget-friendly, and keeps your loved ones in sight every day.
@media(max-width:480px){
27. Glitter and Glam Wreath
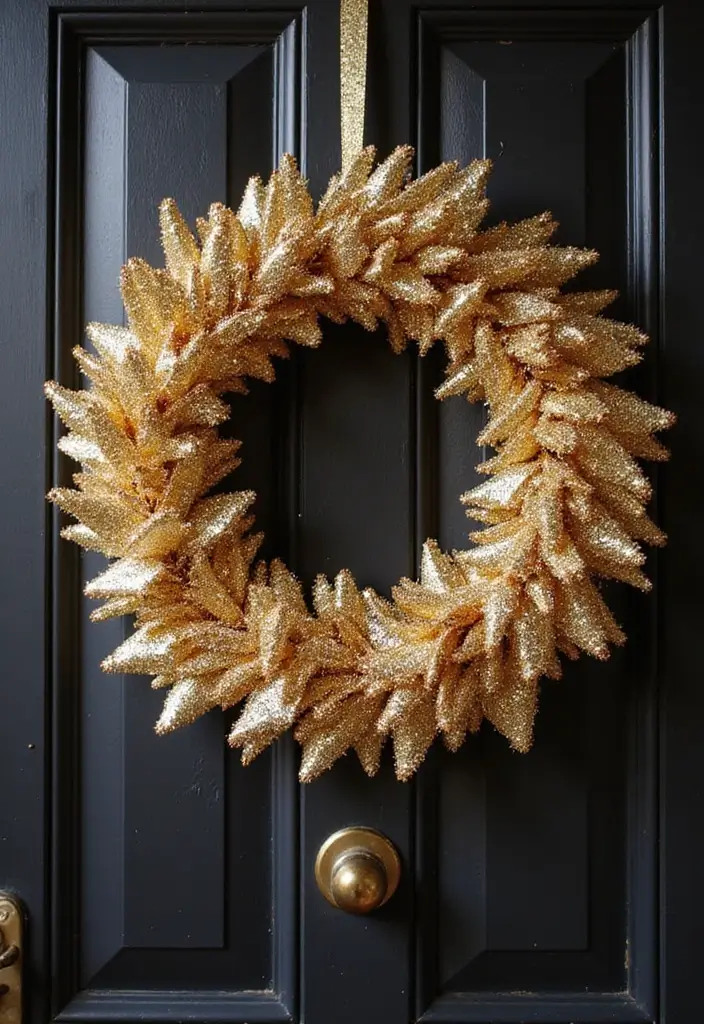
Want a door that catches the light without a lot of mess? A glitter and glam paper wreath can do that. You can use glittery paper or add glitter to your crafted pieces. Either choice makes your entrance feel festive and bright. A clear spray sealant helps keep the shine in place and cuts down on glitter shedding.
Materials you need
– Glitter-covered paper or plain craft paper you can coat with glitter
– A sturdy wreath base (cardboard or light cardboard)
– White school glue or craft glue
– Fine or chunky glitter
– Clear spray sealant or Mod Podge sealant
– Scissors, pencil, and a glue stick
– Ribbon or string for hanging
Step-by-step
1) Cut simple shapes from your paper. Circles, stars, or petals work well. Here is why simple shapes are easier to arrange. Next steps become faster, and you waste less material.
2) Glue shapes onto the wreath base in a balanced pattern. Leave small gaps for sparkle to peek through.
3) Add extra glitter to the glued areas while they are still tacky. Shake off the excess.
4) Let the glue dry, then seal with a light spray coat. A quick mist helps lock glitter in place without a crusty finish.
5) Tie on a ribbon and hang your glittery wreath on the door.
Pro tips
– Work over a tray or old newspaper to catch stray glitter.
– Seal in thin layers to avoid a thick, grainy look.
– Store flat when not in use to keep the shapes intact.
Seasonal styling ideas
– Gold and white for winter charm.
– Red and emerald for holiday nights.
– Pastels for spring porch welcome.
Common questions
– Will glitter shed a lot? Some will shed at first; sealing helps reduce it.
– Can I reuse the wreath? Yes, you can refresh with new shapes or a touch more glitter after a season.
@media(max-width:480px){
28. Classic Monochrome
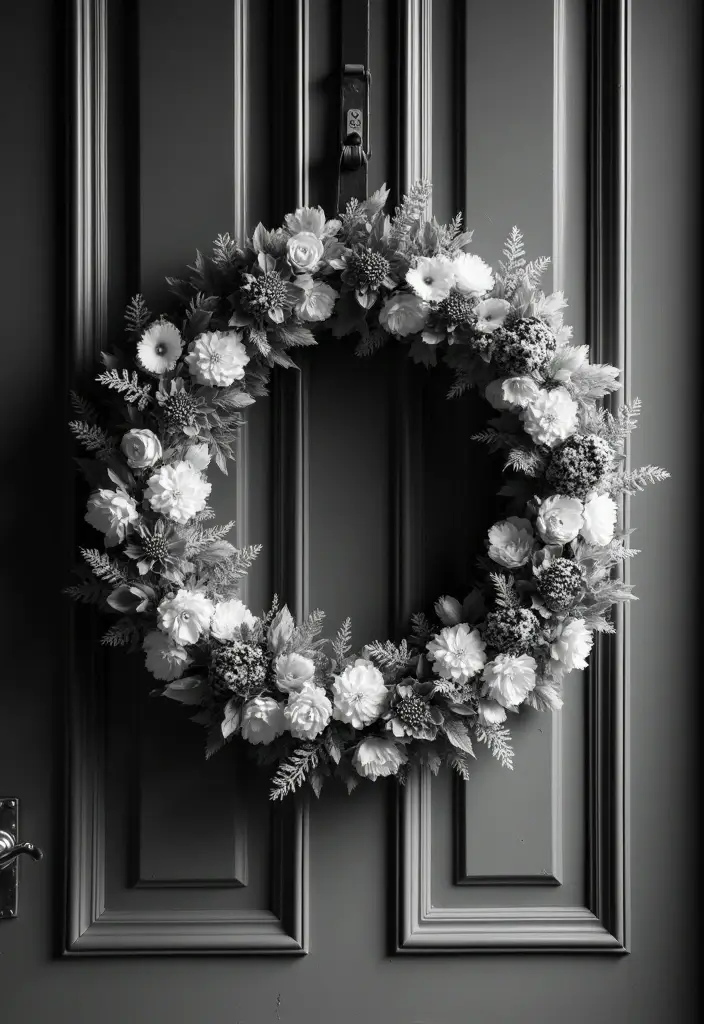
You want a door wreath that stays chic without work. A classic monochrome look uses black and white to feel clean, modern, and easy to pair with any door. Patterns add interest, but a tight color palette keeps the design calm.
Here is how to pull it off.
– Materials
– Black and white craft paper in a few patterns (stripes, dots, or checks)
– Cardboard ring or foam wreath base
– White glue or a glue stick
– Scissors and a ruler
– Metallic foil accents or a little spray of silver or gold
– Optional ribbon for hanging
– Build it
– Cut strips and shapes in your chosen patterns
– Plan a balanced layout by pairing stripes with dots
– Glue each piece to the ring, working in sections from top to bottom
– Tuck lighter pieces beside bolder ones to keep contrast
– Finish touches
– Add a small metallic accent to catch light
– Let the glue dry fully before you hang it
– Care and display
– Dust gently with a soft cloth
– Keep out of direct sun to prevent fading
– Swap in new patterns seasonally to refresh the look
Next steps: hang this chic black and white wreath on your front door and enjoy the calm, graphic vibe.
29. Fun Animal Theme
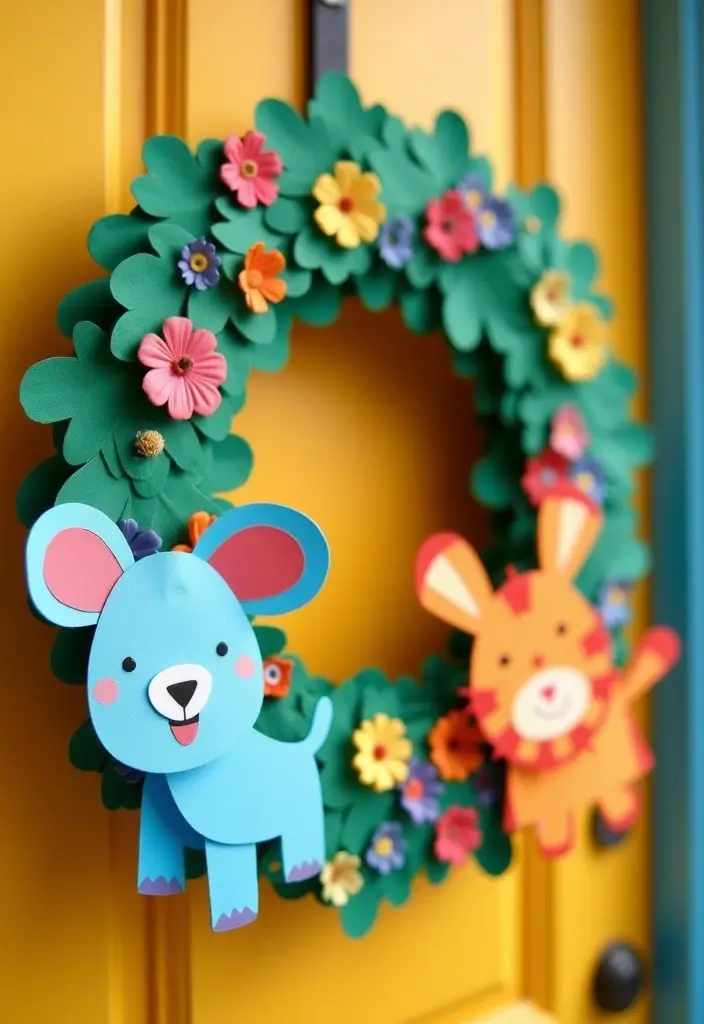
Finish your wreath with a playful animal theme. This look brings warmth to a door and smiles to a room. Here is why it works: you and your kids can create it together, and the result doubles as decoration you’ll actually use. Let’s break it down into simple steps.
– Gather supplies: colored paper, scissors, glue, a round base (paper plate or foam ring), markers. Optional: animal-print paper scraps.
– Make shapes: draw simple animals like owls, foxes, bunnies, or friendly critters. Cut clean shapes.
– Add texture: layer prints or use small fur-like scraps on one side for a tactile feel.
– Arrange: place the largest animals first, then fill gaps with smaller pieces. Keep colors balanced around the ring.
– Theme ideas: forest friends, farm pals, or your favorite creatures.
– Involve kids: let them choose colors, help cut (with safety scissors), and decide where to place each piece.
– Finishing touches: glue pieces securely. Tie a ribbon or string to hang. A light coat of clear spray can help keep it intact.
– Care: hang away from direct sun. Store flat during off seasons.
This wreath adds whimsy to any space and makes a fun, easy craft you can repeat. Next steps: gather your supplies and start today. Start today and watch the door glow.
@media(max-width:480px){
Conclusion
Creating your own DIY paper wreath is not just a fun craft, it’s an opportunity to express your personal style and sustainability.
These 29 unique designs offer a range of ideas to inspire your creative journey while keeping waste to a minimum.
Whether you’re celebrating the seasons or adding an artistic touch to your home, there’s a paper wreath idea here for everyone. So gather your materials, unleash your creativity, and let your door be a reflection of your eco-friendly and artistic spirit!
Note: We aim to provide accurate product links, but some may occasionally expire or become unavailable. If this happens, please search directly on Amazon for the product or a suitable alternative.
This post contains Amazon affiliate links, meaning I may earn a small commission if you purchase through my links, at no extra cost to you.
Related Topics
diy paper wreath
eco-friendly crafts
seasonal decorations
paper crafts
beginner friendly
upcycled materials
home decor projects
minimalist design
holiday wreaths
colorful decor
personalized gifts
quick crafts