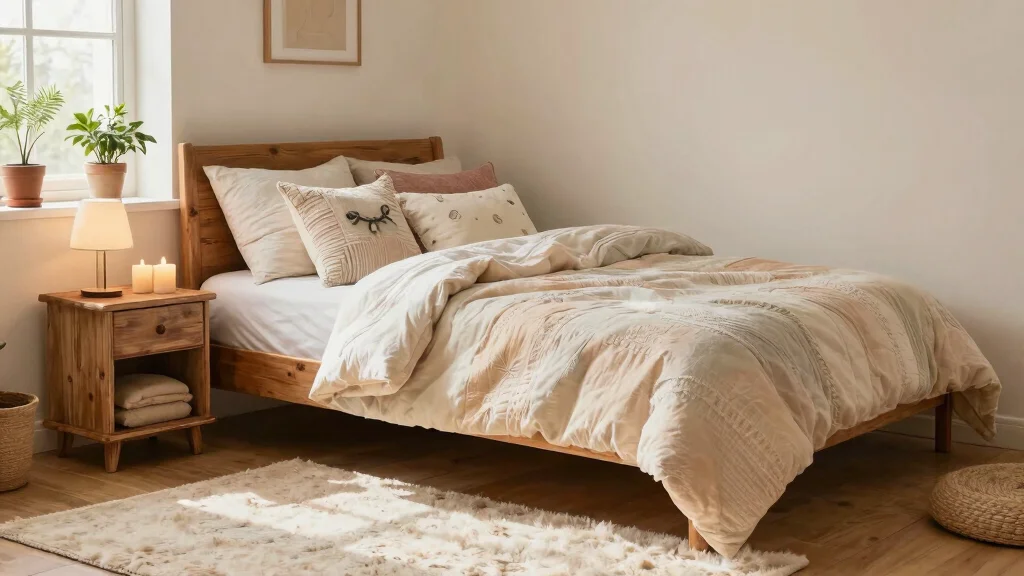
Creating a cozy space filled with memories is something we all crave, especially when home becomes the backdrop for our lives. A DIY photo wall collage is a fantastic way to bring those cherished moments to life. With so many unique and creative options available, it’s easier than ever to turn your walls into a stunning gallery that tells your story. This post is designed to inspire you to get crafty and find the perfect way to showcase your favorite photos.
If you’re someone who loves DIY projects and is passionate about home decor, you’ll find plenty of ideas here that cater to your creative side. Whether you’re in a small apartment or a spacious home, these photo wall collage ideas are perfect for personalizing your space. They not only add a personal touch to your decor but also make it easy to celebrate special moments with loved ones.
Get ready to dive into a world of memory wall inspiration! I’ve gathered 20 DIY photo wall collage ideas that are fun, stylish, and completely customizable. These projects will help you express your personality and keep your fondest memories front and center. So grab your favorite photos, some crafting supplies, and let’s get started on creating a beautiful display that reflects you and your journey.
Key Takeaways
– Discover a variety of DIY photo wall collage ideas that cater to both small and large spaces, ensuring you find the perfect fit for your home.
– Explore creative photo display options, from minimalist styles to vibrant themed collages, that can transform any wall into a personalized gallery.
– Gather practical tips on materials and techniques needed for each project, making crafting accessible and enjoyable for everyone.
– Learn how to create memory displays that not only capture moments but also enhance your home decor, adding warmth and personality.
– Find inspiration for seasonal updates or annual showcases that keep your photo wall fresh and engaging year-round.
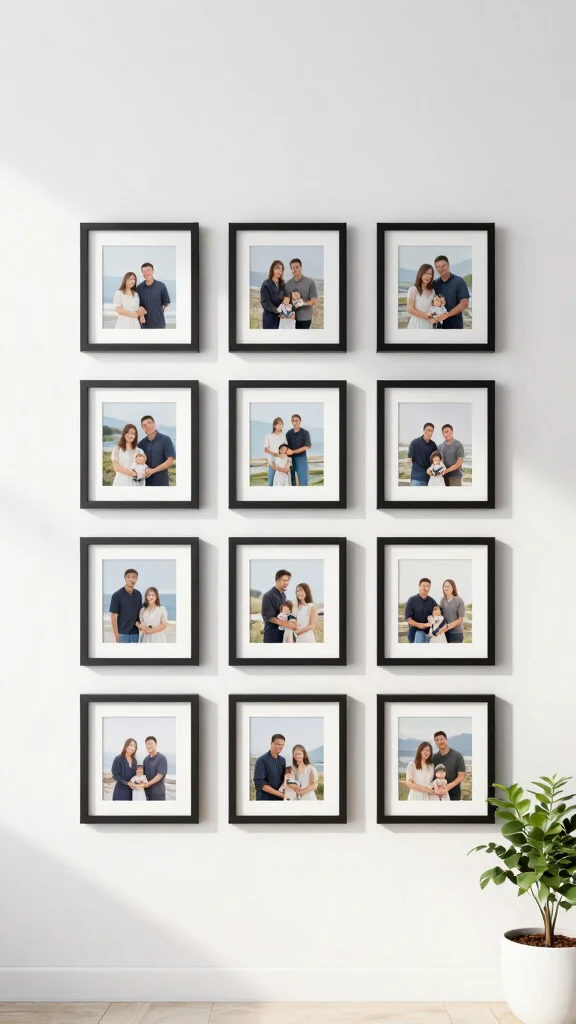
1. A Grid of Memories

A grid layout is a classic choice for arranging your cherished photos. This method promotes visual harmony and creates a structured appearance that feels both organized and inviting. By using matching frames or a mix of similar styles, you can achieve a cohesive look that enhances your wall’s aesthetic. For an effective arrangement, measure your wall space carefully and decide how many photos you wish to display. Laying them out on the floor first can help you visualize the final product before making any commitments to your wall.
To implement this design, you can easily find budget-friendly frames at thrift stores or online. Consider using painter’s tape to outline the frame positions on the wall, ensuring everything aligns perfectly. This grid approach not only maximizes your wall space but also connects your memories into one beautiful display.
Consider these tips to create your grid layout:
– Pair similar frame styles for a unified look.
– Use painter’s tape to plan frame placement accurately.
– Leave adequate spacing between frames for a polished appearance.
This method elevates your decor while showcasing your life’s moments, making your space feel warm and personal.
2. The Heartfelt String Display
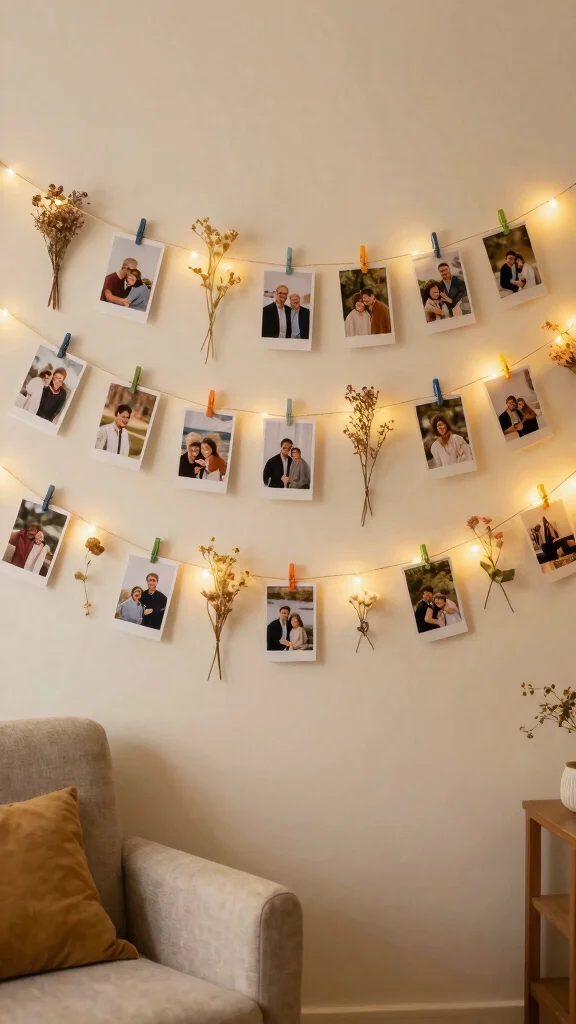
A string photo display is a charming way to showcase your memories. By using twine or fairy lights, you can create a relaxed and inviting feel that’s perfect for any small space. This method allows you to easily swap out photos with clothespins or clips, making it a dynamic display that evolves as you create new memories. Incorporating colorful clips or themed decorations can add a unique flair that reflects your personality.
For an effective implementation, consider hanging the string at varying heights to create visual interest. Adding small decorative elements like dried flowers or handwritten notes can further personalize your display. This approach not only saves space but also connects emotionally, as you can frequently update it with new snapshots.
Here are some tips for your string display:
– Hang the string in creative patterns for an artistic touch.
– Incorporate small decorations for added charm.
– Use warm fairy lights to create a cozy evening ambiance.
This display adds a playful yet heartfelt element to your decor, enhancing the warmth and intimacy of your space.
Recommended Products

GREAT GIFT : Great gift for your lovers, friends and familiy's birthday party Christmas festival celebration. Warm white color make your life WARM!

Durable LED Lights: 100 bright LEDs on 33 feet of silver wire with 4 inch spacing between bulbs for long-lasting use.

Upgrade 120LED Photo Clips String Light: Our Copper Wire Fairy String Light have 120LED; Total 40ft long with extra 10ft long power cord; And 10cm distance between LED bulbs, allowing you to free adjustment any sizes on the led string lights for picture
🏡 Transform Your Space Today
Unlock the secrets to stunning DIY decor with this comprehensive guide, perfect for enhancing your photo wall collages!
3. Thematic Collage
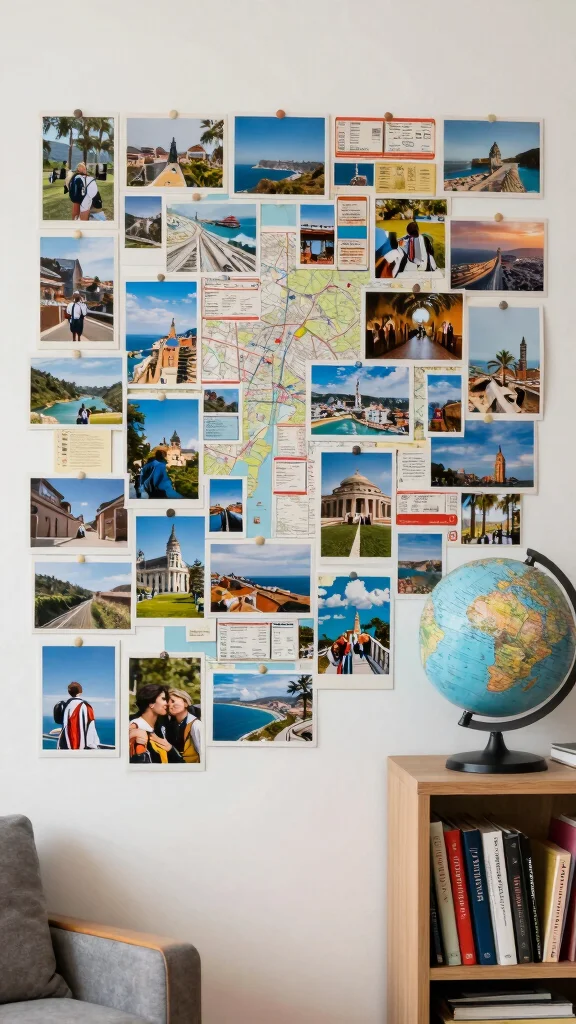
Creating a thematic photo wall allows you to tell a meaningful story through your images. Whether it’s focused on travel adventures, family milestones, or your love of nature, clustering photos that share a common theme creates a captivating display. Enhancing your collage with maps, tickets, or other memorabilia adds depth and context, making it perfect for smaller areas where storytelling shines.
To achieve this look, ensure the colors of your images complement each other for a harmonious effect. You can also create a ‘mood board’ by mixing textures and materials that relate to your theme. Experimenting with different layouts before hanging can help you find the perfect balance between larger and smaller pieces.
Consider these tips when creating your thematic collage:
– Choose images with complementary colors for unity.
– Incorporate various textures to enrich the theme.
– Plan your layout on the floor before hanging for easy adjustments.
This approach not only beautifies your space but also creates an engaging narrative that reflects your personal journey.
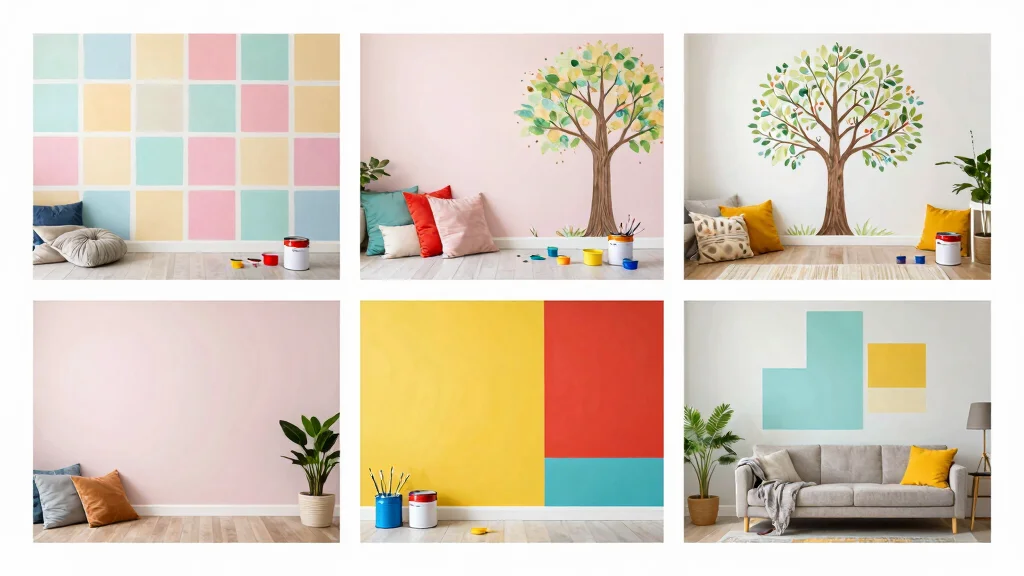
4. Color Pop Collage
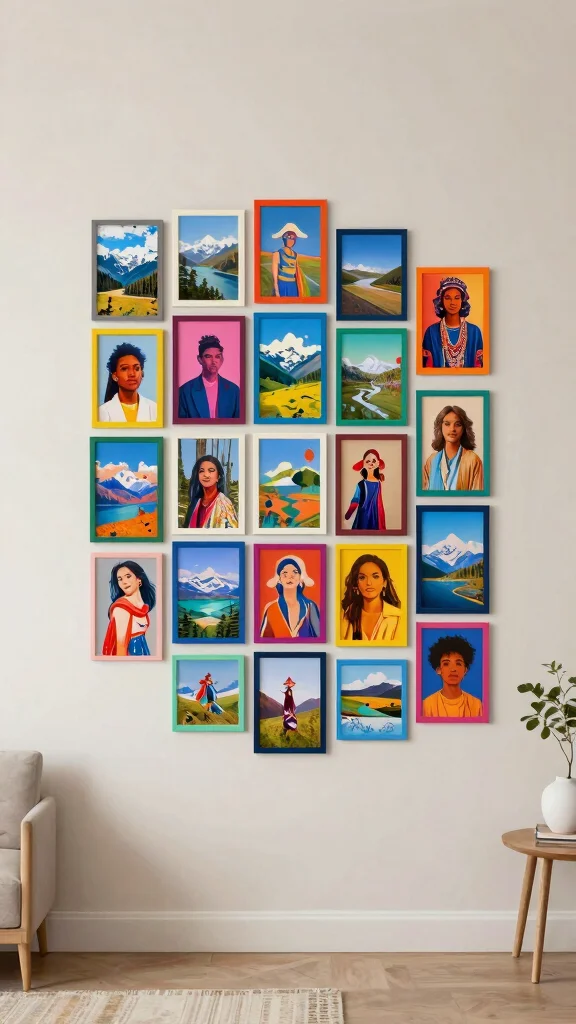
If vibrant colors excite you, a color pop photo wall is the way to go. Selecting photos that feature bold shades creates an energetic and lively display that can brighten up any small space. Using brightly colored frames adds impact and allows for a playful arrangement that transforms your wall into a canvas of creativity.
To enhance this look, consider using colored backgrounds behind your photos to amplify the color pop effect. Mixing in patterned frames can also add visual interest and character. If you’re feeling adventurous, integrate some abstract art or graphics that align with your color scheme for added flair.
Here are some tips for your color pop collage:
– Incorporate colored backgrounds for enhanced vibrancy.
– Use patterned frames to add visual depth.
– Mix in abstract art for a creative twist.
This vibrant approach not only energizes your space but also showcases your unique personality and style.
Recommended Products

【Multi-size Picture Frames】The 10pcs picture frames set come with 2pcs 8x10in frames, 4pcs 5x7in frames and 4pcs 4x6in frames. Multi-size picture frames to help you make the creative display for your cherished memories and favorite photographs. Display one frame or many to create a gallery wall filled with love

Easy to install: Our 11x14 frame is equipped with flexible rotating tabs on the back, so you can install your photos very easily. Opening design slightly smaller than 0.5 inch , but this is not a defect, It can prevent your photos from falling out and is more secure.

How to use the application:
5. Floating Shelves Feature
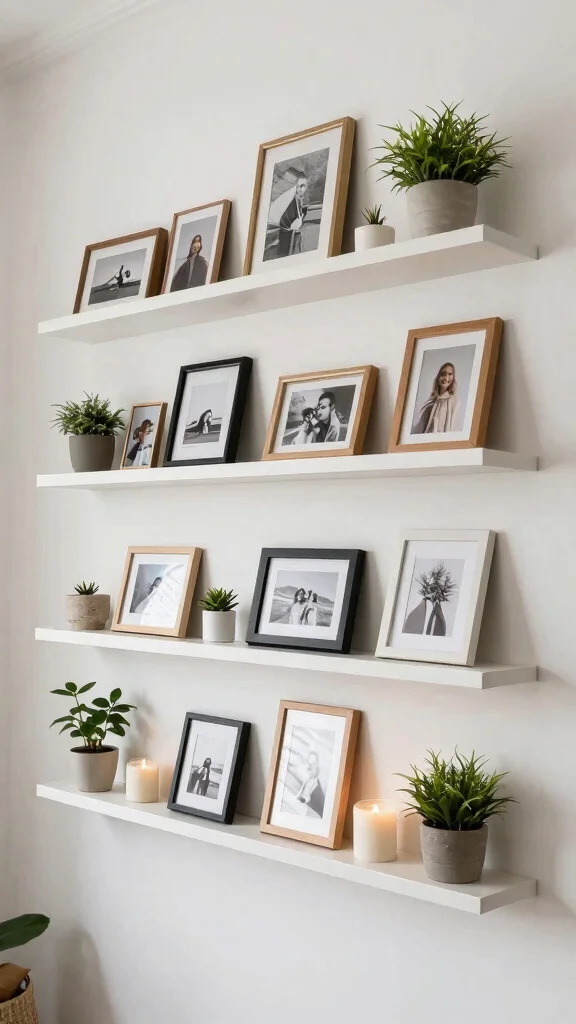
Floating shelves offer a fantastic way to display your photos while adding dimension to your decor. They create a versatile platform for showcasing not only your pictures but also small decorative items or plants. This setup is ideal for tight spaces, allowing you to play with varying heights and arrangements for added visual interest.
To implement this design, choose a color for the shelves that either contrasts or complements your wall color. Mixing framed photos with art pieces and candles can create a dynamic visual experience. Alternating frame orientations can also enhance the playful effect of your display.
Consider these tips for your floating shelves:
– Select a contrasting shelf color for a striking look.
– Alternate between horizontal and vertical frames for fun.
– Ensure shelves are securely mounted to support your items.
This method not only organizes your photos beautifully but also adds depth and creativity to your overall design.
Recommended Products

Centerpiece of Room Decoration - These shelves boast a distinctive design and an elegant shape, making them a focal point that elevates the style of any room. Ideal for the living room, bedroom, study, bathroom, laundry room, children's room, or office, they reflect the owner's sophisticated taste and blend seamlessly with various decor themes.

【Perfect solution for your walls】The 36 inch floating shelves is SAME SIZE as each other (L 36" x D 4.5" x H 2.2") and is such an easy way to storage kids books without making lots of holes in your walls. The nursery book shelves are crafted from Paulownia wood which are lightweight yet proportionately strong, sustainable real wood. They come fully assembled and all mounting hardware is included in the package. Sturdy enough to hold up to 20 lbs with proper installation.

MEMORIES SHOWCASE SHELF: Display your memorable photos with these picture ledge shelves available in large sizes. These hanging racks allow you to store and display different types and sizes of photo frames in one place without worrying about organization
Difficulty Rating & Requirements
Overall Difficulty Rating: Medium
Creating a DIY photo wall collage is a project that can be both fun and rewarding, but it falls into the medium difficulty category. It requires some planning and creativity, making it suitable for those who enjoy crafting and have a bit of time to dedicate to the project. If you have basic crafting skills and a vision for your wall, you are likely to find this project fulfilling.
Time Estimate:
⏱ Estimated time: 3-5 hours
Breaking it down:
– Planning and gathering materials: 1-2 hours
– Arranging and prepping photos: 1 hour
– Mounting and final touches: 1-2 hours
Skill Requirements:
– Required skills: Basic crafting skills, an eye for design, and some patience
– Beginner-friendly: Yes, this project is accessible for beginners. With some guidance, you can learn to create a beautiful display.
– Skills that can be learned: Arranging photos, measuring spaces, and using tools like a hammer or adhesive.
– Skills that require experience: Advanced framing techniques and intricate designs may require a bit more skill.
Tools & Materials Needed:
🧰 Essential items checklist:
– Photos (required)
– Adhesive or tape (required)
– Scissors (required)
– Ruler or measuring tape (required)
– Frames or clips (optional)
– Decorative elements (like string lights or washi tape) (optional)
– Level (optional)
– Command strips or nails (for hanging) (required)
Step-by-Step Overview:
1. Planning (1-2 hours): Decide on the layout and style of your collage. Gather your photos and materials. Think about themes or colors that resonate with you.
2. Arranging Photos (1 hour): Lay out your photos on the floor or a table. This will help you visualize how they will look on the wall. Adjust the arrangement until you’re satisfied.
3. Mounting (1-2 hours): Start placing your photos on the wall. Use adhesive or hanging strips to secure them. Double-check each piece with a level to ensure everything looks straight.
4. Final Touches (30 minutes): Add any decorative elements, such as frames or string lights, to enhance your collage.
Cost Comparison:
Professional vs DIY: Hiring a professional to create a custom photo wall can cost anywhere from $200 to $1,000, depending on the complexity and materials used. In contrast, a DIY project typically costs between $50 to $150, depending on the supplies you choose. If you’re handy and enjoy crafting, tackling it yourself is a cost-effective and enjoyable option that allows for personalization and creativity.
Recommended Products
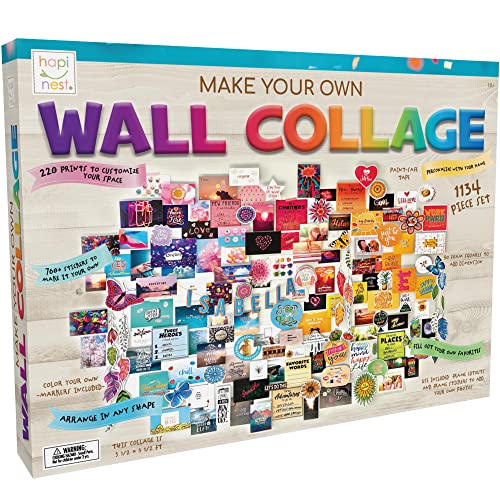
Kit Includes: 154 cutouts, 66 letter cutouts, 769 stickers, 41 quote stickers, 10 markers, paint-safe double-sided sticky tape, 6 yards of string, 90 foam squares, and instructions. This collage measures roughly 5.5 x 3.5 feet. Ultimately the shape is up to you.
Wall Collage Kit:The wall collage kit for teen girls with over 1000pcs includes cute stickers, smiley face clock and cards, 10 envelopes, 10 cards, 20 round stickers, 4 glue dots, 3D butterflies, lighted clips, foam double-sided tapes, string light clips, 10m natural jute rope, 10 mini clips, and 30 push pins, an instruction manual, a felt board, a storage box,—everything you need for hours of creative fun

50 Pack.One set is 50 pieces, not repeated. Each piece is very beautiful and is very suitable for decorating your wall.
6. Vintage Frame Collage
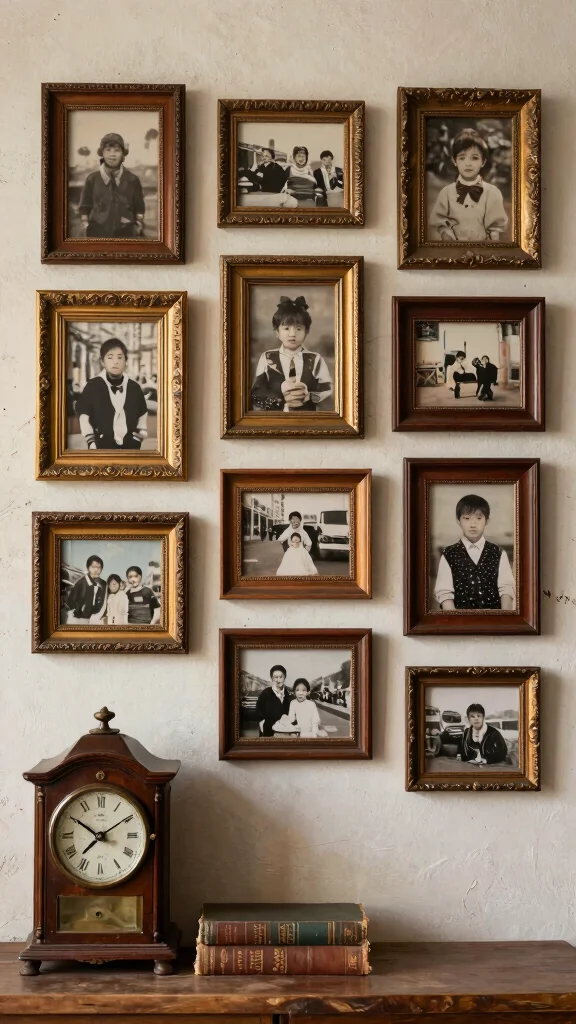
A vintage frame collage brings a nostalgic touch to your photo display. Mixing different styles of vintage frames creates an eclectic aesthetic that feels warm and inviting. You can paint the frames in uniform colors for a cohesive look or leave them in their original patina for a rustic vibe.
This style works wonderfully in small spaces, as it adds character without overwhelming the area. Including black-and-white photos alongside colorful ones can also introduce a timeless quality to your display. Thrift stores are great places to find unique frames at reasonable prices.
Consider these tips for your vintage frame collage:
– Explore thrift stores for affordable, one-of-a-kind frames.
– Experiment with layout on a table before hanging.
– Use picture hanging strips for easy rearrangement.
This charming approach not only personalizes your space but also creates a cozy atmosphere that speaks to your history.
7. Minimalist Photo Grid
For those who appreciate simplicity, a minimalist photo grid is a sleek way to showcase your favorite memories. Utilizing clean, simple frames in monochromatic colors creates a sophisticated look that keeps the focus on the photos themselves. This uncluttered design is perfect for modern spaces, enhancing the overall aesthetic without overwhelming the viewer.
To achieve this look, maintain a consistent frame size for a more uniform appearance. Creating a layout template on the floor before hanging helps ensure you’re satisfied with the arrangement. Non-traditional frames like acrylic or metal can also introduce a modern touch.
Here are some tips for your minimalist photo grid:
– Use consistent frame sizes for a polished look.
– Plan your layout on the floor for easy adjustments.
– Consider using acrylic or metal frames for a contemporary vibe.
This design not only elevates your decor but also allows your photos to shine through their simplicity.
8. Chalkboard Accents
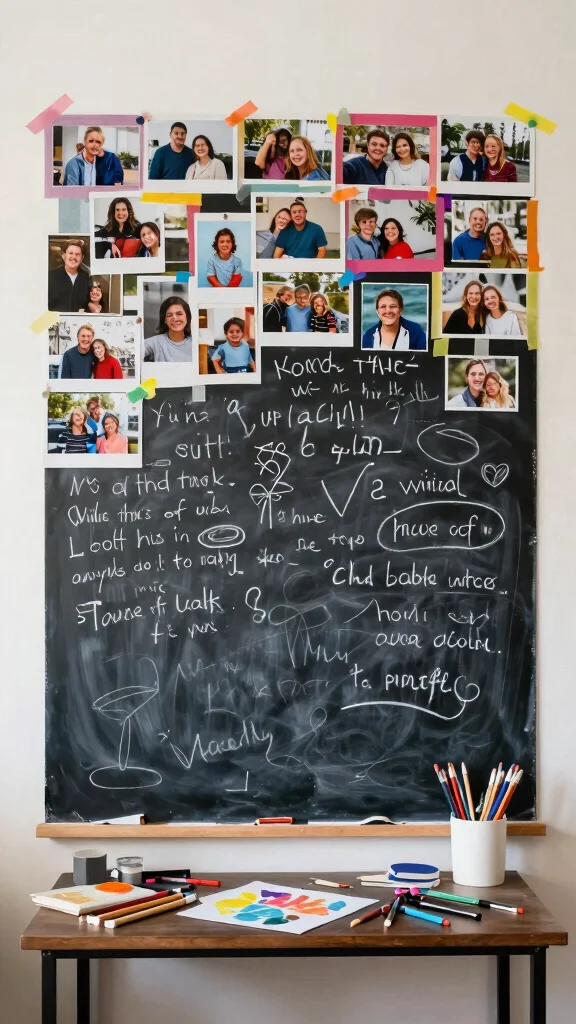
Integrating chalkboard elements into your photo wall collage adds a playful and interactive touch. You can either paint sections of your wall with chalkboard paint or use a large chalkboard frame to combine photos with handwritten notes or quotes. This dynamic approach is perfect for small spaces where creativity thrives, allowing for frequent updates.
For a vibrant display, use colorful chalk to make your notes stand out against the dark background. Incorporating magnets on a chalkboard surface makes it easy to swap photos out as you create new memories. Embracing imperfections in your handwriting adds to the charm of this unique display.
Consider these tips for your chalkboard accents:
– Use colorful chalk for eye-catching notes.
– Incorporate magnets for easy photo changes.
– Embrace handwritten notes for added character.
This creative method enhances your decor with both function and fun, making your space feel lively and personal.
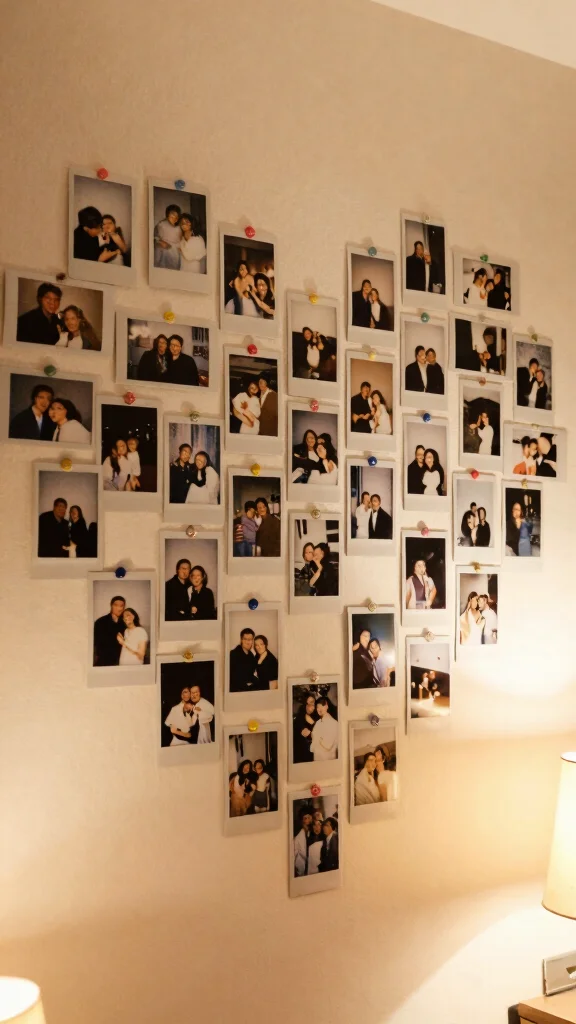
9. Polaroid Wall
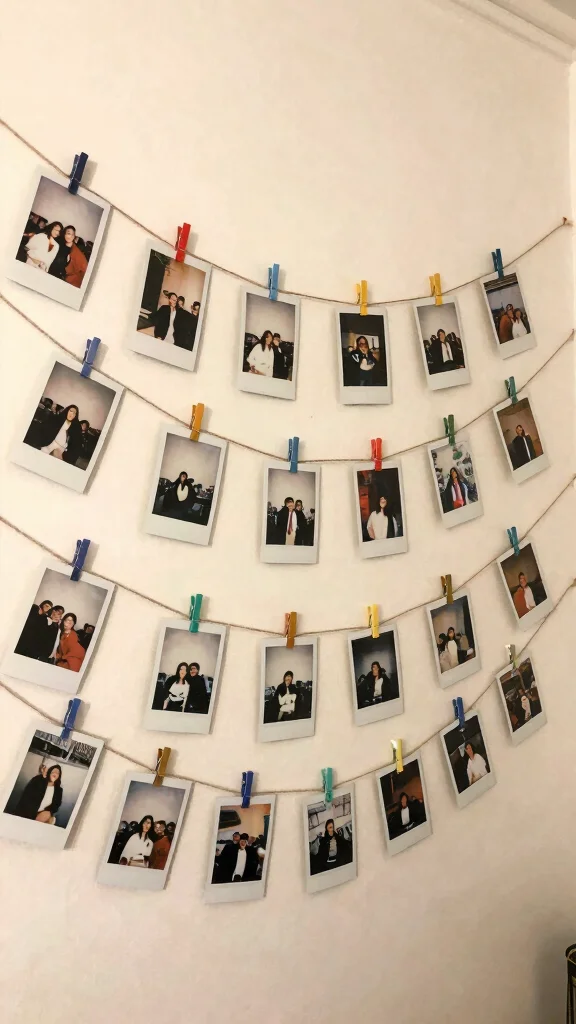
Capture and display your memories in real-time with a Polaroid photo wall. This nostalgic style allows you to exhibit spontaneous moments casually and charmingly. Simply hang a string or wire and attach your Polaroids with clips for a relaxed yet stylish look. This display is fantastic for small spaces, as you can easily rotate photos to keep it fresh and current.
To add a visual timeline, use color coding for dates or events when arranging your Polaroids. Mixing in small themed decorations can also enhance the overall aesthetic. Incorporating fairy lights around the display adds a magical touch during the evenings.
Here are some tips for your Polaroid wall:
– Use color codes for event timelines.
– Mix in themed decorations for added flair.
– Add fairy lights for an enchanting evening effect.
This delightful approach not only showcases your memories but also creates an engaging atmosphere that captures the essence of your experiences.
10. Artful MDF Boards
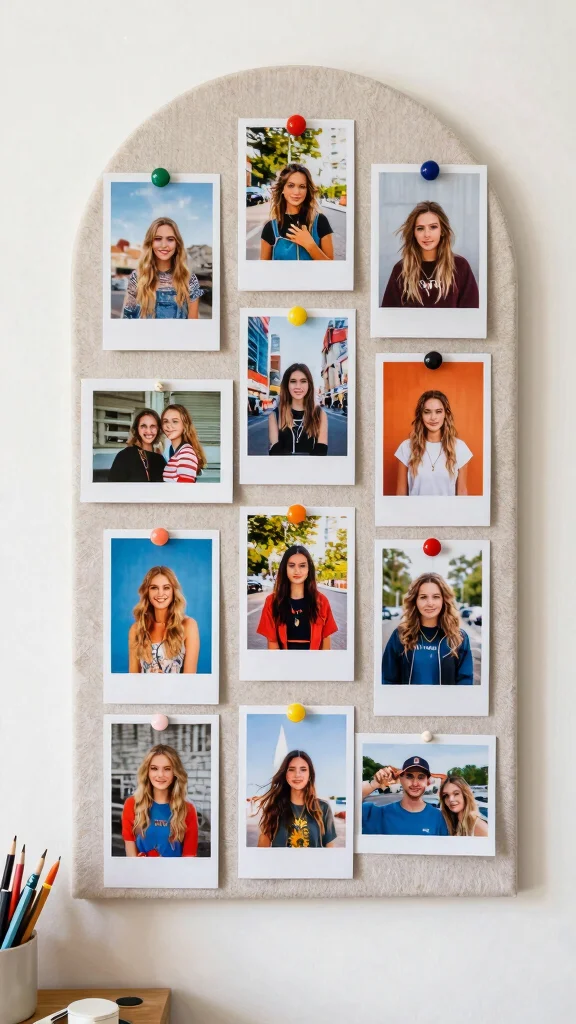
Transform plain MDF boards into stylish photo display panels that elevate your decor. These boards can be painted or covered in fabric for a chic backdrop that complements your photos. Using push pins or clips to attach your images allows for easy swaps, making this method versatile and appealing, especially in small spaces.
To create a clean and sophisticated look, consider choosing a vibrant color for your MDF boards that contrasts with your wall. Incorporating interesting textures can also enhance the visual appeal of your presentation. Layering photos on the boards adds depth and dimension to your display.
Consider these tips for your MDF boards:
– Frame your MDF boards for a polished finish.
– Use textured fabrics for an elevated presentation.
– Layer photos for added visual interest.
This method not only beautifies your space but also offers a unique way to showcase your favorite moments.
Fun fact: A bold MDF board backdrop can speed up photo swaps in under 2 minutes. In small spaces, contrast and texture elevate a DIY photo wall collage into a chic focal point you’ll actually love to display.
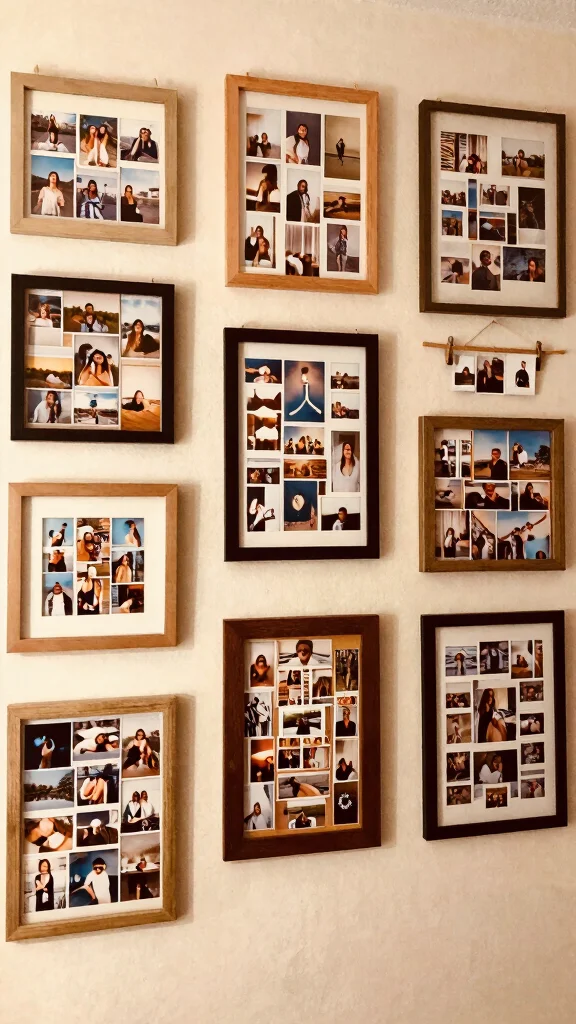
11. Layered Frames
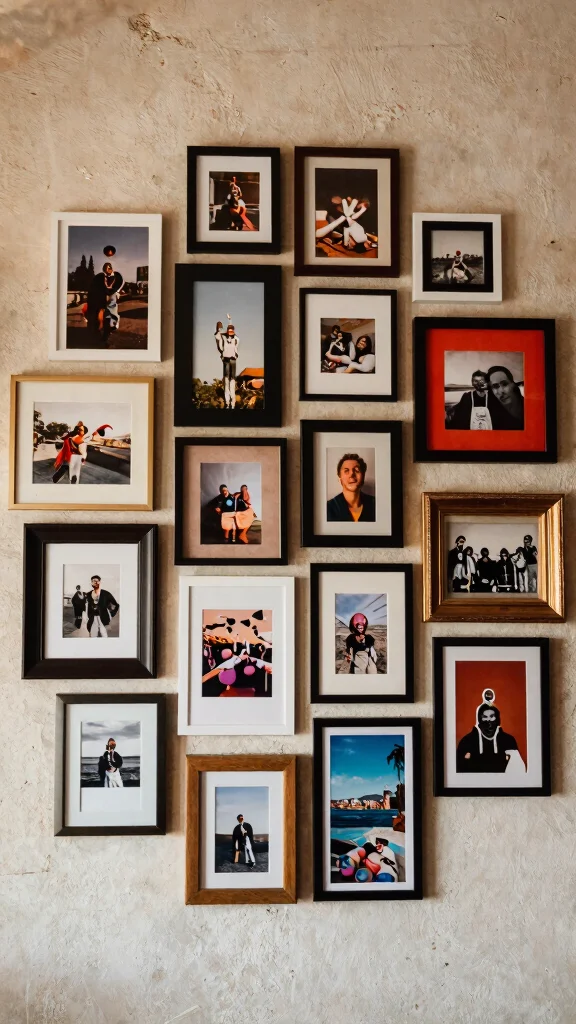
Experimenting with layering different frame sizes and styles can create a uniquely dynamic display. This artistic technique transforms your photo wall into a curated gallery, where each piece complements the others. Begin with a central focal point and build outward, mixing larger and smaller frames to fill empty wall space thoughtfully.
This method is perfect for smaller rooms, allowing you to create a statement piece without overwhelming the area. Maintaining a consistent color scheme helps unify the display, even with varied frame styles. Incorporating three-dimensional elements can enhance depth and interest in your design.
Here are some tips for layering frames:
– Stick to a color scheme for cohesion.
– Add three-dimensional elements for depth.
– Create negative space to avoid clutter.
This approach not only personalizes your space but also allows for creative expression through your memories.
12. The Family Tree
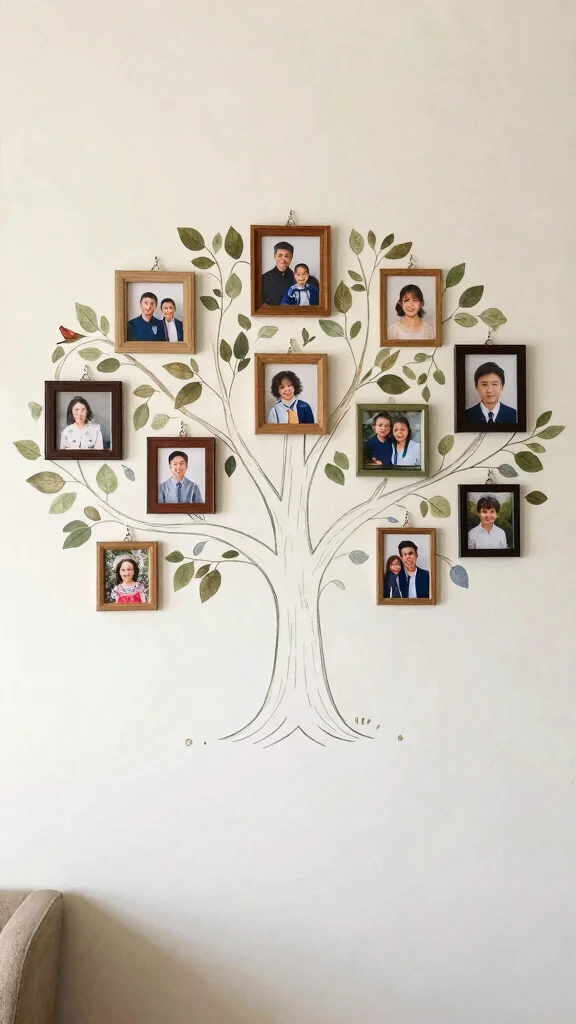
Celebrate your loved ones with a family tree-inspired collage that adds a personal touch to your space. Using a large tree decal or painted outline, attach framed photos of family members as ‘leaves’ of the tree. This meaningful design not only honors your family’s history but also serves as a stunning focal point in any room.
This approach is perfect for small areas, as it creatively utilizes vertical space while allowing for future expansions. Including birth dates or names alongside the photos adds a personal and sentimental touch. You can mix different frame styles while maintaining a consistent color scheme for a cohesive look.
Consider these tips for your family tree collage:
– Use various frame styles but keep colors consistent.
– Add small decorative elements for a whimsical touch.
– Leave space for future family members.
This design not only beautifies your home but also creates a heartwarming tribute to those you cherish most.
13. Calendar Collage
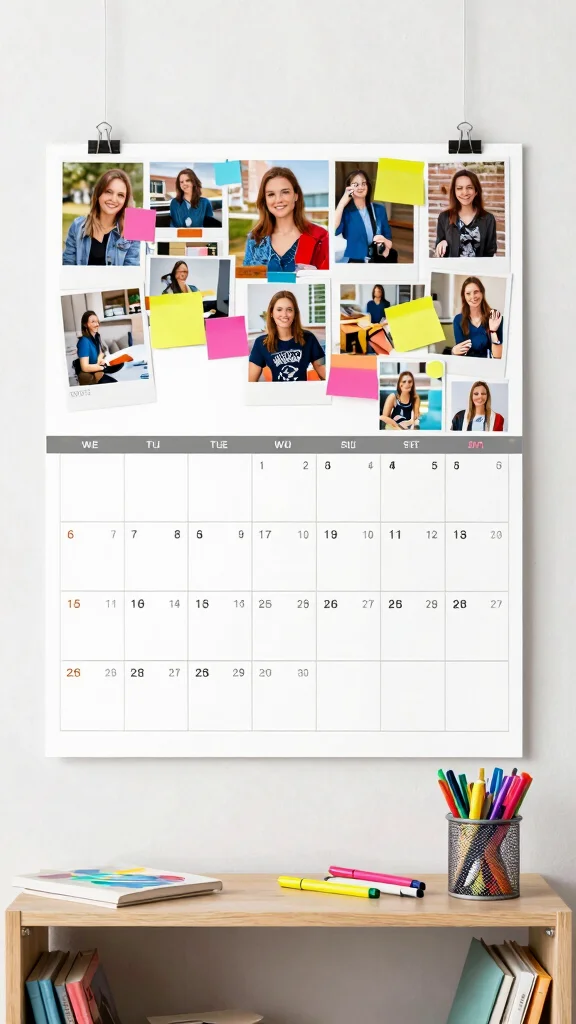
Design a calendar-themed photo collage that combines practicality with creativity. Select a wall space for a large monthly calendar and attach photos that correspond to special dates, like birthdays or anniversaries. This layout not only serves as a decorative element but also provides functional reminders of cherished moments.
This idea works beautifully in smaller spaces, where you can blend art with utility. The calendar can be a simple printed template or a decorative chalkboard for added charm. Using colorful markers or sticky notes can also inject a playful touch into the design.
Here are some tips for your calendar collage:
– Use colorful markers for a cheerful calendar.
– Incorporate a small shelf for stationery or reminders.
– Maintain a cohesive color scheme for a unified look.
This creative approach not only organizes your memories but also adds a touch of whimsy and functionality to your decor.
Fun fact: a 12-photo calendar collage turns wall space into a living memory calendar—you’ll spot birthdays, anniversaries, and milestones at a glance. This diy photo wall collage blends art with utility, giving small spaces daily reminders you’ll actually use.
14. Inspirational Quote Collage
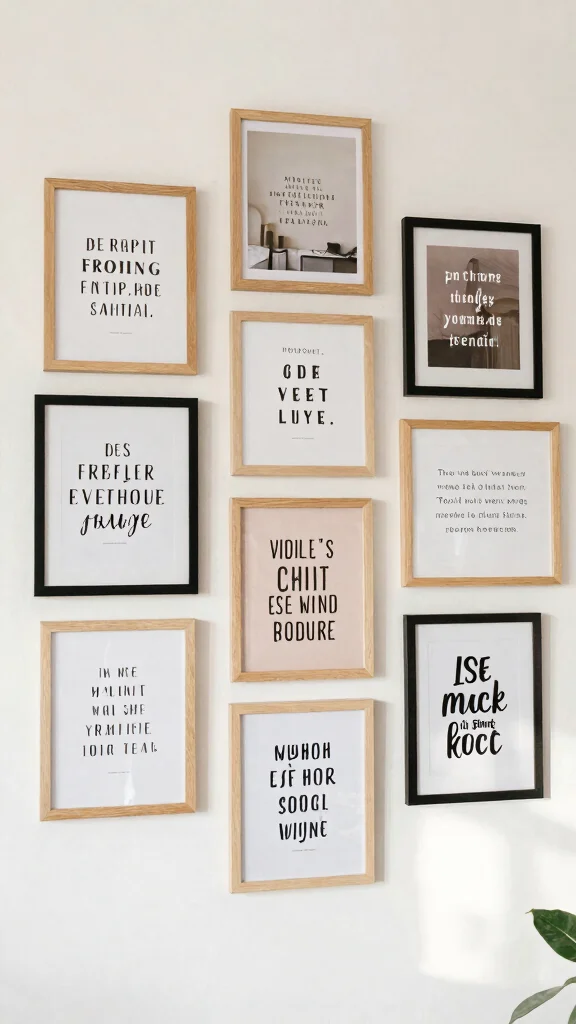
Create a motivational environment by combining inspirational quotes with your favorite photos. This concept allows you to showcase not just memories but also your personal philosophy, enhancing the depth of your display. Use typography prints or hand-lettered quotes in stylish frames alongside your images to encourage positivity and reflection.
This dual approach is perfect for small areas like a workspace or personal corner, transforming them into uplifting spaces. Experimenting with different font styles and sizes can create visual interest, while maintaining a consistent color theme across both quotes and photos promotes harmony.
Consider these tips for your inspirational collage:
– Vary font styles and sizes for dynamic visuals.
– Keep a consistent color theme for unity.
– Position key quotes at eye level for maximum impact.
This design not only beautifies your space but also inspires and motivates you daily.
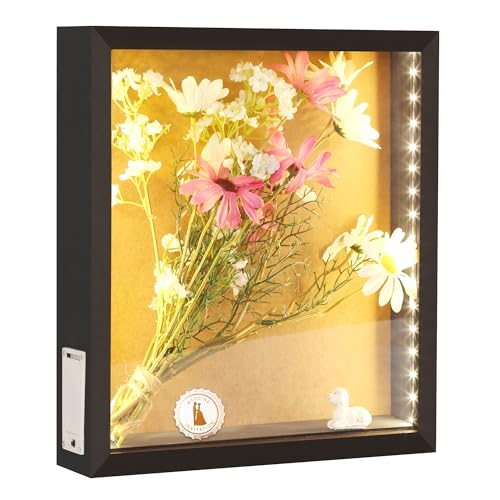
15. Shadow Box Display
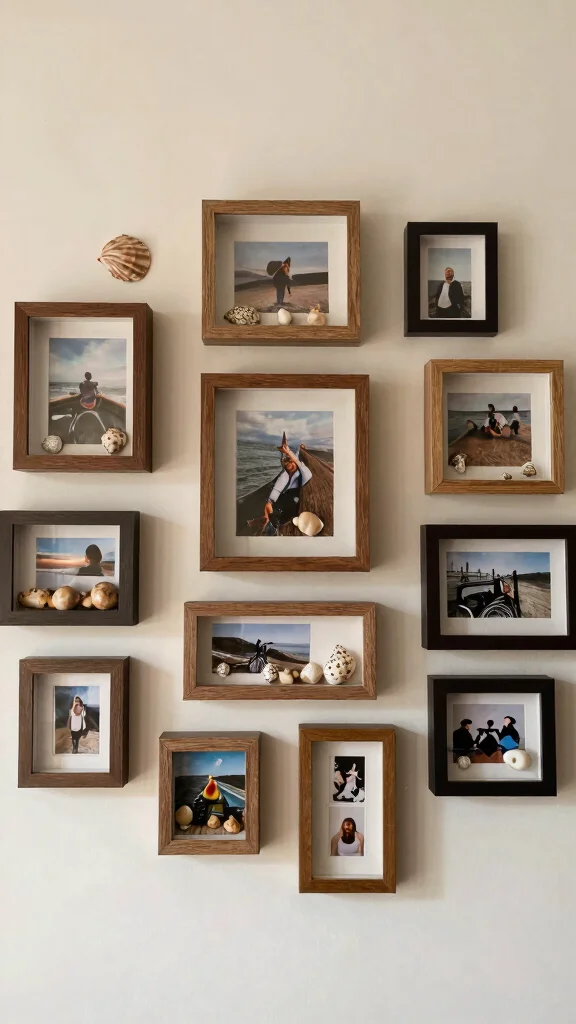
Transform your photo display into three-dimensional art by using shadow boxes. These unique displays allow you to add depth and texture by incorporating small objects alongside your photos, such as keepsakes from trips or tiny treasures that tell your story. This method is especially captivating for small areas, creating a focal point without requiring extensive wall space.
To enhance your display, consider using shadow boxes in various sizes for a dynamic arrangement. Painting the backs of the boxes can provide contrast and highlight the items inside, while adding lighting can create a dramatic effect. This approach not only showcases your memories but also narrates your unique journey.
Here are some tips for creating your shadow box display:
– Use different sized boxes for visual variety.
– Paint the backs for added contrast.
– Incorporate lighting to highlight special items.
This method not only adds visual interest but also tells your story in a creative and engaging way.
Recommended Products

[High-CRI & Adjustable LED Lighting] - Equipped with 120 SMD2835 LEDs (CRI ≥95) for true-to-life color rendering, this 12"x12"x12" lightbox ensures vibrant, accurate imagery while reducing energy use. Features 10 brightness levels and 3 color temperatures (white/soft/warm) to adapt to diverse shooting scenarios, from product details to creative setups.
【Advanced and Fashionable Farmhouse Design】The shadow box comes with a sturdy and durable wooden frame,transparent and shatterproof PVC window, and swivel tabs on the back which make the box convenient to open and refresh the content.The fashionable farmhouse style can meet any decoration needs of you! Place in kitchen, living room, dining room or on bar area to showcase your love for life and share laughter with your friends, family and office colleagues.

SAMGUYUE Shadow Box Frame -- The shadow box frame is made of sturdy wood with double-sided high-definition acrylic panels and built-in LED lights. It is convenient for you to decorate and fill, and easily put small items in and out. It can stand alone on any horizontal surface.
16. Ceiling Photo Hang

Optimize vertical space by hanging photos from your ceiling for a unique display. This creative method is especially effective in small areas where wall space is limited, allowing you to showcase your memories in an unexpected way. Lightweight frames or clips and string can create a casual yet captivating look that draws the eye upward.
To ensure safety, make sure all hanging items are securely attached. Using colorful strings or ropes adds visual interest, while mixing in hanging plants can enhance the overall aesthetic. This approach not only utilizes space efficiently but also introduces an intriguing element to your decor.
Consider these tips for your ceiling display:
– Secure all hanging items to prevent accidents.
– Use colorful strings for added visual flair.
– Mix in hanging plants for a lush, green touch.
This innovative display method showcases your treasured memories while making a stunning statement in your room.
17. Clipboards for Easy Exchange
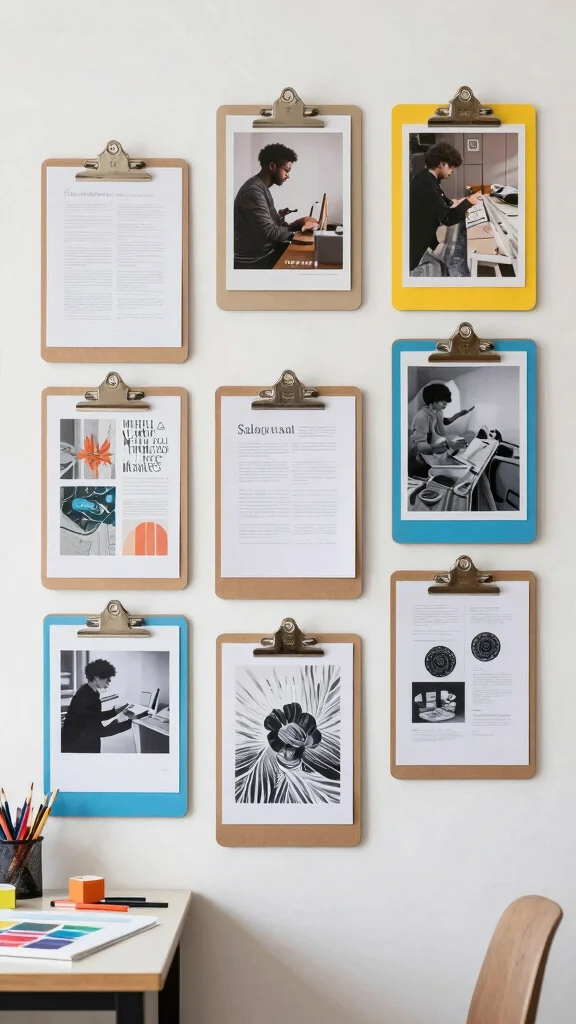
Utilize clipboards to create an easily interchangeable photo display that suits your ever-changing style. This method makes swapping out images a breeze, allowing you to showcase recent adventures or favorite moments. Arrange different colors or styles of clipboards on the wall for an organized and artistic look that brings personality to your space.
This practical approach is perfect for small areas, promoting frequent updates without the need for re-hanging or rearranging frames. Mixing in some blank clipboards can also serve as a canvas for quotes or artistic touches. This setup keeps your decor fresh and engaging, reflecting your current mood or experiences.
Here are some tips for your clipboard display:
– Choose various colors for a vibrant effect.
– Incorporate blank clipboards for creativity.
– Arrange them in a grid or casual scatter for a relaxed vibe.
This method not only adds a functional aspect to your decor but also encourages a playful and personalized touch.
Fun fact: swapping photos on clipboards takes under 60 seconds—perfect for your DIY photo wall collage in small spaces. Line up three to five clipboards in varying colors for instant personality, without re-hanging frames. Your wall rotates with memories, fast and fuss-free.
18. Polaroid Heart
Craft a heart-shaped arrangement of Polaroid photos to create a lovely statement piece in your space. This design not only showcases your favorite memories but also serves as a romantic focal point that draws attention. Start by laying out your Polaroids on the floor to achieve the perfect heart shape before transferring it to the wall.
This arrangement is ideal for small areas, capturing a lot of love in a concise space, and is perfect for bedrooms or cozy corners. For an added decorative element, use colorful washi tape or small heart-shaped decorations around the display to enhance its charm.
Consider these tips for your Polaroid heart:
– Use colorful tape for extra flair.
– Incorporate small heart decorations for charm.
– Position it at eye level for maximum impact.
This heartfelt display not only beautifies your room but also serves as a constant reminder of cherished moments.
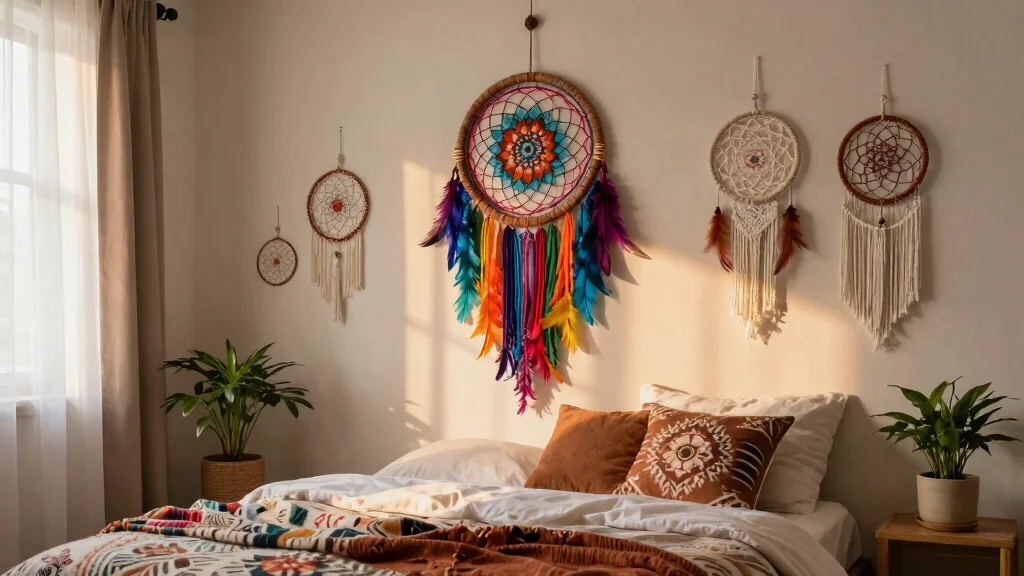
19. Woven Wall Hanger
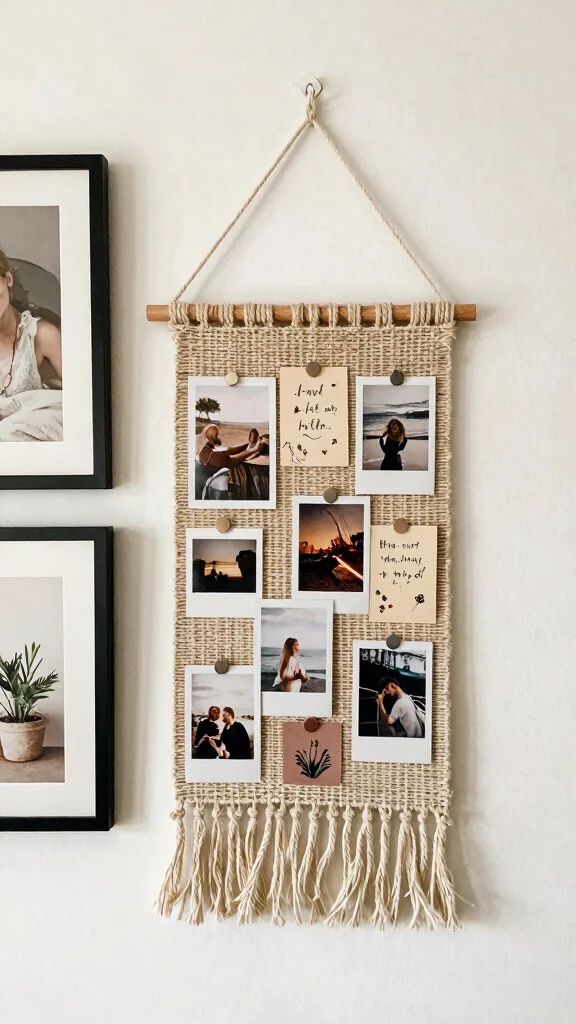
Incorporate a woven wall hanger into your photo collage for added texture and style. This element can be hung alongside or above your photos, offering a creative way to display smaller images or notes. This combination lends a bohemian flair to your decor and creates a unique focal point that draws the eye.
This approach works wonderfully in small spaces, as the woven texture contrasts beautifully with the flatness of photographs. Layering photos and mementos around the woven piece can create depth and interest in your design. Choose natural materials like wood or fiber to enhance the overall look.
Consider these tips for your woven wall hanger:
– Select a piece that complements your decor style.
– Layer photos and notes for added creativity.
– Use natural materials for a cohesive aesthetic.
This method not only adds visual interest but also enriches your space with warmth and character.
20. Annual Memory Showcase
Dedicate a wall to an annual memory showcase where you can change out photos each year to reflect milestones and special occasions. This ongoing project makes a small space feel personal and meaningful, capturing the essence of your family’s journey over time. Using simple frames or clips to hold each year’s photos creates a timeline that visually narrates your evolving story.
This idea keeps your memories fresh and allows you to reflect on the moments that matter most, making it both sentimental and practical. Consider using a consistent color theme to differentiate each year, or create a small plaque for each display for added personalization.
Here are some tips for your annual memory showcase:
– Use a color theme to mark different years.
– Create title cards for each year’s display.
– Encourage family contributions for diverse memories.
This approach not only organizes your cherished moments but also transforms your space into a heartfelt celebration of your family’s journey.
Conclusion
DIY photo wall collages allow you to infuse your personality into your living space while displaying cherished memories.
Whether you choose a simple grid, a whimsical string display, or a thematic collage, the possibilities are endless. These creative home decor ideas not only help you showcase your favorite moments but also enhance the aesthetic of your small space, making it feel more like home. Embrace your creativity and let your walls tell your story!
Frequently Asked Questions
What is the easiest way to create a diy photo wall collage in a small space?
Here’s the easiest approach to a diy photo wall collage in a small space. Start by choosing a wall with good light and measuring the available area. Decide on a layout — a tight grid or a salon style arrangement both work well for small walls. Pick a cohesive color palette and 2 to 3 frame styles that fit your aesthetic. Print photos in a consistent size and matte for a clean, polished look. Before you mount anything, test the layout on the floor or with painter’s tape on the wall using paper templates to avoid holes. Use removable mounting strips or picture hanging hooks to keep walls pristine. Hang and tweak spacing until the display feels balanced. This practical plan keeps your diy photo wall collage creative and easy to manage as you add new memories.
How should I choose a layout for a diy photo wall collage to avoid clutter in a small room?
Start with a clear focal point like a favorite memory. Decide between a tight grid for symmetry or a salon style for a more eclectic look that still reads as memory wall inspiration. Keep frames within 2 or 3 complementary sizes and finishes, and leave negative space around the edges. Use paper templates or painter’s tape to map the arrangement on the wall before drilling. After you hang, adjust spacing so the display feels balanced. This approach aligns with popular home decor ideas and creates a creative photo display that stays tidy in tight spaces.
What budget-friendly materials and tools do I need for a diy photo wall collage?
To keep costs down, gather a few essentials: frames in two or three coordinating finishes, mats for consistency, prints sized the same, a printer or printing service, acid-free photo corners or mounting strips, a level, a tape measure, and a pencil. Add painter’s tape, scissors or a craft knife, and kraft paper or poster board for making layout templates. Use removable mounting strips or hooks so walls stay pristine. With these supplies you can create a polished personalized wall art display without stretching your budget, perfect for crafting projects and memory wall inspiration on a budget.
How can I personalize a diy photo wall collage to reflect memories and become memory wall?
Choose photos that tell a story, grouping them by events, people, or seasons to build a narrative you can call memory wall inspiration. Add captions or tiny labels to provide context. Mix in a few small non photo elements like ticket stubs, fabric swatches, or a tiny plaque to add texture. Pick a color scheme that complements your room, and let a few bold accents stand out. When possible, frame sets with cohesive finishes, so the result feels intentional and memory wall inspiration becomes personalized wall art that reflects your life and style.
What quick ideas can refresh a diy photo wall collage for seasons or different rooms?
Refresh your diy photo wall collage in minutes by rotating images and swapping frames. Use a wire grid or clipboards for easy updates, and add seasonal color with washi tape or new mats. Change the lighting with a warm LED string to shift the mood. If you have a small shelf or ledge, swap pieces on and off the wall for a fast update. These simple tweaks keep your crafting projects feeling fresh and keep the memory wall inspiration alive year round.
Related Topics