Creating a beautiful space often begins with the right decor, and mirrors can serve as stunning statement pieces. I’ve seen how a well-placed mirror can transform a room, making it feel larger and brighter. That’s why I put together this guide of 18 DIY mirror decor crafts. Whether you want to spruce up your living room or add character to your hallway, these creative mirror ideas are designed to help you reflect your personal style without breaking the bank.
If you’re a DIY enthusiast or someone who simply loves home decor projects, this post is for you. You might be looking for budget-friendly crafts that allow you to express your creativity and make your house feel like a home. From upcycled vintage mirror designs to interactive chalkboard mirrors, I’ve crafted a collection that caters to various tastes and styles.
What can you expect? A treasure trove of 18 unique mirror crafts that are not only fun to make but also practical and beautiful. Each project comes with clear instructions, so you can easily follow along. Whether you’re a beginner or a seasoned pro, these crafts will inspire you to add a personal touch to your space. Get ready to brighten and expand your home with these stunning mirror decor ideas!
Key Takeaways
– Discover 18 unique DIY mirror decor crafts that can enhance the aesthetics of any space.
– Learn how to repurpose vintage mirrors and materials for budget-friendly home decor projects.
– Explore various styles, from geometric art to rustic designs, ensuring there’s something for every taste.
– Each project includes easy-to-follow instructions, making it accessible for both beginners and experienced crafters.
– Enhance your home with creative mirror ideas that not only beautify but also create the illusion of more space.
Recommended Products

SELF-ADHESIVE MOSAIC TILES: Please remove the protective film on the mirror surface before use.Each small mirrors for crafts come with a self-adhesive backing, making it easy to stick directly onto any surface. No need for extra adhesives—just peel and stick for a hassle-free application

What will you get: the package comes with a total of 8 pieces of plastic mirrors, sufficient quantity to meet your needs in DIY projects; Made of quality acrylic material, these round mirror tiles are smooth, bright, with nice texture, not easy to break or deform, and can serve you for a long time

【Package Included】 You will receive a complete package containing 50 pieces of mini mirror, which is enough to meet your daily use needs and can be replaced at any time without worry. In addition, Small mirror can also add unlimited fun to the DIY activities of you and your family during the holidays.
1. Vintage Frame Mirror

Reviving an old vintage frame by adding a mirror is a delightful way to infuse personality into your space. This project breathes new life into ornate frames that might have lost their luster, creating a beautiful focal point in your home. The intricate details of the frame combined with the reflective surface creates a stunning display that captures attention and adds depth to any room. Think about painting the frame in a color that complements your existing decor or giving it a distressed finish for a more rustic feel. To execute this project, remove the old glass and replace it with a mirror cut to size. You might also consider embellishing the frame with decorative accents like faux jewels or floral motifs for added charm. Hanging it above your entryway console table can effortlessly make a chic first impression.
– Pair a vintage frame with a classic round mirror for a timeless look.
– Use mirror adhesive or double-sided tape for secure placement.
– Consider anchors for drywall installation to ensure stability.
– Regularly clean the mirror for a sparkling finish. This approach not only enhances your decor but also celebrates the character of vintage elements, making your space feel warm and inviting.
Recommended Products
【360 Degree】2 pieces packaged, newest upgrade 360 degree rotate and sway adjustable, maximize your view with wide angle in car. All convex spot mirrors are equipped with tiny adjustable swivel mounting bracket for easy installation.
Club Masters Sunglasses Design: Trendy sunglasses have been an iconic piece in the fashion world. It has become the cute sunnies with metal rim in the world. Browline sunglasses is so affordable. 2 pack sunglasses can offer you different colors to switch. Black sunglasses make you cool, brown sunglasses make you hipster. You may be the center when you wear cool sun glasses at club or party
【360 Degree】2 pieces packaged, newest upgrade 360 degree rotate and sway adjustable, maximize your view with wide angle in car. All convex spot mirrors are equipped with tiny adjustable swivel mounting bracket for easy installation.
2. Geometric Mirror Art
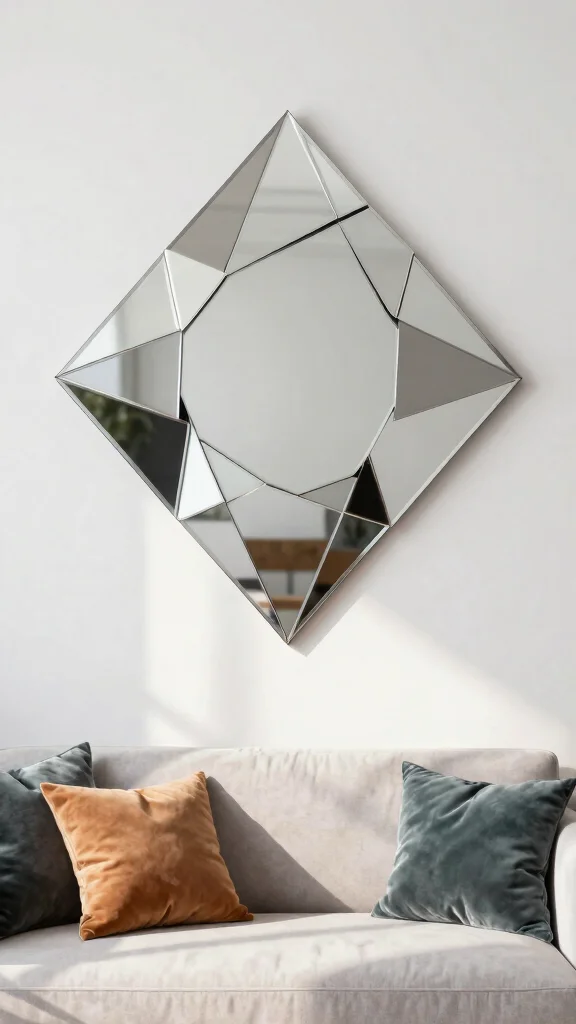
Creating a geometric mirror piece adds a modern edge to your decor. This project plays with shapes and angles, resulting in a striking visual that draws the eye. Using a large mirror as your base, you can design a unique geometric pattern that reflects your personal style. For instance, try outlining triangles or diamonds with painter’s tape and adding a metallic finish to the edges for a trendy touch. This fun DIY can be taken further by adding a colorful backdrop, such as plywood painted in a contrasting shade, to emphasize your geometric design. Hang your mirror above a sofa or in a hallway to create an engaging focal point.
– Use painter’s tape to outline your geometric shapes on the mirror.
– Paint the edges with metallic spray paint for added flair.
– Incorporate a contrasting backdrop to enhance your design.
– Regularly polish the mirror to keep it sparkling and sharp. This dynamic piece not only elevates your space but also creates an atmosphere of modern sophistication.
3. Mirror Mosaic
Dive into creativity with a vibrant mirror mosaic that transforms broken pieces into a stunning work of art. This project allows you to collect shards from old mirrors or purchase glass tiles to craft a colorful design. Start by sketching your desired pattern on a sturdy surface, letting your imagination flow. The joy of this DIY lies in its flexibility; whether you opt for an intricate design or a simple layout, the result is bound to be eye-catching. Once you have your design, adhere the mirror shards to your chosen surface, ensuring they fit snugly together. After the adhesive dries, apply grout to fill in the gaps for that polished, finished look.
– Sketch your mosaic design on a wooden board or canvas.
– Apply adhesive and carefully place mirror pieces into your design.
– Use grout to fill gaps between glass pieces for a seamless finish.
– Hang your mosaic above a mantel or as part of a gallery wall. This colorful addition brings boldness and fun into your decor, while the reflective surfaces create depth and light.
🛠️ Transform Your Space Today!
Unleash your creativity with our expert DIY guide to elevate any room in your home effortlessly.
4. Rustic Wood Frame Mirror
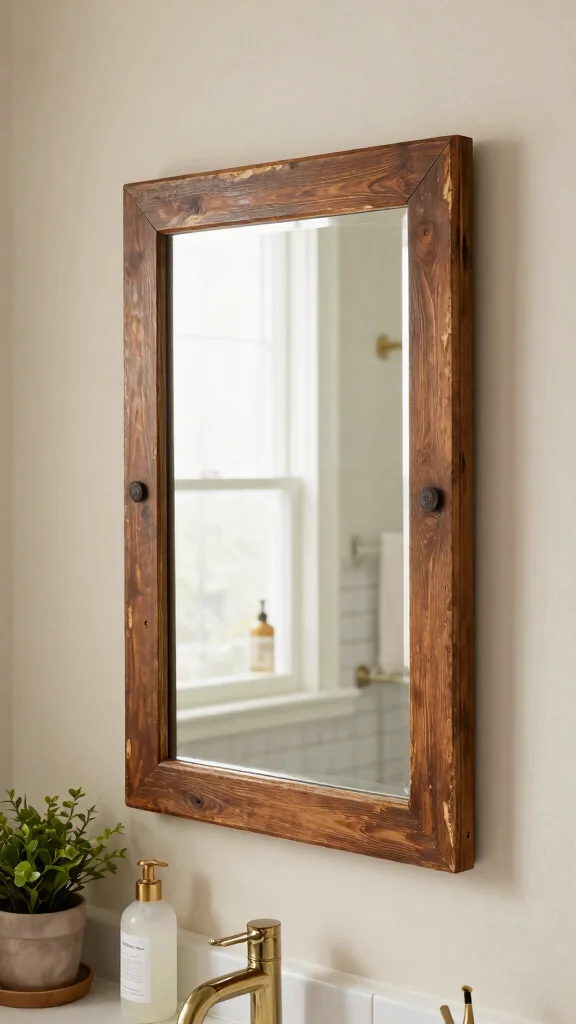
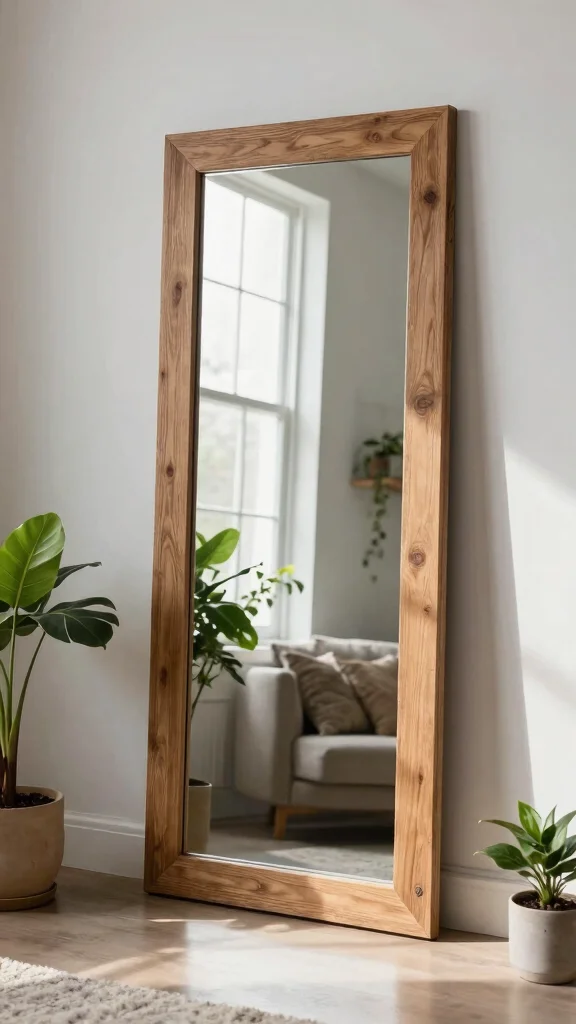
Crafting a rustic wood frame mirror is an excellent way to embrace farmhouse style in your home. This DIY project allows you to select reclaimed wood or new materials that provide that warm, rustic feel. Start by cutting the wood to create a frame that perfectly fits your mirror size. Leaving the wood natural enhances its organic beauty, or you can stain it for a richer tone. For added character, try distressing the wood with simple tools to achieve a weathered look. Secure the frame pieces with wood glue and finish with nails for durability. Hanging this rustic gem above a bathroom sink or dresser creates a cozy atmosphere.
– Choose reclaimed wood for an authentic rustic look.
– Consider staining or distressing the wood for added charm.
– Use wood glue and finishing nails for a secure attachment.
– Regularly clean the mirror to maintain its shine and rustic appeal. This project not only enhances your decor but also brings warmth and a touch of nature indoors.
Difficulty Rating & Requirements
Overall Difficulty Rating: Medium
Creating DIY mirror decor crafts can be a fulfilling project for anyone enthusiastic about home improvement. While some crafts may seem simple, others can require more intricate skills and techniques. This level makes it suitable for crafters with some experience or those willing to learn along the way. If you’re a beginner, don’t worry—you can still tackle some easier designs and gradually build your skills!
Time Estimate:
⏱ Estimated time: 3-5 hours per project
Most of the time will be spent gathering materials and allowing any paint or adhesive to dry. Here’s a quick breakdown:
– Gathering materials: 1-2 hours
– Crafting phase: 2-3 hours
– Drying time: Up to 24 hours (depending on the project)
Skill Requirements:
– Required skills: Basic crafting, painting, measuring, and cutting techniques
– Beginner-friendly: Yes, for simpler designs like the Vintage Frame Mirror or Colorful Framed Mirror. These require less intricate skills. However, more complex projects like the Geometric Mirror Art may need some prior experience.
– Skills that can be learned include painting techniques, how to use adhesive properly, and basic woodworking skills, while others, like creating a mirror mosaic, may require some crafting experience to execute well.
Tools & Materials Needed:
🧰 Essential items checklist:
– Mirror (required)
– Frame or backing material (required)
– Paint or adhesive (required)
– Measuring tape (required)
– Cutting tools (scissors or craft knife) (required)
– Decorative elements (such as beads, fabric, or tiles) (optional)
– Sandpaper (optional, for a rustic look)
– Hanging hardware (required, if you plan to mount the mirror)
Step-by-Step Overview:
1. Design Planning: Take 30 minutes to sketch your idea or gather inspiration from online sources. Planning helps streamline the rest of the process.
2. Material Gathering: Spend about 1-2 hours collecting all necessary items. You can often find materials at thrift stores or craft stores for budget-friendly options.
3. Crafting Phase: Allocate 2-3 hours to construct your piece. This includes cutting, painting, and assembling the mirror decor.
4. Drying Time: Depending on your project, allow between 1 to 24 hours for everything to set and dry properly.
Professional vs DIY:
The cost of hiring a professional to create a custom mirror decor can range from $200 to $600, depending on the design and materials used. In contrast, creating your own DIY mirror decor crafts can be done for as little as $20 to $100, depending on the materials you choose. This not only saves money but also adds a personal touch to your home. If you’re unsure about your skills or design ideas, seeking professional help might be worth considering for more complex projects.
5. Macramé-Style Mirror
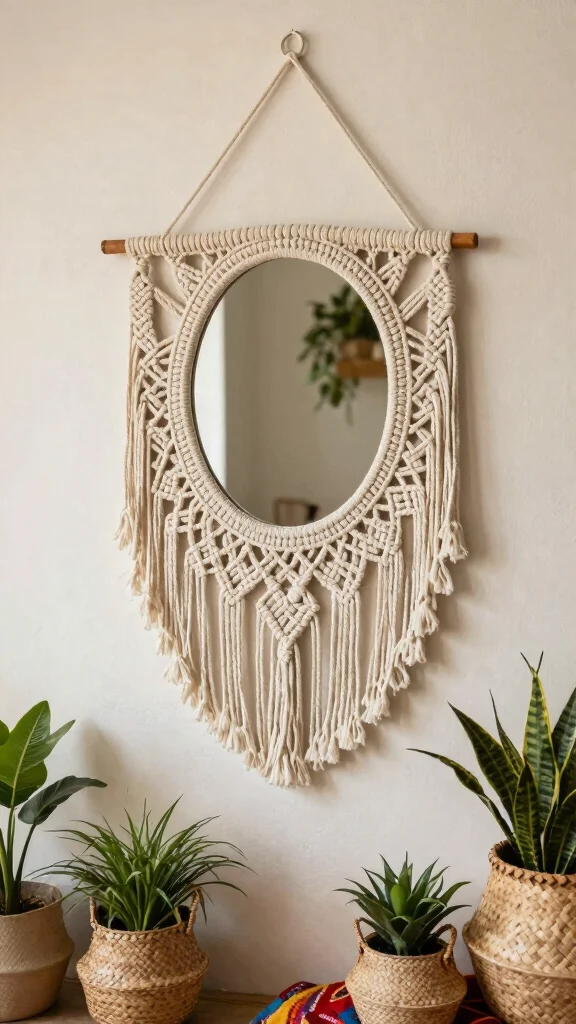
Infuse your home with bohemian charm by creating a macramé-style mirror. This project beautifully merges textile art with reflective surfaces, adding a unique flair to your space. Start with a simple mirror and gather cotton cord or hemp twine to craft your macramé design. The knots and fringes provide texture, making the mirror a statement piece. This fun project can also be a perfect weekend gathering with friends for a crafting session. Once you’ve tied your macramé around the mirror, hang it prominently in a living room or bedroom to enhance the atmosphere with softness and warmth.
– Gather cotton cord to create your macramé design.
– Wrap the cord around the mirror edges, incorporating fun knots.
– Invite friends for a crafting session to make it a fun activity.
– Dust the macramé regularly to maintain its beauty. This mirror not only serves a practical purpose but also acts as a beautiful piece of art, enriching your home with texture and style.
6. Sunburst Mirror
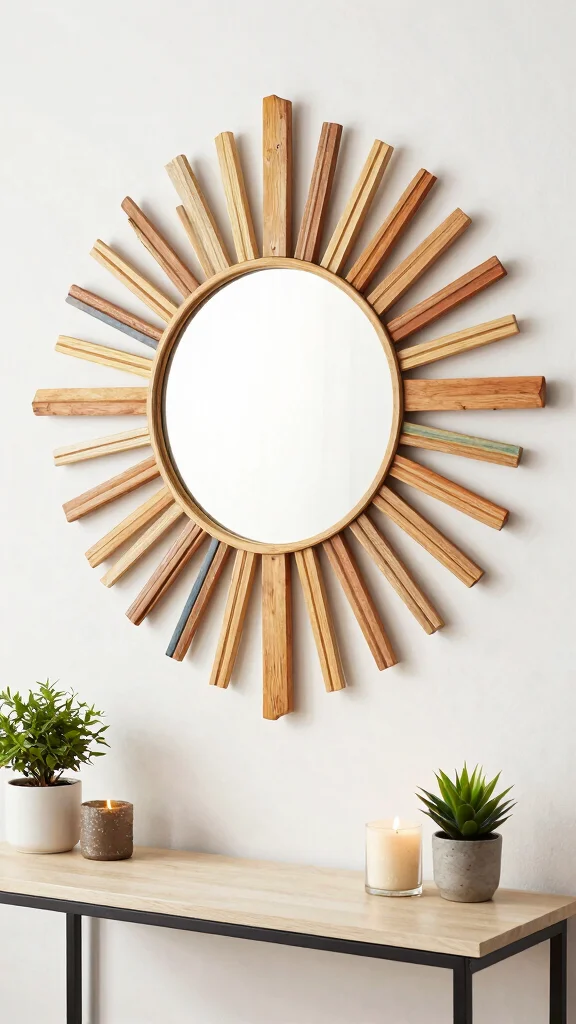
Brighten up your space with a sunburst mirror, a classic design that radiates joy. Using small wooden dowels or skewers, you can create sun rays that surround a central mirror. Start with a round mirror as your base and evenly space the dowels around it for a harmonious look. You can choose to leave the dowels natural or paint them in a vibrant hue for an extra burst of color. Hanging your sunburst mirror above a console table or in a sunny corner enhances its radiant effect. This quick project delivers stunning results that can transform any room.
– Attach wooden dowels around a round mirror for a sunburst effect.
– Paint dowels in bright colors for a playful touch.
– Hang it in a sunny spot to enhance its brightness.
– Regularly clean the mirror to keep it shining bright. This cheerful piece not only serves as a practical mirror but also as a lively decoration that uplifts the entire space.
7. Colorful Framed Mirror

Add a vibrant touch to your home with a colorful framed mirror that reflects your personality. Start with a simple mirror frame and choose your favorite paint colors to create a lively design. Use painter’s tape to section off areas of the frame, allowing for playful patterns like bold stripes or polka dots. This project is a fantastic way to express your creativity and breathe life into dull spaces. Once painted, allow the frame to dry completely before hanging it in a colorful area, such as a child’s room or a funky hallway. The affordability of this project makes it accessible to everyone.
– Select your favorite paint colors for the mirror frame.
– Use painter’s tape for clean lines and fun designs.
– Allow the paint to dry thoroughly before hanging.
– Apply a sealant to protect the paint from chipping. This lively addition not only enhances the aesthetics of your space but also invites a sense of joy and playfulness.
8. Beach-Inspired Mirror
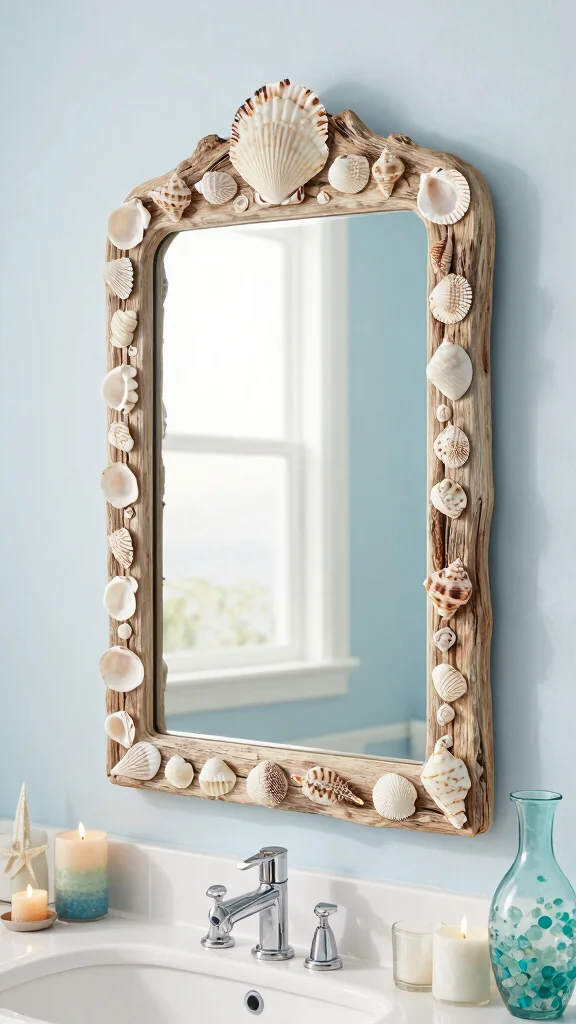
Bring the soothing vibes of the beach into your home with a beach-inspired mirror project. Gather shells, driftwood, and sand to create a coastal-themed mirror that instantly evokes summer memories. Start with a round or square mirror and glue shells and driftwood pieces around the edges, mimicking the natural beauty of the shoreline. Sprinkle some sand along the bottom for added texture and a true beach feel. This mirror serves as a perfect addition to bathrooms or beach houses, radiating relaxation. Using a light color palette can further enhance its coastal aesthetic.
– Collect seashells and driftwood to adorn your mirror.
– Glue shells around the mirror’s perimeter for a beachy look.
– Add sand along the bottom for extra texture.
– Dust off the shells regularly to maintain their vibrancy. This DIY project not only brightens up your space but also keeps a piece of the beach close to your heart.
9. Painted Canvas Mirror
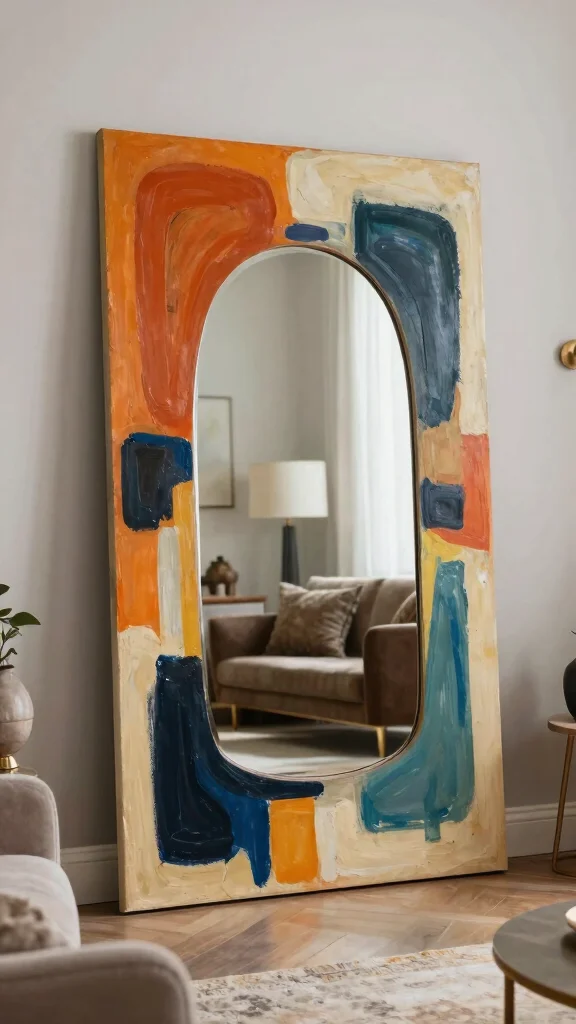
Combine artistry and functionality by creating a painted canvas mirror. This unique project allows you to express your creativity while decorating your home. Start with a canvas that matches your decor style and paint it with bold colors or abstract designs. Cut out the center to fit your mirror, framing the edges to achieve a polished look. This artistic approach provides a stunning backdrop for your mirror, making it a conversation starter in any room. Hang it over a desk or in the living room for a captivating effect.
– Paint a canvas that complements your decor style.
– Cut out the center to fit your mirror snugly.
– Frame the edges for a seamless finish.
– Clean the mirror regularly to maintain clarity. This project beautifully combines art and utility, enhancing your decor while showcasing your artistic flair.
10. Faux Animal Head Mirror
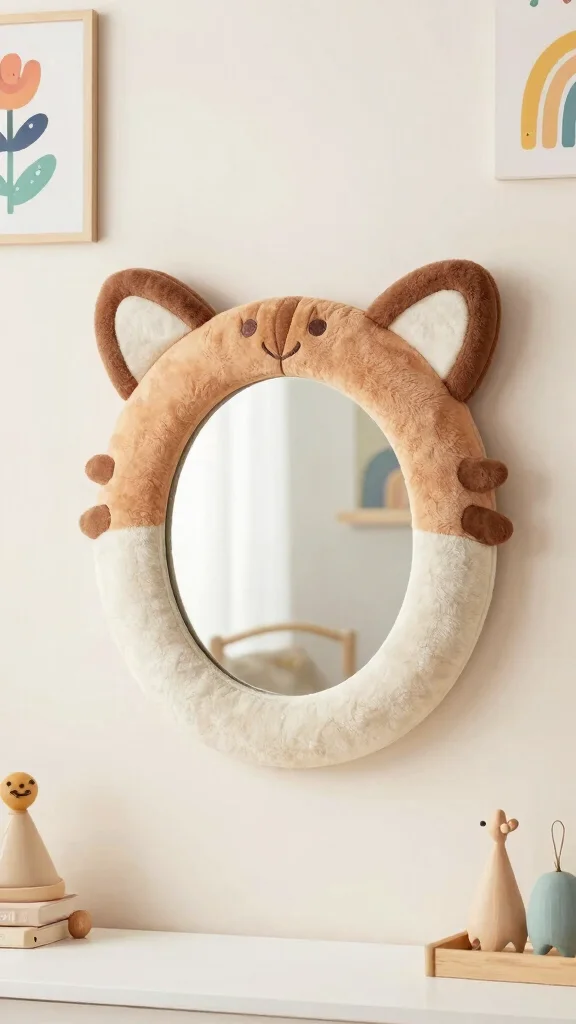
Introduce a quirky twist to your decor with a faux animal head mirror. This playful project blends creativity with humor, making it an exciting addition to your home. Use foam or papier-mâché to craft an animal head shape, then center a mirror to create a whimsical face. Paint it in colors that suit your style, and hang it in a child’s room or a fun hallway to spark joy. Experiment with different animals, from bears to deer, for a rustic touch. Secure the mirror properly with anchors to ensure it stays in place.
– Craft an animal head shape using foam or papier-mâché.
– Center a mirror to create the animal’s face.
– Paint the animal head in colors that match your decor.
– Regularly dust the mirror to keep it looking fresh. This delightful piece not only serves a practical purpose but also adds a sense of whimsy to your space, inviting conversation and smiles.
Turn a plain wall into a playful statement with diy mirror decor crafts. A faux animal head mirror brings whimsy and practical charm—great for kids’ rooms or a quirky hallway. Build the head from foam or papier-mâché, center a mirror, and paint to fit your style.
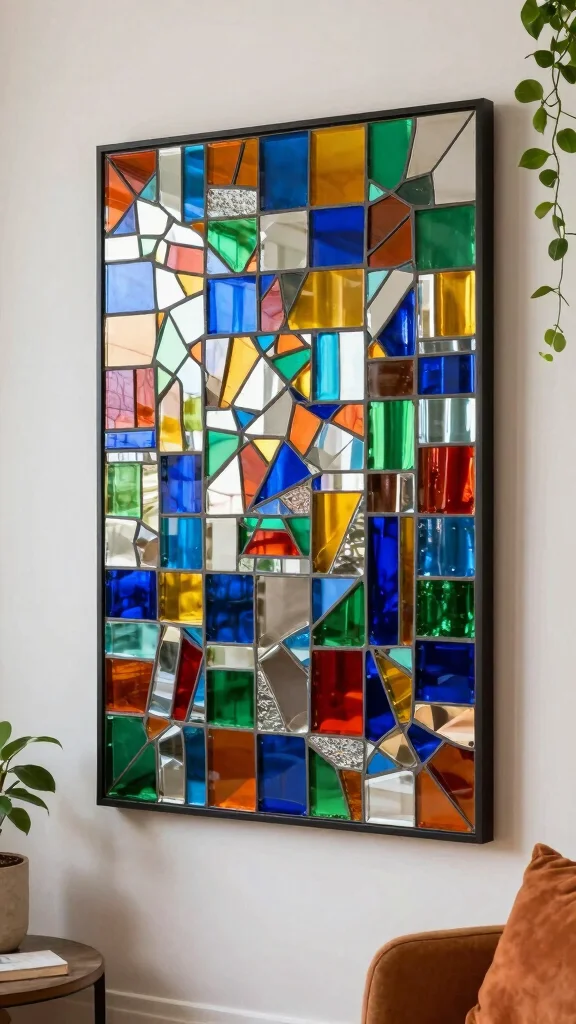
11. Tiled Mirror Frame

Create a stunning tiled mirror frame that adds colorful charm to your home. Using ceramic tiles, glass tiles, or colorful broken china pieces, this project transforms a plain mirror into a vibrant masterpiece. Begin with your mirror and cover it with adhesive, arranging the tiles into a design that catches your eye. The beauty of this DIY lies in blending colors and shapes for a captivating effect. Once placed, fill the gaps with grout to achieve a finished look that enhances the mirror’s appeal. This tiled mirror is a perfect addition to kitchens, bathrooms, or entryways where a pop of color is desired.
– Use ceramic or colorful tiles to frame your mirror.
– Arrange tiles in a pleasing pattern for visual interest.
– Fill gaps with grout for a polished finish.
– Clean the tiles regularly to keep them vibrant. This colorful creation not only makes a bold statement but also brings a unique artistic flair to your home.
Fun fact: A tiled mirror frame can brighten a room by up to 30% thanks to reflective ceramic and glass tiles. Mix bright colors or broken china for a one-of-a-kind focal point—perfect for your diy mirror decor crafts.
Recommended Products

Grout Shield Grout Restoration System- Cover 350 Sq Feet Tiled Surface (Ivory)
12. Fabric-Wrapped Mirror

Transform a simple mirror into a cozy textile masterpiece with a fabric-wrapped mirror. Choose your favorite fabric that complements your decor style, adding warmth and texture to your space. Cut the fabric to size and use adhesive to wrap it around the edges of the mirror, ensuring a snug fit. For an eclectic look, consider using multiple fabric patterns to create a beautiful patchwork effect. This DIY project is perfect for nurseries or bohemian spaces, bringing in a soft and inviting atmosphere. Just ensure the fabric is securely glued, and avoid high-moisture areas unless you use waterproof materials.
– Select a fabric that matches your decor for a cohesive look.
– Wrap the fabric around the mirror edges securely.
– Consider a patchwork effect with multiple fabric patterns.
– Regularly check the fabric edges to keep everything fresh. This charming mirror not only enhances your decor but also adds a touch of warmth and comfort to your home.
13. Repurposed Window Mirror
Breathe new life into an old window frame by transforming it into a stunning mirror. This charming DIY project embraces rustic elegance and creates a captivating focal point in any room. Start by removing the glass from the window frame, cleaning it thoroughly, and replacing it with a mirror panel cut to size. You can opt to leave the wood in its natural state for a farmhouse feel or paint it for a more contemporary twist. Hanging your repurposed window mirror in your living room or dining area makes a beautiful statement piece that’s sure to draw conversations. Just remember to secure it well, especially if it’s larger, and keep the mirror clean for a bright reflection.
– Remove the glass and clean the window frame thoroughly.
– Replace with a mirror panel cut to size for a seamless fit.
– Choose to leave the wood natural or paint it for a fresh look.
– Regularly clean the mirror to maintain its shine. This project not only enhances your decor but also showcases the beauty of repurposed materials, making it a sustainable choice.
Fun fact: Upcycling an old window into a mirror cuts decor costs by up to 70%, and it’s one of the simplest diy mirror decor crafts. In just 3 steps, you’ll add rustic charm and reflect more light.
14. Textile Wall Hanging Mirror
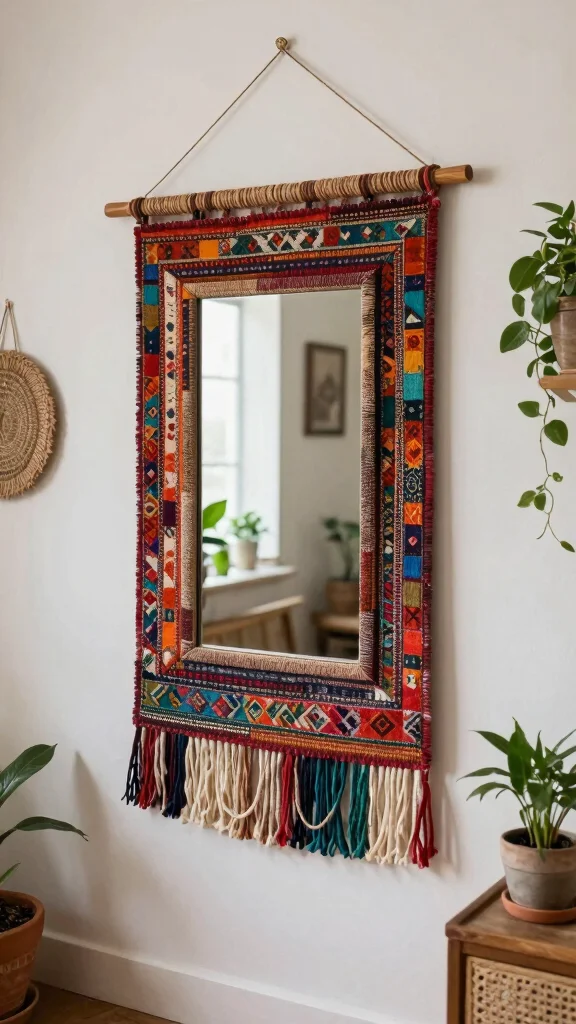
Combine textile art with a mirror to create a stunning wall piece. This DIY project emphasizes layering textures, adding depth to your decor. Start with a mirror and select a fabric that speaks to you, such as macramé, crochet, or a vibrant tapestry. Attaching the fabric around the mirror forms a unique border that elevates its artistic value. This layered design becomes a striking focal point, ideal for bohemian or eclectic styles. Hang it in an area where its artistry can be admired, ensuring it becomes a highlight of your space.
– Choose a fabric that resonates with your decor style.
– Attach the fabric around the mirror for a unique border.
– Hang it in a prominent spot for visual impact.
– Keep the fabric clean with a lint roller to maintain its beauty. This creative approach not only enhances your decor but also brings a delightful artistic flair to your home.
Recommended Products

Premium Material:Handcrafted from 100% durable brown cotton cord and mounted on a smooth wooden rod. Designed in a unique woven pattern with wooden accents, this macrame artwork is rich in texture and visually warm.

Style:Macrame wall hanging semi circle wall hanging set features two beautifully coordinated pieces made from semi-circular wooden boards, one accented with elegant blue tassels and the other with soft ivory tassels, creating a harmonious blend of bohemian charm and modern minimalist style that adds depth, texture, and visual warmth to any interior space.

【Chic Design】The macrame wall hanging inspired by tribal objects, ethnic art, and boho design,Featuring hand knotted macrame textiles, layered fringe details, geometric wave knit patterns, and wool ball, Its unique design integrates into any home or office decor.
15. Sports-Themed Mirror
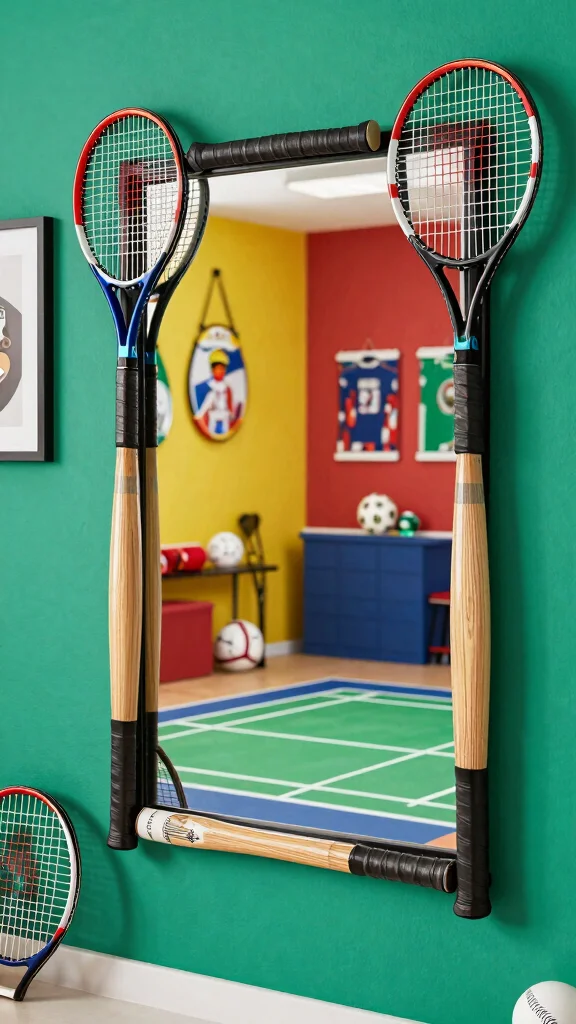
For sports enthusiasts, a sports-themed mirror adds a playful touch to your decor. Use old sports equipment like tennis rackets, baseball bats, or soccer balls to frame a mirror in a creative way. For instance, a baseball bat can form a circular frame for a round mirror, or you can arrange rackets in a unique shape. This DIY project injects personality into a game room, kids’ room, or any sports-themed area. Ensure that all equipment is clean and securely attached to prevent any accidents. Regular dusting will keep your sports-themed mirror looking fresh and vibrant.
– Use old sports equipment to creatively frame your mirror.
– Securely attach the equipment to ensure stability.
– Consider various designs to match your style.
– Regularly dust the equipment to keep it looking great. This fun addition not only serves a practical purpose but also celebrates your love for sports, making it a cherished piece in your home.
16. Light-Up Mirror
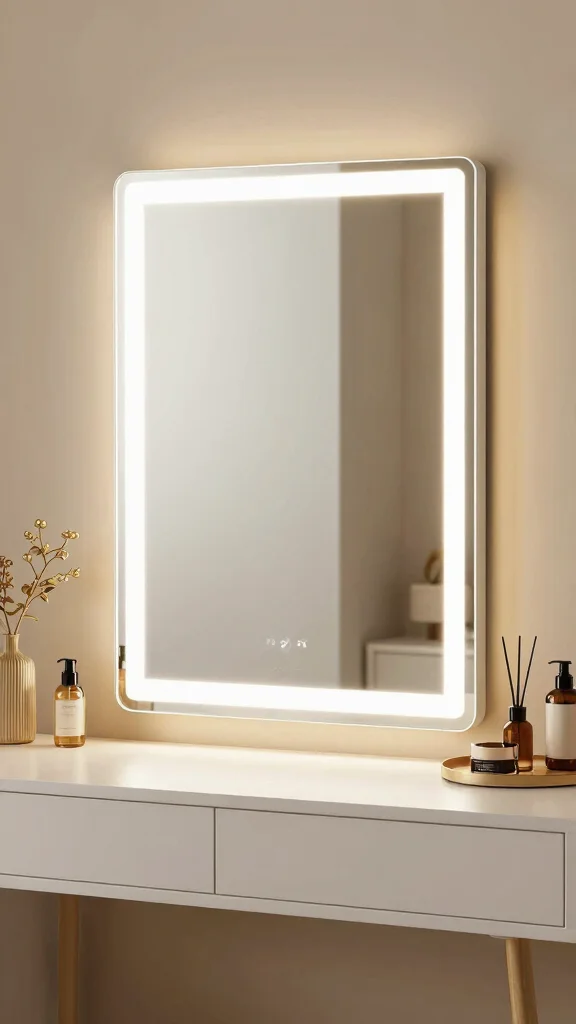
Illuminate your space with a light-up mirror that combines style and function. This project is perfect for a vanity or bathroom mirror, adding a magical glow to your routine. Using an LED strip, attach it around the mirror’s perimeter to create adjustable lighting. Choose from warm white or colorful settings depending on the mood you want to set. This DIY allows you to enhance your space’s ambiance, whether you want a soft glow or a brighter light when needed. Ensure that the wires are secured properly, and maintain the mirror’s cleanliness for optimal reflection.
– Attach an LED strip around the mirror for a glowing effect.
– Choose between warm white or colorful lighting options.
– Secure the wires properly for safety.
– Regularly clean the mirror to keep it clear and reflective. This functional piece not only elevates your decor but also enhances your daily routines with its stylish glow.
Recommended Products

💗【Adjustable Brightness & 3-Color Lighting Modes】including cold light/daylight/warm light three color settings, the brightness of each color can be adjusted; simulating lighting in various occasions to meet personal makeup needs. "M" button on the left is used to change the light mode, the middle button is used to turn on and off, and the "P" button on the right is used to adjust the brightness.

💗【Adjustable Brightness & 3-Color Lighting Modes】Long press the button to adjust the brightness ranging from 10% to 100%; Choose from cool, warm, or natural lighting modes to suit your preference and create the perfect atmosphere for any occasion.

📦 Customizable Detachable Storage: Separate Brushes Compartment - Travel makeup bag with mirror comes with a separate space to hold your brushes and protect them from dust. Good travel makeup bags with led mirror for women to fit different-sized cosmetics (foundations, palettes, lipsticks) + separate brush holders to avoid mess.
17. Upcycled Metal Mirror
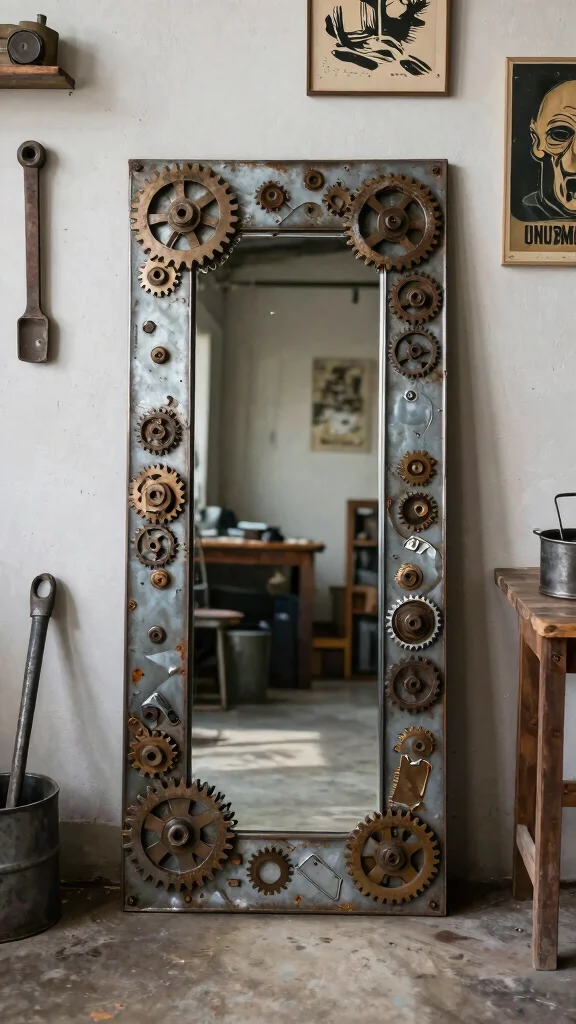
For those who appreciate a bold aesthetic, an upcycled metal mirror is a fantastic DIY project. Gather old metal scraps, like gears or tin, to craft an industrial-style frame around your mirror. Arrange these pieces in a collage fashion, securing them with strong adhesive for a unique look. You can leave the metal raw for an authentic feel or paint it to add a splash of color. This mirror fits perfectly in offices, workshops, or eclectic living rooms, providing a rugged charm. Regular dusting will keep the metal looking fresh and maintain its edgy appeal.
– Use old metal scraps to craft an industrial frame.
– Arrange pieces in a collage for a unique look.
– Consider painting the metal for a pop of color.
– Regularly dust to keep the metal looking great. This project not only adds character to your decor but also showcases your creativity in upcycling materials.
18. Interactive Chalkboard Mirror

Add a playful twist to your mirror with an interactive chalkboard mirror. This DIY project combines creativity with functionality, making it a fun addition to your home. Paint the frame of a mirror with chalkboard paint, or apply it directly to the mirror’s edges for a versatile surface. This allows you to write notes, doodles, or designs that can be changed regularly. Ideal for kitchens, kids’ rooms, or entryways, this mirror serves as both a reminder board and an interactive piece. Ensure the chalkboard paint is applied evenly for a smooth writing experience, and keep some chalk handy for spontaneous inspiration.
– Paint the frame or edges of the mirror with chalkboard paint.
– Write notes or doodles for a fun interactive experience.
– Ensure a smooth application for easy writing.
– Keep chalk nearby for spontaneous creativity. This engaging addition not only enhances your decor but also invites creativity and fun into your everyday life.
Conclusion
Transforming your space with DIY mirror decor crafts not only brightens your home but also reflects your personality.
With these 18 creative projects, you can experiment with various styles and materials while adding a personal touch to your décor. Happy crafting and may your mirrors shine bright!
Frequently Asked Questions
What are some beginner-friendly DIY mirror decor crafts to brighten a small space?
Getting started with beginner-friendly DIY mirror decor crafts is all about using what you already have and budget-friendly supplies. Start with a thrifted frame or an old mirror and refresh the surface with mirror tiles or a simple glass mosaic to create a new focal point. Glue the pieces with a glass-safe adhesive, then seal the edges with clear caulk and let it dry before hanging. This approach showcases upcycled mirror designs that fit into budget-friendly crafts and instantly brightens any room.
Tip: pick a frame color that matches your space and always wear gloves and work on a protected surface when handling glass.
How can I create budget-friendly upcycled mirror designs for home decor projects?
For upcycled mirror designs that shine on a budget, gather old frames, trays, or even mirrored shards. Paint or refinish the frames to a cohesive color, then attach mirror tiles or shards with a strong epoxy or construction adhesive. Replace hardware, add a hanging hook, and seal the edges for a clean finish. This approach keeps your home decor projects affordable while delivering creative mirror ideas you can be proud of.
Pro tip: source secondhand frames and mirror pieces from thrift stores to maximize savings.
What supplies are essential for decorative wall mirrors and creative mirror ideas?
Essential supplies include a sturdy frame or backing, a mirror sheet or mirror tile, glass-safe adhesive, safety gloves, a glass cleaner, painter’s tape, and clear caulk for edge sealing. Add optional decorative touches like paint, beads, or wrap to customize your decorative wall mirrors look. Having a small, organized workspace and a measuring tape helps ensure your diy mirror decor crafts come out precise and durable.
Tip: recycle old frames and shop clearance aisles to keep budget-friendly crafts rolling.
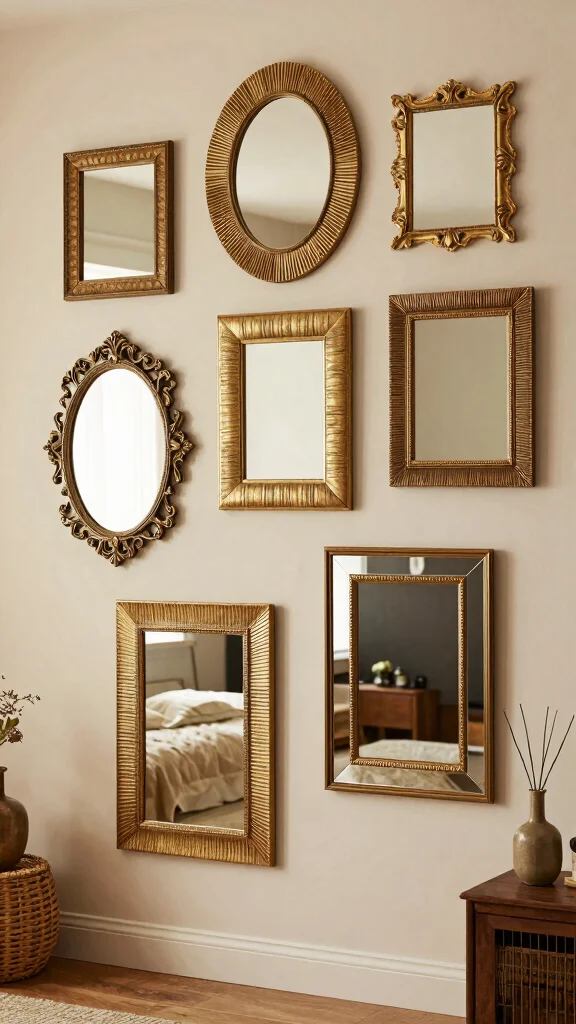
How can mirrors be arranged to make a space look bigger and brighter?
To visually enlarge a space with decorative wall mirrors, place mirrors opposite a window to bounce natural light, group multiple sizes into a cohesive gallery, and align the tops for a tidy, intentional look. Use light frames or a common finish so the arrangement reads as one design rather than many pieces. Position mirrors at eye level and keep surrounding clutter to a minimum to maximize the effect of your creative mirror ideas.
Bonus: add warm lighting to enhance reflections and warmth.
Are there simple upcycling ideas using vintage mirrors for a cohesive look in home decor projects?
Absolutely. Try these upcycled mirror designs for a cohesive vintage-meets-modern vibe: paint or distress frames in a unified color family; wrap edges with jute cord or metallic trim; repurpose old cabinet doors as large decorative mirrors; or create a sunburst by combining assorted vintage pieces. Start with a planned layout on the floor, then mount using proper hardware. These home decor projects are practical, stylish, and budget-friendly while honoring the charm of vintage mirrors.
Tip: balance busy frames with a few simpler pieces to avoid visual clutter.
Related Topics