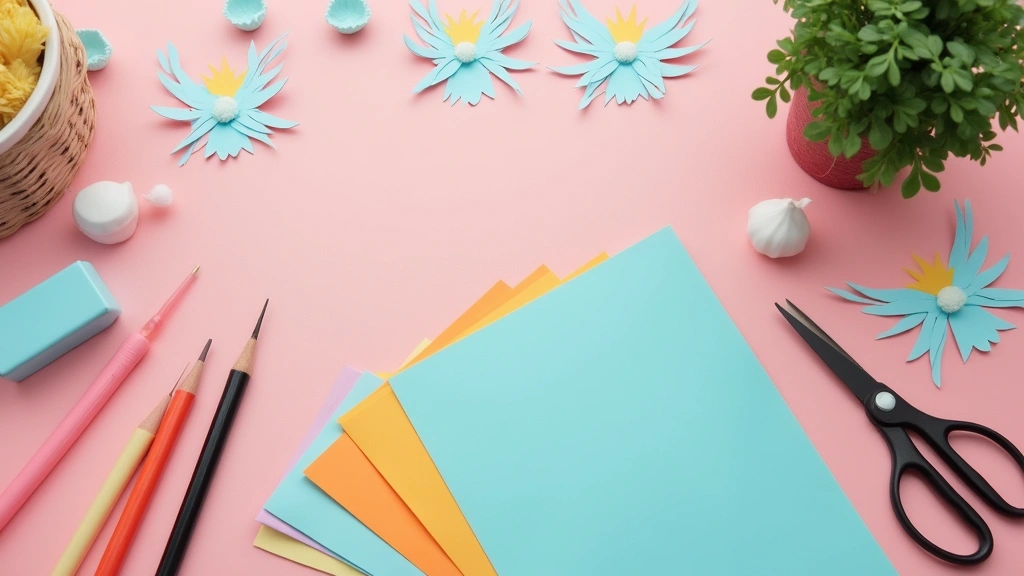
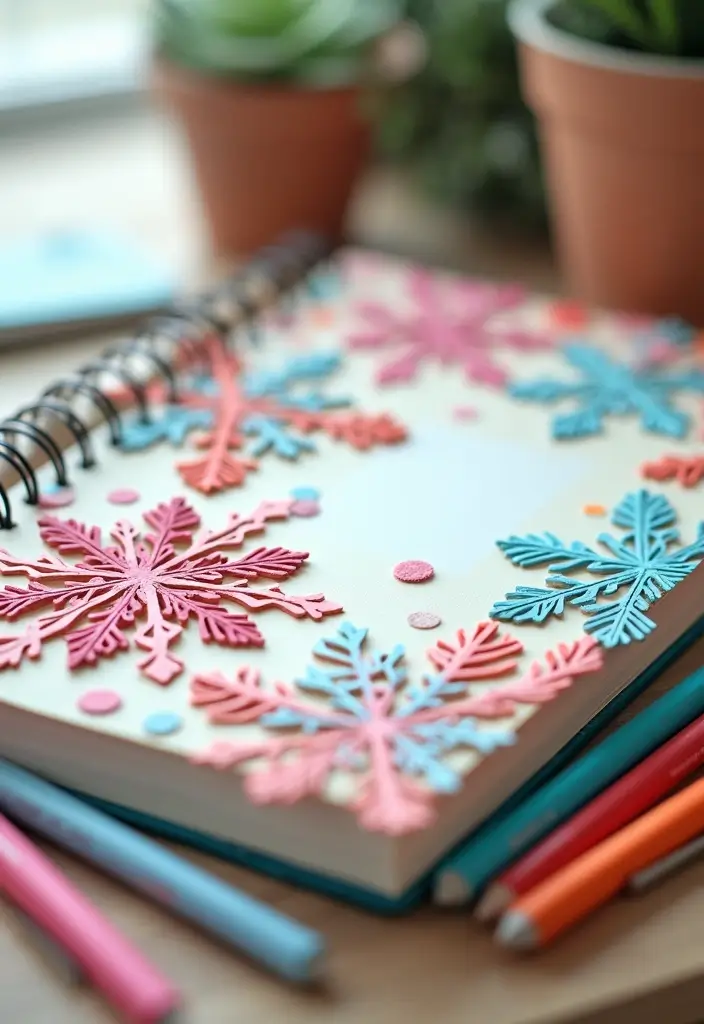
Winter has me craving tiny crafts that bring a smile. I grew up chasing snowflakes on the window, and that winter magic still thrills me. This season I wanted to share a way to keep that winter magic alive at home. I pulled together 30 paper snowflake crafts DIY projects that are easy, affordable, and fun to make.
If you love simple projects you can finish in an afternoon, this post is for you. If you decorate with string lights and cozy corners, you will relate to the vibe. These ideas fit busy lives and small spaces.
You will get ideas that cover a range of styles from delicate lace to bold geometric shapes. You will find tips you can follow with kitchen scissors and a sheet of printer paper. You will learn simple techniques to fold, cut, layer, and hang the snowflakes. You will see how to turn plain paper into window art, garlands, or table decor.
The post stays practical by keeping steps short and supplies easy to find. You can reuse scraps and make several pieces from one sheet. We cover a mix of colors, textures, and sizes so you can match your home. Expect quick wins and little mess.
Not every idea will fit your space. Some patterns are easier than others. Take what works and skip what does not. The goal is joy, not perfection.
Ready to dive in today? Pick a few and start folding. Share your creations and inspire others. If you want more tips, keep reading and try a different style next weekend.
1. Classic Folded Paper Snowflakes
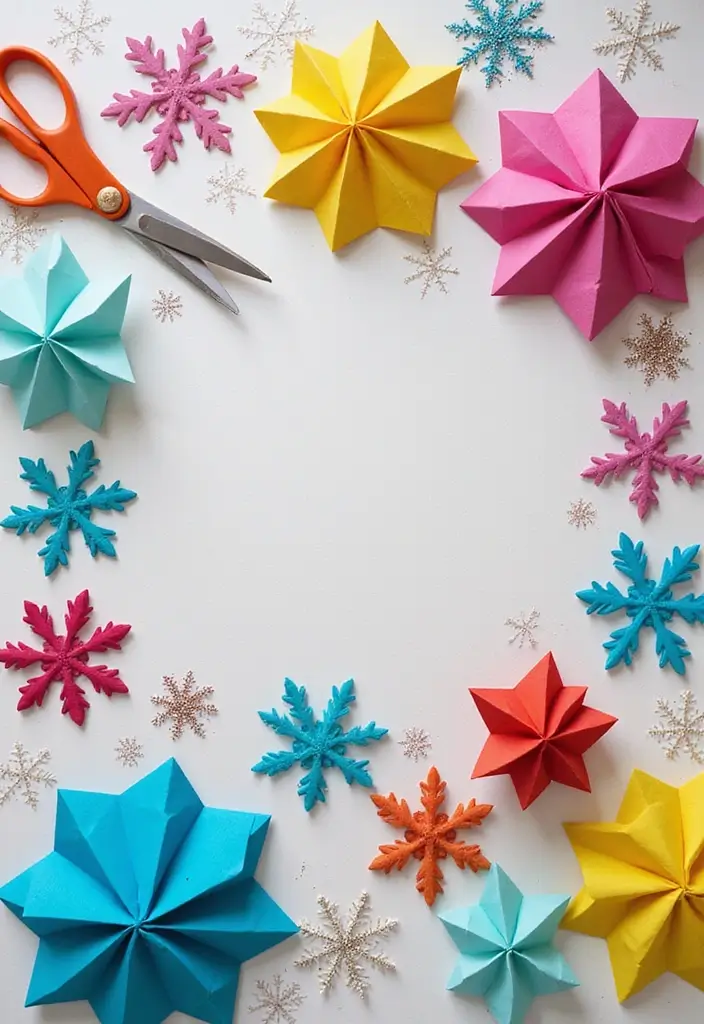
Looking for a winter craft that’s quick, affordable, and fun for all ages? Folded paper snowflakes fit the bill. They don’t need glue or fancy tools, and each snowflake feels unique.
Here is why this works: you need just one square of paper, a pair of scissors, and a little imagination. No mess, no fuss. When you fold the paper, the cuts make a mirror image. The result looks like real snow art you can hang up.
Next steps
– Grab a square piece of paper.
– Fold it into four equal layers.
– Cut shapes from the folded edge only. Start simple, then try tiny zigzags or circles for more detail.
– Unfold slowly to reveal a delicate snowflake.
– Press gently with a light hand to flatten curls.
Tips: Try colored paper, patterned scrapbook sheets, or white cardstock. Different sizes look great together. Use lighter paper so you can see your cuts clearly. Don’t cut too deep or too shallow for clean edges. After you unfold, add glitter, markers, or a soft watercolor wash to personalize each flake. Hang them in a sunny window or across a doorway to create a winter garland. These flakes teach symmetry in a hands-on way and give you a simple, satisfying way to brighten your space.
@media(max-width:480px){
2. Coffee Filter Snowflakes
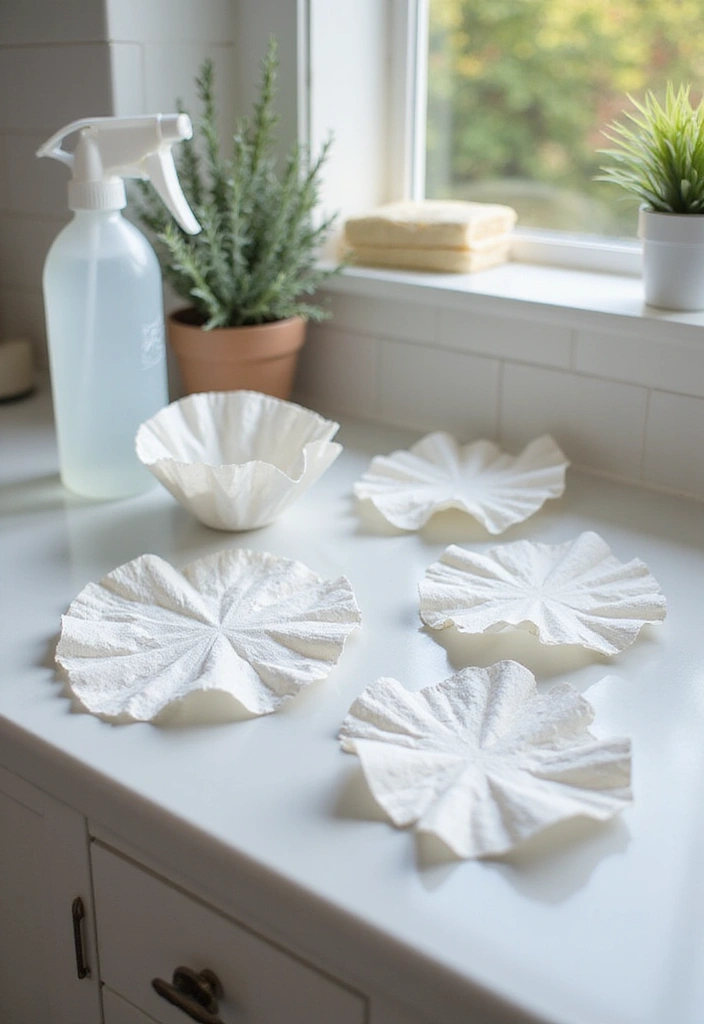
Want a quick, budget-friendly winter decoration that kids can make and you can reuse? Coffee filter snowflakes fit. They turn plain filters into delicate winter art while cutting waste. Light as a feather, they catch the light just right when hung from the ceiling.
Materials
– Coffee filters
– Scissors
– Spray bottle with water
– String or thread
– Tray or parchment for drying
Steps
– Start by folding a filter in half, then in half again until you have a small, neat triangle.
– Cut shapes along the edges. Try triangles, curves, and tiny diamonds to vary the look.
– Open the fold and unfold the filter to reveal a snowflake pattern.
– Lightly mist the snowflake with water. This helps the paper “open up” and hold its shape as it dries flat on a tray.
Display ideas
– Hang several from the ceiling for a sparkling winter display.
– Tie one to a gift to add a handmade touch.
– Create a simple garland by linking pieces with string.
Tips and quick variations
– Use different sizes by starting with whole filters and then folding others smaller.
– If a piece tears, trim the edges and keep the folds tight to regain balance.
– Dry on parchment so they lie flat and keep their shape.
Why this works
– It teaches folding and cutting in a kid-friendly way.
– The result looks graceful and airy on any wall or package.
– It’s an eco-friendly craft that fits DIY winter decor trends.
@media(max-width:480px){
3. Glittered Snowflakes
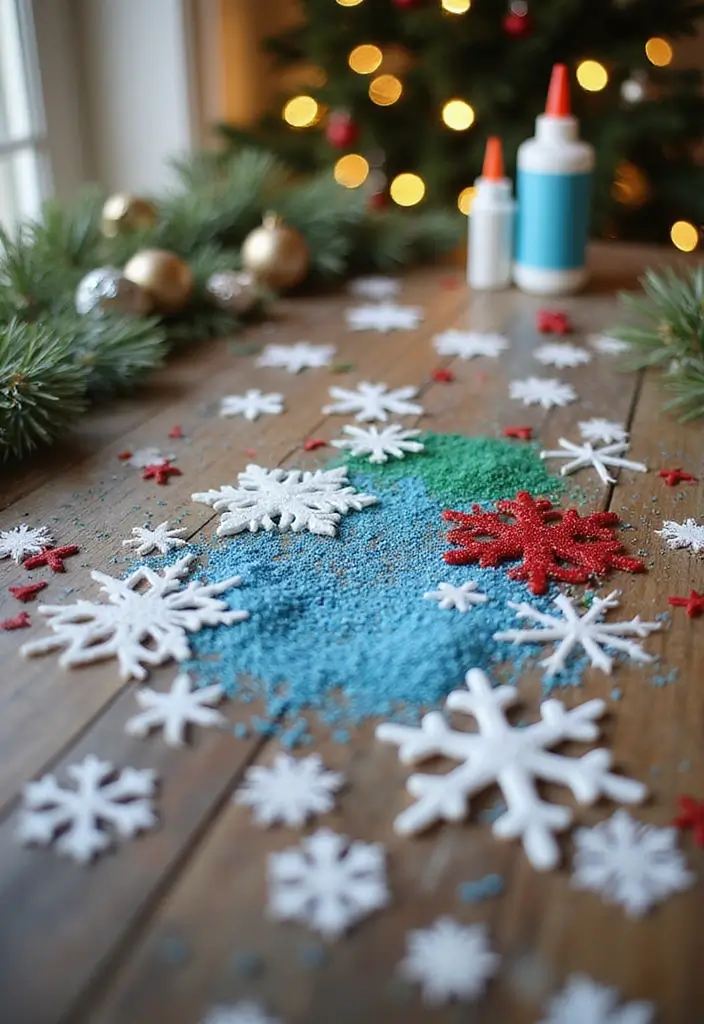
Here is why you want glitter on your snowflakes. You get more shine and fun that lasts. Let’s break it down.
– Pick a snowflake design you already made. This keeps the project quick.
– Apply a thin line of craft glue along the edges you want sparkly. A small brush or a toothpick works best.
– Sprinkle glitter over the glue. Do it over a paper plate so you can reuse the excess.
– Tap lightly to remove the loose glitter. Let the glue dry completely, about 15–30 minutes, or longer if your room is cool.
– For a lasting sparkle, spray a light coat of clear sealant when dry. This helps glitter stay on and adds a bit of protection.
Next, make them hangable:
– Add a loop of string or thin ribbon before the glue dries if you want ready-made ornaments.
– If you want mix colors, use silver and white for a classic winter look, or mix blues, pinks, and greens for a rainbow snowflake.
Tips:
– Use tweezers for precision on small details.
– Try glitter glue pens for neat lines.
This simple method turns plain snowflakes into eye-catching ornaments or table decor. It’s great for winter displays and cozy DIY sessions with family.
Recommended Products

Makes your art sparkle and enhances rubber stamped designs

Voted America’s Favorite Crafting Glue by generations of crafters, hobbyists, and households

PRECISION METAL TIP & PIN – Includes a fine metal tip and stainless steel pin for precision glue application. Perfect for intricate details, fine lines, and tiny embellishments without clogs or mess.
4. Snowflake Templates for Easy Cutting

If you want neat snowflakes but worry about freehand cutting, snowflake templates are your fix. Print-ready designs come in simple and intricate shapes. Print on plain paper, then cut along the lines.
This approach shines in group crafts. It helps each snowflake look the same, so you can hang a whole winter wall with coordinated pieces. They stay flat and easy to store.
After you cut, you can add life. Color with markers or paint, then layer two or three cutouts to build a 3D look. Tape them slightly offset to create depth.
Let kids pick designs. When they choose, they feel part of the project. It sparks creativity and pride.
Where to find templates
Search for printable snowflake templates, snowflake cutting templates, or paper snowflake templates. Save a few favorites for quick starts.
Tips for easy cutting
– Use light printer paper for soft edges.
– Keep scissors sharp and safe for kids.
– Set up a flat cutting area with a trash bin nearby.
– Try two templates on one sheet to save paper.
– Punch holes and string the snowflakes as garlands.
How to mount and show them
String several pieces on ribbon, pin to a corkboard, or tape to a window. It brightens rooms.
This simple kit fits any winter project. Try one sheet per child.
Recommended Products

LOTS OF SNOWFLAKES AND IDEAS: Unlock endless creativity with 80 punch-out white paper snowflake cutouts, available in large and small sizes. Each set includes an IDEA GUIDE featuring 13 fun and imaginative ways to use these snowflakes, perfect for holiday decorations, classroom activities, and art projects. Whether creating a winter wonderland or unique crafts, our snowflakes provide endless possibilities.

Punched Out Size : 1 3/4 inch x 1 7/16 inch (L x W)
5. Paper Snowflake Wreaths
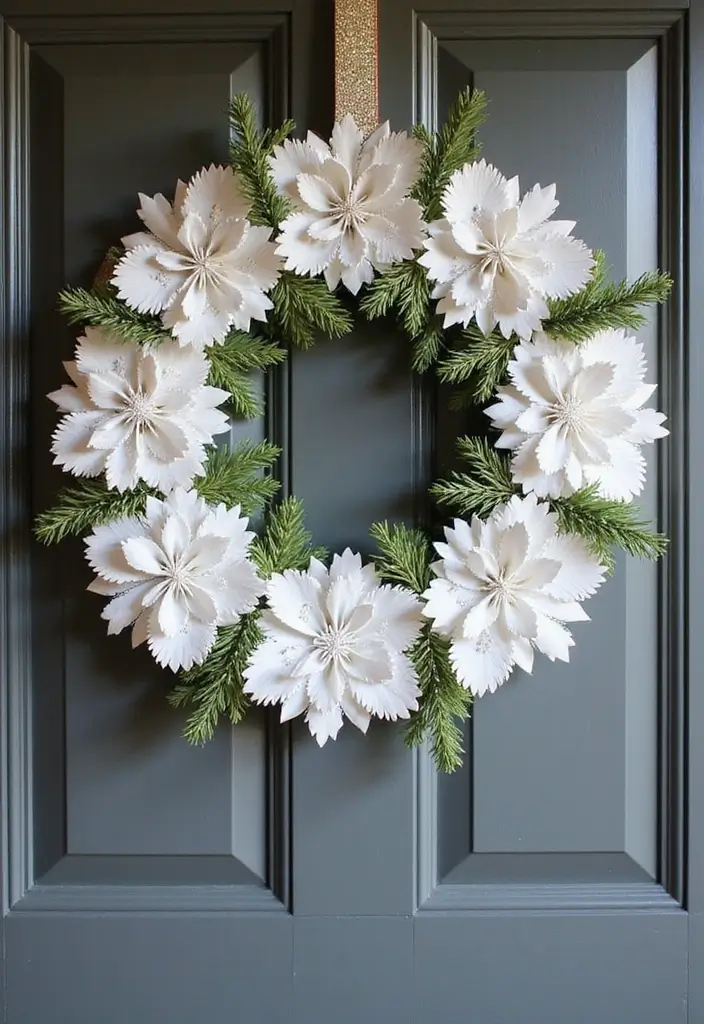
You want a warm welcome for winter. A paper snowflake wreath brings that charm to your home. It’s easy and fun to build with family.
– Materials: a circular base (foam ring or sturdy cardboard); paper snowflakes in different sizes and designs; a hot glue gun and glue sticks; scissors; decorative accents like faux pine, ribbon, or twine.
– Step 1: Make snowflakes in several sizes and patterns. Let them be simple or elaborate, so your wreath looks layered.
– Step 2: Start with a base layout. Arrange a few snowflakes on the ring to plan the look.
– Step 3: Glue snowflakes to the base one by one. Press firmly and let the glue set.
– Step 4: Add extra touches. Slip in faux pine, a ribbon bow, or a hanging loop for the door.
– Step 5: Check the balance. Stand back and move pieces until spacing feels even.
Here is why this works. It creates depth with different sizes and textures.
Next steps: hang it on a door, a wall, or use it as a table centerpiece.
Storage tip: store flat with tissue between layers so you can reuse it next season.
Tip: pick a color that matches your winter decor.
You can swap in metallic or pastel snowflakes for a fresh look.
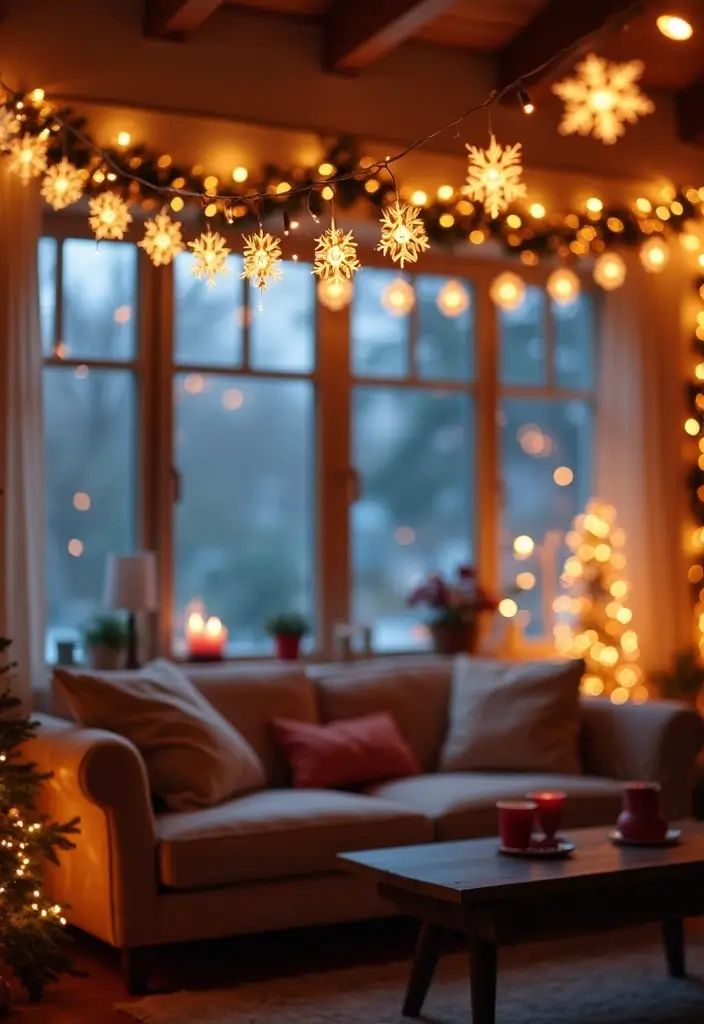
6. 3D Paper Snowflakes
Do you want more depth in your winter décor? 3D paper snowflakes add depth and life to your space. You can hang them from the ceiling or set them on a table to build a small winter scene. They catch light and glow softly, making your room feel cozy.
What you’ll need
– White or pastel paper
– Scissors
– Glue or double-sided tape
– Ruler or scoring tool
– Thread or fishing line for hanging
– Optional: a bone folder or spoon to crease folds
Two ways to make them
Option A: layered 3D snowflakes
– Cut two or more flat snowflakes.
– Decorate with a simple pattern if you like.
– Glue the centers together to build a layered look.
– Let the glue dry before you hang them.
Option B: folded 3D snowflakes
– Cut one snowflake on sturdy paper.
– Score fold lines so it folds neatly.
– Fold along the lines to form a 3D shape.
– Attach arms to a small central hub with a glue dot.
Where to use them
– Suspend from the ceiling for a floating snow shower.
– Place on a table as a charming centerpiece.
– Dangle near windows or doors to catch sunlight.
Tips for success
– Classic white works well, but pastels or bright colors give a modern twist.
– Lighter paper is easy to fold; thicker paper lasts longer.
– Use clear thread to create a true floating effect.
– Make small batches and dry glue completely before moving them.
Ready to try? Gather materials and pick a style. You’ll have a festive, tactile display in no time.
@media(max-width:480px){
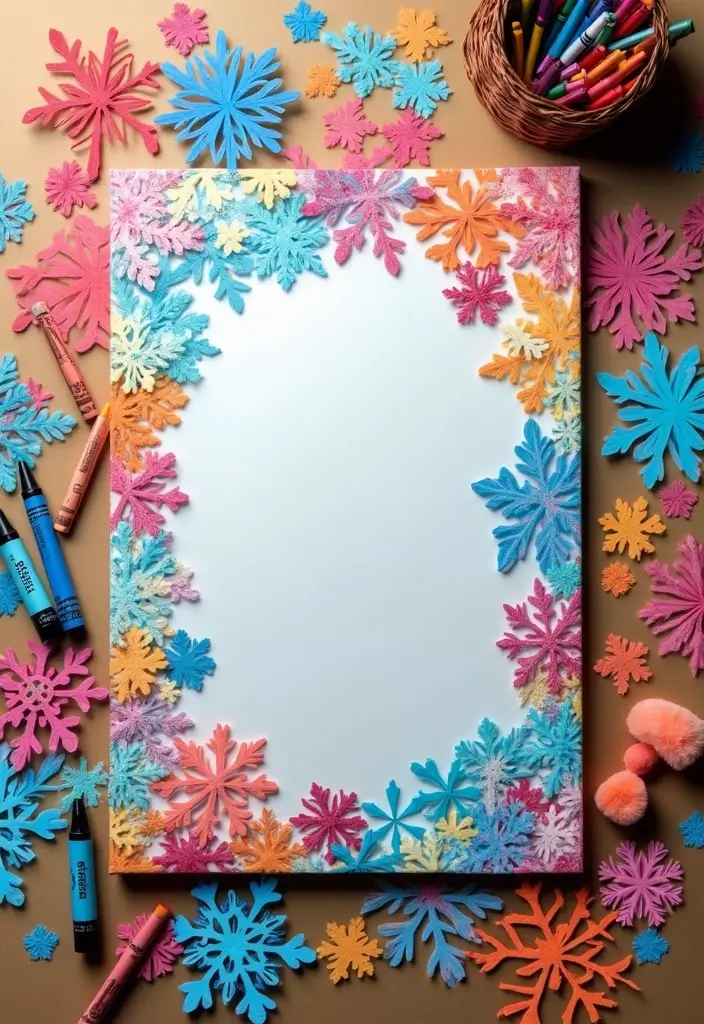
7. Snowflake Coloring Pages
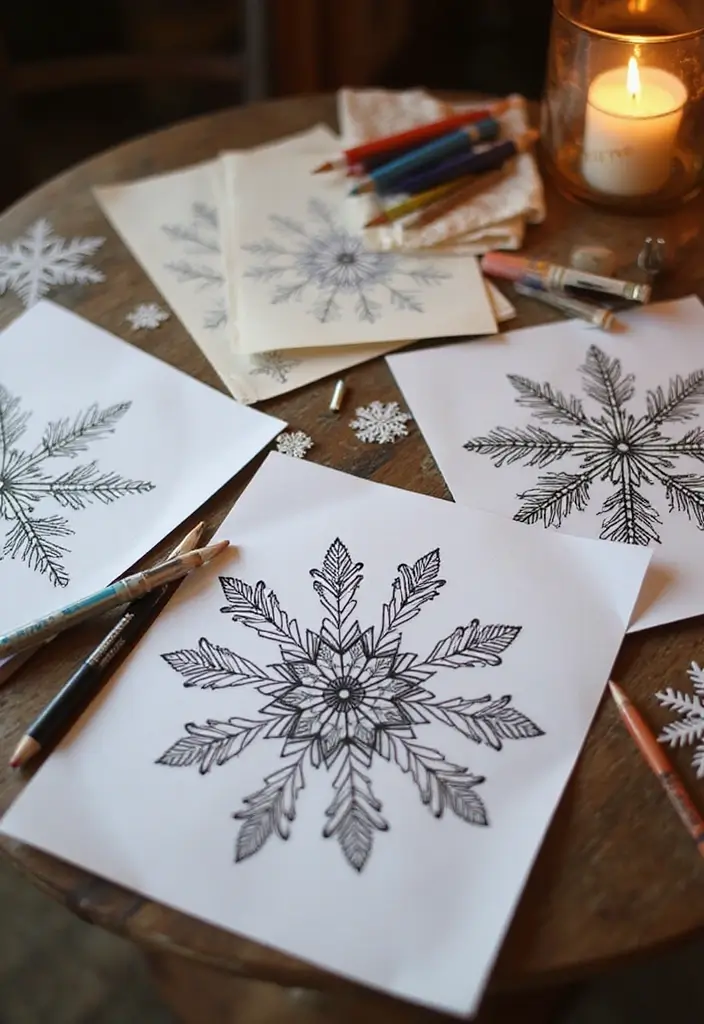
Here is why snowflake coloring pages fit a calm winter moment. They are simple, quiet, and fun. Print a set of snowflake designs you can color. This activity helps calm nerves, lets small hands practice grip, and adds a touch of winter charm to your home.
What you need
– Paper
– Coloring tools such as colored pencils, markers, or watercolors
– A tray to catch spills
– A spot to hang finished art
How to use them
– Choose a page.
– Set up a cozy, well-lit area.
– Pick colors and color with steady strokes.
– When a page is done, cut it out and display it.
Next steps
– Create a small gallery on a wall or window.
– Turn coloring time into a light contest: who makes the most unique snowflake?
What you gain
– A relaxing activity that helps focus and fine motor skills
– Color choices spark imagination
– Finished pieces become quick winter decor
– These pages work for kids and grownups too, fitting in a snack break, after homework, or a rainy day
Tips
– Use sturdy paper and dry colors for sharp lines.
– Let paint or ink dry before cutting.
– Keep sessions short so kids stay engaged.
8. Stained Glass Snowflakes
You want winter decor that catches the eye without a big mess. Stained glass snowflakes give you color and light with one simple project. The sun behind them makes the colors glow, like real stained glass. It’s a small trick that brightens a room and teaches kids about color mixing and light.
What you need
– Translucent tissue paper in several colors
– A clear backing: a plastic window sheet or a clean window
– Scissors
– White school glue or clear craft glue
– String or fishing line for hanging
– Optional outdoor sealant if you plan to display them outside
How to make your stained glass snowflakes
– Cut a few simple snowflake shapes from the tissue. Keep the pieces thin to let light pass through.
– Lay the tissue shapes on your clear backing. Layer colors to create bold color blocks or soft blends.
– Gently glue the edges and corners to hold the snowflake in place. Press flat so no air pockets trap behind the colors.
– Let the glue dry completely, then hang in a sunny window. The brighter the sun, the more the colors pop.
Care and tips
– Use a mix of warm and cool colors for a richer glass effect.
– If you plan to put them outside, spray a light sealant to help the colors last.
– For kids, pick bigger snowflakes and safer glue to keep the project smooth.
– You can reuse sheets by peeling them off and storing flat.
Next steps: grab colors you love, cut several shapes, and turn your winter light into art you can enjoy all season.
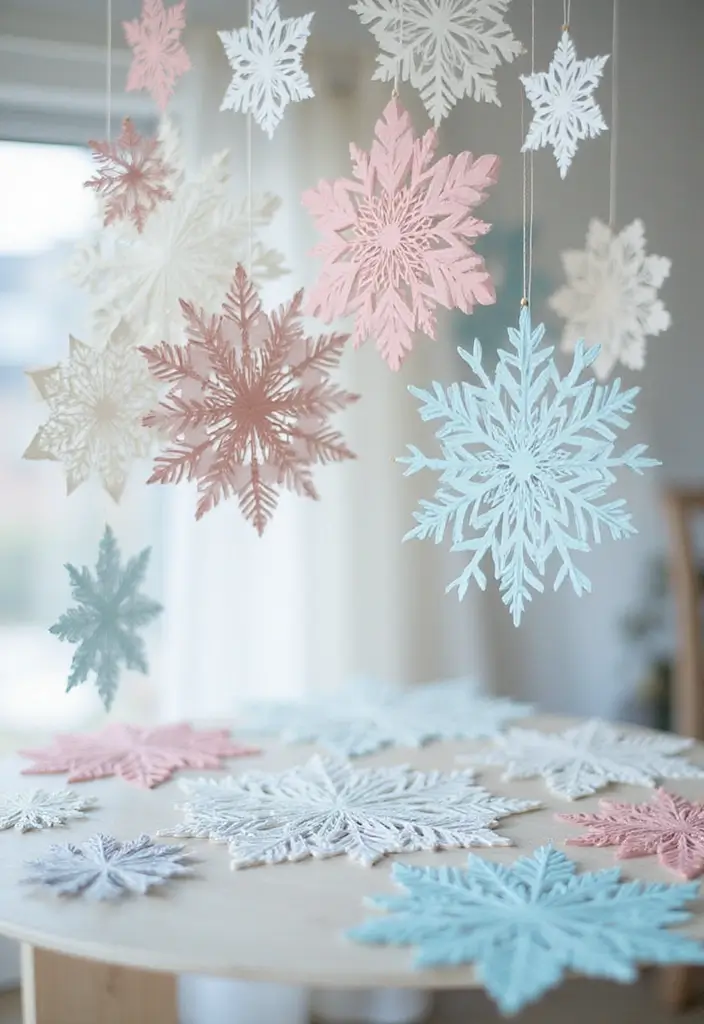
9. Paper Snowflake Garland
Want a quick way to add winter charm to your home? A paper snowflake garland does the job. It looks delicate yet is simple to finish. You can make it in one afternoon and reuse it for many seasons.
Here is why this project shines. It fits tight corners and wide mantels. You pick colors to match your decor. You control how long the garland is by the number you string.
Materials
– White or colored paper
– Scissors
– Pencil and ruler
– String or ribbon
– Tape or glue
– Needle
Steps
1) Fold a sheet cleanly to form a square for snowflake cuts.
2) Cut simple patterns from the folded edge.
3) Unfold gently and press flat so the snowflake lies smooth.
4) Make several snowflakes.
5) String them with twine, thread, or ribbon. Space them evenly or mix gaps for a playful feel.
6) Hang the garland where it shows best, above a mantel, across a window, or along a porch.
Tips and variations
– Mix sizes and colors for depth.
– Add a splash of sparkle with glitter.
– For outdoors, seal with clear tape or laminate the edges.
Care and storage
– Store flat in a box between seasons.
– If creased, gently re-press with a warm iron on low setting.
With care, you can reuse this garland for many winters.
Recommended Products

Product Packag: The package contains a white metallic twist garland with snowflake, its dimensions is: length 32.8 feet / 10 meters, width 3.5 inches / 9 cm.

Create a dreamy party atmosphere for your house with our Christmas snowflake banner, stylish and attractive, fit for your party and home decoration, it will wow and earns compliment from your families and friends.

Dimensions: The diameters of these 3D paper hanging snowflakes measure appr.9.8 in, 7.9 in and 5.9 in.
10. Snowflake Table Centerpieces
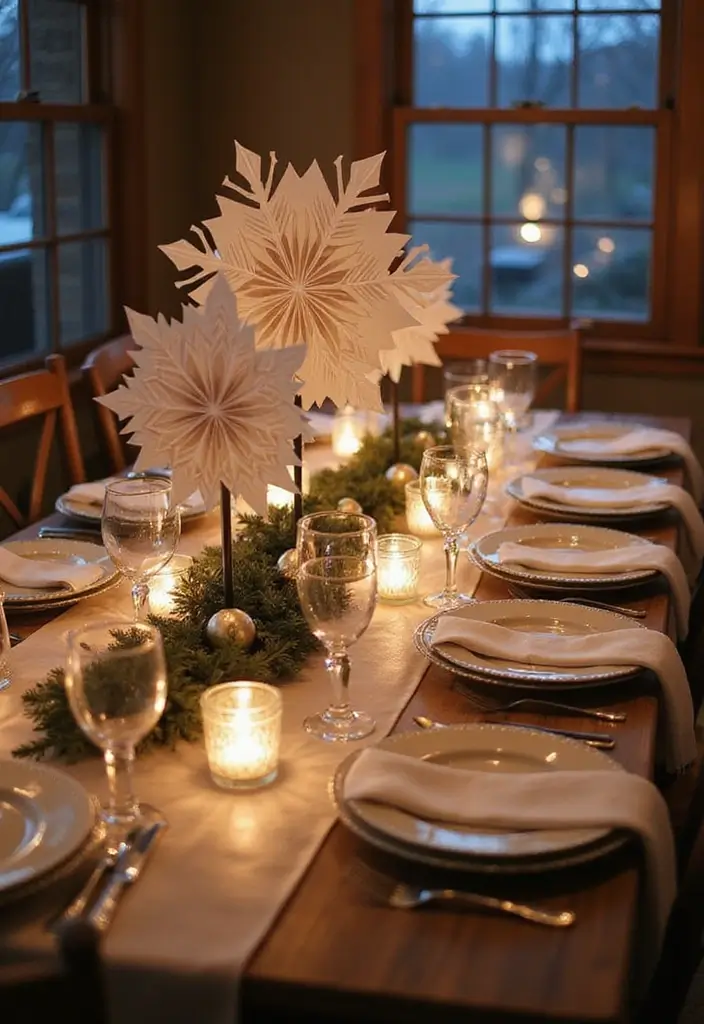
If you want a table that feels winter warm, try a snowflake centerpiece. Big paper snowflakes form the bold base. Add a soft glow with candles, pine cones, and simple greens.
Here is why this works: it’s inexpensive, easy to change for each party, and it looks polished.
– Materials you’ll need: large paper snowflakes, a few LED tealights, a shallow tray, pine cones, evergreen sprigs, and optional colored snowflakes to match your theme.
– Setup in simple steps:
1) Arrange 4–6 large snowflakes in a circle in the center of the table.
2) Place LED candles in the middle. Real flames near paper aren’t safe.
3) Add pine cones and a small bunch of greenery.
4) Drop in 2–3 colored flakes if you want a pop of color.
– Quick tips:
– Use a tray to catch any wax if you choose real candles.
– Pick 2 colors max for a cohesive look.
– For a rustic vibe, swap in burlap ribbon.
– Styles you can try:
– All white frost for a clean, modern feel.
– Rustic greens with natural textures.
– Bright accents with a few bold flakes.
– Finishing touch:
– Keep the centerpiece a touch lower than hands reach so guests chat easily.
Next steps: set the table, snap a photo, and tweak colors to suit your space.
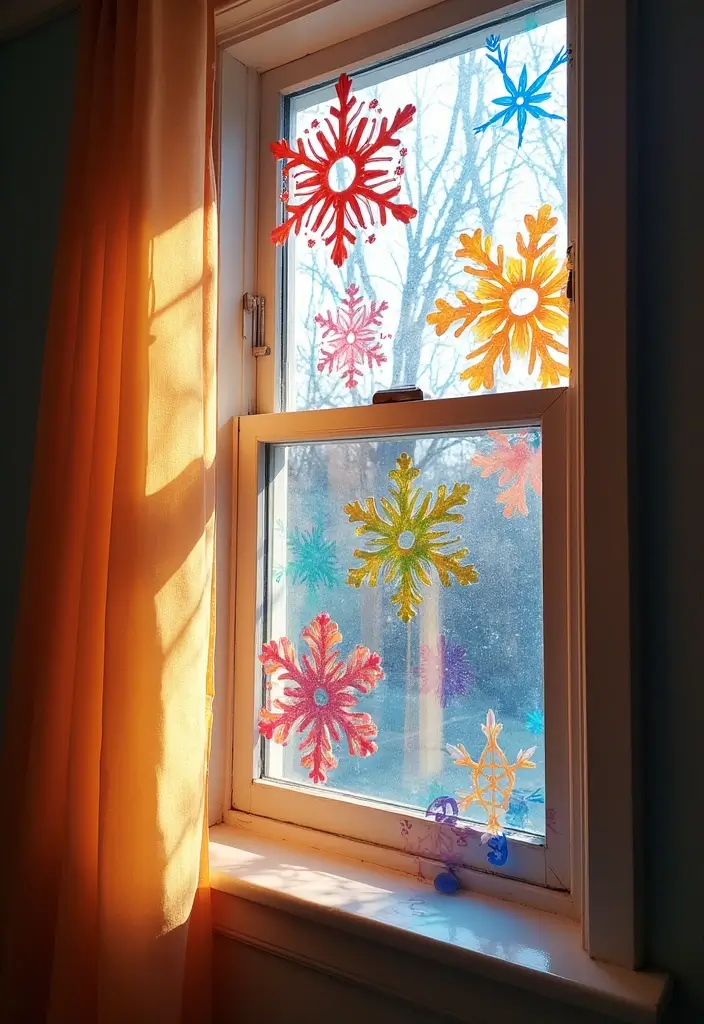
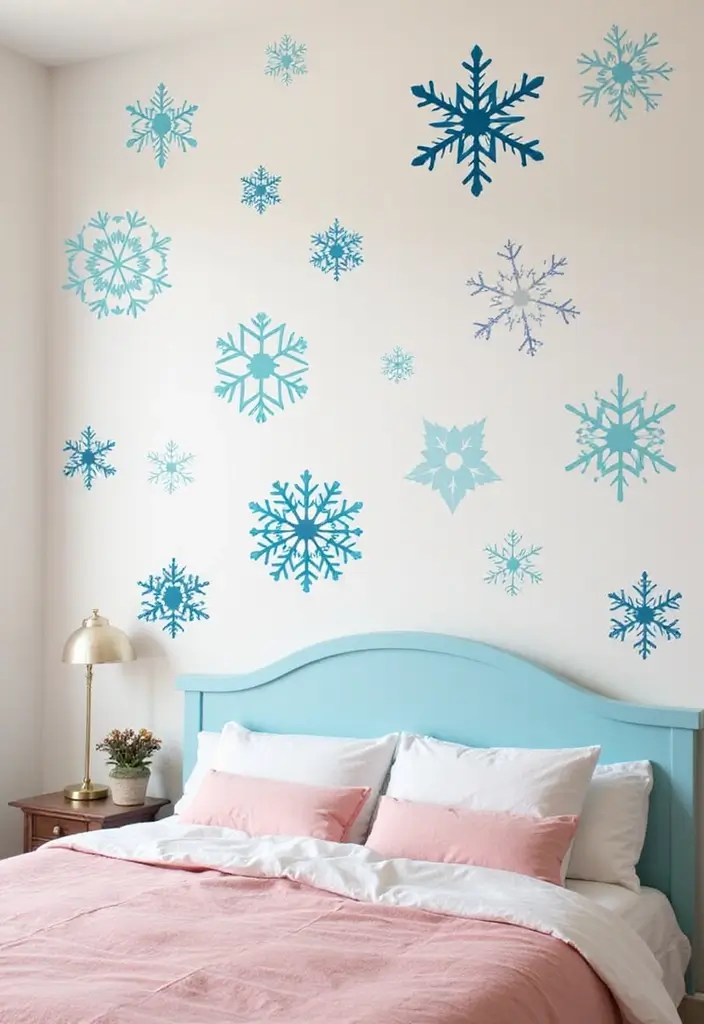
11. Winter Window Decorations
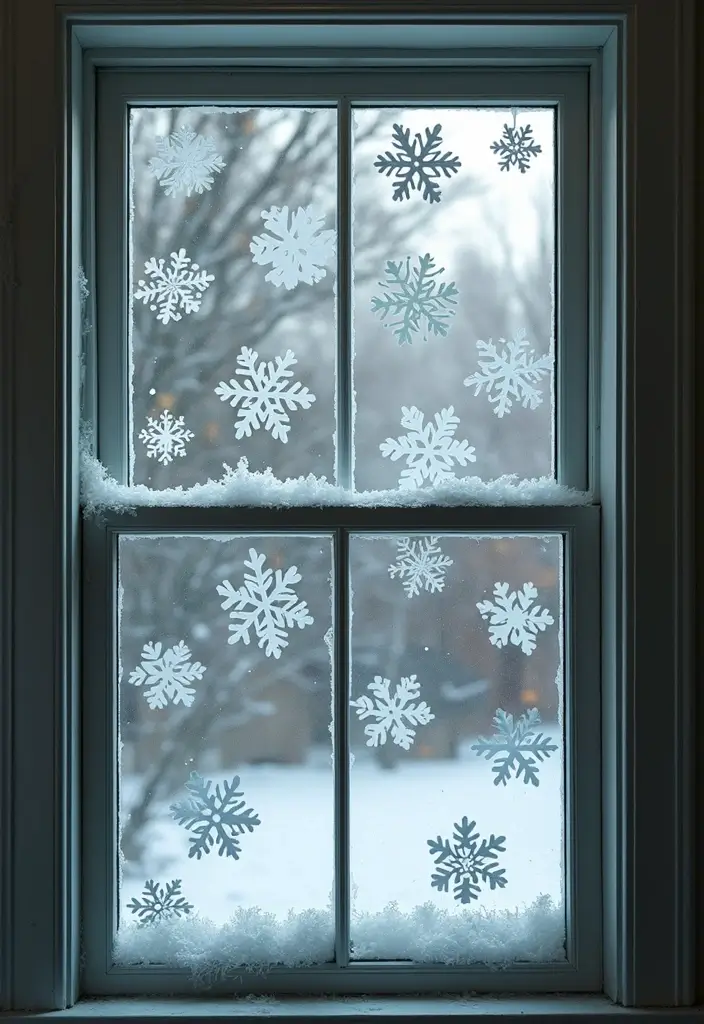
Winter Window Decorations
Want a quick winter glow on your windows? Paper snowflakes offer a simple, affordable way to bring light and charm into a room. They’re easy, kid friendly, and easy to swap when the season changes.
What you’ll need
– White or colored craft paper; plain printer paper works too.
– Scissors and a pencil for quick patterns.
– Double-sided tape or removable window-safe tape.
– Optional: colored paper to match your decor.
– Optional: a strand of small lights behind the glass for a soft glow.
Here is why these basics help. They stay flat on glass and are easy to reposition. Tape leaves no mess and comes off clean.
How to make it
– Fold a sheet into a triangle and snip simple shapes.
– Create several snowflakes with mixed sizes and cuts.
– Space them across the window so light shines through from both sides.
Next steps. If you want extra sparkle, add a soft light behind the pane or switch in colorful paper to set the mood.
Kids and care
– Let kids pick patterns and place flakes. It builds creativity and spatial awareness.
– Use low-tack tape so you can reposition designs or switch them with the season.
From outside, the display can look like a friendly winter scene that invites a second glance.
12. DIY Snowflake Ornaments
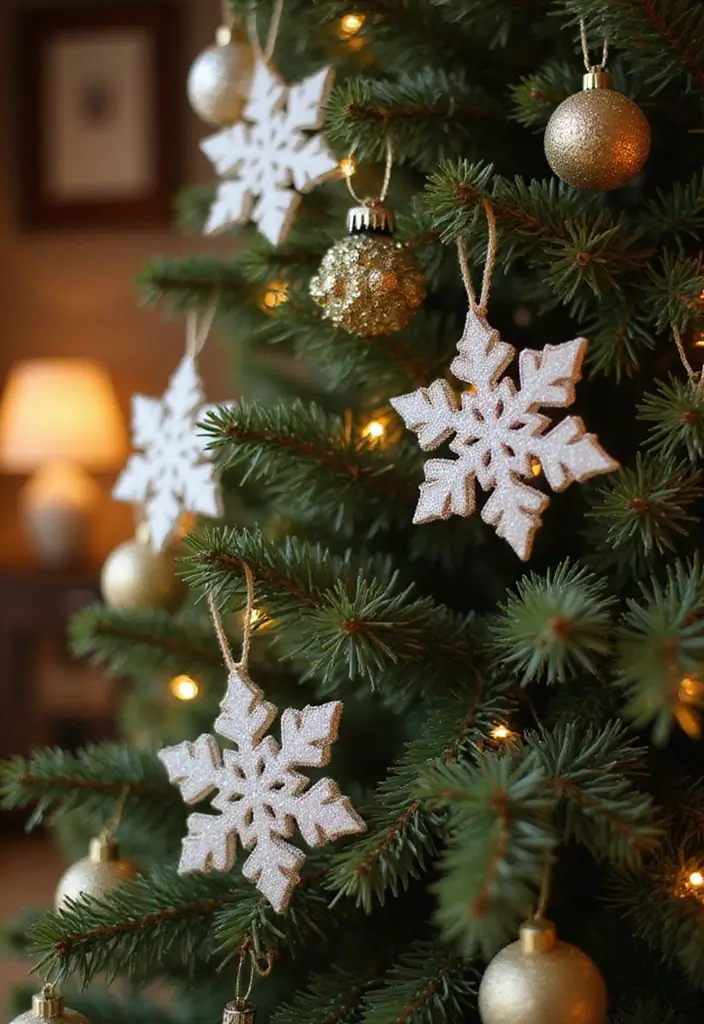
You want quick, affordable ways to add winter charm. Paper snowflake ornaments fit the bill. Use sturdy cardstock or thin cardboard for durability. Fold the sheet, then snip a simple pattern. When you unfold it, a delicate snowflake appears. You can add paint, glitter, or sequins after shaping them.
Personalize to make memories. Write family names or the year on the back with a fine marker. This turns each piece into a keepsake. You can swap ornaments year by year and feel the season grow with your family.
Finish is simple. Punch a small hole near the top, then thread ribbon or string. Hang them on your holiday tree, on a mantle, or in windows to catch light. You can also tie a snowflake to gift tags for a tiny winter surprise.
Want a quick version? Use pre-cut snowflake shapes or a printable pattern. Pick colors that fit your decor. Vary sizes for a lively display.
Practical tips. Let the decorations dry fully before touching. Store them in a flat box or folder so they stay neat. Mix sizes and colors for a playful display. If you want extra glow, place them where sunlight hits.
Next steps. Gather supplies, pick a pattern you like, and start folding. Use plain or colored paper. Make enough to share with friends and neighbors. This little craft grows into a warm winter tradition.
Recommended Products

CREATE 8 SNOWFLAKE ORNAMENTS: Who crafted these stunning snowflakes? Step into a world of winter magic as kids fold, decorate, and assemble 8 unique ornaments—3 large paper snowflakes and 5 shimmering foil designs. Each one showcases intricate patterns perfect for decorating Christmas trees, bright windows, and festive displays. A must-have pick for Christmas activities for kids for seasons to come

Package Included: Our cardstock snow globe craft kit includes 20 half-round plastics, 20 each of 2 winter snowflake cardstock frames, 20 packs of glitter sequin sugar paper (10 packs each of white and blue), and 20 sheets of winter decorative stickers. The quantity is enough to add joy to your winter, DIY place your photos and decorate your room!

Snowflake Craft for kids:The snowflake craft kit for kids includes 18 pack of snowflake craft sets,such as snowflake ,santa claus,penguins, Christmas trees, elk, snowmen,etc,and have a lot of accessories enough quantity to meet needs on a activity for kids,kids can make their own Chirstmas arts crafts set to decorate Christmas tree and create a Christmas atmosphere!
13. Snowflake Gift Wrap
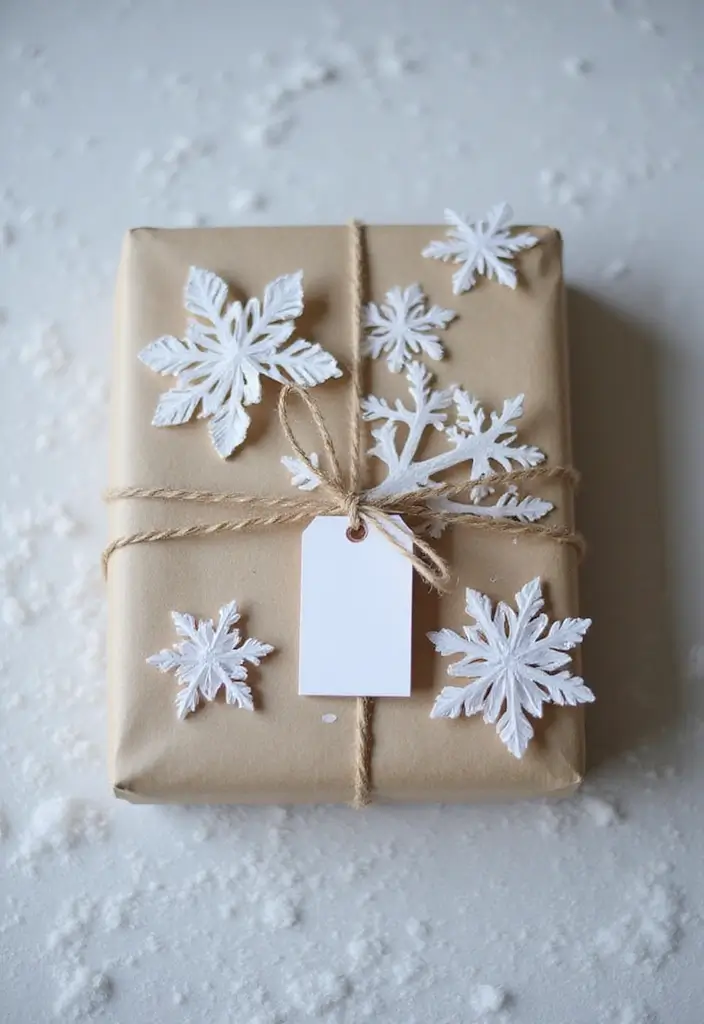
Want your gifts to feel magical before the lid is even opened? Snowflake gift wrap can do that. You wrap, then add tiny winter stars to make it special.
What you’ll need
– Plain wrapping paper or brown craft paper
– Snowflake cutouts or printable snowflake templates
– Glue or clear tape
– Scissors
– Optional: metallic string, ribbon, or a small tag
Step-by-step
1) Wrap the gift in plain paper. Keep the surface smooth so the snowflakes stick well.
2) Arrange snowflakes on top. Mix big and small pieces. Create a cluster in the center or a line across the wrap.
3) Attach the snowflakes with glue or tape. Check that they lie flat so the package travels easily.
4) Add a matching tag or card. Use a template to cut out snowflake shapes, then write a short note. Tie on with string or a ribbon.
Tips for a polished look
– Use a cool color theme: white, silver, pale blue. It feels wintry and clean.
– Try a thin twine bow to finish the package with a small, rustic touch.
– If you have left over snowflakes, reuse them on multiple gifts for a cohesive set.
– For a bit of sparkle, dab a touch of glitter glue on the edges or lightly spray with a shimmering mist.
Practical notes
– If your paper is glossy, use double-stick tape for strong hold.
– Too many decorations can feel busy. Start with 3–5 snowflakes per wrap.
– This idea works with any gift size, from books to boxes to tins.
Next steps: gather your snowflakes, choose a wrap color, and turn plain paper into winter magic that’s all about care.
14. Snowflake Mobile for Kids’ Rooms
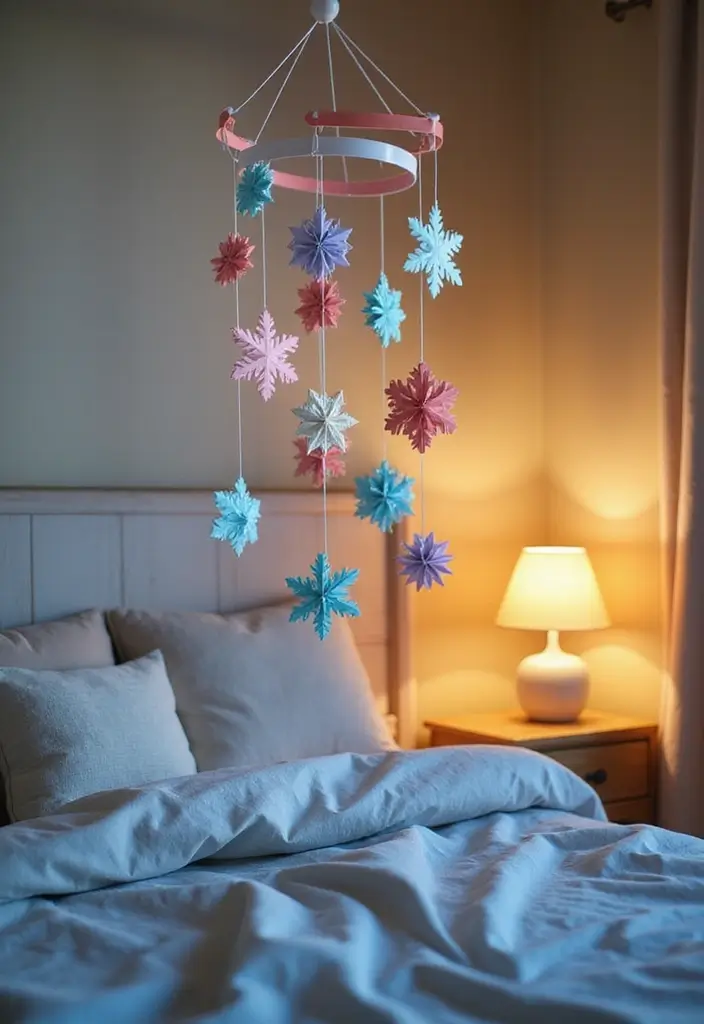
You want a simple project that adds calm, wintry charm to your kid’s room. A paper snowflake mobile fits perfectly. It’s easy, kid-friendly, and looks great all season long. Here is how to make one and keep it fresh.
Materials
– Paper snowflakes in different sizes and colors
– A hoop, branch, or small ring
– String or fishing line
– Scissors and tape or glue dots
– A hole punch or pin
– A nearby lamp or night light for a soft glow
How to make it
1) Cut several snowflakes. Mix big and small shapes for depth. Keep the patterns simple for quick success.
2) Punch a small hole at the top of each snowflake. This is where the string will attach.
3) Tie a short length of string to every snowflake. Use different lengths so they hang at varied heights.
4) Attach the other end of each string to the hoop or branch. Space them evenly to create a balanced look.
Ways to use it
Let the mobile drift near a light source. It will cast tiny shadows on the wall, adding a cozy, wintry feel. Invite your child to choose colors and helpers to assemble pieces. This makes the project feel alive and personal.
Tips and care
– Try white, blue, and silver for a classic chilly vibe. Add a pop of color for a playful room.
– Keep strings short enough for safety with younger kids.
– When not in use, store the pieces flat to avoid creases.
This simple snowflake mobile brings quiet beauty to a room and sparks gentle creativity all year long.
15. Snowflake Place Cards
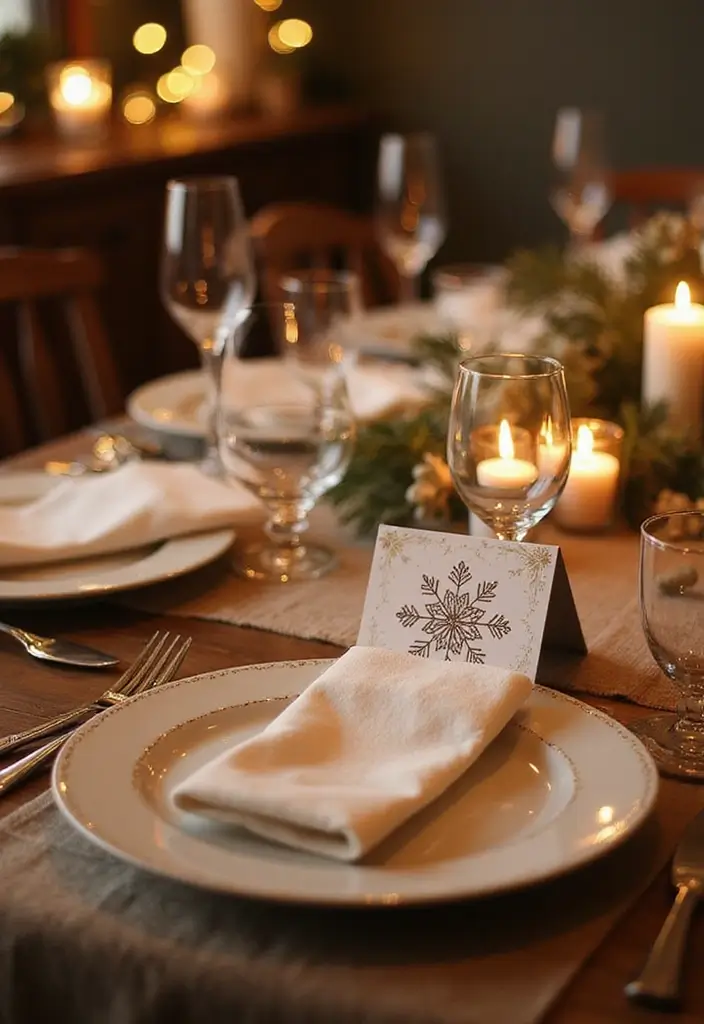
You want a warm, personal table for winter dinners. Snowflake place cards give that touch without a lot of fuss. They feel handmade and special.
Materials
– White card stock or folded blanks, scissors, a pencil, and a glue stick.
– A snowflake punch or decorative scissors can speed things up.
Steps
– Fold the card so it stands up on the plate.
– Draw a tiny snowflake on scrap paper, then cut it out.
– Glue the snowflake to the card’s front edge. Let it dry.
– Write names with a dark marker for clear legibility.
– Place cards at the edge of the plate so guests can see them.
– Store flat and reuse next year.
Tips and variations
– If you want a fuller look, try two snowflakes per card.
– For a clean, modern vibe, use plain white cards with a single snowflake.
– Let kids help by labeling and decorating.
Kids enjoy naming guests and helping with colors.
This tiny project adds warmth to the table and starts conversations.
Choose ink colors that fit your decor.
@media(max-width:480px){
16. Snowflake Shadow Boxes
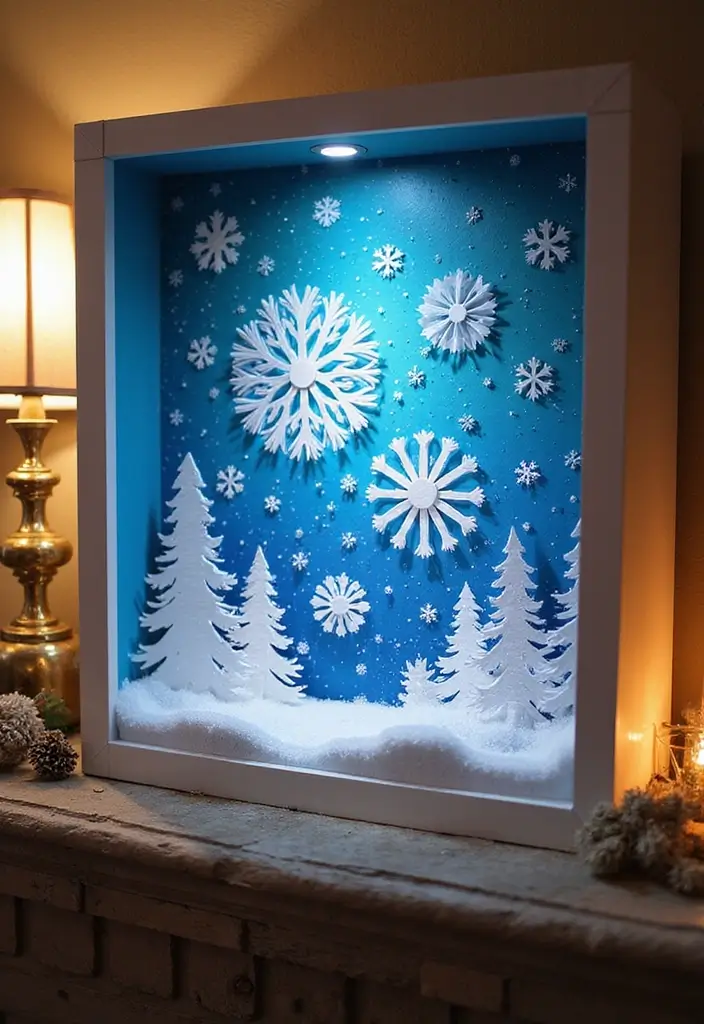
A snowflake shadow box makes your handmade flakes shine. Start with a deep frame. Choose a background that fits your mood: colorful paper, glitter, or soft faux snow.
Next, arrange snowflakes in layers. Use foam dots so some stay near the glass and others hover higher. It creates a 3D look.
Here is why this works: layers add depth and draw the eye. Place big flakes toward the center and small ones at the edges. Mix colors or keep white for a calm feel. You can add a light string for a warm glow.
Let’s break it down into a quick plan. 1) mount the background in the frame. 2) place outer flakes first, then fill the middle. 3) trim any protrusions so the glass stays clean. 4) hang on a wall or set on a shelf as a centerpiece.
Next steps: invite someone to help. Kids can help arrange shapes and press the foam dots. This keeps craft time fun and neat, and you keep a keepsake.
Keep extra flakes for tweaks. This is a simple project you can finish in a day. Swap the background for different looks. Over time, this decor grows with your snowflake collection.
@media(max-width:480px){
17. Snowflake-Themed Party Invitations
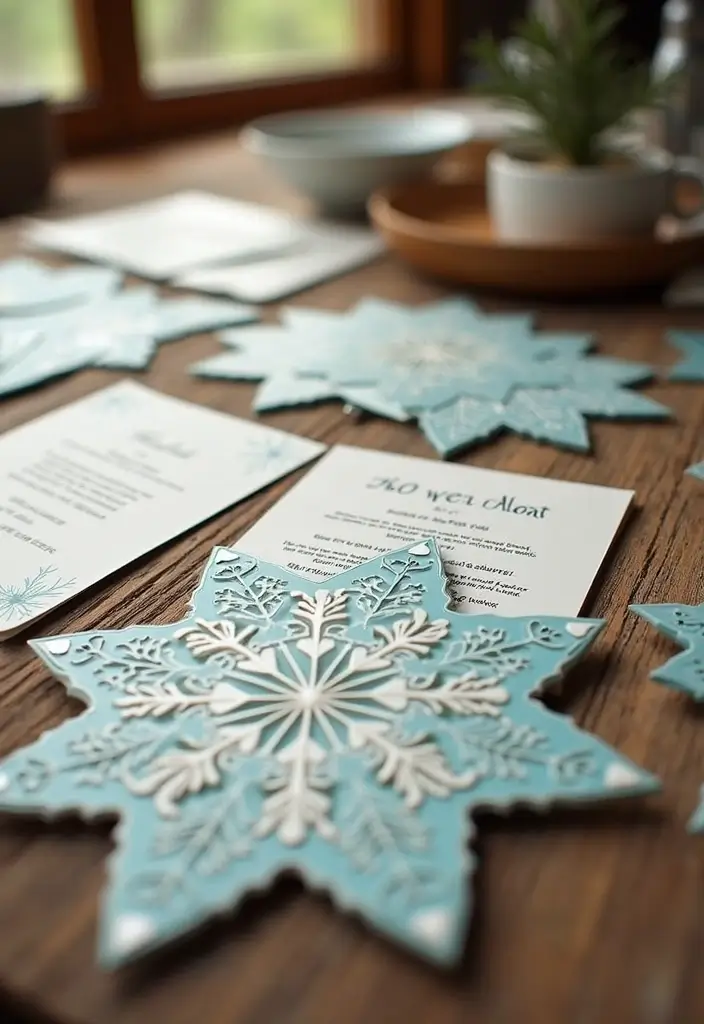
Snowflake-Themed Party Invitations
Want invites that set a cozy winter mood? Snowflake-themed invites do just that. They hint at a warm, festive night and get guests ready to celebrate.
Here is why they work. A simple snowflake on the front adds texture and a hint of sparkle. It feels personal, not store-bought. You can keep it clean or add a splash of color to fit your party style.
Here is how to make them in minutes.
– What you’ll need
White or light-blue card stock, extra paper for snowflakes, scissors or a snowflake punch, glue or tape, markers or pens, optional glitter or metallic pens.
– Steps
1. Fold a sheet of card stock to form a small card.
2. Cut a few simple snowflakes or use a punch for clean edges.
3. Glue a cut snowflake to the front of each card.
4. Write or print the invitation text inside. Keep it readable: date, time, place, and RSVP.
5. Add a little color or sparkle with markers, foil accents, or a thin ribbon if you like.
– Tips for a great look
Mix a few snowflake sizes for a layered feel. Use light, legible handwriting or a clean font if you print. For mailing, keep the card a standard size so it lands flat in the envelope.
– Quick variations
Try a blue and white theme, or add a tiny seal with wax for a classy touch. If you want digital options, photograph the handmade card and email a photo invite with the same wording.
Next steps: assemble a small sample, test readability, then copy or print the rest. Your guests will love the personal, wintry charm of these DIY invites.
@media(max-width:480px){
18. Snowflake Embellished Scarves
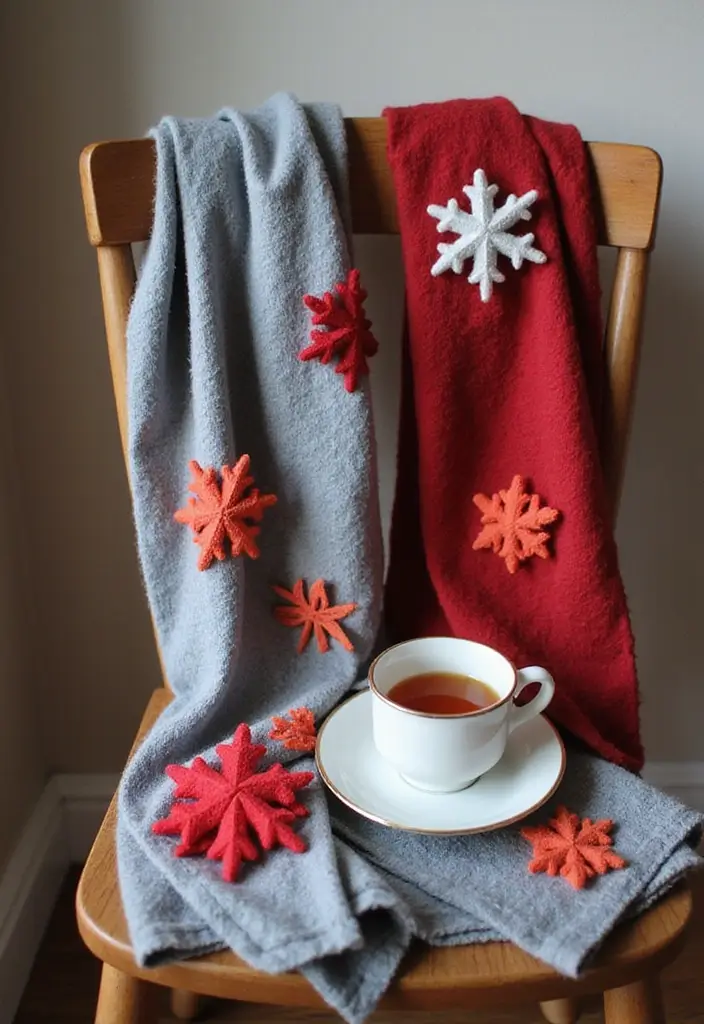
Materials
– A plain scarf in your favorite color.
– Snowflake shapes cut from felt or fabric.
– Scissors and a way to attach them.
– Fabric glue or a needle and thread.
– Optional beads or tiny sequins for extra sparkle.
Steps
Here is how to make it work. Lay the scarf flat and plan your snowflake layout. Place the shapes on the fabric and adjust until you like how it looks. Cut or prep snowflakes in two or three sizes for depth. Attach the pieces by sewing or glue.
– Sewing method: For neat stitches, sew around the edge of each snowflake with small, regular stitches. If you want extra hold, stitch through the center for larger pieces.
– Glue method: If you use glue, apply tiny dots to the back and press the snowflakes down firmly. Let the scarf dry completely before wearing.
Care tips
– Hand wash gently and avoid rough rubbing.
– Let it air dry flat.
Older kids can sew. Younger ones can help with glue under supervision. Mix white, silver, and blue flakes for a wintry feel. Vary sizes to add visual interest.
@media(max-width:480px){
19. DIY Snowflake Puzzle
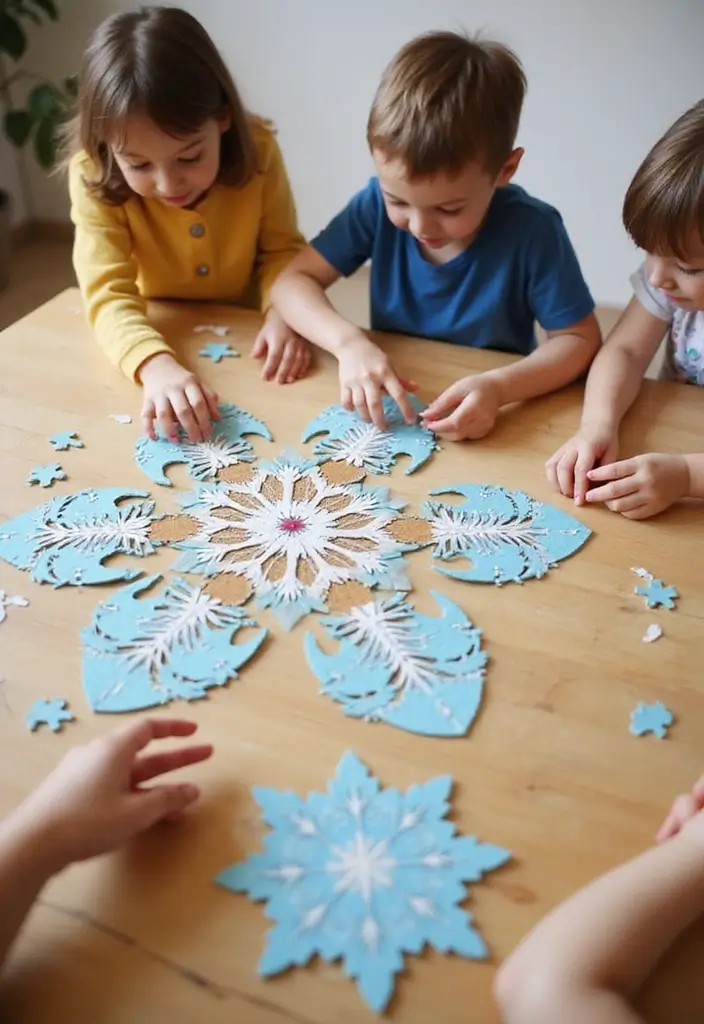
You want a winter activity that keeps kids indoors and sharp. A DIY snowflake puzzle fits that need. It’s simple to make, sturdy to reuse, and great for thinking. Here is a practical plan you can follow.
Materials
– Large snowflake cut from sturdy paper or cardstock
– Scissors and a pencil
– Optional markers or colored tape
– Clear contact paper or a laminator sheet for durability
Steps
1) Cut a big snowflake from the sturdy paper. Make it wide and solid.
2) Place it on a clean surface and sketch a few puzzle lines across the snowflake.
3) Cut along the lines to form puzzle pieces. Use a mix of straight and curved edges.
4) Reassemble to check fit. If pieces are too small, trim them a bit bigger.
5) Add color or decorations if you like. For longer life, laminate before cutting or mount on a thick backing.
Tips
– Young kids do best with 4–6 large pieces; older kids can handle 8–12.
– Store the finished puzzle in a small box for quick play.
Why it helps
– It builds memory, focus, and fine motor skills. It reinforces the winter theme in a hands-on way.
Next steps
– Try a second snowflake design to keep the challenge fresh.
@media(max-width:480px){
20. Snowflake Art Collage
You want a simple winter craft that kids can enjoy and you can proudly display. A snowflake art collage fits that need. It turns paper snowflakes into a bright winter scene and gives you a keepsake to hang all season long.
Here is why this works. It combines creativity with a touch of design. It’s easy to adapt to any age. It also encourages teamwork when you work together on a big canvas. Now, let’s break it down so you can start quickly.
– Gather your paper snowflakes. Use the ones you’ve cut or folded yourself.
– Choose a base. A big sheet of white or colored paper, or a blank canvas works well.
– Plan the layout. Group larger flakes near the center and smaller ones around the edges. Think about balance and space.
– Attach the pieces. Glue them down in loose clusters to keep some air between shapes.
– Add a background. Let kids color or draw a pale sky and a snowy ground to create a cozy scene.
– Finish and display. Let the glue dry, then frame or tape the collage to a wall or door.
Next steps. You can add touches like faint blue shadows, glitter, or tiny sticker stars for extra charm. This snowflake art collage is a friendly, hands-on way to celebrate winter with art you can treasure.
21. Snowflake Photo Frame
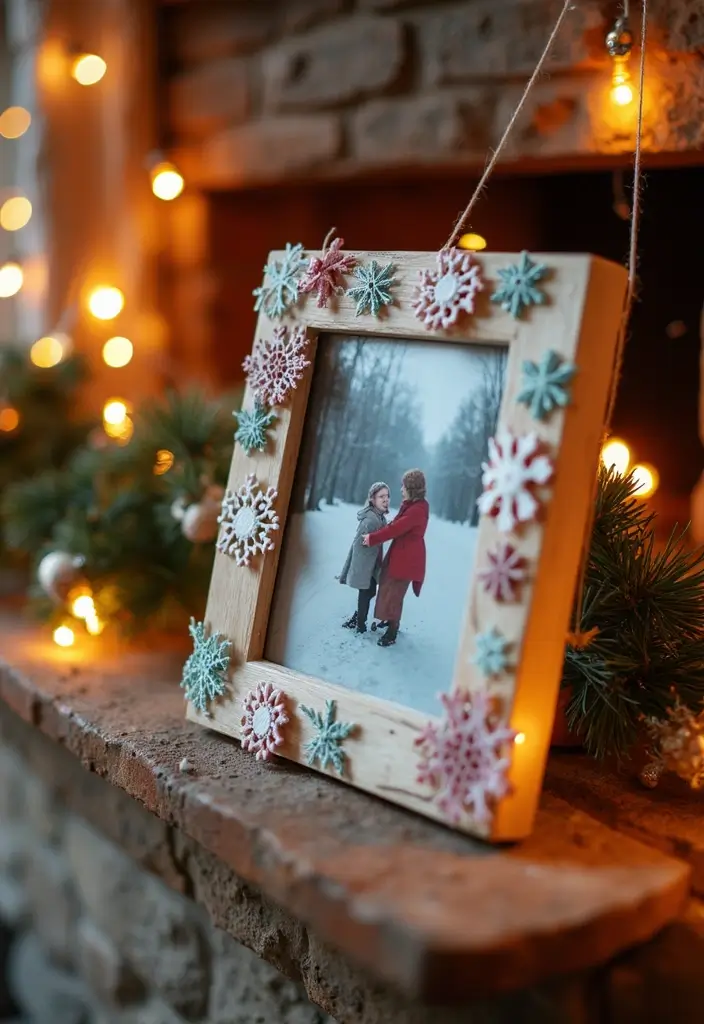
Snowflake Photo Frame: Capture Winter in Art
You want a display that holds winter memories. A DIY snowflake photo frame fits. It’s simple, sturdy, and ready for your wall.
Here is why it helps: it turns photos into art. It also makes a fun activity for kids.
What you need
– Frame in cardboard or wood
– Snowflakes to glue on the border (cut paper flakes or small foam shapes)
– Craft glue or hot glue (adult supervision for hot glue)
– Paints or markers (optional)
– A few favorite photos
Steps
1) Pick your frame base. Cardboard saves money; wood looks durable.
2) Lay out snowflakes around the edge. Use big pieces in corners and smaller ones along sides.
3) Glue them in place. Press lightly so they stay flat.
4) Color the rim if you want the snowflakes to pop. Bright paint makes white look bold.
5) Insert a photo and trim it to fit. A light sprinkle of glitter or a ribbon adds charm.
6) Let glue dry completely. A quick clear spray helps keep pieces in place.
Design ideas
– Try a bright frame for contrast, or keep a natural wood tone.
– Use a mix of snowflake shapes for texture.
– Add a thin string at the top for a hanging display.
Tips
– Work on a clean surface; arrange first, then glue.
– Involve a child to choose the photos and layout.
– Check that the frame is balanced so it hangs straight.
@media(max-width:480px){
22. Snowflake Wall Art
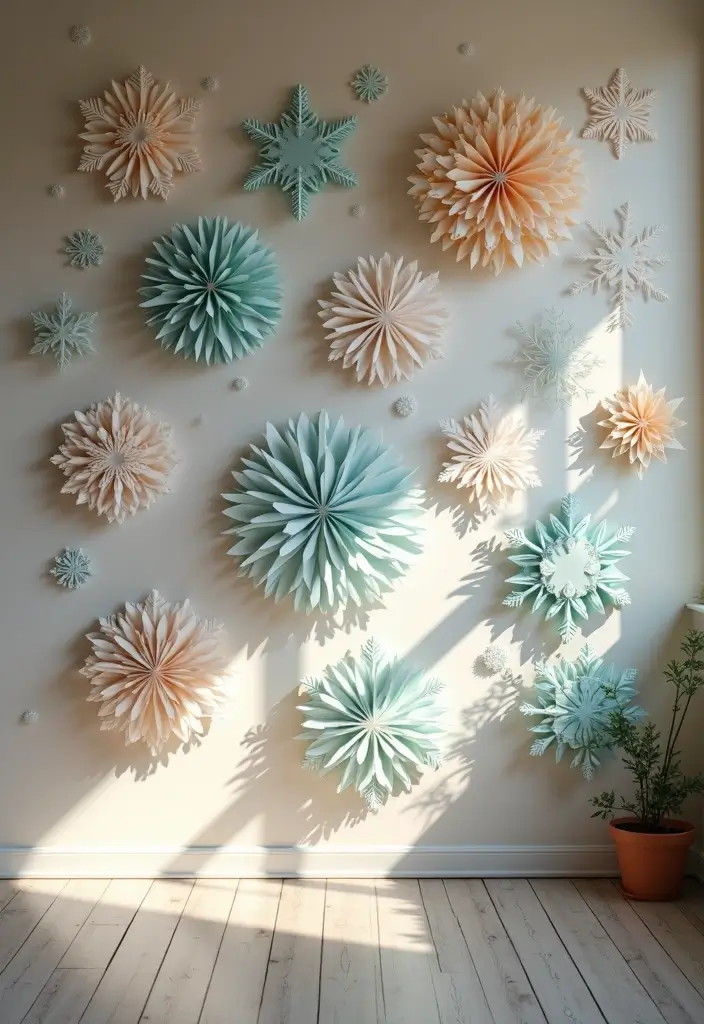
Want a bold winter look on your wall? Create Snowflake Wall Art with oversized paper snowflakes. Use large sheets to cut big shapes. Paint them white, blue, or silver. Add glitter or beads for sparkle. Hang a cluster on a wall. It becomes a strong focal point and lifts the room with a winter feel. Here is why this works: big white shapes catch the eye and set a festive mood without clutter.
Materials you’ll need
– Large sheets of paper or poster board
– Scissors or a craft knife
– White paint and one icy color (blue or silver)
– Paint brushes, glue, glitter, and small beads
– String, fishing line, or removable mounting tape
– Tape measure, pencil, ruler
How to build your snowflake wall art
– Step 1: Cut 3–6 large snowflakes from the paper. Keep edges neat.
– Step 2: Unfold and shape the pieces. Trim as needed.
– Step 3: Paint them in a solid color or with light shading to add depth.
– Step 4: Add glitter or embellishments while the paint is wet.
– Step 5: Attach a small loop with string on the back of each piece.
– Step 6: Plan the layout on the floor. Try a loose cluster or a tidy grid.
– Step 7: Hang using removable tape or tiny hooks. Step back and adjust spacing.
Display ideas and tips
– Vary sizes to create depth. Put larger pieces near the center and smaller ones around the edges.
– Leave space around each piece for a clean, airy look.
– Use warm lighting from above to bring out texture and shine.
– Get the kids involved. Let them pick colors and placement for a fun design session.
– Care: handle gently and rehang if a piece shifts during cleaning.
@media (max-width: 600px) {
.visual-quiz-iframe { min-height: 995px !important; height: 1100px !important; }
}
23. Snowflake Refrigerator Magnets
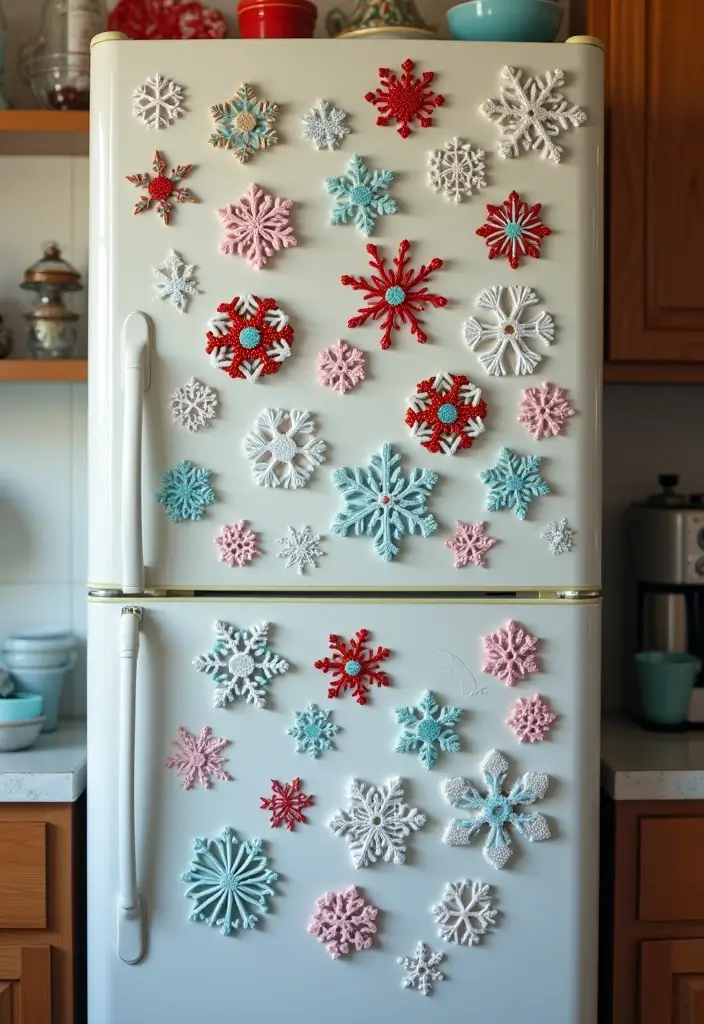
Snowflake Refrigerator Magnets
Need a quick way to brighten the kitchen with a winter vibe? DIY snowflake magnets are a perfect fit. They are simple, safe for kids, and easy to make.
– Materials
adhesive magnetic sheets
paper (white works best, but any color)
sharp scissors
glue or glue stick
markers or stickers for decoration
optional: clear tape or a laminating sheet
– How to make
Cut out small paper snowflakes. You can use a simple snowflake pattern or make a few freehand.
Cut pieces from the magnetic sheet that match the snowflake shapes.
Glue the snowflakes to the magnetic pieces. Press flat and let dry.
Decorate. Add dots, lines, or tiny faces with markers. Stickers glow under fridge light.
Place on the fridge. They cling without extra glue and keep a tidy look.
– Personalize and play
Try different sizes for variety. Use colored paper for a rainbow snowstorm. Laminate the snowflakes first for extra durability, then mount on magnets.
– Quick tips
Choose thin magnets so your magnets don’t block doors. Keep wet or sticky hands away to prevent smudges. Rotate designs weekly to keep the fridge fresh.
– Why it helps
This craft is fast. It teaches steps in order. It gives you a small, bright winter touch every time you open the fridge.
@media(max-width:480px){
24. Snowflake Gift Tags
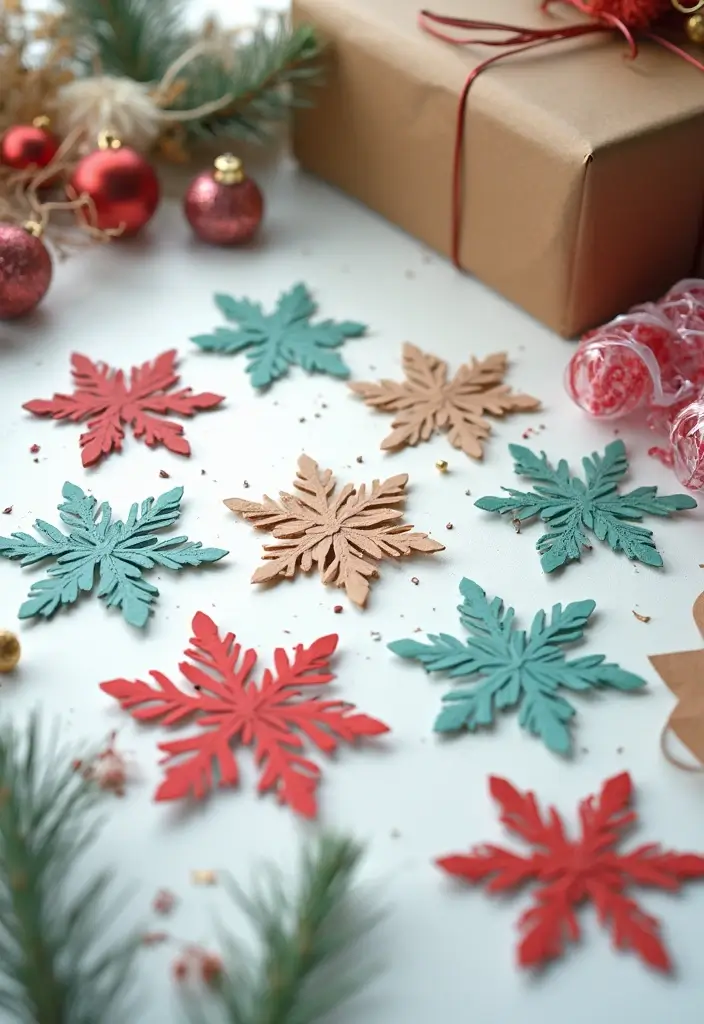
Here is why snowflake gift tags work. They add warmth to winter gifts and show you care. You can make them with just a few supplies and a little time. The result is tags that look handmade, feel crisp, and stand out on the wrap.
Materials
– cardstock in white or colored shades
– scissors or a craft knife
– a hole punch
– markers, pens, or colored pencils
– stickers or small gems
– string, twine, or ribbons
Steps
1) Cut out snowflake shapes from the cardstock. Keep edges neat for a clean look.
2) Write the recipient’s name or a short message across the center.
3) Add a simple decoration with markers or stickers.
4) Punch a hole at the top.
5) Thread a piece of string or ribbon through the hole.
6) Tie the tag to the gift wrap above the bow.
Tips and ideas
– Use kraft or colored paper for a rustic vibe.
– Let kids help by tracing shapes and choosing colors.
– If you have many gifts, make a small tag batch in one sitting.
– Use double-sided tape to attach a tag that sits flat.
Variations
Experiment with sizes. A tiny tag can look cute on mini packages. A larger tag adds a bold touch to a big present. You can also laminate a tag for reuse.
Next steps: try a batch this weekend and see which style fits your gifts best.
@media(max-width:480px){
25. Snowflake-Themed Family Calendar

Want a calendar that helps your family stay organized and adds winter magic? A snowflake themed family calendar can do both. It turns planning into a shared craft and makes monthly tasks feel like a team effort. You get a bright wall piece and a clear plan all in one.
Materials you’ll need
– sturdy poster board or a set of monthly pages
– white and colored paper
– scissors and glue or tape
– a hole punch and binder rings or string
– markers, stickers, and thin foil or textured paper for sparkle
Here is how to make it:
1. Prepare monthly pages by printing a simple calendar grid or drawing your own on blank paper.
2. Cut several paper snowflakes. Fold, snip, and open to reveal unique patterns.
3. Attach snowflakes as borders or as dividers between months.
4. Invite kids to decorate pages with winter scenes and to write key dates.
5. Fill in birthdays, school events, sports practices, and family trips.
6. Add small color codes or icons to mark event types at a glance.
Next steps: Hang the calendar where you plan as a family. Use color markers to track activities. Laminate pages if you want durability, and flip to next month as you finish the current one.
This simple project grows with your family as new months come.
26. Snowflake Thank You Cards
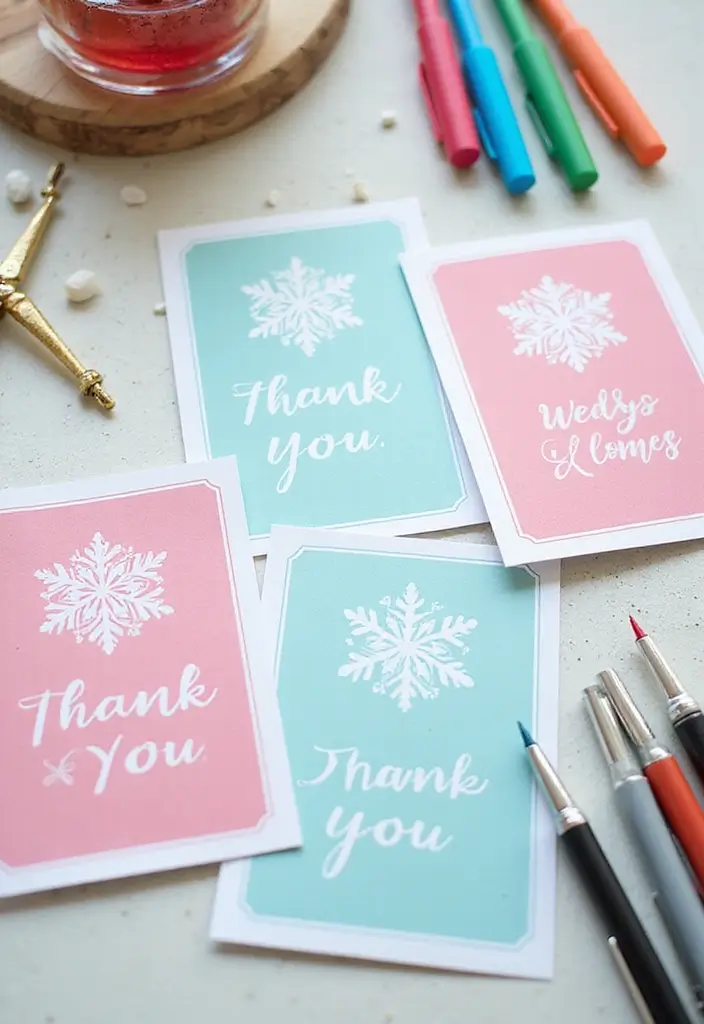
You want a warm way to say thanks this winter. Snowflake thank you cards do just that in a simple, fun way. They feel personal and special, even with a short note inside.
What you need
– Blank cards (white or light colors)
– Paper snowflakes or a snowflake punch
– Glue or double-sided tape
– Markers or pens
– Optional: glitter, ribbon, or stickers
Here is how to make them
– Pick a card front and place a snowflake on it. Glue it in the center so it shines.
– Try layering a pale paper behind a white snowflake for a soft, frosty look.
– Write a short message inside. Simple lines are easy for kids to read and copy.
– Let the front dry a minute before you close the card.
Tips to add heart
– Have kids jot a few lines: “Thanks for your help with …” and a specific detail.
– Use different colors for each card to keep things fresh.
– Keep messages short and kind so every card feels sincere.
Why this works
– It teaches thanks in a hands-on way.
– Each card becomes a tiny winter keepsake.
– The project is quick enough for a busy weekend or a classroom activity.
Next steps: gather supplies, set a cozy crafting time, and start making. Your snowflake cards will spread cheer at home, in class, or as gifts.
@media (max-width: 600px) {
.normal-quiz-iframe { min-height: 570px !important; height: 570px !important; }
}
27. Snowflake Bookmarks
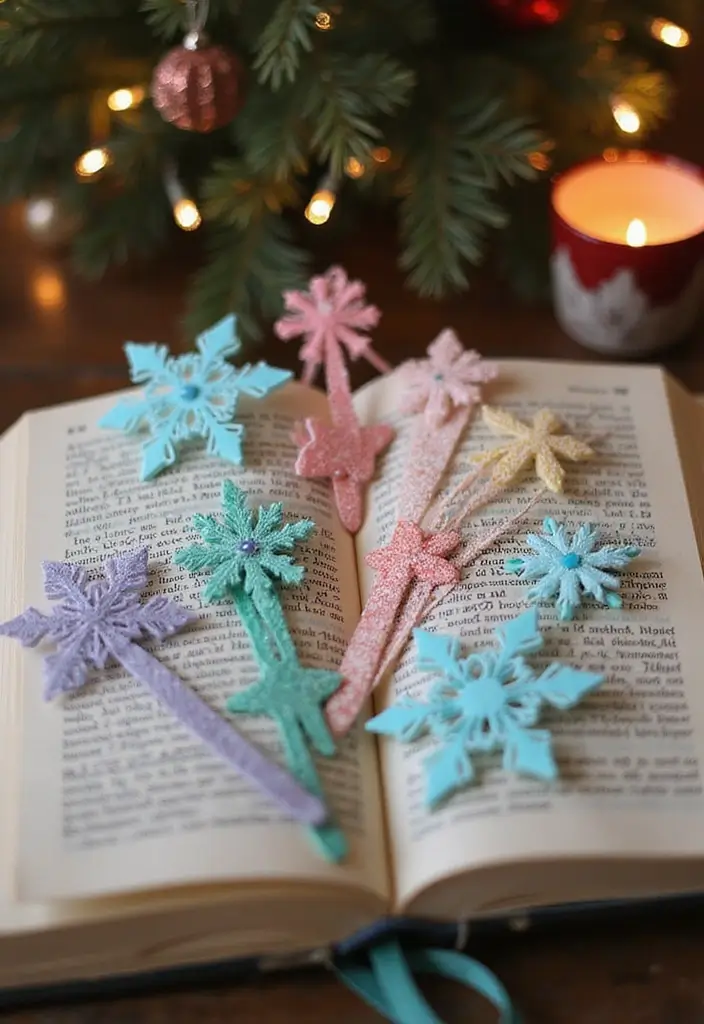
Snowflake Bookmarks
Looking for a small, useful winter craft that promotes reading? Snowflake bookmarks fit the bill. Cut snowflake shapes from sturdy paper or cardstock, then decorate them in wintry colors. Let kids add a favorite quote or a tiny drawing. They work as gifts or party favors and turn long winter nights into moments of making and learning. Each time you open a book, you’ll remember the time you spent crafting them.
What you need
– Sturdy paper or cardstock
– Scissors
– Ruler and pencil
– Colored pens, markers, stickers, or washi tape
– Laminating sheets or clear tape (optional)
– Hole punch and ribbon or yarn
– Optional: a small tassel
Steps
1) Draw a simple snowflake on the cardstock.
2) Cut it out with clean, careful cuts.
3) Decorate with winter colors and a bit of glitter.
4) Punch a hole at the top and tie a ribbon for a tiny tassel.
5) For durability, laminate the snowflake or glue it to a second piece of cardstock.
Tips and ideas
– Make sets for classroom gifts or party favors.
– Have kids write a short quote on the back or draw a tiny scene.
– Use them as page markers in books, planners, or journals.
– Store extras in a small box for quick, ready-to-go gifts.
@media(max-width:480px){
28. Snowflake Notebooks
You want a notebook that feels cozy for winter. Snowflake notebooks do the trick. Paper snowflakes on the cover turn a plain book into a tiny winter scene. They’re easy, affordable, and you can change the look anytime.
Here is how to make them fast and fun.
Materials
– a blank notebook or sketchbook
– white or colored paper
– scissors
– glue or a glue stick
– markers or paint
– optional clear seal like Mod Podge
Steps
– Cut out several snowflakes from paper. You can fold the paper to make neat shapes.
– Lay out the pieces on the cover first. Move them until the balance feels right.
– Glue the snowflakes down. Press flat and let them dry a moment.
– Add a little color around the snowflakes. Use a blue or silver marker to draw tiny trees, stars, or a soft border.
– If you want extra staying power, add a light coat of clear sealant over the top.
– Use the notebook for class notes, a journal, or give it as a small gift.
Here is why this works. It gives you a quick, tactile project you can finish in one afternoon. The cover looks personal, and the plain notebook suddenly feels special.
Next steps. Try a set of three covers for friends, or mix in glitter paper for a frosty sparkle. You’ll have a simple craft that adds winter charm to school and home.
29. Snowflake Themed Clothing
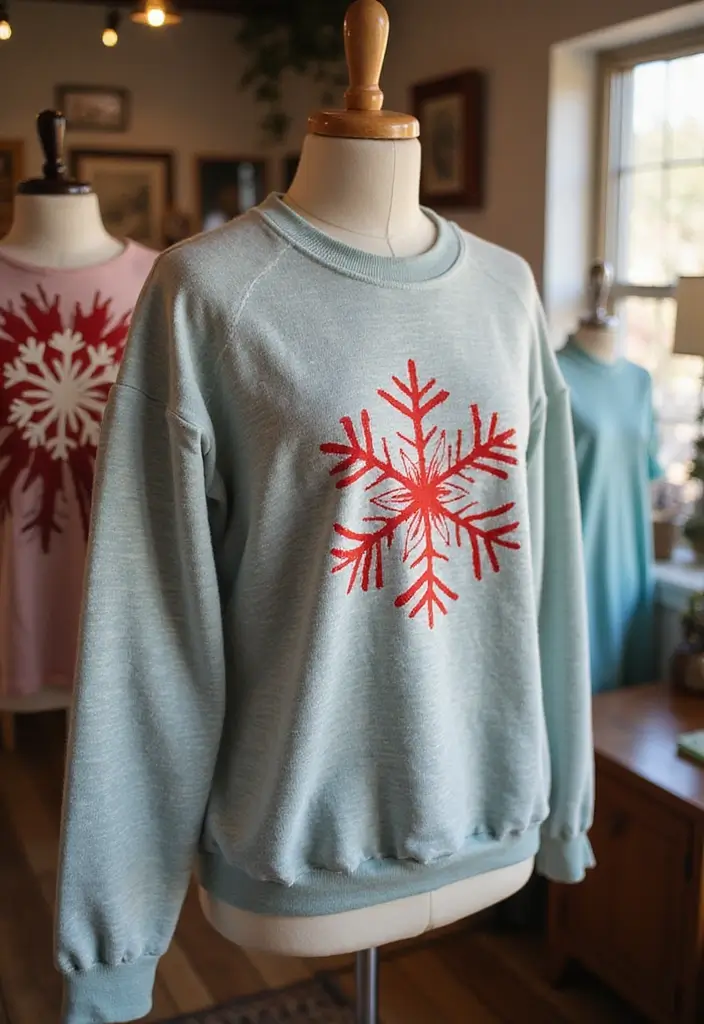
You want a cozy, unique winter look. Snowflake themed clothing lets you wear art you made. It’s simple, fun, and perfect for chilly days.
What you’ll need
– Light-colored cotton shirt or soft sweatshirt
– Fabric paint or embroidery floss and a needle
– Snowflake stencils or freezer-paper templates
– Chalk or washable fabric pencil
– Iron and a cloth for heat setting
Two easy methods
1) Fabric paint
Mark a snowflake on the fabric. Use a stencil or freehand design. Paint with small, steady strokes. Let it dry. Heat set with a warm iron over a cloth.
2) Embroidery
Trace a snowflake. Stitch with a simple backstitch. Pick colors you love. Tie off ends, trim threads. Let it finish, then heat set if needed.
Tips to make it pop
– Start with one small snowflake on the chest or sleeve
– Use bright thread or light colors on dark fabric for contrast
– Let kids help by choosing colors and guiding simple stitches
Family style
– Make matching shirts for gatherings. Keep patterns similar, colors different
Care and limits
– Turn clothes inside out for washing. Air dry or use low heat
– Paint can crack on rough fabrics
Next steps
Try a quick project this weekend. Share photos with family. Have fun with this winter craft.
30. DIY Snowflake Wall Decals
Here is why you need a simple winter decor trick that doesn’t take long. Want a fast way to add winter charm to your walls without a big project? DIY snowflake wall decals fit the bill. They save money and stay flexible as the season changes. It’s easy and fun.
Materials
– Use removable adhesive paper or ready-made wall decal sheets.
– Use scissors or a craft knife.
– Have a pencil and ruler.
– Work on a clean, smooth wall.
How to make and place them
– Draw several snowflake shapes on the adhesive paper, then cut out small, medium, and large sizes.
– Peel the backing and stick each snowflake on the wall. Start with a simple layout, like a diagonal line or a soft cluster.
– Add more flakes around it, varying sizes for depth. You can lift and re-stick if you want a new look later.
Tips to keep it easy
– Use removable tape to test layouts before sticking.
– Spark a frosty glow by adding a light spray of metallic paint around the decals (optional).
– Keep a small notebook near the wall to plan the next design idea.
Care and changing seasons
– When you tire of a pattern, peel them off gently and re-stick in a new arrangement or save them for next year.
Next steps
– Start with one wall, then grow your winter scene as you go.
@media(max-width:480px){
Conclusion
With these 30 enchanting paper snowflake crafts, you have the perfect opportunity to create beautiful winter decorations that are fun and eco-friendly. Whether you’re looking to engage your kids, add a festive touch to your home, or create lasting memories, these projects are sure to inspire creativity and joy.
So gather your materials, let your imagination run wild, and transform your space into a winter wonderland this season!
Note: We aim to provide accurate product links, but some may occasionally expire or become unavailable. If this happens, please search directly on Amazon for the product or a suitable alternative.
This post contains Amazon affiliate links, meaning I may earn a small commission if you purchase through my links, at no extra cost to you.
Related Topics
paper snowflake crafts
DIY winter decorations
eco-friendly crafts
kids craft projects
easy paper crafts
winter activities
snowflake templates
festive decor
budget-friendly crafts
3D snowflakes
holiday crafting
quick DIY projects