I put this together because simple decor can warm a room, and I wanted a quick way to say I love you. Here is why this matters: paper hearts are cheap, forgiving, and easy to display. They let you mix colors, textures, and sizes in minutes. You can make a little bouquet, a garland, or a wall collage that feels personal.
If you love cozy homes, small crafts, or kid friendly projects, this one’s for you. Whether you decorate for Valentine’s Day, a birthday, or just a quiet weekend, these hearts fit. You don’t need special skills or fancy tools.
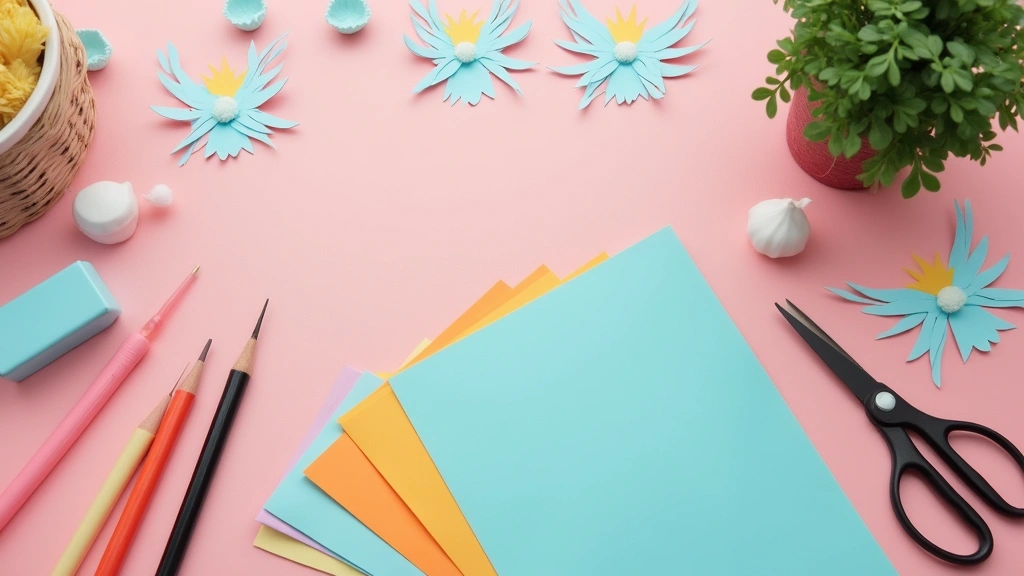
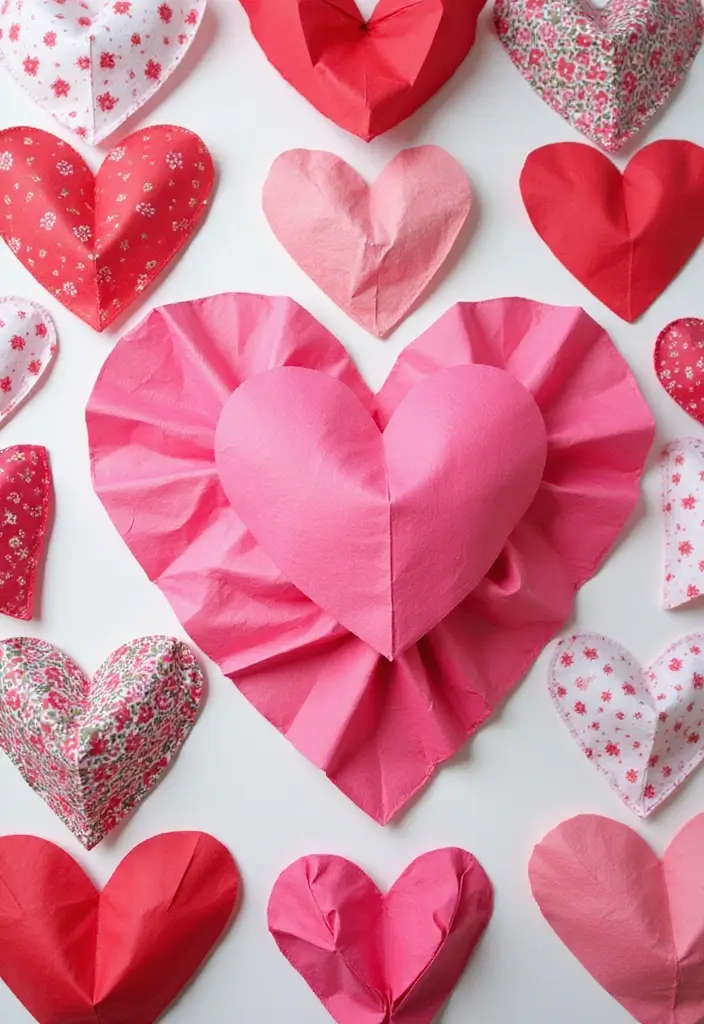
27 DIY paper hearts for decor that express love creatively is what you’ll find here. You’ll see hearts that are simple to cut, folds that add dimension, and colors that match anything from soft pastels to bold wall shades. Each idea uses easy supplies and quick steps, so you can finish a batch in one afternoon. These hearts work as garlands, wall accents, or cute bowls of love sitting on a coffee table.
Here are practical ways to use them. You can string a long garland across a mantle, prop a few on a shelf, or make little cards that say who the heart is for. Some designs tuck into a picture frame, others sit like tiny banners over a doorway. The possibilities feel playful without taking up a lot of time.
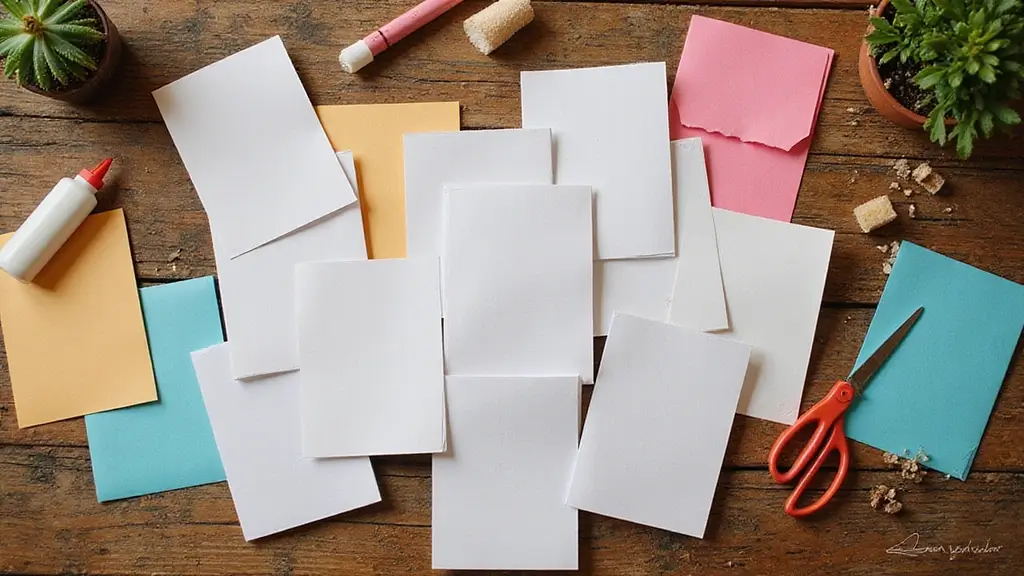
Keep the basics simple. Gather cardstock, patterned paper, scissors, glue, a hole punch, and string or ribbon. Try a few quick folds to add texture, like a shallow valley or a gentle crease along the top. If you want extra shine, add a dab of glitter glue or a touch of washi tape on the edge.
Next steps are easy. Pick a color you love, cut a heart, and try one fold. Then move to a second design and compare how it looks on the wall. Start with a small project to build confidence, then go for the full set of 27. Have fun, snap a photo, and share what you create so others can be inspired too.
1. Classic Folded Paper Hearts
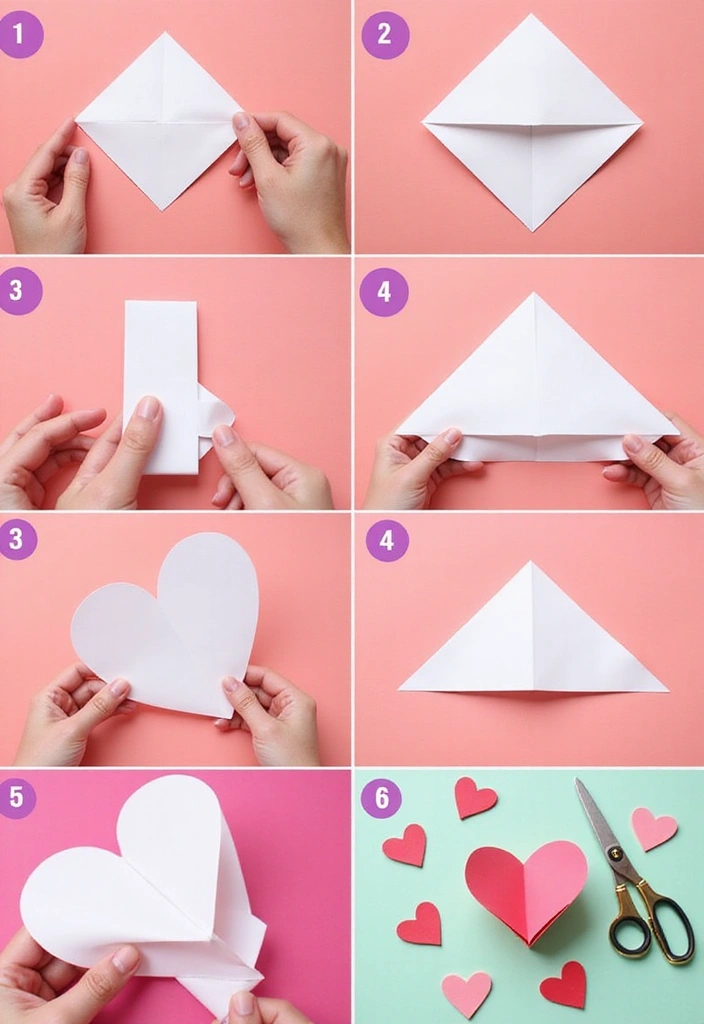
Want a quick, cozy decor trick? Folded paper hearts fit that need. They work with any paper and give a handmade feel to walls, windows, or tabletops. Here is why they shine: you can make many at once, and they cost almost nothing.
What you need
– A square sheet of paper in colors or patterns you like
– Optional: double-sided paper for extra depth
How to make
– Fold the square in half diagonally to form a triangle
– On the folded edge, trace half a heart from corner to corner
– Cut along the line, stopping at the crease
– Unfold to reveal a full heart
– If a heart looks off, trim the point a touch for symmetry
Display ideas
– String several hearts to form a garland across a wall
– Clip them to a cord or twine on a window or frame for a light, floating look
– Gather a few in a bowl or cup for a simple centerpiece
Tips
– Use a soft shade so the heart stays calm but visible
– Mix sizes and colors for depth
– Try recycled pages from old books or maps for a vintage touch
Next steps: grab paper, make a stack, and hang them where you want a warm handmade vibe.
@media(max-width:480px){
2. Heart-Shaped Paper Flowers
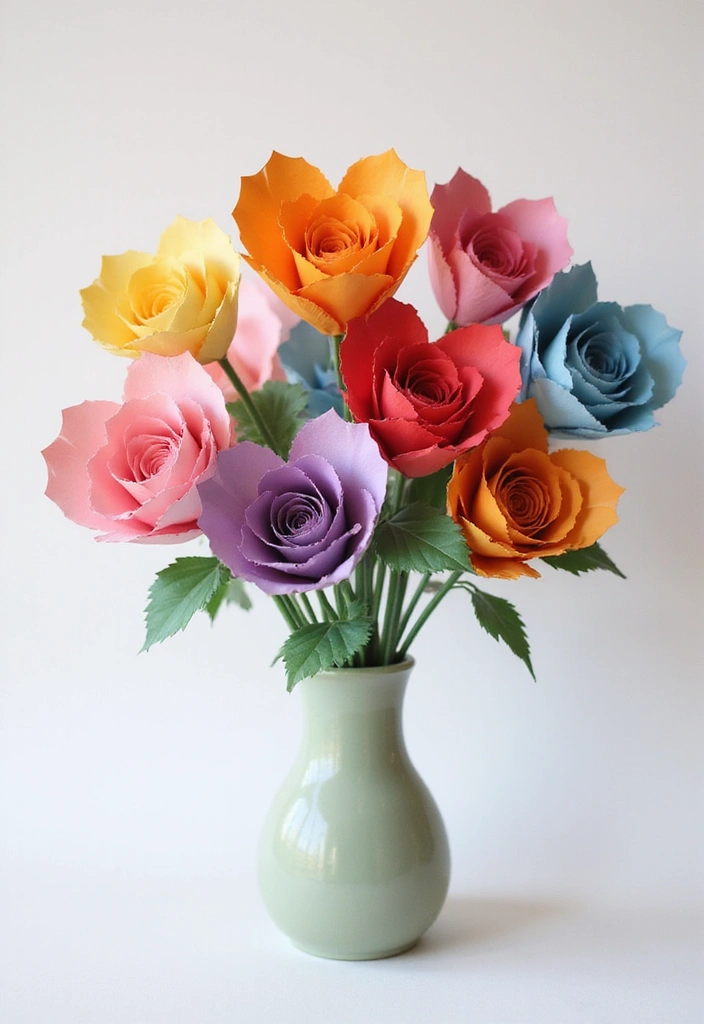
Want decor that feels warm without a lot of fuss? Try heart-shaped paper flowers. You can go glam with metallic paper or keep it cozy with textured stock.
How-To
– Cut several hearts in different sizes from your chosen paper. Use bright colors for a playful vibe or metallic sheets for a party glow.
– Layer the biggest heart first, then add smaller ones. Glue the center and press gently until the layers sit neat.
– Add a center touch. A small button, gem, or bead gives the bloom a real focal point.
– If you want stems, attach a thin wire or toothpick so you can place the flowers in a vase or pin them to a board.
These flowers work well as table centerpieces, wall decor, or a garland along a mantel. They suit weddings, anniversaries, or a cozy night at home.
Styling tips
– Vary sizes for depth. Mix large and small hearts.
– Use different papers for texture and color.
– A dab of glue keeps layers together, then secure with tape.
– Store flat between parchment sheets for reuse.
Next steps? Pick a color scheme, grab your paper, and start cutting. You will get soft color and a rosy feel that lasts. Then hang them or share with friends.
@media(max-width:480px){
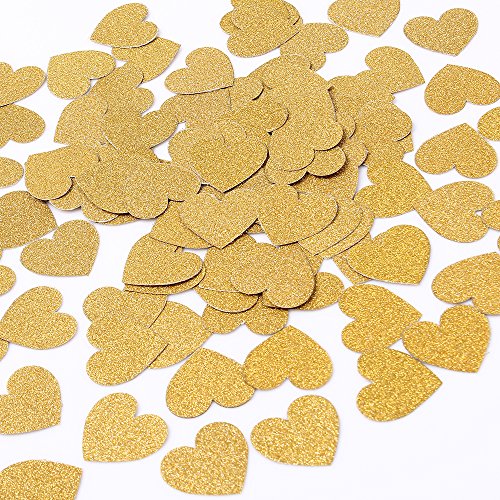
3. Glitter Heart Confetti

Want to add sparkle to your event without a mess? Glitter heart confetti brings tiny shine to any table and makes photos pop. It works for a party, a romantic dinner, or a sweet moment with loved ones.
What you need:
– Glitter paper in your favorite colors
– A heart-shaped punch or a simple stencil and scissors
– A shallow tray or baking sheet to stay tidy
– Optional: glue and loose glitter for extra sparkle
How to make it:
– If you have a heart punch, punch out many small hearts from glitter paper.
– If not, trace tiny hearts on plain paper, cut them, and sprinkle glitter over the sticky glue or use a dab of glue on each heart.
– Keep a small tray nearby to catch scraps and glitter as you work.
Ideas:
– Scatter the hearts on tabletops for a festive look.
– Slip a few into invitations for a cheerful surprise.
– Toss them in the air for a quick, joyful photo moment.
– Tuck them into place cards or napkin rings for a subtle shimmer.
Pro Tip: To cut cleanly and stay neat, work over a tray or sheet. This keeps glitter off your floor and furniture.
Eco option: choose biodegradable glitter or paper confetti to keep cleanup easy. Biodegradable glitter is a friendly choice for indoor events.
Next steps: pick your colors, try one method, and watch the room glow.
@media(max-width:480px){
Recommended Products

【Package Include】The Confetti about 4000 pieces in total with glitter effects.

【Package Include】The Heart Shaped Confetti Sequins is thousands of pieces in total with glitter effects.
4. Paper Heart Wreath
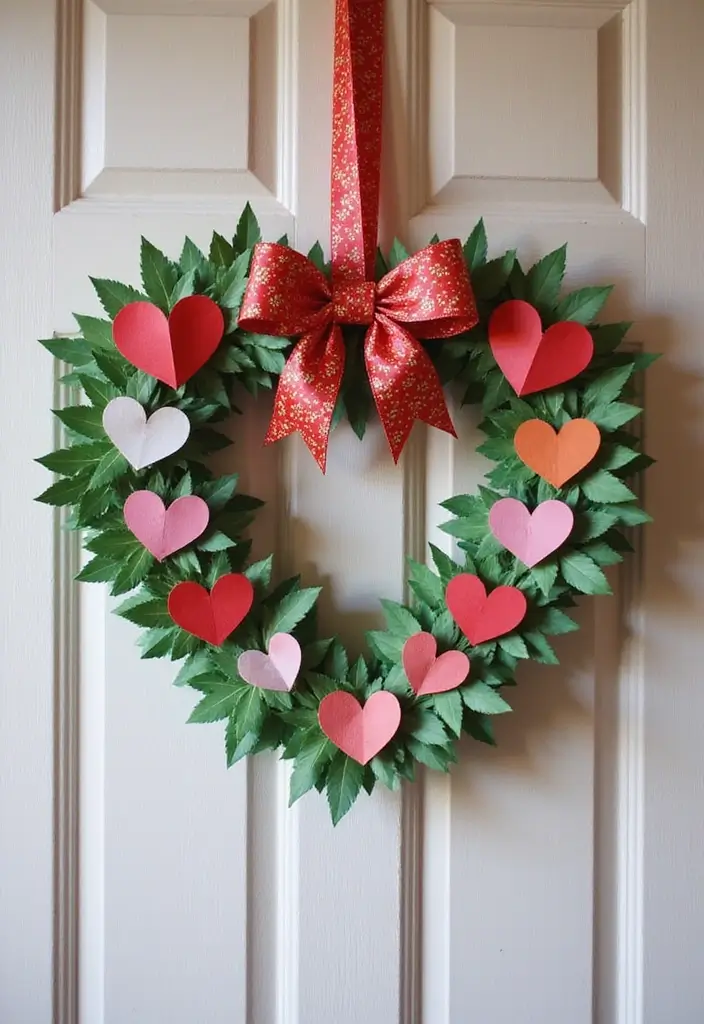
Need a warm welcome for your home? A paper heart wreath makes guests smile and adds charm without a big effort. You pick colors that fit your space, and you can swap pieces when the season changes. Here is why this DIY works: it feels personal and uses cheap supplies.
Materials
– Cardboard ring or a simple wire frame
– Hearts cut from colored paper in several sizes
– White craft glue or pins
– Scissors
– Ribbon, twine, or a small sprig of greenery for a finishing touch
Step-by-step
1) Create a base with your ring or frame. Make sure it is sturdy.
2) Cut out hearts in different sizes and colors. Mix pinks, reds, and whites for a lively look.
3) Attach the hearts in overlapping layers. Start near the edge and work toward the center.
4) Finish with a bow or a touch of greenery. This pulls the piece together.
Display tips
– Hang it on a door or a wall where it will meet light, not shade.
– If you use pins, keep extra on hand so you can adjust the layout later.
Next steps: try a smaller version for a desk or a hallway shelf. For a seasonal feel, swap in autumn colors or add tiny faux berries. Extra tip: for a bold look, use many small hearts all around the ring. You can also add a few metallic accents like a tiny foil heart for a touch of shine.
@media(max-width:480px){
Recommended Products

Complete Paper DIY Kit: Valentine's Day heart paper craft kit contains 12 hollow heart cardboard, 6 colors of tissue paper and a roll of twine; Easy to make beautiful heart decorations without extra tools, perfect for holiday decorations, family events

Valentine's Day Craft Kit: you will receive 48 sets of Valentine's Day wreath craft, 6 styles, 8 pieces each, including 48 Valentine's theme stickers (6 styles, 8 pieces each), 1 pack of 300 foam heart stickers, 4 diamond stickers, 4 rolls pink ropes, suitable for multiple people to carry out Valentine's Day DIY wreath activities

Super Value Set: You will get 24 pieces of Valentine's Day coloring cards, 11.41 x 11.41 inches in size. Sufficient quantity and designs will meet your various needs.
5. Heart String Art

If you want a graceful wall piece that blends color and texture, try heart string art with paper hearts. It mixes the look of string art with the soft touch of cardstock. This is how you make a bright focal point for any room.
Materials
– Cardstock hearts in a few sizes
– Thick string or twine in two colors
– Hole punch or pin and a ruler
– Scissors and tape for clean edges
Step-by-step
1. Cut 5 to 7 hearts from sturdy cardstock in matching or contrasting colors.
2. Punch small holes around each edge.
3. Plan a layout on your wall or board. Try a line, circle, or starburst.
4. Start at a hole and weave string from heart to heart.
5. Tie ends and mount in a frame or on the wall.
Design ideas
– Two colors create contrast, or use metallic thread for shine.
– Mix heart sizes for depth. Put the largest in the center.
– Choose a light background so the strings pop.
Tips
– If a hole tears, trim and re-punch nearby.
– Begin at an edge and grow outward to avoid knots.
– Expand later by adding more hearts and strings.
Next steps: pick colors, sketch a layout, and gather your supplies.
@media(max-width:480px){
6. 3D Paper Hearts

Want a bold, lightweight decoration that adds charm without a lot of work? 3D paper hearts are your answer. They catch the eye and move with a gentle breeze.
Materials
– Colored paper or cardstock
– Scissors
– Glue or a glue stick
– Ruler or bone folder for clean folds
– Thread or fishing line for hanging
Steps
1) Cut out two heart shapes from the same color and size.
2) Fold each heart down the center so you have a crisp crease.
3) Glue the two halves together along the center, but leave the top edge unglued so the heart pops out in 3D.
Display ideas
– Hang from the ceiling to float above a tablescape.
– Clip or tape them in front of a bright window for a colorful shadow.
– Create a garland by tying several hearts at different lengths.
– Use different sizes to add depth and a playful rhythm.
Tips for a polished look
– Use sturdy paper for sharper folds.
– Mix colors and shades to mimic sunlight or a sunset.
– Keep a thin line of glue to avoid bumps along the fold.
Care and storage
– Store flat in a box to prevent bending.
– Reuse by swapping in fresh strings when you switch decor scenes.
Next steps: try a small set for a birthday table, then scale up for a room-wide display. This 3D paper heart method is simple, quick, and endlessly adaptable for any season.
@media(max-width:480px){
7. Paper Heart Mobile
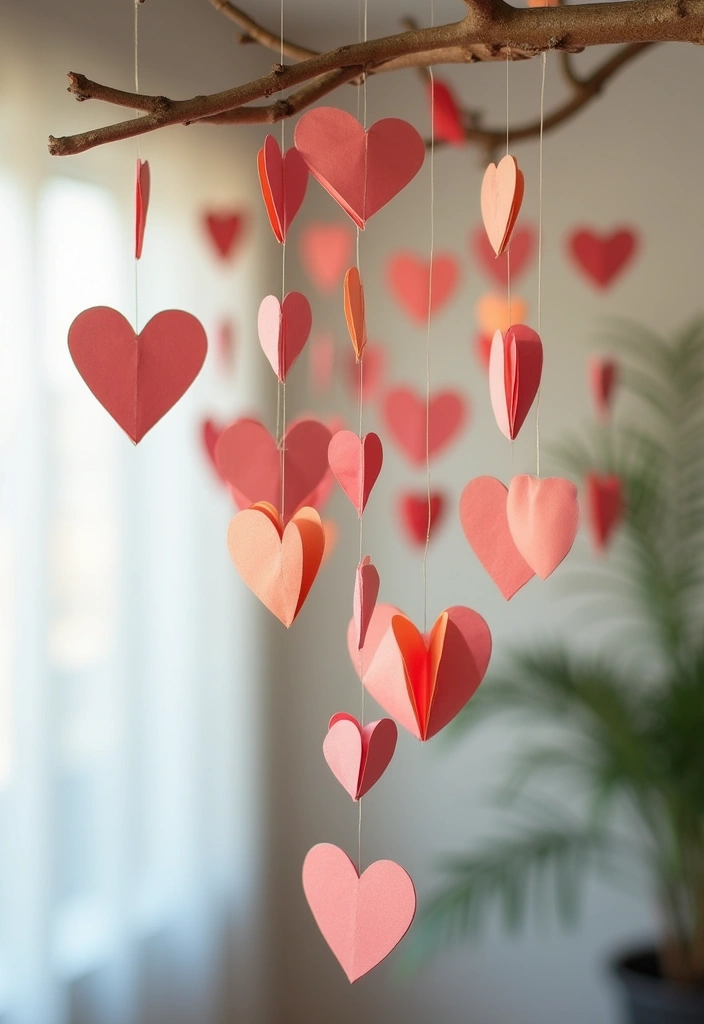
If you want soft, moving decor that adds love to a room, try a paper heart mobile. It works in a nursery, a kid’s room, or a cozy corner. It’s easy to make and you can tailor colors and textures to your space. This DIY project is quick and kid-friendly. You can finish it in an afternoon.
Materials
– Colored paper or cardstock
– Scissors
– Hole punch or a thick needle
– String, twine, or satin ribbon
– A small branch, a bamboo stick, or an embroidery hoop
– Glue or tape for extra hold
Steps
1. Cut hearts in different sizes from your papers.
2. Punch a small hole near the top of each heart.
3. Thread a piece of string through the hole and knot it secure.
4. Tie several strings to your frame at different lengths.
5. Hang the mobile from the ceiling or a wall hook. Let the hearts sway with the air.
Design tips
– Pick colors that match the room, or go soft pastels for a gentle look.
– Use a mix of matte and shiny papers for texture.
– Add a touch of glitter or washi tape to small hearts.
– Balance the sight by placing some hearts closer to the frame and others farther down.
– No branch? Use a hoop or a simple wire frame instead.
Care
– Dust lightly with a soft brush.
– Keep away from direct heat or moisture to avoid curl.
8. Paper Heart Garland
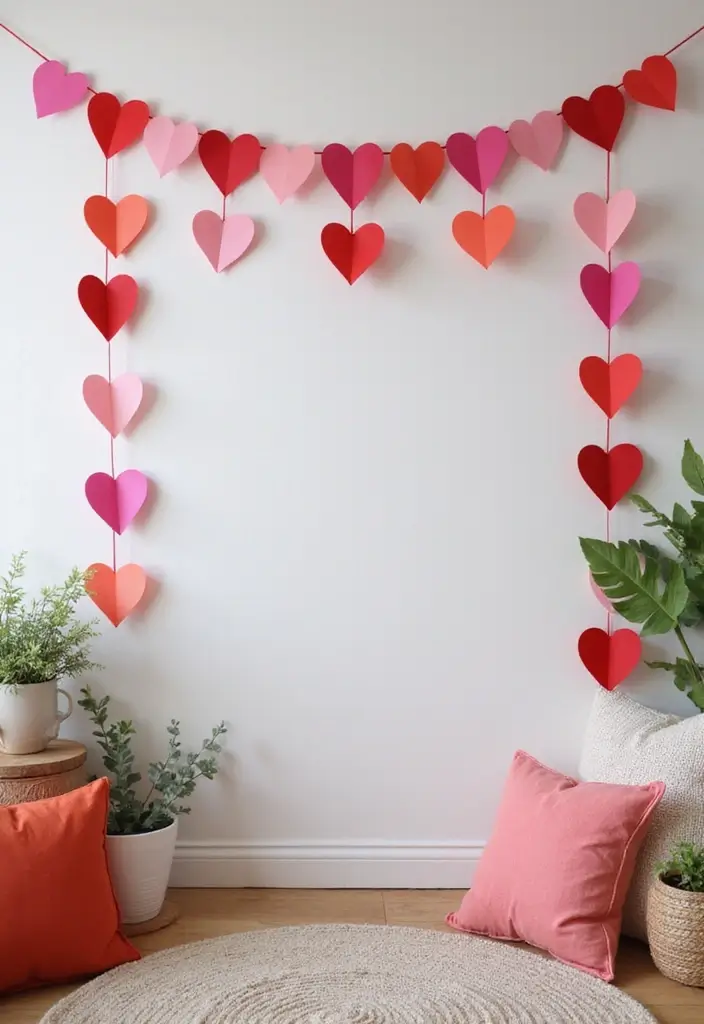
Here is a simple way to brighten a room or celebrate a special day. A paper heart garland brings warmth to birthdays, anniversaries, or everyday spaces. It uses easy supplies and a little time, yet it makes a big visual impact.
What you’ll need
– paper in colors or patterns (two or three shades work well)
– string, twine, or thin ribbon
– scissors
– a needle or a hole punch
Here is how to make it
1. Cut out several hearts in different sizes. Mix big and small for a playful look.
2. Add a tiny hole near the top of each heart, or thread with a needle.
3. Thread the hearts onto the string. Space them as you like, or twist the line for a fuller effect.
Where to hang it
You can drape it across a mantel, along a wall, above a doorway, or over a table setup for a party. The garland creates a cozy, festive feel and is easy to remove when the party ends.
Tips and tweaks
– Make two layers of paper for a bold, chunky look.
– Use old scrapbook pages for a vintage vibe.
– For a kid-friendly version, tape the hearts instead of sewing.
– Go pastel for a soft mood, or bright for a lively celebration.
Optional twist
Clip photos or notes to the garland for photo display.
@media(max-width:480px){
Recommended Products

Sparkling Heart Design – Blue, white & silver glitter paper hearts add instant shine.

Perfect Valentine Day Decoration: These pretty heart string lights are perfect to light up your home and really spread the love in Valentine's Day or anniversaries. Each pink heart housing a warm white LED which illuminates from within to create a cosy, intimate ambience

Perfect for Valentine's & Galentine's Decor: Create a magical vibe with BOHON 13ft red white pink heart string lights! Ideal as Valentines day decorations or Galentines day decorations, these 40 white LED hearts add charm to any space. Use them as valentines day garland or valentines day lights for parties, bedrooms, or weddings.
9. Personalized Heart Gift Tags

You want a simple way to make gifts feel warm and personal. Personalized heart gift tags do that. They turn a plain box into a memory.
What you need
– Cardstock in a few colors.
– Scissors and a small hole punch.
– Markers, pens, or stamps.
– Twine or ribbon.
– Glue or tape for decorations.
– Optional stickers or washi tape.
Steps
– Cut a clean heart from the cardstock.
– Write a short message on the front.
– Decorate with color pens, stamps, or stickers.
– Punch a hole near the top edge.
– Thread twine through the hole and tie to the gift.
– Add a brief message on the back for a personal touch.
Tips
– Use bright colors so the tag catches the eye.
– Keep the front clean; place more detail on the back.
– For a big gift, add two small tags for balance.
– Let kids draw a tiny heart for extra charm.
– Seal the back with a small bit of tape to protect the note.
These tags work for birthdays, holidays, or just because. They are quick, cheap, and kind.
Next steps: gather supplies and start making your own heart gift tags.
Have fun and share a photo of your tag creations.
@media(max-width:480px){
Recommended Products

[Package & Size] - Includes 100pcs blank gift tags and 2pcs jute twine. Every white paper gift tags mrasures about 4 x 2 inches/10cm x 5cm. The jute twine total length: 66ft/20m. Can perfectly pair with greeting card, invitation cards, gift wrapping, etc.

[Package & Size] - Includes 100pcs blank gift tags and 2pcs jute twine. Every white paper gift tags mrasures about 4 x 2 inches/10cm x 5cm. The jute twine total length: 66ft/20m. Can perfectly pair with greeting card, invitation cards, gift wrapping, etc.

Vibrant Rainbow Design: This set includes 100 pcs gift tags and 65 feets long jute twine,beautiful rainbow with star and heart design, add a cheerful touch to your presents. Elevate your gift-giving with this exquisite gift tag.
10. Heart-Shaped Wall Art

Turn your wall into a warm display with a big heart built from many small hearts. This DIY lets you mix colors and sizes to make a bold scene you can hang anywhere.
What you’ll need
– Colored paper in different sizes
– Scissors
– Poster board or a clean wall space
– Double-sided tape or removable putty
– Pencil and a ruler
Steps
1. Cut out hearts in several colors and sizes.
2. Plan the large heart by laying hearts on poster board or directly on the wall. A light grid helps you keep the shape even.
3. Start at the center and add hearts outward. Press each piece to secure.
This piece can be a focal point in a living room or hall. It also makes a great backdrop for photos. Natural light makes the colors pop, so choose a bright spot.
Tips and style ideas
– Keep a tight color scheme for a calm look; pick a few tones in the same family.
– Create a rainbow arc for a playful vibe.
– Vary sizes to add texture and movement.
– Use removable putty if you plan to change art often.
– Measure spacing first; aim for about 1-2 cm between hearts.
Next steps: Hang it where light hits, step back, and adjust for balance.
Bright colors pop.
@media(max-width:480px){
11. Heart-Shaped Photo Frame
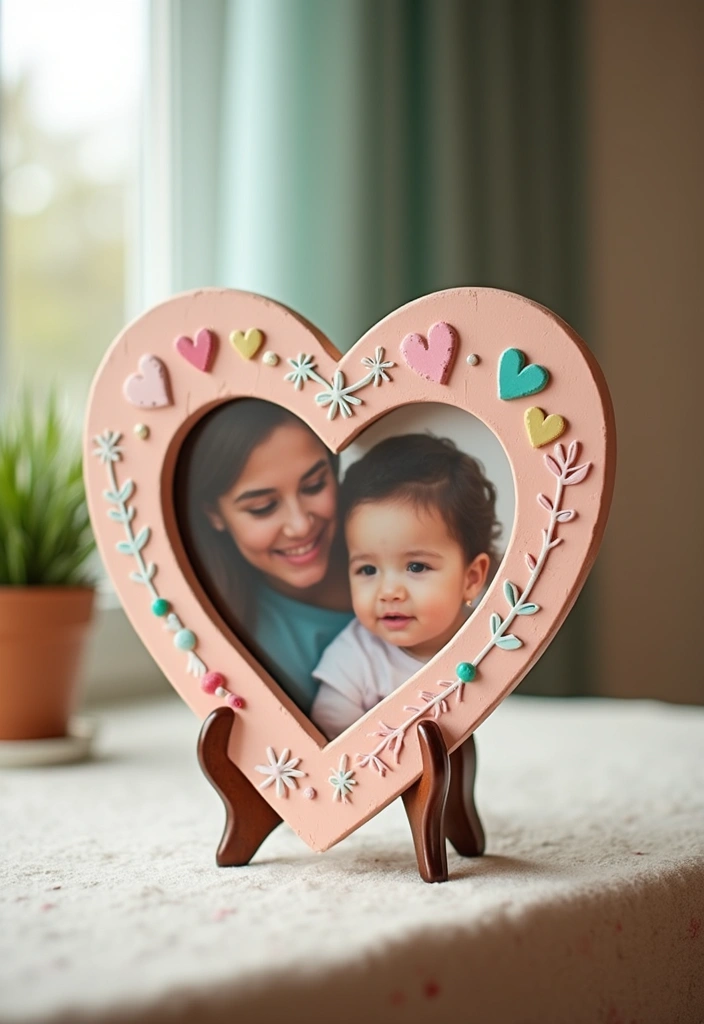
You want a small, meaningful way to show love. A heart-shaped photo frame made from paper fits that need. It’s quick, personal, and perfect for gifts or your own cozy home nook.
Here is why this project helps you stand out. It uses simple supplies, yet it looks thoughtful. You can change colors, add a name, or pick a favorite photo. The result feels handmade and warm, not slick. It also teaches you a few handy paper-craft skills you can reuse later.
Materials you need
– Thick cardstock for the base
– Scissors and a craft knife
– Clear glue or tape
– One 4×6 photo (trim as needed)
– Stickers, paint, or markers for decorating
– Optional: a small stand or magnet for display
Step-by-step
1. Cut a large heart shape from the thick cardstock to be the frame front.
2. Cut a smaller heart in the center so your photo can show through.
3. Slip or glue the photo behind the opening and secure the edges.
4. Decorate the outside with stickers, paint, or washi tape until it feels just right.
Display ideas
– Prop it on a shelf with a mini easel.
– Hang it on a wall or fridge using a magnetic strip.
– Layer a few in a row for a cute gallery wall.
Next steps. Try a two-tone frame, add a date, or switch the photo with seasons. Your DIY heart photo frame stays charming and easy to update.
@media (max-width: 600px) {
.visual-quiz-iframe { min-height: 995px !important; height: 1100px !important; }
}
12. Heart-Shaped Place Cards

You want a warm welcome at the table. Heart shaped place cards add a personal touch guests notice.
– Choose easy, sturdy paper that is thick cardstock, about 110 to 120 lb, in a color you love.
– Cut clean hearts using a simple template, making two identical hearts about 3 inches tall.
– Write names neatly with a fine tip pen or a small printed label so guests can read quickly.
– Add tiny details like a small doodle, a dab of glitter, or a slim ribbon for a special touch.
– Make a tiny stand by folding the bottom edge to form a tent and gluing a short back strip.
– Place with charm and set each heart on a plate or beside the setting, tilting toward the guest.
– Match to your theme with white and gold for formal settings or kraft and twine for a rustic vibe.
– Keep extras handy stored flat in a folder so you can reuse them later.
If you use light colors, pair with soft lighting for a cozy glow.
It also helps guests spot their name easily.
Next steps: print a simple template, gather supplies, and start creating. Your table will feel warmer, and your guests will notice the caring touch.
@media (max-width: 600px) {
.normal-quiz-iframe { min-height: 570px !important; height: 570px !important; }
}
13. Heart Cupcake Toppers

Here is a quick way to make heart cupcake toppers that brighten any dessert.
What you gain
– A sweet look for birthdays, anniversaries, or casual gatherings
– Colors that match your party theme
– Tiny accents that spark smiles when guests see them
What you need
– Sturdy paper or cardstock in your chosen colors
– Toothpicks or small skewers
– White glue or clear-drying glue
– Scissors and a pencil
– Optional: a punch for fancy edges, markers, or a pinch of glitter
Step-by-step
1. Cut out several small hearts from the sturdy paper.
2. Glue a toothpick to the back of each heart and let it dry a moment.
3. For a cleaner look, you can tape the toothpick in place instead.
4. Insert the toppers into cupcakes or other desserts right before serving.
Tips and variations
– Try hearts with scalloped edges or two-tone colors.
– Write a short word like Love or XOXO on the heart.
– Add a tiny sprinkle of glitter for festive flair.
– Vary height by using different heart sizes.
Storage and care
– Keep extra hearts flat in a box so they stay crisp.
– Reuse toppers on future treats if the paper stays in good shape.
Next steps
– Pick a theme and color palette.
– Practice with a few shapes to see what looks best on your tray.
Have fun with this project, and save a few extra toppers for your next party. They travel well in a small box.
@media(max-width:480px){
Recommended Products

Create Personalized Cake Toppers in Minutes: this all-in-one DIY kit lets you turn any baby face photo into an adorable, unique cupcake topper; Simply stick a flat birthday hat on your photo, attach the wooden stick, and instantly create a custom keepsake decoration for cakes, cupcakes, or desserts

[High Quality]: Made From High Quality Bamboo Toothpicks And High Quality Cards With Flash Paper.

Six Styles for Every Celebration – This Valentine's Day sprinkle set includes 6 different designs. Perfect for adding variety and charm to your desserts!
14. Heart-Shaped Bookmarks
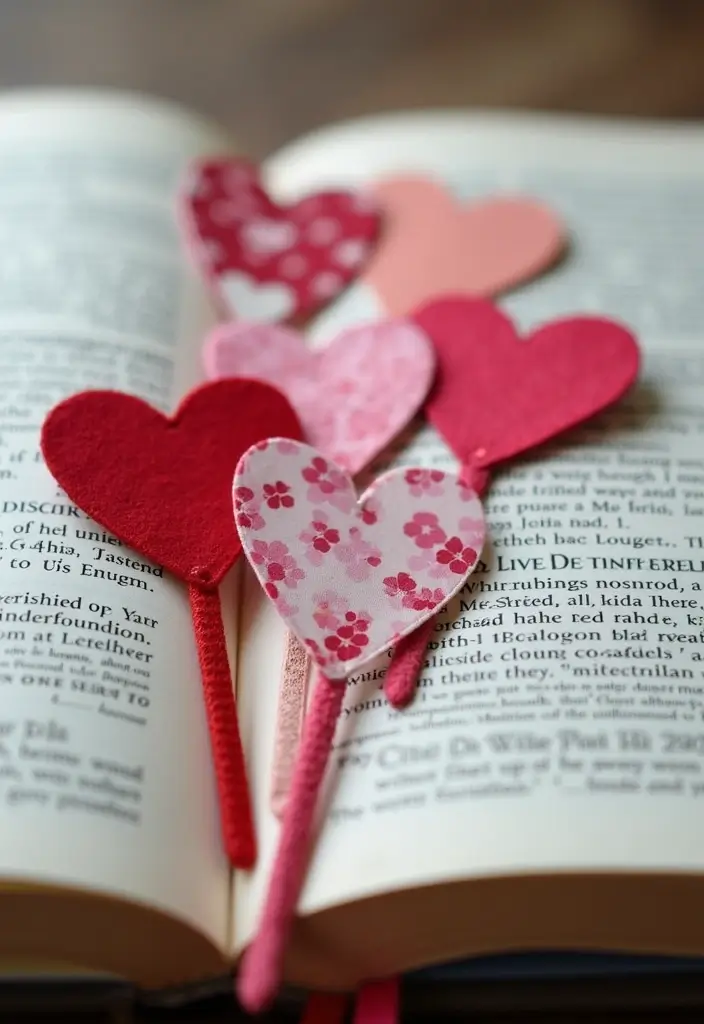
Want a thoughtful gift for the reader in your life? Heart-shaped bookmarks fit the bill. They’re cheap, quick, and easy to tailor with a line you know they love. Here is how to make them and keep them sturdy.
What you’ll need
– sturdy paper or thin card stock
– scissors
– markers, stamps, or washi tape
– optional: laminate sheets or clear tape
Steps to make
1. Draw a clean heart on a piece of sturdy paper, or fold and trace half to keep it even. Cut it out.
2. Decorate with short quotes, tiny drawings, or patterns.
3. For long life, cover with laminate or a clear sleeve.
4. Punch a small hole and thread a ribbon or tassel through the top.
Make it yours
– Pick a quote, name, or your own doodle.
– Choose colors that match the book cover or reading mood.
– Write a short message on the back.
Tips for great results
– Use bright colors on light paper so it pops in your book.
– If you skip lamination, seal both sides with clear tape to fight wear.
– Keep the tip sharp so it slides easily between pages.
These heart bookmarks make a sweet gift for birthdays, book clubs, or library events. They travel well in a gift box and surprise readers. Anytime, anywhere, too. Perfect for gifting.
@media(max-width:480px){
15. Paper Heart Lanterns
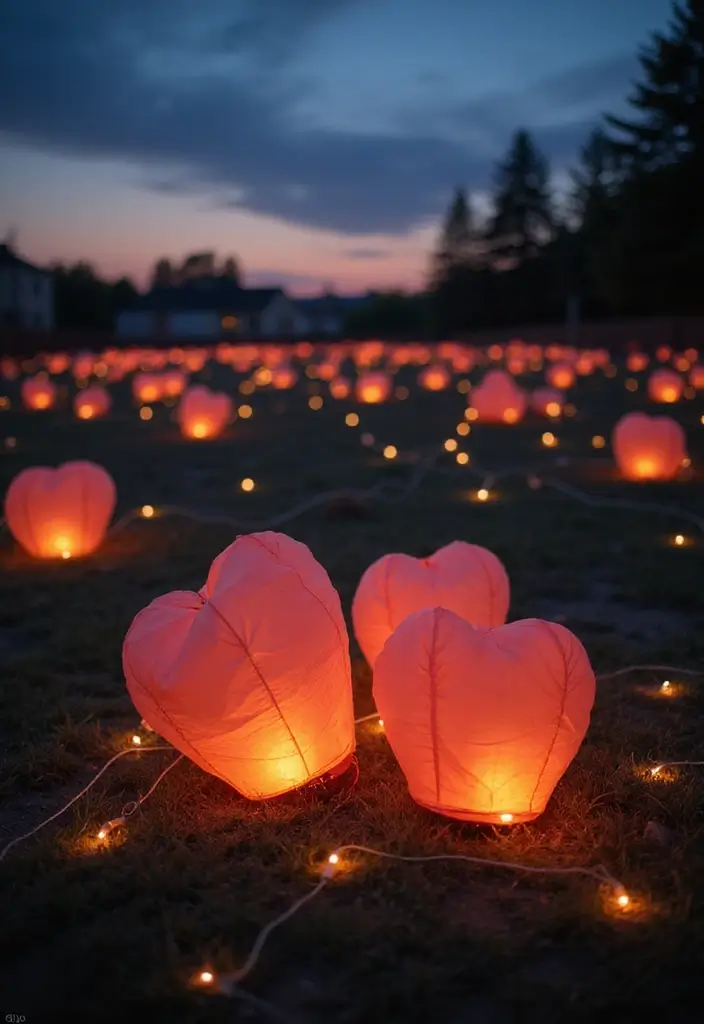
You want cozy light that feels warm but stays safe. Paper heart lanterns give a soft glow and a romantic touch for any gathering. Use LED lights inside to keep things easy and clean.
Materials
– Thick craft paper or cardstock
– Scissors and glue or tape
– Pencil for tracing
– String or twine to hang
– LED tea lights or a small LED string light
Steps
1. Trace several heart shapes on sturdy paper and cut them out.
2. Fold and glue the edges to form a lantern. Leave a small opening at the bottom for the light.
3. Layer the hearts to build a lantern look. Attach hearts one over another to create depth.
4. Place a safe LED inside. Use an LED tea light or a tiny LED bulb so there is no flame.
Style and setup ideas
– Use red, pink, or white paper for a classic vibe. Add lace-patterned paper for a delicate glow.
– Hang lanterns along a doorway, above a table, or from tree branches for outdoor evenings.
– Mix sizes to create dimension. Put a string of lights through the lanterns to make the glow even.
Safety tips
– Always use LED lights. Do not use real candles.
– Keep paper away from hot bulbs. Check that the light sits well inside the lantern.
Next steps: gather supplies, plan your color scheme, and start building tonight for a cozy, safe glow.
@media(max-width:480px){
16. Heart-Shaped Soap Packaging

Want a gift that feels personal and useful? Heart-shaped soap packaging works well.
What you need
– heart-shaped soaps (homemade or bought)
– colorful paper, tissue, or a clear bag
– ribbons, string, or twine
– a small tag with your message
– optional stickers or dried flowers for a finishing touch
Steps
1. Pick or make heart soaps. Choose colors and scents that fit the person.
2. Prep the packaging. Cut a piece of paper big enough to wrap the soap, or place it in a bag with tissue.
3. Wrap and decorate. Tie with ribbon and attach a short tag.
Tips
– Match colors to the occasion. Pastels for a birthday, reds or pinks for Valentine vibes.
– Keep it simple with one ribbon and a small tag.
– Use eco-friendly paper or reusable boxes when you can.
– Let the soap dry a bit before wrapping so it looks neat.
Why it works
This gift is cute and useful. It fits birthdays, anniversaries, or just because moments. It’s easy to scale for party favors or small tokens.
Next steps: try a set with two heart soaps in one package for a bigger gesture.
@media(max-width:480px){
17. Heart-Shaped Memory Jar
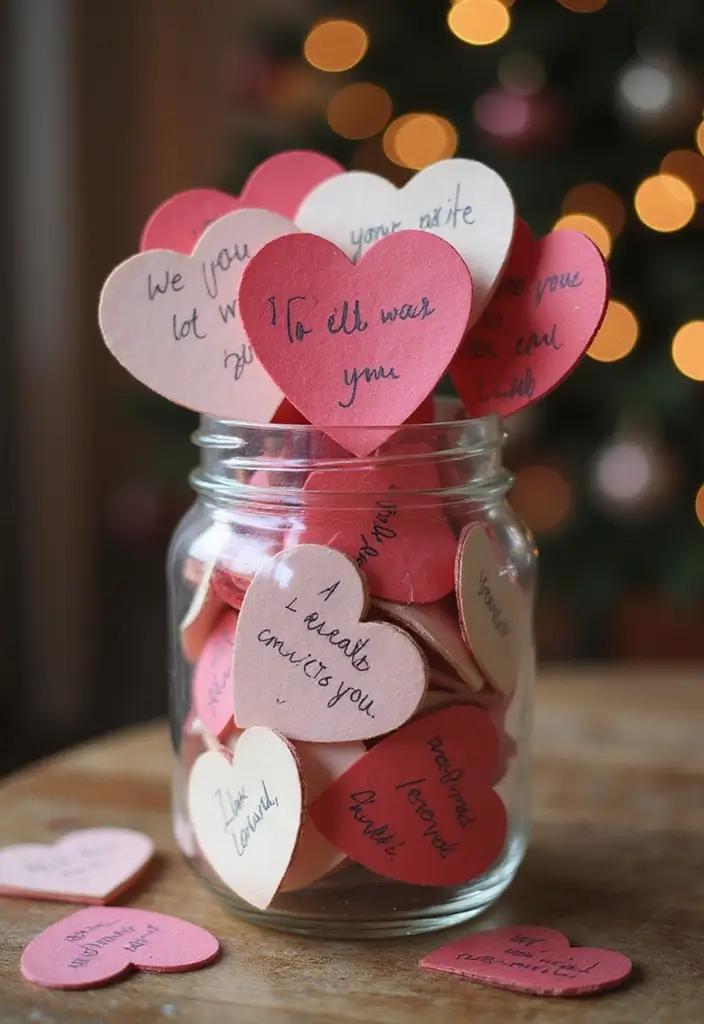
Here is why you want a heart-shaped memory jar. It is a simple, touching way to hold onto small moments. You get a keepsake you can open again and again. It makes a kind gift for someone you love.
What you need
– clear glass jar
– colored paper or craft paper
– scissors
– a pen or marker
– decorations like stickers or a ribbon
How to make it
1. Cut small hearts from paper. Write a note on each one.
2. Drop the hearts into the jar. Add a date to mark the moment.
3. Decorate the outside with more hearts, stickers, or a ribbon.
4. Seal it and share it with someone special, or keep it for yourself as a daily reminder.
Ways to use this memory jar
– Create a yearly jar by adding new notes each year.
– Give it as a wedding or anniversary keepsake.
– Let kids add a note on birthdays for a tiny collection of cheers.
Next steps
– Keep the jar on a shelf or desk.
– Open it when you need a smile, and read a few memories aloud.
18. Heart-Shaped Keychains
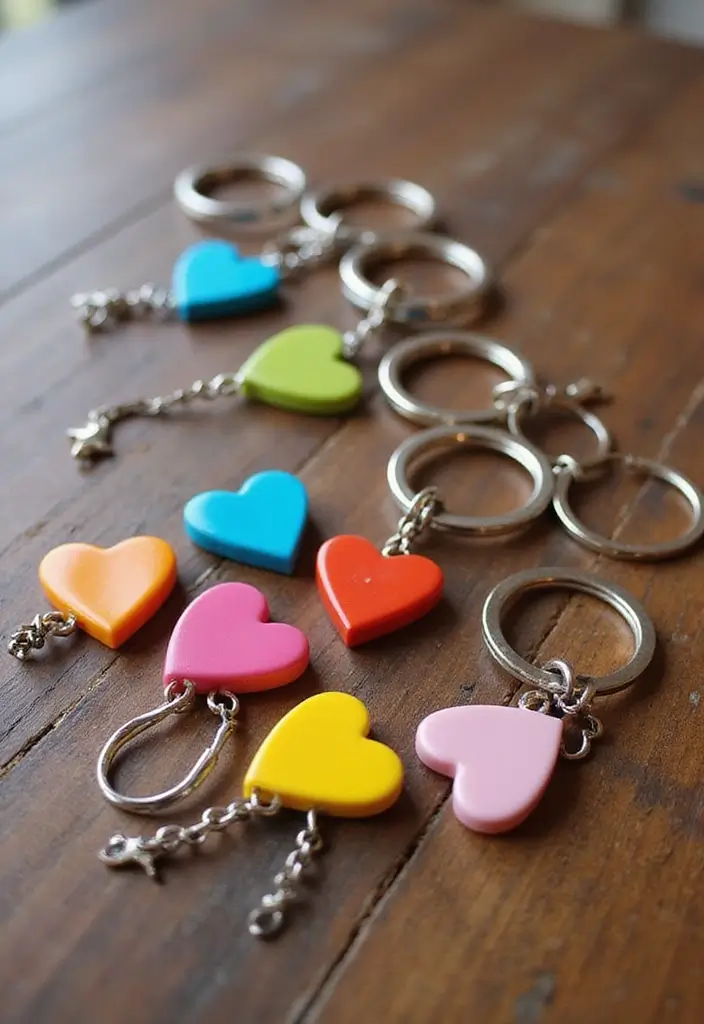
Here is why you might want a heart keychain: it keeps a piece of you with your loved ones every day. This quick project stays sturdy, looks cute, and works as a thoughtful gift.
What you need
– Thick paper or cardstock in colors you love
– A heart template or draw your own
– Scissors
– A laminator or clear sealant
– A punch or small drill for a hole
– Jump rings and a small keychain clip
– Optional decor like stickers, markers, or washi tape
Steps
1. Choose your paper and cut two same-sized hearts.
2. If you want a double-sided look, decorate one side, then flip and decorate the other.
3. Punch a hole near the top of each heart.
4. If you laminate, run the hearts through a laminator and trim cleanly, or seal with a clear cover.
5. Thread a jump ring through the hole and attach the keychain clip.
6. Add a final touch by drawing a tiny message or adding a sticker before closing the ring.
These tiny charms hang nicely on keys, bags, or zippers. They make sweet, daily reminders of affection, not too hard to craft, and easy to customize for anyone you love.
19. Heart-Shaped Pillow Covers

You want a cozy touch that says love. Heart-shaped pillow covers fit that goal. They can be made from fabric or felt and suit any couch or bed. Here is why they work: they are quick, beginner-friendly, and easy to refresh with the seasons. This DIY project is simple to pull off.
Materials you need
– Two equal heart shapes in the size you want
– Matching thread
– A needle or sewing machine
– Stuffing for the inside
Step-by-step guide
1. Cut two heart shapes, leaving a small seam allowance
2. Pin them with right sides together
3. Sew around the edge, leaving a small opening
4. Turn the piece inside out
5. Fill with stuffing and close the opening
Design ideas
– Pick colors that match your room
– Use a contrasting thread for a pop
– Try felt for clean edges, or add a tiny embroidery
– Try small sizes for a playful look
– They also make a thoughtful, personal gift
Care and use
– Hand wash or gentle cycle
– Air dry to keep shape
Next steps: enjoy a soft, personal touch
– Slip the cover on a pillow form or use as a decorative cover
– Gift a handmade heart to someone you love
@media(max-width:480px){
20. Heart-Shaped Photo Booth Props

Want a simple, friendly way to boost photos at your party? Heart-shaped photo booth props fit the bill. They spark laughs, invite selfies, and give your memories a warm, personal touch. You can make them in minutes with a few easy supplies.
What you need
– Thick paper or cardstock in your color theme
– Wooden sticks or craft dowels
– Glue or tape
– Markers, colored pencils, or paint
– Optional sparkle: glitter, stickers, ribbon, or washi tape
Simple steps
1. Cut out big heart shapes on the thick paper. Make a few different sizes for variety.
2. Glue a stick to the back of each heart so guests can hold them up.
3. Decorate with markers, paint, glitter, or stickers. Let each heart show a little personality.
Decoration ideas
– Try bold color blocks or a watercolor wash for a soft look.
– Add glitter on the edges for a tiny shine.
– Layer two colors or add small cutouts to create cute faces or patterns.
– Mix plain hearts with themed designs that match your party.
Tips for use
– Keep a small tray of supplies nearby so guests can quickly customize props.
– Write names on the back of some hearts to keep track of photos.
– Have a few extra props ready for late arrivals to stay photo-ready.
Next steps: set up a simple backdrop, a stool or two for height, and a container for finished props. Your party photos will feel warmer, and guests will love posing with these DIY hearts.
21. Heart-Themed Scrapbook Page
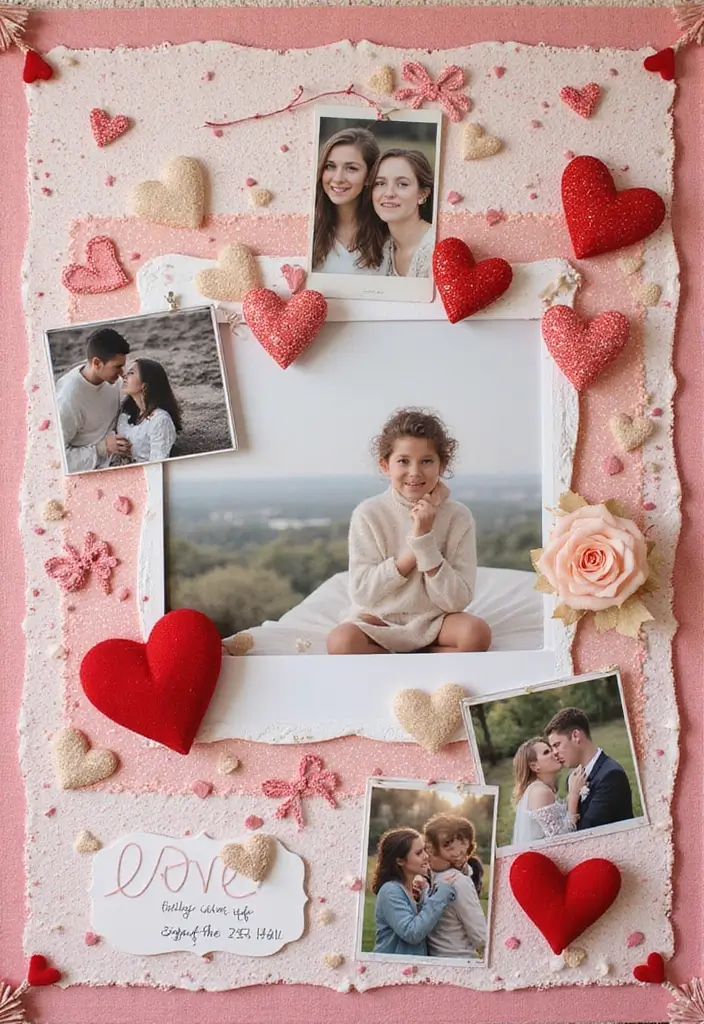
If you want your memories to glow on the page, a heart-themed scrapbook page does the job simply. It blends memory keeping with easy art. You control color, texture, and the size of every heart.
Here is why this setup works: hearts lead the eye, soft colors calm the page, and a clear layout leaves room for story.
Steps:
1. Choose a background you love. Go for patterned paper, a gentle solid, or a light watercolor wash on white stock.
2. Cut out hearts in different sizes. Use a heart punch or cut by hand. Space them across the page with a loose, friendly rhythm.
3. Place photos, short quotes, and small embellishments around the hearts. Use photo corners, washi tape, or tiny stickers to hold and decorate.
Tips to bring the page to life
– Start with a rough map. Lightly plan where each photo will go before you glue.
– Tie colors to your memories. Soft pinks, creams, and neutrals work well for warm moments.
– Add texture. Try a bit of fabric, burlap, or ribbon near a heart edge.
– Write a short caption for each heart. Keep sentences clear and kind.
This page is a simple, joyful way to keep love fresh in your scrapbook. It works for family, friends, and little everyday moments.
22. Heart-Shaped Paper Chains
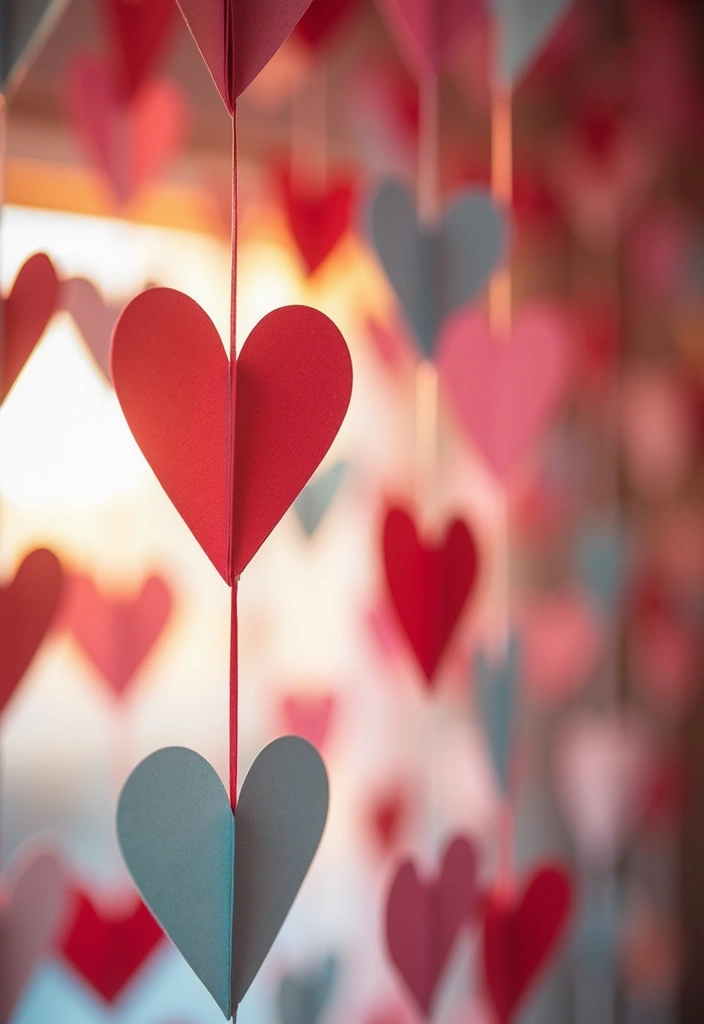
Want a simple decor trick that adds warmth? Heart-shaped paper chains fit the bill. They move with the air, catch light, and bring smiles to parties, weddings, or a cozy room.
Here is why they work: they’re cheap, quick, and you can customize color, size, and paper type. Here is how you tailor them to your room. Choose colors that match your theme and vary sizes for rhythm.
What you need
– Different papers (construction, scrapbook, or even old mags)
– String, twine, or ribbon
– A hole punch or a needle
– Scissors
How to make them
1. Cut out many hearts in different sizes.
2. Punch a small hole near the top of each heart.
3. Thread the string through the holes to link the hearts.
4. Space them or bunch them to fit your space, then hang.
Ways to use heart chains
– In doorways to greet guests
– On walls for color
– From the ceiling for a floaty look
– Along stair rails to draw the eye
Tips for style
– Mix pinks, reds, and white for depth
– Matte paper gives a soft look; shiny paper adds sparkle
– Recycle scraps to save money and cut waste
This project is friendly for kids and beginners. Give yourself an hour.
Next steps: grab scraps and start today for a quick, charming display.
23. Heart-Shaped Stickers
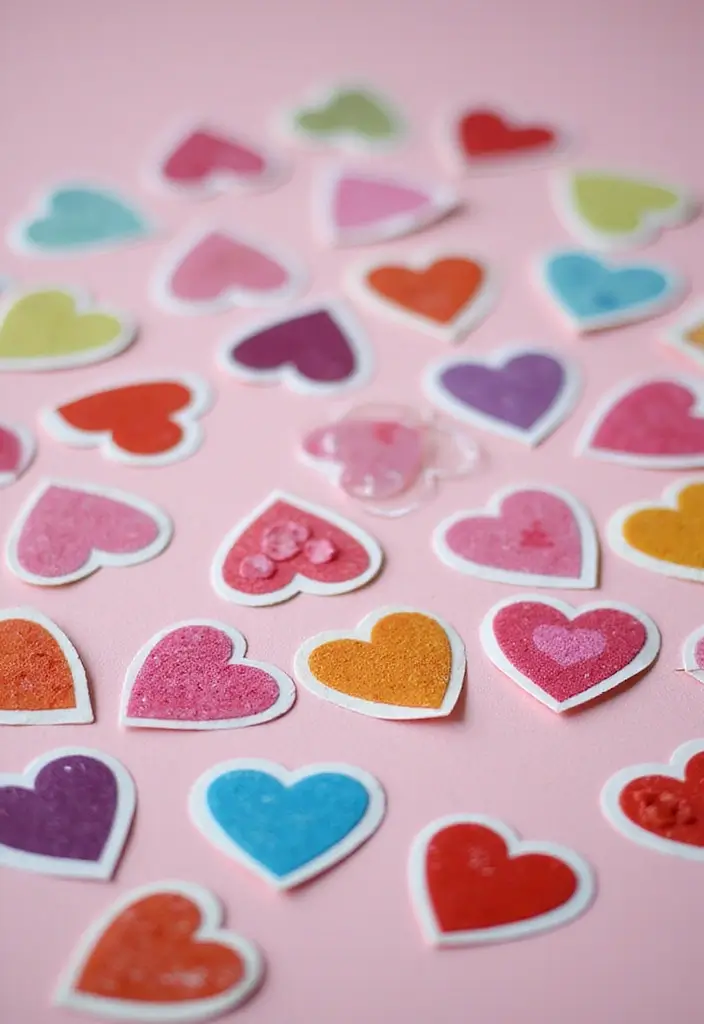
Heart-Shaped Stickers
You want a quick, cute way to add love to gifts and cards. Here is why these stickers hit the mark. They are easy to make. They bring a tiny pop of color to any project. They also stretch your craft time, not your budget.
Materials
– You need adhesive paper sheets.
– You need scissors.
– You need markers, stamps, or pens.
– Optional: glitter, washi tape, or foil pens to add shine.
How to make them
– Step 1. Cut out small heart shapes from the adhesive sheet.
– Step 2. Decorate with markers or stamps.
– Step 3. Peel off the backing and press the sticker to your card, gift tag, notebook, or envelope.
Ways to use
– Use them on handmade cards to send a warm message.
– Stick them on gifts to add a tiny surprise.
– Pop a few on planners or notebooks to brighten a page.
– Add them to jars, envelopes, or gift bags for a sweet touch.
Tips for best results
– Choose a size that fits your project.
– Work on a clean surface so the adhesive sticks well.
– Let ink dry before you place the sticker.
– If you want a glossy look, spray lightly with a clear sealant.
Next steps
– Gather supplies, cut a batch, and start decorating.
24. Heart-Shaped Coasters
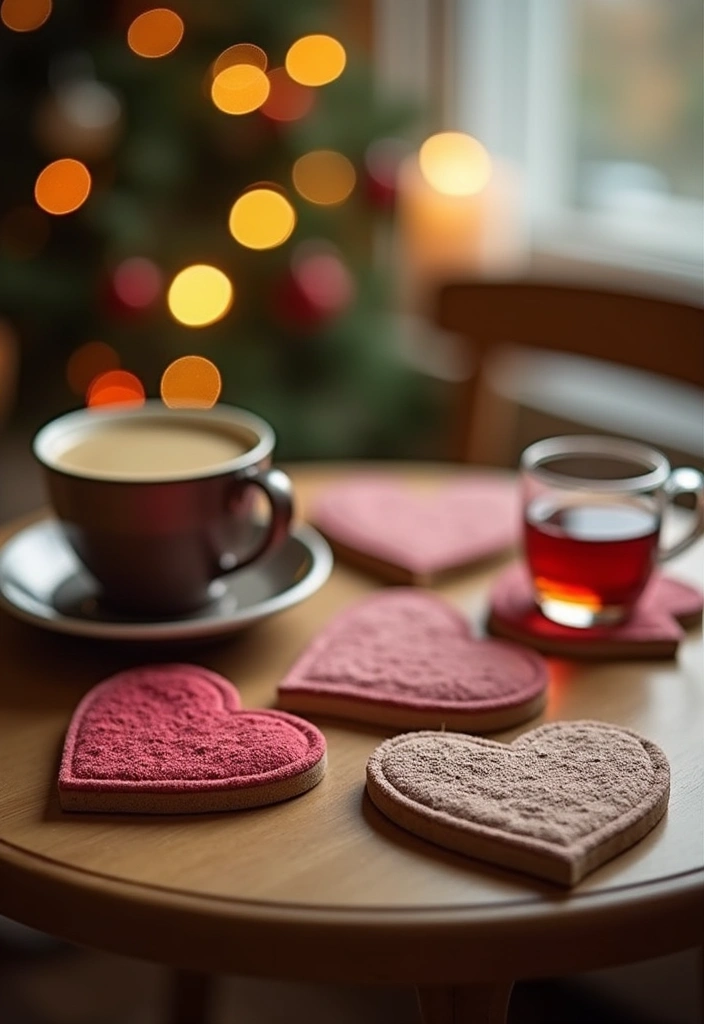
Want coasters that protect surfaces and add a soft, loving touch to your space? Heart-shaped coasters made from paper or felt are simple to make and fun to use at gatherings or for everyday decor.
What you need
– Thick paper or felt sheets in the color you like
– Sharp scissors
– A pencil or fabric chalk
– Acrylic paints, markers, or colored pens
– Small paintbrushes or sponge dabbers
– Clear sealant or Mod Podge (only for paper coasters)
– Optional: cork or thin felt for backing
How to make them
1) Cut heart shapes from your material of choice. Aim for even sizes, like three to four inches across.
2) Decorate with patterns, colors, or tiny designs. You can paint stripes, polka dots, or a tiny print that fits your theme.
3) Attach a backing. Glue on a piece of cork or extra felt to the bottom to protect furniture and stop slips.
4) Seal the surface. If you used paper, apply a clear sealant in a smooth coat. Let it dry fully before use.
5) Test and place. Check for any rough edges and trim if needed. Then set them out where drinks land.
Tips for lasting coasters
– Choose felt for a soft feel and great grip. Paper coasters stay snug with a sealant.
– Use contrasting colors for a bold look, or soft tones for a calm vibe.
– Add a tiny mark with initials or a date for gifts or party favors.
Why these work
They protect tabletops and serve as small decor accents. They’re lightweight, inexpensive, and easy to customize. You can match them to seasonal themes, weddings, or kid-friendly parties. And yes, you can gift a set to friends or family.
Care and use
Wipe felt coasters with a damp cloth. Paper ones with sealed surfaces can be cleaned gently, but avoid soaking. Store flat to keep shapes neat.
Next steps
Grab your materials, pick a color scheme, and start crafting. With a little time, you’ll have a charming set that makes every drink feel special.
@media(max-width:480px){
25. Heart-Shaped Magnets
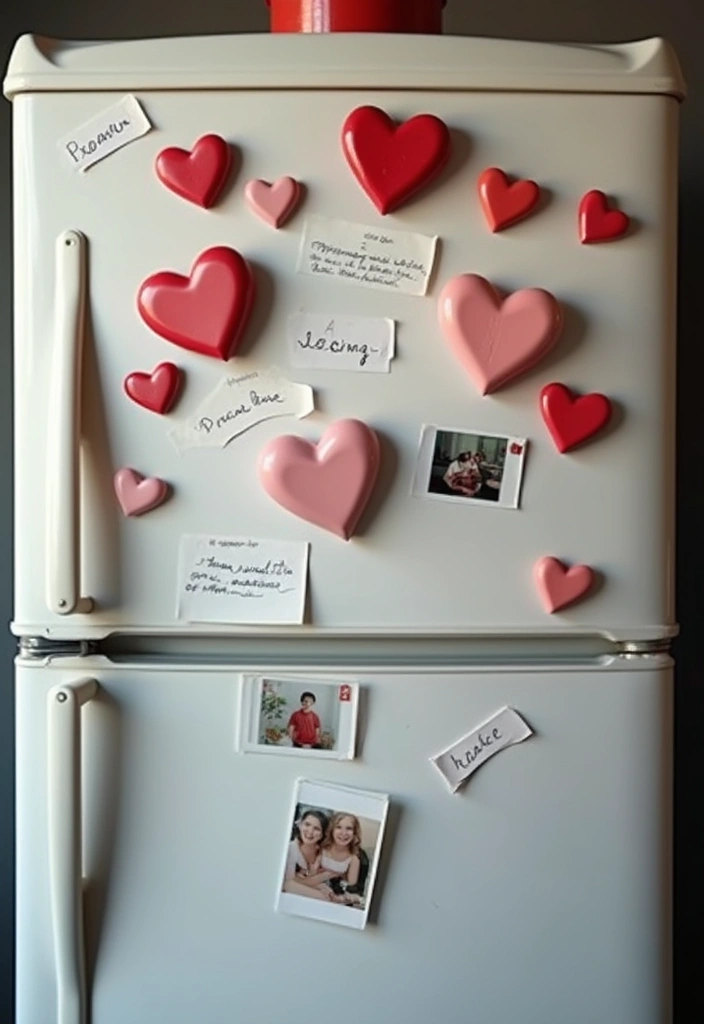
If you want a tiny decor upgrade that also helps you keep notes, try heart-shaped magnets. They look sweet on the fridge and are easy to make. They work as a small gift and a handy reminder spot.
Materials
– Cardstock or felt in your favorite red, pink, or white
– A small fridge magnet or magnetic strip
– Glue (hot glue works best, but craft glue can also do)
– Markers, paint, or glitter for decoration
– Scissors
– Optional: washi tape, fabric scraps, or enamel dots for extra texture
Steps:
1. Cut two identical hearts from your chosen material.
2. Glue one heart to the magnet, then sandwich the other heart on top for a tidy back. Let dry.
3. Decorate the front with simple drawings, patterns, or glitter.
Here is why this works: you get a cute piece of art that also holds notes and photos. Display ideas include a row on the fridge or a magnetic board in a homework nook.
Tips
– Use different sizes for a mini heart family set.
– Try felt for a soft touch or cardstock for bold colors.
– Let glue dry fully before sticking anything on.
Next steps: make a batch as gifts or party favors, or teach kids to design their own magnets.
26. Heart-Shaped Seed Paper
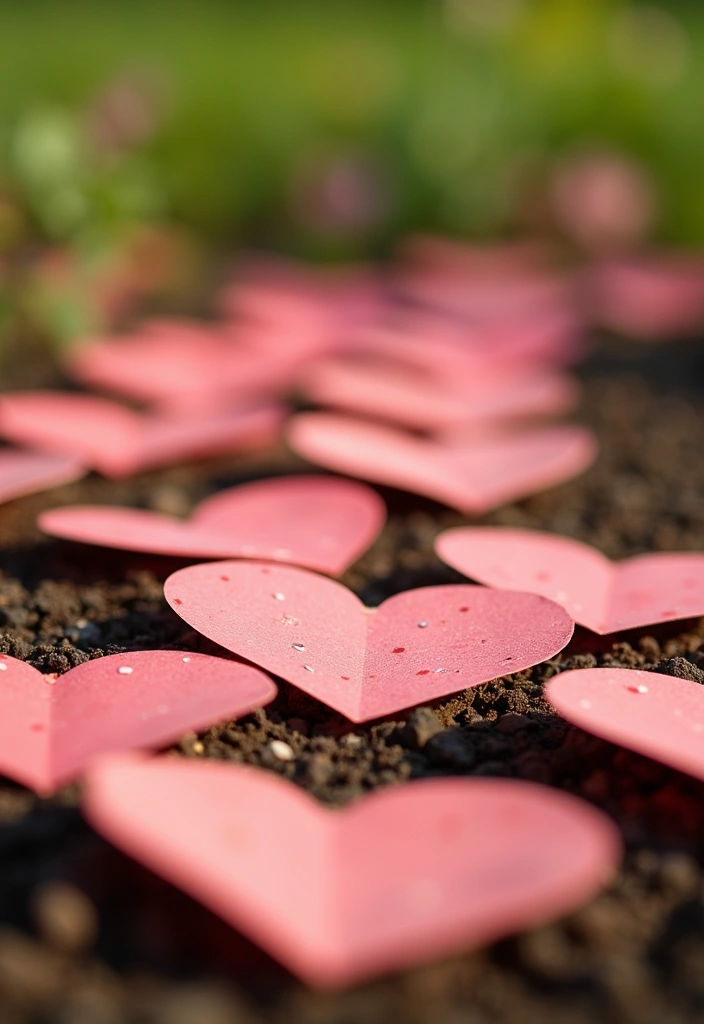
Are you after decor that feels personal and helps the planet? Heart-shaped seed paper fits the bill. These tiny hearts can become plants after you plant them. They work well in greeting cards, gift tags, and table decor.
What you need
– Used paper scraps (old notebooks, junk mail)
– Water
– A blender
– Seeds you like (flowers, herbs, or vegetables)
– A small heart mold or a cookie cutter
– A tray and a light-weight press or heavy book
– Optional: non-toxic dye for color, a sponge for squeezing out water
How to make seed hearts
– Tear paper, soak in water until mushy.
– Blend to a smooth pulp, then mix in seeds evenly.
– Spoon pulp into the heart mold and press down hard.
– Air-dry in a warm, shady spot for two to four days. Turn the hearts once if you can.
– When dry, pop them loose and lay flat to finish drying. Store in a dry place until you are ready to use them.
Planting tips
– Bury each heart under about one inch of soil.
– Water gently at first, keep the soil damp but not soggy.
– Put the pots or bed where they will get light.
This craft turns waste into living gifts. It’s easy, inexpensive, and perfect for kids and adults alike. Try a set of three shapes for a cute display.
27. Heart-Themed Calendar
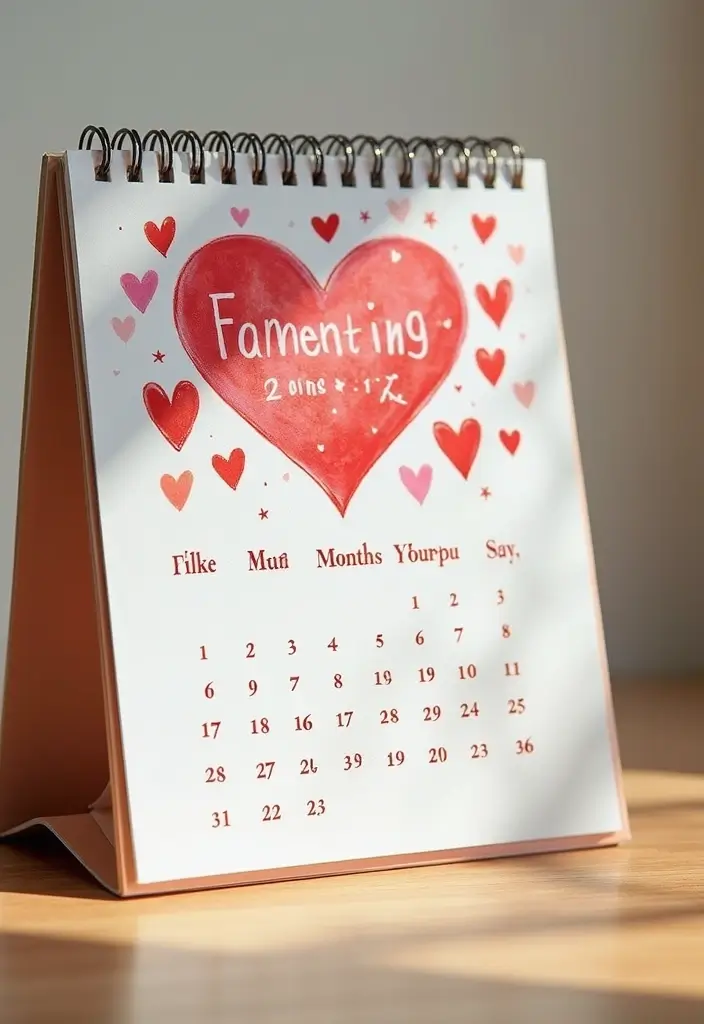
Want a calendar that helps you remember dates and adds charm to your space? A heart-themed calendar does both. It turns daily planning into a small celebration of love. Here is a simple plan you can follow.
What you’ll need
– Poster board or thick craft paper for the base.
– A calendar grid or a printable template.
– Heart shapes, stickers, or cutouts in colors you love.
– Glue, scissors, and a ruler for neat lines.
– Washi tape or decorative accents for finishing touches.
Simple steps
1. Pick a layout you like. Use a ready template or draw a grid by hand.
2. Create a monthly heart motif. Place a large heart for the month and smaller hearts for special days. You can cut hearts in different sizes to add depth.
3. Fill in dates and events. Note birthdays, anniversaries, and reminders.
4. Finish and hang. Laminate it if you want durability, then hang on a wall or set it on a desk.
Tips and display ideas
– Color code by family member to keep track faster.
– Use a light pencil first, then go over with ink.
– Let February shine with red and pink hearts, and swap in soft pastels for spring.
– Reuse a base year by updating dates with a sticky note system.
Next steps.
Conclusion
From garlands to bookmarks, these 27 DIY paper heart ideas offer plenty of ways to express your creativity and love. Each project allows you to personalize your space or gift something special to a loved one. Whether you’re prepping for a big event or simply want to add warmth to your home, these handmade touches will surely impress.
Don’t hesitate to try out these craft ideas and let your creativity soar! Happy crafting!
Note: We aim to provide accurate product links, but some may occasionally expire or become unavailable. If this happens, please search directly on Amazon for the product or a suitable alternative.
This post contains Amazon affiliate links, meaning I may earn a small commission if you purchase through my links, at no extra cost to you.
Related Topics
DIY paper hearts
home decor
creative crafts
handmade decorations
romantic projects
easy DIY
budget friendly
paper crafts
seasonal decor
beginner friendly