Creating a home that reflects your personality and style can sometimes feel overwhelming. With so many options available, it’s easy to get stuck in a rut, especially when it comes to the walls of your living space. That’s why I put together this list of 15 DIY wall frame crafts that not only serve as unique gallery displays but also draw inspiration from reclaimed materials. If you’re looking for ways to elevate your home decor projects and make them truly your own, you’re in for a treat.
Whether you’re an experienced crafter or just starting out, this guide is designed for anyone who loves to personalize their space. If you’re passionate about creative display solutions and enjoy upcycled frame crafts, you’ll find plenty of inspiration here. Each of these wall art ideas offers a fun and engaging way to showcase your favorite memories or artistic endeavors. Plus, they add a touch of warmth and character to any room.
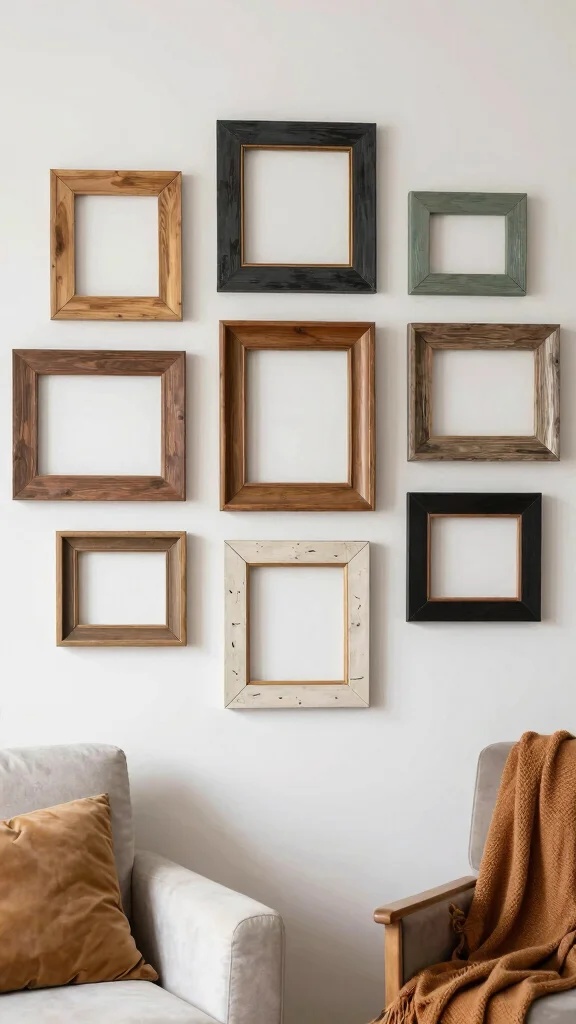
Get ready to dive into a world of creativity! You’ll discover a variety of projects that are not only simple to create but also serve as conversation starters in your home. From a rustic pallet wood frame to a whimsical puzzle piece frame, there’s something here for everyone. Let’s transform those blank walls into a gallery that tells your story.
Key Takeaways
– Explore 15 creative DIY wall frame crafts using reclaimed materials that enhance your home decor projects.
– Discover unique wall art ideas that fit various styles, from rustic to modern, making your space feel personalized.
– Get inspired by upcycled frame crafts, encouraging sustainability and creativity in your crafting endeavors.
– Learn how to implement practical display solutions that not only beautify your walls but also tell your story.
– Find step-by-step guides for each project, making it easy for beginners to tackle and enjoy these crafts.
1. Rustic Pallet Wood Frame

Add a warm, rustic touch to your home with a frame crafted from repurposed pallet wood. This element not only showcases sustainability but also brings a rich, natural vibe that can enhance any decor style. The unique variations in wood grain create visual interest, making each frame a one-of-a-kind piece. Imagine using this frame to display family photos or cherished artwork, adding character to your living space.
To create your own, simply break down a pallet and cut the wood to your desired frame size. Sand the edges for a polished finish, and consider staining or painting to match your aesthetic. Hang several frames together to craft an eye-catching gallery wall or place a standout piece over a mantel for added charm.
Consider these steps for your rustic frame project:
– Gather materials: Reclaimed pallet wood, saw, sandpaper, wood stain or paint, frame backing, hangers.
– Cut the wood to size: Create four pieces for the frame edges.
– Sand edges: Smooth out any rough spots for safety.
– Assemble the frame: Use wood glue or nails to fasten the edges.
– Apply stain or paint: Customize the look to suit your decor.
– Add backing and hangers: Secure your art and prepare for display.
This approach not only brings a rustic warmth but also highlights the beauty of natural materials, enhancing the overall aesthetic of your home.
Did you know that turning a pallet into a rustic frame can save up to 3-5 pounds of waste per project? DIY wall frame crafts like this embrace sustainability with style—perfect for displaying memories and adding natural warmth to any wall.
Difficulty Rating & Requirements
Overall Difficulty Rating: Medium
Creating DIY wall frame crafts offers a satisfying mix of creativity and hands-on skills. While some projects are straightforward, others might require a bit more finesse, especially when working with reclaimed materials. These crafts are suitable for individuals with basic crafting skills and a willingness to learn new techniques. If you’re someone who enjoys DIY projects and has a bit of patience, you will likely find these crafts enjoyable and achievable.
Time Estimate:
⏱ Estimated time: 2-5 hours, depending on the complexity of the frame selected.
– Planning & Design (30 minutes): Take time to visualize what you want your frame to look like. Gather inspiration and sketch your ideas.
– Material Preparation (1-2 hours): Collect and prep your reclaimed materials. Cut, sand, or paint as needed.
– Assembly (1-2 hours): Put your frame together using glue, nails, or screws. This is where you’ll see your vision come to life!
– Finishing Touches (30 minutes): Add any embellishments or final touches. Allow everything to dry completely before hanging.
Skill Requirements:
– Required skills: Basic woodworking, painting, and assembly techniques
– Beginner-friendly: Yes, with some projects being more suited for beginners than others. For instance, simpler designs like the Twine Wrapped Frame are quite approachable.
– Some skills you can easily learn through practice, like sanding wood or using a staple gun. Others, such as precise cutting or intricate designs, may take a bit more experience.
Tools & Materials Needed:
🧰 Essential items checklist:
– Reclaimed wood or old frames (Required): The main material for your project. Look for local sources or ask friends.
– Paint or stain (Optional): Personalize your frame with color.
– Nails or screws (Required): For assembling pieces together securely.
– Hammer or screwdriver (Required): Basic tools for construction.
– Glue (Required): Wood glue or hot glue can be used for additional support.
– Sandpaper (Optional): For smoothing edges and surfaces.
– Measuring tape (Required): Ensures your dimensions are accurate.
– Decorative elements (Optional): Items like fabric, twine, or photos for customization.
Step-by-Step Overview:
1. Planning & Design (30 minutes): Start by sketching your frame idea and deciding on the size and style. It helps to visualize before you begin.
2. Material Preparation (1-2 hours): Gather your reclaimed materials. Cut and sand them down to size. If you’re painting or staining, do it now and let it dry.
3. Assembly (1-2 hours): Begin constructing your frame. Use glue, nails, or screws to attach pieces. Ensure everything is aligned properly for a professional look.
4. Finishing Touches (30 minutes): Add any decorative elements. Consider hanging mechanisms for wall display. Let everything dry thoroughly.
Professional vs DIY:
Creating your own wall frames can save you money compared to hiring a professional. A custom-made frame can cost anywhere from $50 to over $200, depending on size and materials. In contrast, you can often create similar frames for under $30 using reclaimed materials! If you enjoy crafting and want a personal touch in your home decor, tackling these DIY wall frame crafts is a rewarding alternative. However, if you’re pressed for time or feel unsure of your skills, seeking professional help may be the best route for flawless results.
2. Vintage Window Frame Display
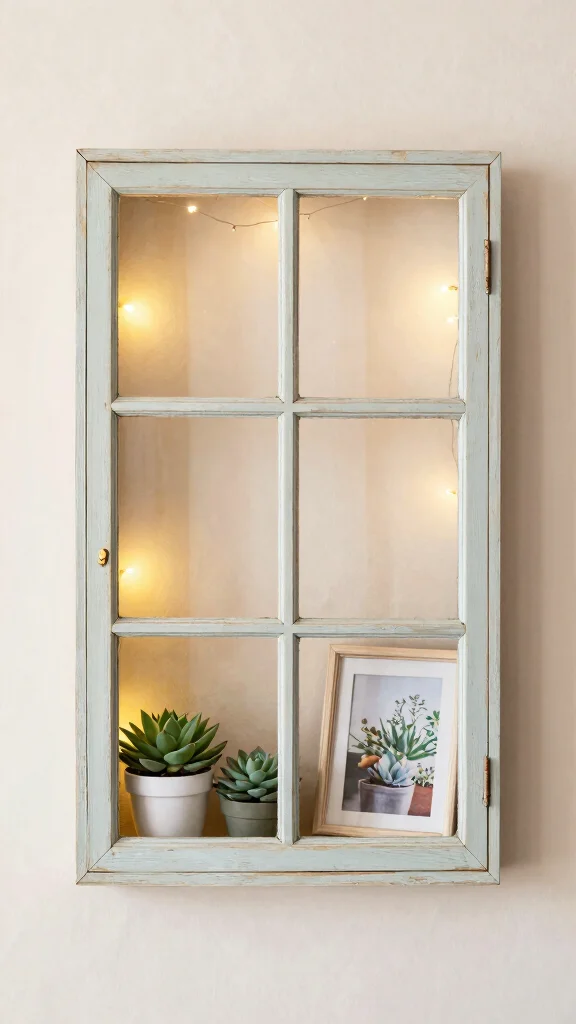
Infuse your space with nostalgia by using a vintage window frame as a unique display piece. This charming decor idea not only repurposes old windows but also serves as a beautiful focal point in any room. The combination of glass panes and rustic wood creates a delightful contrast that evokes memories of the past. Picture showcasing cherished photos or small plants behind the glass, drawing the eye and adding life to your decor.
Start by sourcing an old window from a flea market or attic, giving it a good clean and a fresh coat of paint if desired. You can easily insert photos or plants to create a stunning visual display that reflects your personality and style. This frame will surely become a conversation starter in your home.
Here are some ideas to create your vintage window display:
– Source an old window frame from local markets or online.
– Clean the window: Dust off any grime for a fresh look.
– Optional paint: Choose colors that complement your room’s palette.
– Insert photos or plants: Secure them with adhesive or clips.
– Hang or display: Choose a prominent location for your new art piece.
This charming decor element not only adds character but also allows for personal expression, enhancing the warmth of your home.
3. Geometric Wire Frame

Embrace modern design with a geometric wire frame that adds a fresh and playful touch to your wall. This innovative approach to framing allows you to showcase your favorite memories in an artistic way, while the minimalist design keeps your space feeling open and airy. Imagine a series of triangles or hexagons holding your most cherished photos, creating a dynamic visual experience that captures attention.
Use old metal hangers or wire to shape these frames, bending them into unique designs that reflect your personality. Once set, you can easily clip in photos or artwork using clothespins, making it a fun and interactive display. This project highlights creativity while being budget-friendly and easy to execute.
Here’s how to create your geometric wire frame:
– Gather materials: Old metal hangers or wire, pliers, clothespins, photos.
– Shape the wire: Bend it into your desired geometric forms.
– Secure ends: Twist the wire to maintain its shape.
– Attach artwork: Use clothespins or twine for securing photos.
– Hang your creation: Choose a wall space to display your masterpiece.
This modern frame concept not only allows for personal expression but also offers flexibility in showcasing your changing art collection.
🖼️ Transform Your Space Effortlessly
Unlock the secrets of professional decor with our comprehensive DIY guide for stunning home makeovers.
4. Fabric Wrapped Frame
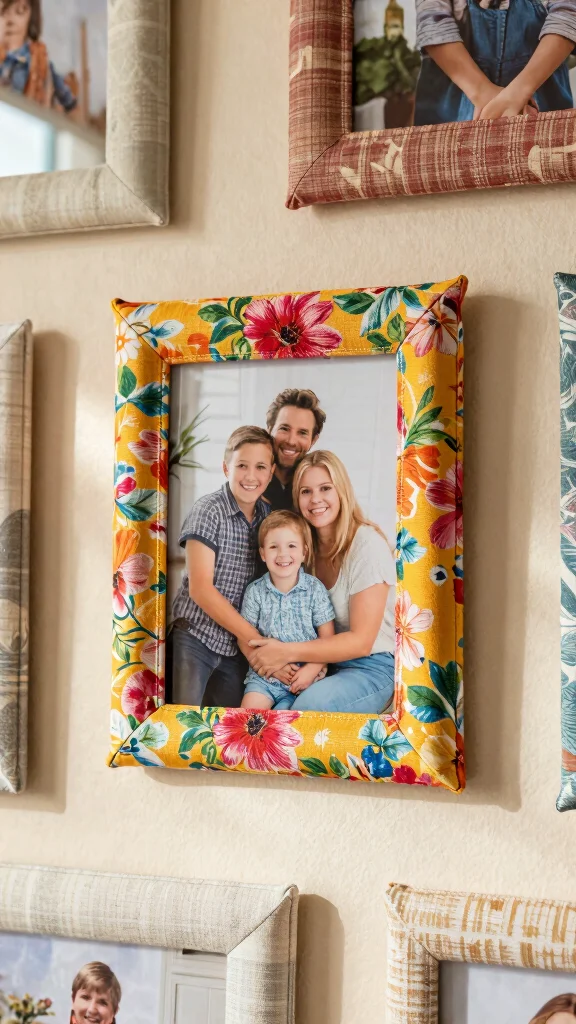
Introduce softness and texture to your decor with fabric wrapped frames that bring warmth to any wall. This creative approach is perfect for those looking to add a cozy vibe to their living space. By selecting vibrant prints or soft textiles, you can transform an ordinary frame into a stunning piece that enhances your favorite photos. Imagine the inviting feel a floral fabric can bring to a spring-themed display!
To create your fabric-wrapped frame, start with an old frame and choose a fabric that resonates with your style. Whether you prefer a patchwork effect or a single print, this project is both simple and rewarding. Rotate fabrics seasonally for a fresh look that aligns with your home’s changing atmosphere.
Follow these steps for your fabric frame:
– Gather materials: Old frames, fabric, scissors, glue.
– Cut the fabric: Leave extra fabric around the edges for wrapping.
– Secure the fabric: Use glue to wrap and adhere it to the frame.
– Insert your favorite photo: Choose a picture that complements the fabric.
– Display your creation: Find a special spot for your new framed art.
This charming framing technique not only adds personality but also enriches the sensory experience of your home with its tactile quality.
Fun fact: 60% of people feel rooms are cozier when fabric-wrapped frames are used in DIY wall frame crafts. That approach also adds texture and warmth, and it’s an affordable update you can swap with the seasons.
5. Bottle Cap Frame

Unleash your creativity with a bottle cap frame, where everyday materials transform into a quirky decor piece. This fun project is perfect for those who love to showcase their personality and interests through art. Picture colorful bottle caps arranged around a cherished photo, creating a vibrant display that invites curiosity and conversation.
Start by collecting bottle caps from your favorite drinks and arranging them into a frame shape. You can glue them to a sturdy cardboard backing or repurpose an old frame. This playful idea not only recycles materials but also makes for a lively addition to any room, especially in casual spaces.
Here’s how to craft your bottle cap frame:
– Gather materials: Bottle caps, cardboard backing, glue.
– Arrange caps: Lay out your design on the backing.
– Glue caps in place: Secure each cap to form the shape.
– Insert your favorite photo: Choose a fitting picture for your frame.
– Hang or display: Showcase your creative frame in any space.
This fun, whimsical project not only showcases your artistic flair but also serves as a unique conversation starter in your home.
6. Scrap Wood Collage Frame
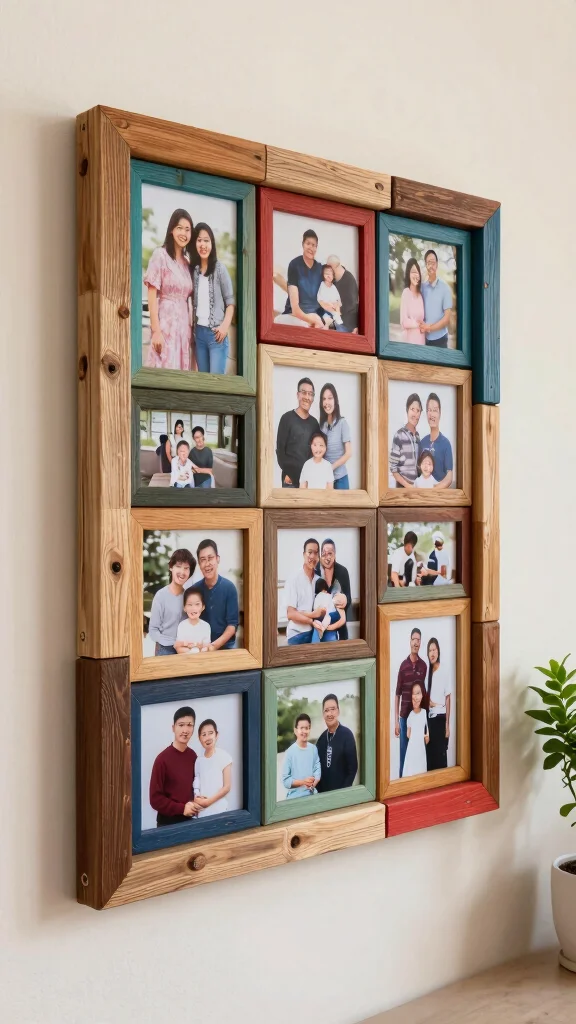
Transform leftover wood scraps into a stunning scrap wood collage frame that adds character to your wall. This unique project is perfect for those who appreciate the beauty of natural materials and enjoy crafting. Imagine a collage of various wood pieces creating an eye-catching display that tells a story about your creativity.
Collect leftover wood from previous projects and cut them into different sizes for a collage effect. Arrange the pieces in a way that feels organic and visually appealing, and consider painting them for added flair. This project not only recycles materials but also creates a beautiful focal point in your home.
To create your scrap wood frame, follow these steps:
– Gather materials: Scrap wood pieces, saw, glue, paint (optional).
– Cut the wood: Trim pieces to desired sizes for your design.
– Arrange pieces: Lay out your design before gluing for best results.
– Glue in place: Secure each piece down firmly.
– Finish it off: Paint or leave natural, depending on your preference.
This engaging project allows you to showcase both creativity and sustainability while adding a personal touch to your decor.
7. Clipboard Frame Gallery
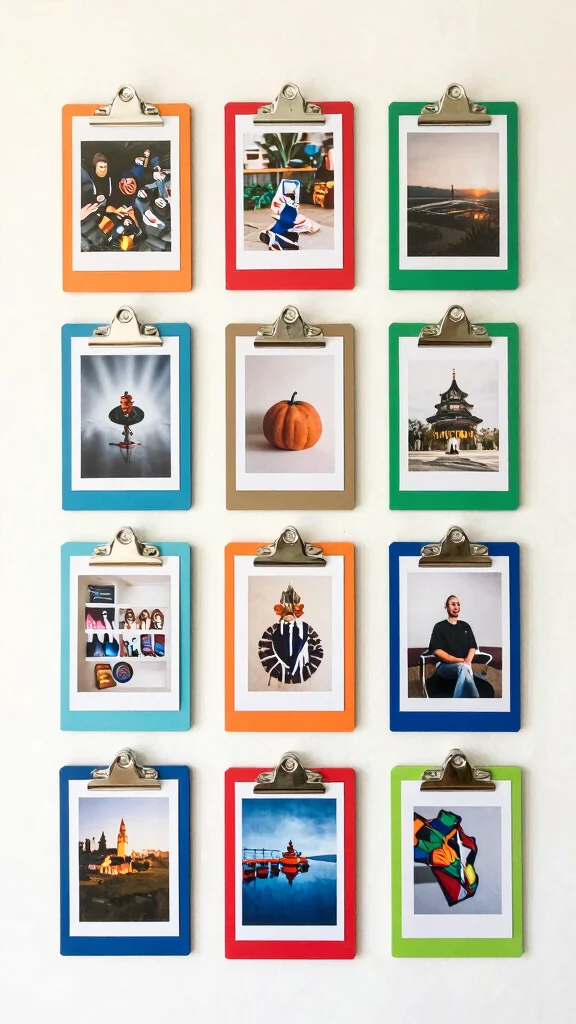
Mix functionality with style by creating a clipboard frame gallery that allows you to change your art whenever inspiration strikes. This clever idea brings a playful and interactive element to your wall, making it a perfect choice for creative minds. Imagine a gallery of colorful clipboards displaying your favorite photos or artwork, always ready for a fresh look.
Collect several clipboards from a thrift store and paint them in colors that complement your decor. Arrange them in a grid pattern on your wall for an organized look, or mix them up for a more eclectic vibe. This easy-to-update display keeps your wall art exciting and personalized.
Here’s how to set up your clipboard gallery:
– Gather materials: Clipboards, paint, nails or adhesive strips.
– Paint clipboards: Choose colors that enhance your decor style.
– Arrange clipboards: Design your layout on the wall.
– Secure clipboards: Use nails or adhesive strips for mounting.
– Insert photos or art: Use the clips to hold your selections in place.
This fun approach not only keeps your decor fresh but also allows for easy personalization, letting your creativity shine through!
8. Paint Can Frame
Inject color and fun into your decor with frames made from repurposed paint cans. This vibrant idea adds a unique twist to traditional framing, making it perfect for casual and creative spaces. Picture a cluster of colorful paint can frames on your wall, each holding a special photo or artwork that brightens up the room.
Transform old paint cans by cutting out the center while leaving a lip around the edges. You can create a playful arrangement on your wall or use multiple cans for a dynamic display. This project not only recycles materials but also brings a modern flair to your decor.
To craft your paint can frame, follow these steps:
– Gather materials: Old paint cans, saw, photos.
– Prepare the cans: Clean and dry them thoroughly.
– Cut out the center: Create an opening large enough for your photo.
– Insert your photo: Secure it behind the lip of the frame.
– Display: Arrange the frames in a fun pattern on the wall.
This creative project adds a pop of color and personality to your space while showcasing your artistic side.
9. Twine Wrapped Frame
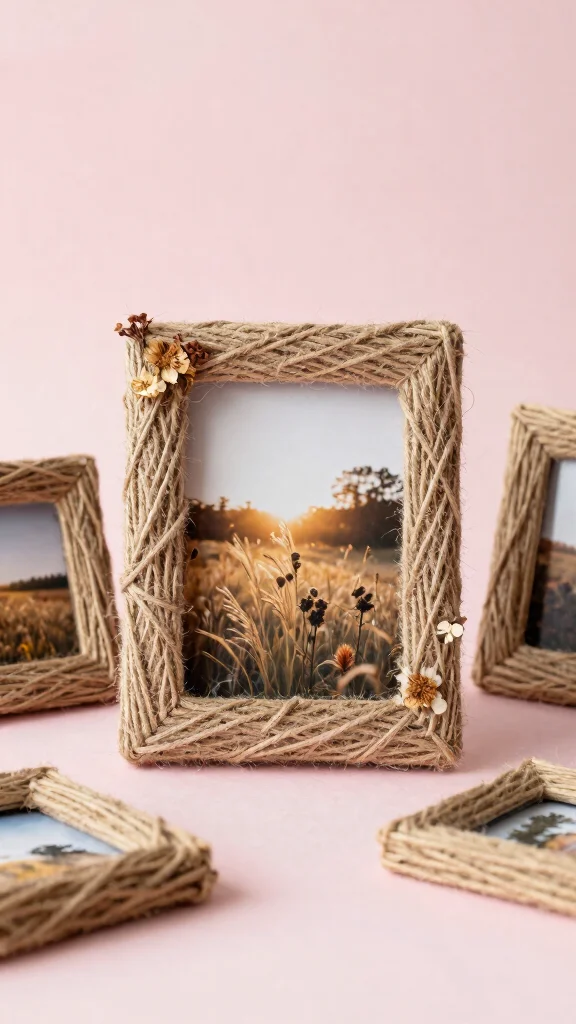
Introduce a whimsical touch to your home with twine wrapped frames, perfect for a rustic or bohemian style. This simple yet stylish project adds a unique texture to your decor. Imagine a cozy, natural frame adorned with twine, showcasing your favorite memories with an earthy charm.
Start with an old frame and wrap it tightly with natural twine, covering the entire surface. For added flair, consider gluing dried flowers or leaves onto the twine, creating a personalized touch. This low-cost craft yields stunning results, making it an enjoyable project for any skill level.
Here are the steps to create your twine frame:
– Gather materials: Old frame, twine, glue, dried flowers (optional).
– Wrap the frame: Start at one corner and wrap tightly until covered.
– Secure the end: Use glue to hold the twine in place.
– Optional embellishments: Glue on dried flowers or leaves for added charm.
– Display your art: Choose a perfect spot to showcase your new design.
This delightful project enhances the textural quality of your decor, bringing warmth and character to your space.
10. Vintage Book Page Frame

Combine literature and art by creating a frame from vintage book pages – a perfect project for book lovers! This creative idea allows you to showcase beautiful illustrations or intriguing text while recycling old books. Imagine displaying your favorite prints within a frame that tells a story of its own, adding depth and character to your decor.
Select pages from old books that resonate with you and attach them to a sturdy backing for an artistic touch. You can layer pages for a collage effect or keep a few standout pages for simplicity. This project not only beautifies your space but also celebrates your love for literature.
To create your vintage book page frame, follow these steps:
– Gather materials: Old book pages, frame or sturdy backing, glue.
– Choose pages: Select pages that speak to you or have beautiful images.
– Arrange on backing: Lay out the pages for best visual appeal.
– Glue in place: Secure each page to the backing or frame.
– Display your literary art: Hang or lean on a shelf as decor.
This engaging project not only decorates your space but also invites storytelling into your home, making it a meaningful addition to your decor.
11. Chalkboard Frame

Blend functionality with style by creating chalkboard frames that allow for creativity and personalization. This fun project lets you easily change messages, quotes, or seasonal decor, making it a versatile addition to your space. Imagine a chalkboard frame displaying inspiring quotes or reminders, all while enhancing your home’s aesthetic.
Start with an old frame and replace the glass with chalkboard material. Paint or embellish the frame edges for a personal touch. This crafty solution not only adds functionality but also serves as an interactive art piece that keeps your decor fresh.
Here’s how to craft your chalkboard frame:
– Gather materials: Old frame, chalkboard paint or material, chalk.
– Remove glass: Carefully take out the glass from the frame.
– Attach chalkboard material: Cut to size and secure in place.
– Decorate the frame: Paint or embellish as desired.
– Start writing: Use chalk to add your favorite quotes or reminders.
This fun approach not only personalizes your space but also allows for creative expression that evolves with your mood and seasons.
12. Shadow Box Frame
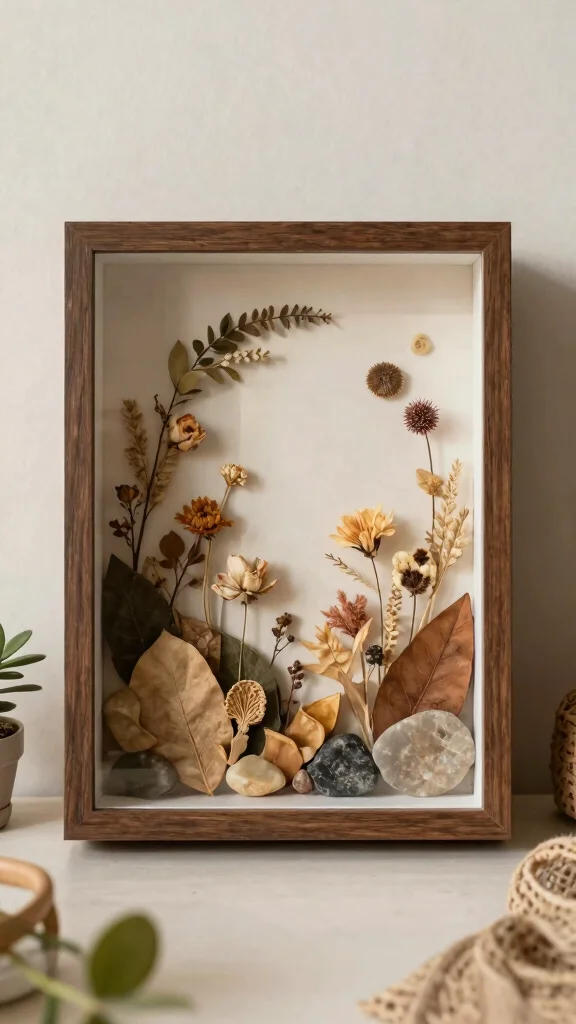
Elevate your decor with shadow box frames that create dimensional displays of your cherished items. This innovative idea allows for storytelling through your decor by showcasing mementos and memories in a unique way. Picture a shadow box filled with treasures from your travels or special events, adding depth and interest to your wall.
To create a shadow box, repurpose an old frame by adding a deeper backing to accommodate your items. Fill these boxes with photos, trinkets, or nature finds, creating a personalized display that reflects your journey. The 3D effect enhances visual interest, making your decor truly one-of-a-kind.
Here’s how to make your shadow box frame:
– Gather materials: Old frame, deeper backing (cardboard or wood), glue, decorative items.
– Prepare the frame: Remove the glass and regular backing.
– Cut new backing: Ensure it fits securely into the frame.
– Arrange items inside: Place your items artistically within the shadow box.
– Secure and hang: Assemble and display your beautiful shadow box.
This project not only adds a personal touch to your decor but also invites cherished memories to take center stage within your home.
Turning memories into art is what DIY wall frame crafts are all about. With a deeper shadow box, you can showcase travel mementos and trinkets—without hiring a pro. Your space becomes a story you live in daily.
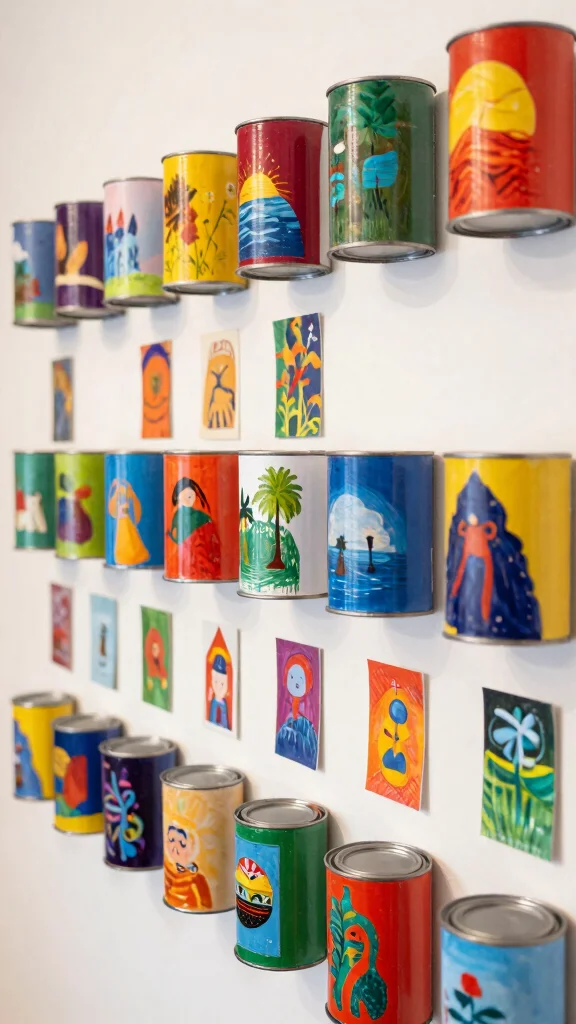
13. Tin Can Frame

Transform tin cans into playful frames that add a whimsical touch to your wall art. This fun and eco-friendly project allows you to express your creativity while reusing materials in an unexpected way. Imagine vibrant tin can frames displaying your favorite photos, bringing a cheerful spirit to your space.
Start by cleaning and painting old tin cans in bright colors or patterns. Cut the fronts off and attach photos behind the cans or mount them directly to the wall, using the top edge as the frame. This playful idea is perfect for casual areas like kitchens or craft spaces, enhancing your decor with a touch of fun.
To create your tin can frames, follow these steps:
– Gather materials: Old tin cans, paint, photos.
– Prepare the cans: Clean thoroughly and remove labels.
– Cut out the front: Use caution to avoid sharp edges.
– Paint or decorate: Choose colors and designs that suit your decor.
– Display with photos: Secure the photos as desired.
This whimsical project not only brightens your space but also showcases your creative side, making it a delightful addition to your home.
14. Wire Mesh Display Frame

Enhance your gallery wall with a wire mesh display frame, perfect for showcasing artsy items and photos. This modern solution combines functionality and style, allowing you to display your favorite pieces in an eye-catching way. Picture a dynamic arrangement of photos, postcards, and small decorative items framed by sleek wire mesh, adding a contemporary touch to your decor.
Use a piece of wire mesh fitted into an existing frame or create one from scratch. Clip in photos and decorative items for a versatile display that can be easily updated. This frame not only serves as art but also invites creativity into your space.
Here’s how to craft your wire mesh display frame:
– Gather materials: Wire mesh, frame, clips, photos or decorative items.
– Prepare the frame: Fit the wire mesh into an existing frame.
– Attach clips: Use small clips to secure items in place.
– Arrange items: Display your favorite photos and art pieces.
– Hang with flair: Choose a bold wall to showcase your modern creation.
This stylish project not only enhances the visual appeal of your wall but also allows for creativity and change, making it a perfect addition to any room.
15. Puzzle Piece Frame

Celebrate your playful side with a frame made from recycled puzzle pieces, adding a whimsical touch to your decor. This creative project is ideal for those who love puzzles and want to incorporate a fun element into their home. Imagine bright, colorful puzzle pieces surrounding your favorite artwork, creating a delightful display that sparks conversation.
Gather old puzzles with missing pieces and use the remaining ones to frame your cherished photos. You can paint the pieces for a cohesive look or leave them in their original colors for an eclectic vibe. This fun craft not only recycles materials but also adds a personal touch to your decor.
To create your puzzle piece frame, follow these steps:
– Gather materials: Old puzzle pieces, frame or sturdy backing, glue.
– Arrange puzzle pieces: Lay them around your photo or art to form a frame.
– Glue pieces in place: Secure each piece carefully to hold together.
– Display your masterpiece: Choose the perfect spot to showcase it.
This playful project not only expresses your creativity but also invites a sense of nostalgia and whimsy into your home.
Conclusion
Crafting DIY wall frames from reclaimed materials is not only an enjoyable creative outlet but also a sustainable choice for home decor.
These projects allow you to express your personal style while giving new life to materials that might otherwise be discarded. Whether you prefer a rustic look, a modern twist, or something entirely unique, there’s a frame idea that suits your taste perfectly. So gather your supplies and let your imagination run wild, creating a gorgeous gallery display that reflects who you are!
Frequently Asked Questions
What are the easiest beginner-friendly diy wall frame crafts using reclaimed materials?
Getting started with diy wall frame crafts is easier than you think. Begin with 3–6 reclaimed frames from thrift stores or curb finds, clean them well, and pick a unifying finish. Lightly sand, then paint, stain, or distress to create a cohesive look. Add mats, fabric swatches, or cork to vary surfaces. Fill with photos, pressed botanicals, or printable art to form a small gallery. This approach delivers practical wall art ideas and creative display solutions using upcycled frame crafts. Personalize with initials or travel mementos to create personalized wall decor.
How can I plan a cohesive gallery display with upcycled frame crafts?
Start with measuring your wall and choosing a cohesive color palette. Mix frame sizes and finishes for interest, while keeping spacing consistent (or use a salon-style grid). Create a floor template with paper cutouts before hanging, then swap in mats, photos, quotes, or small 3D elements for texture. This creative display solution supports various wall art ideas and helps your diy wall frame crafts anchor your space.
What materials and tools do I need for upcycled frame crafts?
Essential tools include a screwdriver, sandpaper, glue or hot glue, and nails or picture-hanging hardware. Gather reclaimed frames, mat boards or cork, decorative papers, photos, and lightweight found objects. Stock up spray or chalk paint, primer, painter’s tape, and a sealant for longevity. Don’t forget hanging hardware and a level. With these supplies you can turn scrap frames into stylish home decor projects and upcycled frame crafts for any room.
How can I personalize wall decor with diy wall frame crafts?
Make it truly yours by telling a story with your frames. Create a photo collage of family memories, mount favorite quotes on contrasting paper, or add travel mementos and fabric textures. Include a monogram, date, or map snippet to highlight meaning. This makes your piece personalized wall decor and a standout example of diy wall frame crafts in your home.
What are some creative display ideas to showcase diy wall frame crafts?
Think beyond a flat grid. Try a layered gallery with shadow boxes, add warm LED lights, or blend frames with shallow shelves for 3D keepsakes. Build a vertical runner for a narrow hallway or an angled salon-style layout for a larger wall. These ideas are perfect for wall art ideas and creative display solutions, turning upcycled frame crafts into lively home decor projects that feel personal.
Related Topics